Configure Page Layouts and Create Record Types
Follow Along with Trail Together
Want to follow along with an expert as you work through this step? Take a look at this video, part of the Trail Together series.
(This clip starts at the 9:59 minute mark, in case you want to rewind and watch the beginning of the step again.)
Introduction
Now that you enabled Knowledge and set up Ada to use it, create a page layout and record type for Knowledge to customize what Ada sees when creating and accessing Knowledge articles.
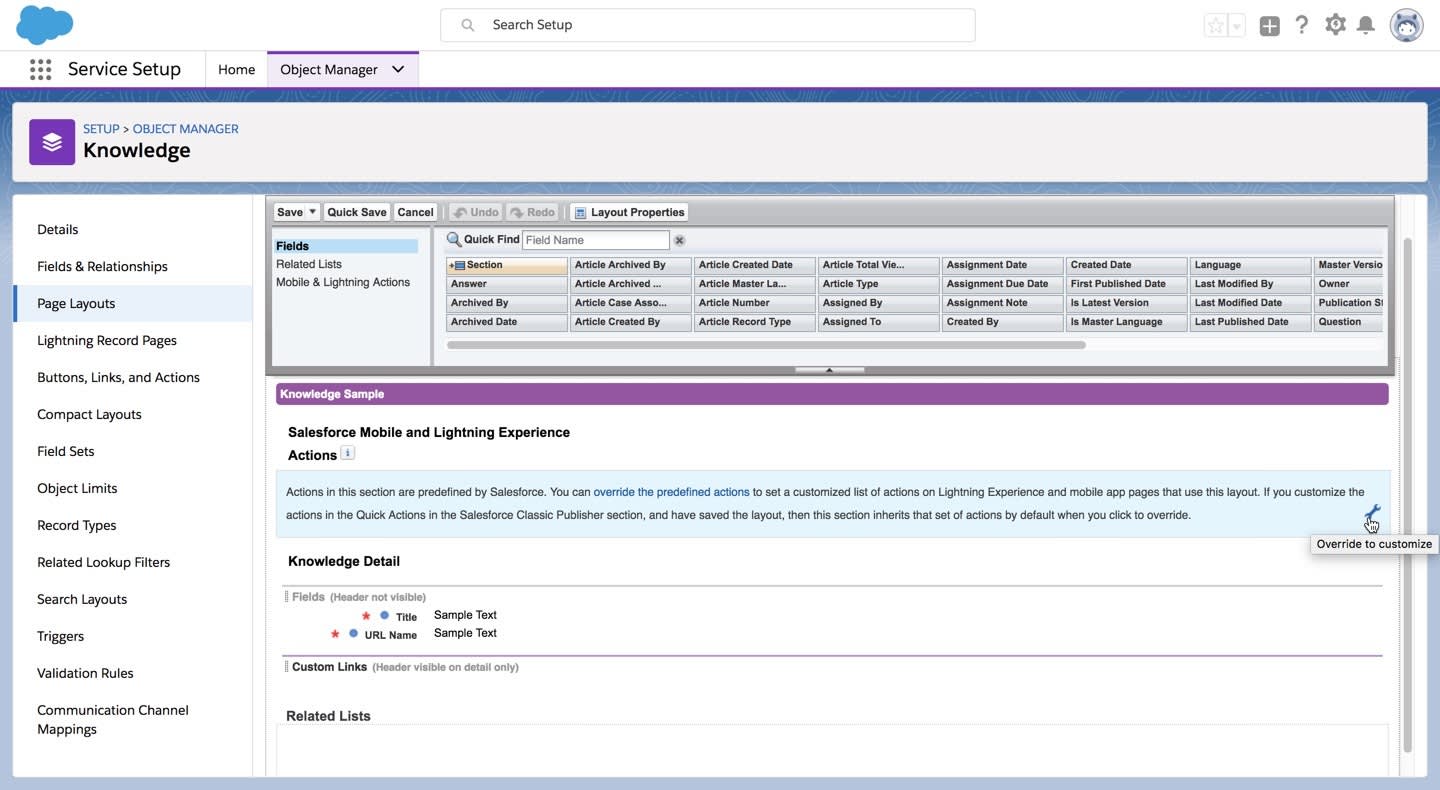
Modify the FAQ Page Layout
The FAQ layout is meant for knowledge articles related to Frequently Asked Questions. The information Ada sees and how it is organized on the page is controlled by this page layout.
- Click the Setup gear
 and select Service Setup.
- Click the Object Manager tab and select Knowledge.
- From the menu on the left, click Page Layouts.
- Click the dropdown next to the Lightning Knowledge FAQ Layout and click Edit.
- Click Mobile & Lightning Actions in the palette, and drag Submit for Approval and Assign to the Salesforce Mobile and Lightning Experience Actions section.

- Click Layout Properties.
- Modify the page layout name by typing in
FAQ. Click OK.
- Click Save.
Create a New How To Page Layout
The How To layout is customized for How To articles. The fields and related lists on this page layout differ from the FAQ layout, so when Ada is creating How To articles, she sees the How To–related information she needs.
- From the menu on the left, click Page Layouts (if you are not already there).
- Click New.
- Leave None for Existing Page Layout.
- Enter the name of your page layout:
How To - Click Save.
Now drill down further into the page layout details. First, make sure Ada can take advantage of all necessary actions that can be performed on knowledge articles.
- Hover over the Salesforce Mobile and Lightning Experience Actions section.
- Click the wrench icon
 to activate this section and customize the predefined actions.
- In the palette click Mobile & Lightning Actions.
- Drag these actions to the Salesforce Mobile and Lightning Experience Actions section:
-
Archive
-
Assign
-
Change Record Type
-
Edit
-
Edit as Draft
-
Post
-
Publish
-
Restore
-
Submit for Approval
- Don’t click Save yet!
Customize the Fields for the How To Layout
Next, since you want the How To article layout to display certain fields and contain specific information relevant to How To articles, add the appropriate sections and fields to the page layout.
- In the palette, click Fields.
- Drag the Publication Status and Validation Status fields to the Knowledge Detail section.
- Drag Section from the palette to below the Knowledge Detail section, and name the new section
Article Details.
- Leave all the defaults, and click OK.
- Drag the Summary field to the Article Details section.
- Drag Section from the palette to below the Article Details Section.
- Name the new section
Assignment Information.
- Choose the 2-Column Layout and Top-down for the Tab-key Order.
- Click OK.
- Drag the following fields to the left column of the Assignment Information section.
- Assigned By
- Assigned To
- Add the following fields to the right-hand column of the Assignment Information section.
- Assignment Date
- Assignment Due Date
- Assignment Note
- Drag Section from the palette to below the Assignment Information section.
- Name the new section
Properties.
- Choose the 2-Column Layout and Top-Down for the Tab-key Order.
- Click OK.
- Drag these fields to the left column of the Properties section.
- Article Created Date
- Article Created By
- Last Modified By
- Last Published Date
- Drag these fields to the right column of the Properties section.
- Visible to Customer
- Visible in Internal App
- Visible to Partner
- Visible in Public Knowledge Base

- Click Save.
Create a Record Type for How To
Record Types determine the page layouts and picklist values users have access to. An FAQ record type already exists. Create a How To record type that allows users to access the How To page layout you just created.
- Click Record Types from the menu on the left.
- Click New.
- Select FAQ for the Existing Record Type.
- For Record Type Label, enter
How To.
- For Description, enter
For step-by-step instructions.
- Select Active to make this record type available immediately.
- Click the checkbox in the Make Available column for the Custom: Support Profile and System Administrator profiles.
- Click Next.
- From the Apply one layout to all profiles menu, select How To.
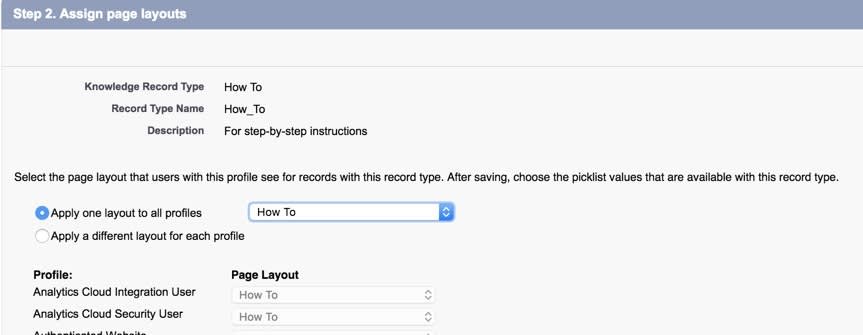
- Click Save.
Add an Articles Related List to the Case Layout
Now that you have record types and page layouts set up, add a related list to the case page layout so Ada is able to see articles that are relevant to incoming or existing cases. Being able to associate and attach Knowledge articles to open cases will help Ada close her cases more quickly.
- From Setup, click the Object Manager tab, then click Case.
- Click Case Page Layouts.
- Click the dropdown next to the Case Layout and click Edit.
- On the palette, click Related Lists.
- Drag the Articles from the palette and drop it below Solutions.
- Click the remove icon
 above the Solutions related list to remove it.
- Click Save.
- Click Yes.

Now that you have the foundation for Knowledge articles in place, move on to the next step and set access for Ada.
Resources
- Salesforce Help: Page Layouts
- Salesforce Help: Page Layouts in Lightning Experience
- Salesforce Help: Create Record Types