Set Up Security
Learning Objectives
After completing this project, you’ll be able to:
- Control access to Program Management Module (PMM) data in Salesforce.
- Make it easier for users to create program engagements.
- Customize your Bulk Service Delivery fields to increase user efficiency.
- Configure service schedules and attendance tracking to meet your organization’s needs.
- Add attendance summary data fields to your records and schedule automatic updates.

Before You Start
Before you complete any steps in this module, make sure you complete the hands-on challenges in Set Up a Program Management Module Trial for Trailhead using the same Trailhead Playground. The work you do in the hands-on challenges here builds on the work you complete in that badge.
Also, consider completing the following recommended content.
Keep Your Data Secure
Program Management Module (PMM) is a foundation on which you build program data and processes in Salesforce. It gives you a Salesforce app and basic data structure that includes the objects and features your organization needs to manage its programs and services. In this module, you gain the foundational knowledge to manage the app and help your users be more efficient.
There are two post-installation tasks to complete before you use PMM to manage your programs: Grant access to users, and, optionally, import existing data from other systems. More on how to grant user access in a moment. And you can check out the documentation linked in Resources for help with data import.
First, a note about Trust. Because Trust is our number one value here at Salesforce, we begin our discussion of administering PMM with a factor that underpins Trust: data security.
Whatever your mission, your clients and program participants trust you to keep their data secure. Fortunately, you have the tools to do that in Salesforce and PMM.
We suggest starting from the principle of least privilege. That means you limit each user's access to only what they need for their jobs. For example, if your organization has fundraisers and program staff who both use Salesforce, only grant access to donor information to fundraisers and client information to program staff, unless the situation calls for broader access.
You can limit data access using profiles, permission sets, roles, and sharing rules. We suggest you complete the Protect Your Salesforce Data trail on Trailhead to better understand these options—and other key tools and settings like multi-factor authentication, My Domain, and trusted IP ranges.
Assign Profiles and Permission Sets
In Salesforce, a profile sets a user’s basic permissions, then their access to data, tools, and functions can be extended using permission sets. A user’s profile can limit their access to very little data, then additional data access can be granted with permission sets for specific purposes.
PMM comes with one default profile—Program Management Standard User—and three permission set options that extend access for different types of users in your organization. These permission sets help you get started, and you can create your own or modify these if you need something different.
Permission Set Name |
Access Level |
What It Adds |
Who It’s For |
|---|---|---|---|
PMM: Manage |
High |
Read, create, edit, and delete access to all PMM custom objects. |
Users such as program directors and managers who set the direction for your programs and create and edit all PMM records. Your admin should have this permission set, too. |
PMM: Deliver |
Medium |
Read program, program cohort, service, and service schedule records. Read and edit service session records. Create, read, and edit program engagements, service delivery, and service participant records. |
Users such as case managers, service providers, and other front-line staff who deliver services and work directly with clients and program participants. |
PMM: View |
Low |
Read access for all PMM custom objects. |
Users such as organizational leadership who need visibility into program performance and service delivery, but don’t have a role in providing services. |
Imagine you have a new program director at your organization. The user has the Program Management Standard User profile assigned, but needs their access extended with a permission set. To practice, let’s create a user and apply the PMM: Manage permission set to their user record in your Trailhead Playground. Follow along in the Trailhead Playground you connected in the Set Up a Program Management Module Trial for Trailhead project so you can verify your work at the end of the step.
First, create a new user.
- From Setup, in the Quick Find box, enter
Usersand select it.
- Click New User.
- Specify these details:
- First Name:
Gia - Last Name:
Mason - Email: Enter your own email address
- Username: Add
+pmmand today’s date before the @ in your email address, likeyou+pmm013125@yourdomain.com. Remember, usernames must be unique to all Salesforce instances.
- User License: Salesforce. If you don’t see this option, you may have too many users with the permission in your Trailhead Playground already.
- Profile: Program Management Standard User
- Save your work.
Now, assign the permission set.
- From Setup, in the Quick Find box, enter
Permission Setsand select it.
- In the Permission Sets list, select PMM: Manage.
- Click Manage Assignments.
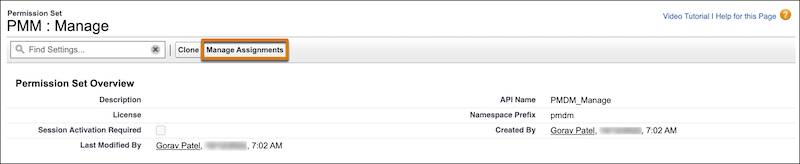
- Click Add Assignment.
- Select the new user, Gia Mason, by checking the box next to their name.
- Click Next.
- Leave the expiration date value as the default, No expiration date, and click Assign.
- Click Done.
Assign Sharing Rules
In addition to permission sets, you can use sharing rules to give users access to more information and features. Sharing rules create exceptions to organization-wide sharing settings.
For example, imagine your organization wants program managers to create and edit any program engagement record. But to maintain participant privacy, you limit read or edit access to program engagements to only the owner of the record. This is a perfect case for sharing rules using a group of trusted users.
First, create a new public group for your program managers.
- From Setup, in the Quick Find box, enter
Public Groupsand select it.
- Click New.
- In the Label field, enter
Program Managers. The Group Name field populates automatically asProgram_Managers.
- In the Search picklist, select Users.
- Select your yourself and Gia Mason in the Available Members column and click
 to move these users to Selected Members.
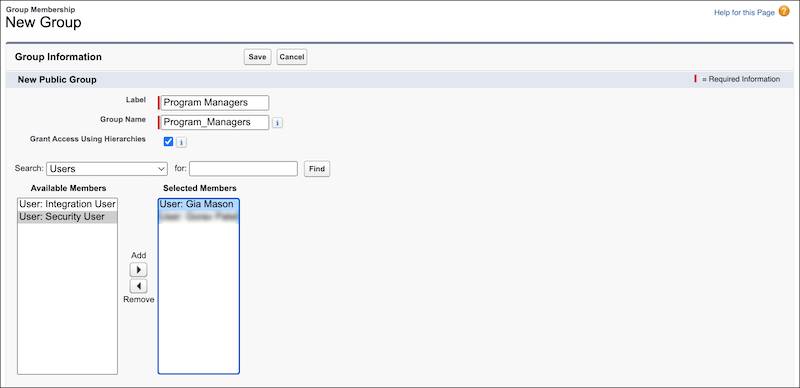
- Save your work. If a verification message appears, click OK on that, too.
Now that you have a public group, you can create the sharing rule.
- From Setup, in the Quick Find box, enter
Sharing Settingsand select it.
- In the Manage sharing settings for list picklist, find and select Program Engagement.
- In the Program Engagement Sharing Rules list, click New.
- Specify these details:
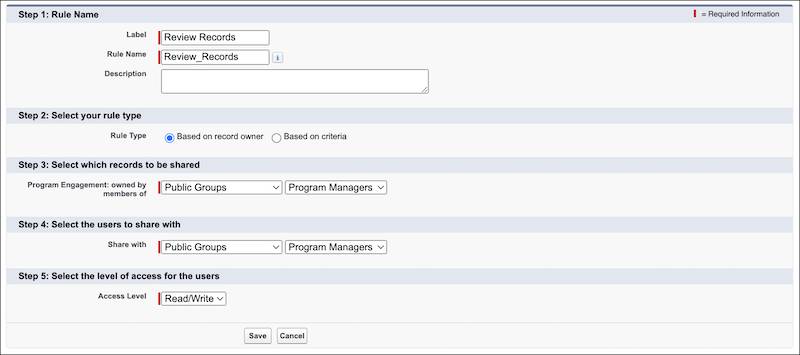
- Label:
Review Records
- Rule Name:
Review_Records(This populates automatically.)
- Rule Type: Based on record owner
- Program Engagement: owned by members of: Select Public Groups and Program Managers.
- Share with: Select Public Groups and Program Managers.
- Access Level: Read/Write.
- Label:
- Save your work. If a verification message appears, click OK on that, too.
Now every member of the Program Managers public group can read and modify program engagement records owned by any other member of the group. Sure, your public group only contains two user records now, but as a program team grows and changes you can go back and add—or remove—others as needed. Public groups are useful for many different things, too. Check out the Public and Personal Groups Salesforce Help article for more information.
Assign Access to Reports and Dashboards
One last task before we move on. PMM comes with many useful reports and dashboards—you can learn about them in the Data Analysis with Program Management Module (PMM) badge—and you need to assign access to them.
Let’s add report and dashboard access to the Program Management Standard User profile so all our users can see the PMM reports and dashboards.
- From Setup, in the Quick Find box, enter
Profilesand select it.
- Find and select Program Management Standard User. It’s easiest to click P to first filter to a shorter list.
- Click Edit.
- Find and select View Dashboards in Public Folders and View Reports in Public Folders in the Administrative Permissions section. This is a long list of settings, so we suggest using your browser’s control+f or command+f search feature to find these settings.
- Save your work.
Now that you know how to set up users, we can move on to how to facilitate their use of PMM. In the next step, we cover how to make it easier to add contacts to programs.
But before you go, be sure to check your work in this step by verifying below.
Resources
- Trailhead: Set Up a Program Management Module Trial for Trailhead
- Trailhead: Program Management Module (PMM) Basics
- Trailhead: Service Delivery with Program Management Module (PMM)
- Trailhead: Data Analysis with Program Management Module (PMM)
- Trailhead: Protect Your Salesforce Data
- Salesforce Help: Required Post-Installation Tasks
- Salesforce Help: Permission Sets
- Salesforce Help: Create Sharing Rules
- Salesforce Help: Public and Personal Groups
- Salesforce Help: Grant Users Access to Reports and Dashboards