Build a Custom Record Page for Lightning Experience and the Salesforce Mobile App
Learning Objectives
Those Lightning Experience Record Pages? You Can Customize Them, Too!
Just like the Home page, you can create a custom record page in different ways: Create it from scratch using a template, clone one of your other custom record pages, or edit an existing page. However, unlike the Home page, custom record pages are not only supported in Lightning Experience on desktop but also in the Salesforce mobile app. We’re going to create a record page using a template, then check out how it looks on a desktop and on a phone.
Create a Custom Lightning Record Page
Let’s build a custom opportunity record page.
We’ll tweak the standard record page layout just a bit, so you can get a feel for how things go together. After you’re comfortable with that, you can go to town and customize your record pages any way you like. Let’s get started.
- From Setup, enter
App Builder
in the Quick Find box, then select Lightning App Builder. - Click New.
- Select Record Page and start stepping through the wizard.
- Name your page
New Opportunity Page
, and select Opportunity.
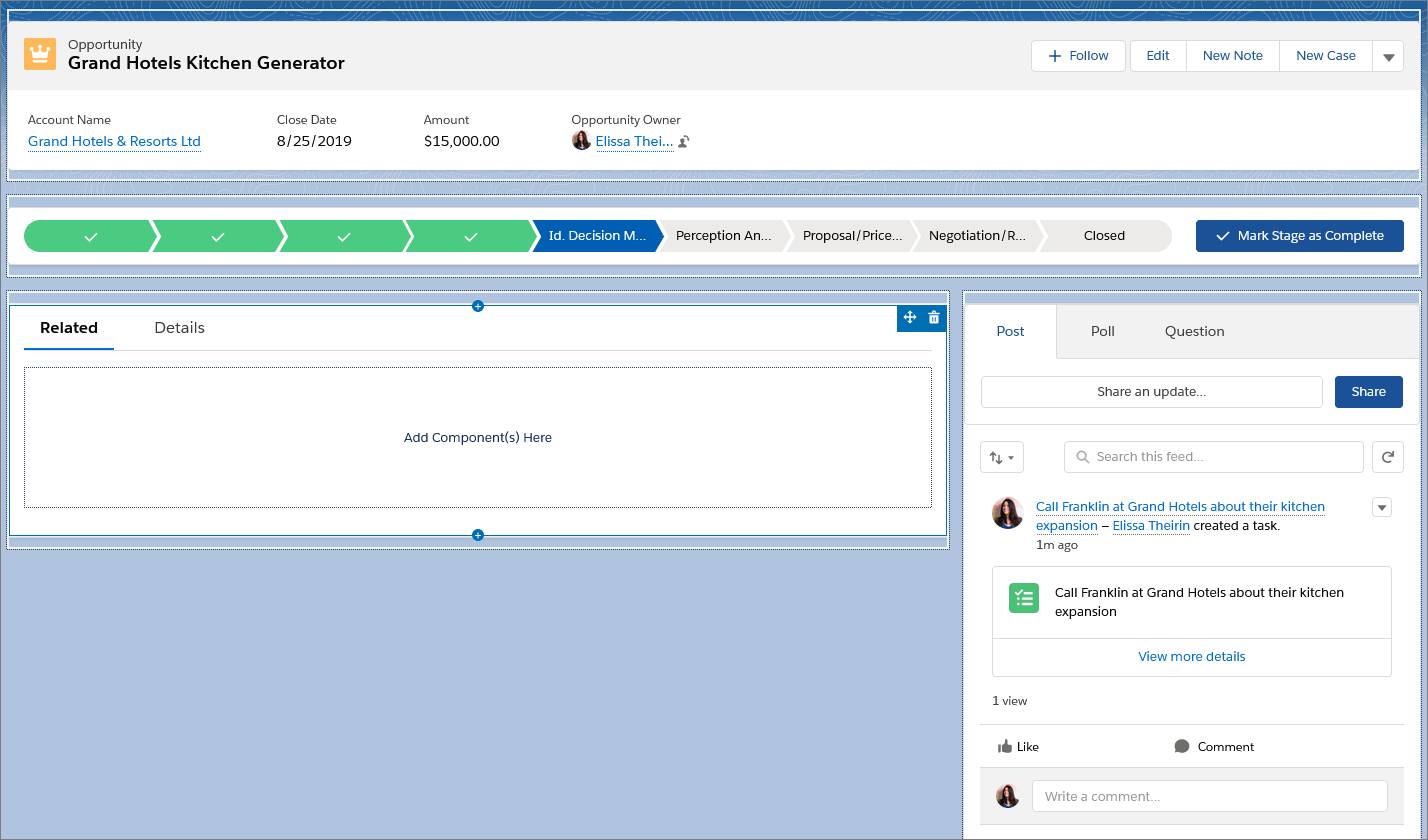
Start typing an object’s name in the Object field to filter the list and find what you’re looking for more quickly. - Choose the Header, Subheader, Right Sidebar template, and click Finish.
In the components pane, you see all the standard components available for opportunity record pages and any custom components that you’ve installed in your org. - From the settings menu (
), select Always show icons.
The icons that appear in the palette show what form factors each component supports. For example, if you add the Chatter Feed component to your page, it displays when you view the page on both a desktop and in the Salesforce mobile app. The same is not true for Chatter Publisher, which is supported on desktop only. We’ll see this behavior in action when we test our finished page. - Drag the Highlights Panel component into the top region of the page. Click See How It Works in the component properties pane to find out where the highlights panel content comes from.
- Add the Path component to the region below the highlights panel.
- Add a Chatter component to the lower right region.
- Add a Tabs component to the lower left region.
The Tabs component comes with some default tabs already in place. Let’s add more.
- In the Tabs component details pane, click Add Tab.
By default, another Details tab is added. But because we already have one, let’s change this new one to something else. - Click the second Details tab.
- From the Tab Label dropdown menu, select Custom, and give the tab a new label:
Recent Items
. - Click Done.
- Create an Activity tab.
- Drag the Recent Items tab to the top of the Tabs list in the properties pane.
The Recent Items tab is now in the first position in the tabs component. You can click around between the tabs, but nothing changes because the tabs don’t have any components in them. They’re empty. Let’s fix that. - Select the Details tab.
- Drag a Record Detail component right below the Details tab, into the green highlighted area.
- Add a Related Lists component to the Related tab, an Activities component to the Activity tab, and the Recent Items component to the Recent Items tab.
- Select the tabs component on the canvas, and in the properties pane, change the order of the tabs to: Details, Activity, Recent Items, then Related.
You can’t drag the tabs inside the component to move them around. You can only adjust them in the properties pane. - Click Save, then Not Yet.
Make Your Record Page Dynamic
- Add a Rich Text component above the Chatter component on the page.
- Enter this text in the component:
A million dollar opportunity closed! Oh yeah!
- In the component properties, make the text bold and centered, 18-point size, and change the font to something that appeals to you.
- Keep Display as card selected.
This setting makes the text inside the component more readable on Lightning pages by adding a white background to it instead of a transparent one. Toggle the setting off and back on to see what we mean. - Click Add Filter.
- Set Field to Amount, if it’s not already.
- Set Operator to Greater Than or Equal. For Value, enter
1000000
. - Click Done.
- Click Add Filter again, and create another filter for the Stage field equal to Closed Won.
Controlling whether a component displays based on field values isn’t all you can do with visibility rules. As we mentioned, custom record pages are supported in Lightning Experience both on desktop and in the Salesforce mobile app. Visibility rules can also control whether components appear on a page based on the form factor (or device) you’re viewing the page on. Let’s set up rules for a component to appear only when the page is viewed on a phone. - Add another Rich Text component right below the first one.
- Enter this text in the component:
This component is for mobile users only.
- Customize the text however you like, then click Add Filter.
- Under Filter Type, click Device.
- Set the Value field to Phone, then click Done.
- Save the page, then click Activation.
Roll Out Your Custom Record Page to Your Users
It’s time to spread the awesomeness! Let’s activate the page. It’s super easy.
- Make the page the org default for the object.
- Make the page the default object record page for specific Lightning apps.
- Assign the page to a combination of Lightning apps, record types, and profiles.
- Assign the page to a form factor, such as a desktop or phone.
Note the last bullet in the list. Not only can you create a page that is customized for the needs of your users, but you can go a step further and customize a page based on how your users access it. You can create uniquely customized record pages that only your mobile users see, containing only what they need while on the road or in the field. At the same time, desktop-only record pages can serve the needs of your users while they’re working on their PCs or laptops.
Let’s assign this page to a specific app, record type, and profile. We’ll also make sure it’s assigned to both the desktop and phone form factors, so we can view it in both places.
- Click the App, Record Type, and Profile tab.
- Click Assign to Apps, Record Types, and Profiles.
- Assign the page to the Sales app, the Desktop and phone form factor, the Master record type, and the System Administrator profile.
- Review the page assignments.
The New Page column is populated with the name of the page we’re activating: New Opportunity Page. - Click Save.
See What You Did There?
You’ve created a page and activated it. Now let’s see it in action. First, we’ll look at it on desktop.
- Click Back in the App Builder header.
- From the App Launcher (
), find and select Sales, then click the Opportunities tab.
- Select any open opportunity with an amount below $1,000,000.
You might have to refresh the opportunity page for the record page changes you just made to appear.
Here’s what the custom record page looks like, using the sample company, Dickenson Mobile Generators. Because you assigned the record page to the System Administrator profile, you can see it, but no other users in your org can. You can customize your different users’ experiences by creating custom record pages and assigning them by app, record type, and user profile. Give your sales managers a different view of opportunities than your sales reps. Configure nonprofit account pages differently than standard business account pages.
Don’t see the rich text components that you added to the page? That’s for two reasons. For one component, it’s because we’re viewing the page on a desktop. We’ll get to that shortly. For the other component, it’s because the opportunity doesn’t meet the criteria that you set. Let’s change that.
- From the page level actions in the Highlights panel, select Edit.
- Change the opportunity’s amount to be over $1,000,000, change the stage to Closed Won, then click Save.
Woohoo, look at that! You didn’t even have to refresh the page. When you save your changes and the filter criteria are met, the page automatically updates to show the rich text component and its message.
Now let’s look at the page in the Salesforce mobile app.
- Open the app on your phone.
- If necessary, log in using your Trailhead Playground credentials.
- Open the menu, tap the App Launcher, and open the Sales app.
- Tap Opportunities, then navigate to the opportunity that you updated to Closed Won.
What you see at first is what you’d expect: actions, record highlights, Path. But scroll down a bit...The tabs in our Tabs component are stacked when viewed on a phone. You can tap them to drill in. But wait! There’s one missing. Where’s the Activity tab? Well, the Activities component isn’t supported on a phone, so it was dropped from the page. And, since that caused the Activity tab to be empty, it was dropped from the page too.
Toward the bottom is the component that appeared when you updated the opportunity to be over a million dollars. But right below it is something we didn’t see when we looked at the page on desktop: the mobile-only component.
Let’s move on to app pages.