Update a Schedule
Learning Objectives
After completing this unit, you’ll be able to:
- List ways to update appointments in the schedule.
- Book an appointment.
Assign and Reassign Appointments
Scheduling policies automate scheduling to help you create your daily schedule quickly and easily. But schedules change, and it’s the dispatcher’s job to make sure that everything runs smoothly. That means that sometimes the dispatcher must reassign appointments manually. Let’s see how.
Operation |
What it does |
How to use it |
|---|---|---|
Schedule |
If an appointment is not yet scheduled, add it to the best slot on the Gantt. |
In the appointment list or on the map, select one or more appointments and click Schedule. |
Reschedule |
If the schedule changes and the current time slot can't be used for a service appointment, use Reschedule to search for the next best slot. |
In the Gantt, right-click the appointment and choose Reschedule. |
Get Candidate |
View a list of ranked candidates who can perform the job. Choose the candidate and time slot with the highest score. |
In the Gantt, right-click the appointment and choose Get candidates. In the appointment list, click the appointment and choose Candidates. |
Appointment Booking |
View a list of ranked time slots. Choose the time slot that works best for you. |
On the work order or service appointment, click the Chatter feed, and choose Book Appointment. If appointment booking is set up in your Salesforce Experience site, customers can book their own appointments there. The admin can add Book Appointment as a global action to other places, too. |
Emergency Scheduling |
Perform the job as quickly as possible. Emergency scheduling uses real-time traffic and its own scheduling policy. The Emergency policy allows candidates to travel from other territories and allows appointments to overlap. |
In the Gantt, double-click the appointment, click the Chatter feed, and choose Emergency. Choose to dispatch the mobile worker as soon as possible or after they complete their current service appointment. |
Maria likes the choices her dispatchers have. She realizes that she must do some setup for appointment booking, so she gets to work.
Set Up Appointment Booking
When a customer contacts Ursa Major to book an appointment, they choose a time slot between the earliest start date and the due date. This choice narrows the time constraint down to a specific arrival window. For example, the mobile worker must arrive between 9:30 AM and 11:30 AM on January 5. The scheduling engine then finds the best qualified candidate who can show up during that arrival window.
Before her team can start to use appointment booking, Maria must set it up.
- From the App Launcher
 , click Field Service Admin.
- Click the Field Service Settings tab.
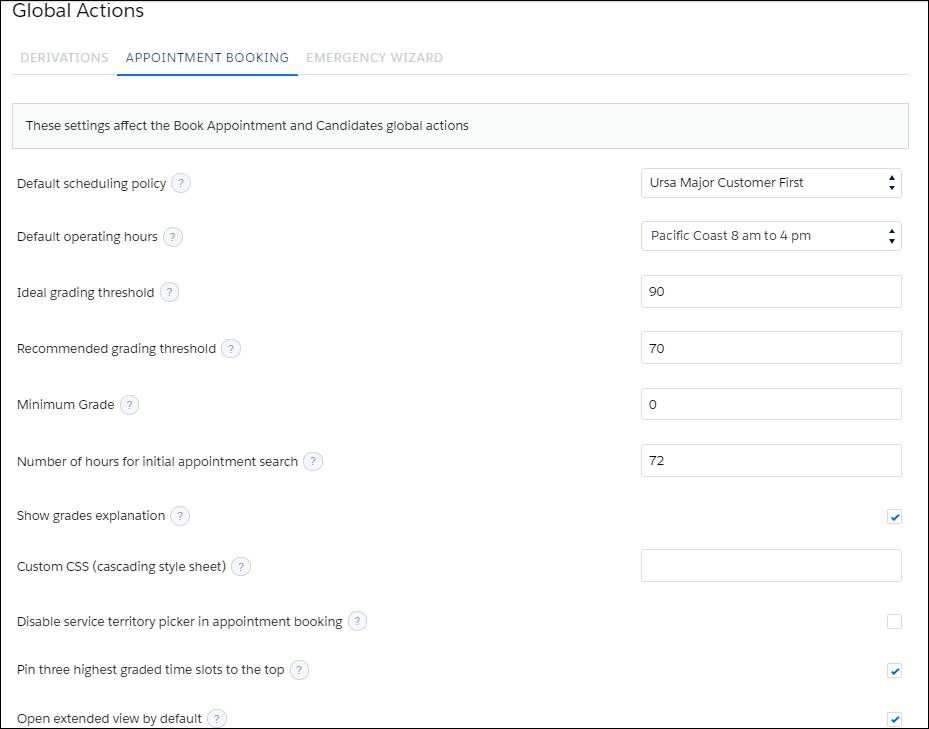
- Click Global Actions, then click the Appointment Booking tab.
- Configure the settings. Maria uses the following values:
- Default scheduling policy: Ursa Major Customer First (if you don't have this option, use Customer First)
- Default operating hours: Pacific Coast 8 am to 4 pm
- Select Pin three highest graded time slots to the top and Open extended view by default.
- She leaves the other settings as they are.

- Click Save.
Book Appointments
Maria can add the Book Appointment global action to service appointments, work orders, work order line items, accounts, assets, leads, or opportunities. She decides to add it to the page layout for work orders, service appointments, and Salesforce Experience sites. That way customer service agents, dispatchers, and even customers can book their own appointments.
After she’s done, Maria turns things over to her top support agent, Ada Balewa. Ada takes customer calls and books appointments. She’s excited to learn more about appointment booking.
Ada books her first appointment.
- From the App Launcher
 , select Work Orders.
- Click the work order to book.
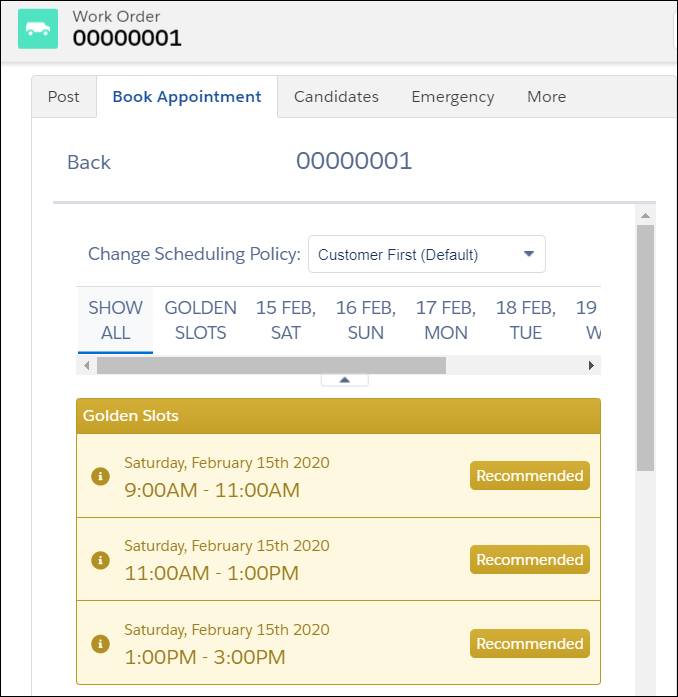
- In the Chatter feed, select Book Appointment.
- If necessary, enter any required information. Ada doesn't enter anything.
- Click Get Appointments.
Because we have a small set of sample data, your Trailhead playground org has no open dates. Luckily for Ada, Ursa Major's org does.
- Click the best time slot in the list. Ada clicks the first Golden Slot.

The scheduler grades time slots using the weighted service objectives set in your scheduling policy. Time slot ratings are as follows.
-
Ideal or Golden. These time slots have the highest grade. If you can, select one of these.
-
Recommended. These time slots have a fairly high grade, too. Select if the ideal time slots don’t work for you.
-
Satisfactory. While these time slots meet the minimum requirements, they’re not the best choice, but they get the job done.
After you choose the time slot, the appointment appears on the Gantt.
In this module, you learned how to schedule and reschedule appointments on the Gantt. You also learned how to set up appointment booking and use it to book appointments right on the customer’s work order.
Resources
- Video: Field Service Demo: Intelligent Scheduling
- Salesforce Help: Schedule Service Appointments for Field Service
- Salesforce Help: Customize Appointment Booking Settings
- Trailhead module: Expand Your Reach with Experience Cloud
- Trailhead module: Lightning Experience Customization