Create Support Processes
Learning Objectives
In this project, you’ll:
- Create processes to streamline a support team’s workflow and case management.
- Customize fields, page layouts, and record types for different kinds of support cases.
- Define picklist values for each new record type.
- Create case assignment rules, queues, and escalation rules to push cases to the appropriate support team at the appropriate time.
- Create and manage entitlements to customize the level of support for each customer.
In this project you step in as admin for Ursa Major Solar, Inc. Ursa Major Solar is a Southwest-based supplier of solar components and systems. As the admin, it’s your job to help the company become more productive and efficient when managing cases. With this in mind, you’re tasked with changing how Ursa Major Solar handles cases.
The support team’s productivity and customer satisfaction are both high priorities for Ursa Major Solar. To that end, you need to create separate processes for handling product support cases and customer inquiries. The processes should track the case statuses, and agents should also specify the type of case or inquiry they’re logging.
Create a New Trailhead Playground
For this module, you need to create a new Trailhead Playground. Scroll to the bottom of this page, click the playground name, then click Create Playground. It typically takes 3–4 minutes to create a new Trailhead Playground.

Create a New User
Before you get going on that, add user Ada Balewa, Ursa Major Solar’s Customer Support Specialist.
- Click the gear icon
 and select Setup.
- From Setup, enter
Usersin the Quick Find box and select Users.
- Click New User.
- Add your product support specialist, Ada Balewa, by entering the following information.
- Email:
ada.balewa@ursamajorsolar + your initials + today’s date (DDMMYY).com - Username: [auto generated based on the email above]
- First Name:
Ada - Last Name:
Balewa - User License: Salesforce
- Profile: Custom: Support Profile
- Add a check to the Service Cloud User option
- Click Save.
Next, ensure that your user information reflects that you’re the admin for Ursa Major Solar.
- From Setup, enter
Usersin the Quick Find box and select Users.
- Click Edit next to Your Name.
- In the Company field, type
Ursa Major Solar.
- Click Save.
Configure Case Status Picklist Values
To help Ursa Major’s customer support reps track cases more efficiently, add values and customize your case status picklist values to track the status and life cycle of cases.
- From Setup, click the Object Manager tab.
- Click Case.
- Click Fields & Relationships.
- Click Status.
- In the Case Status Picklist Values section, click New.
- In the Enter a new status name field, add these case statuses (keep each one on its own line).
Product Defect LoggedProduct Defect FixedOn Hold
- Click Save.
- In the Case Status Picklist Values section, click Reorder.
- Move the Escalated and Closed values to the bottom of the list.
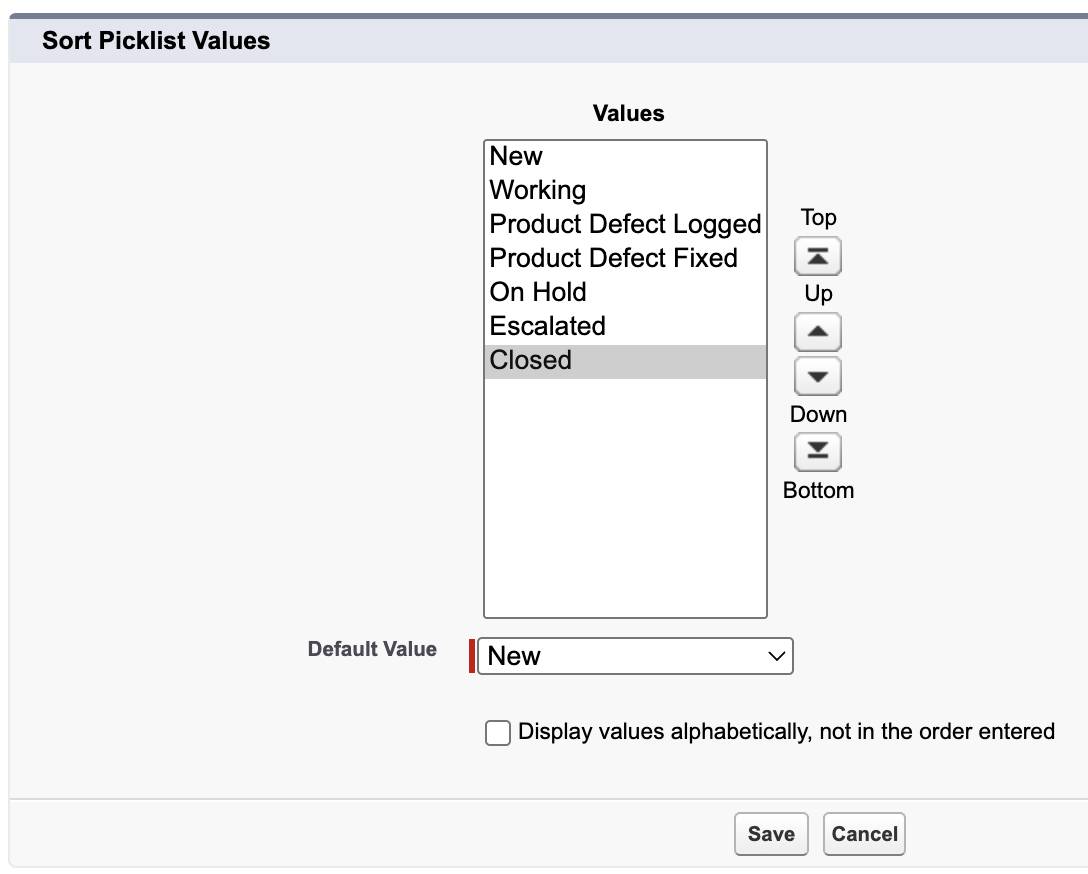
- Click Save.
Create Processes
Now create a product support process to support product-related cases.
- From Setup, click the Home tab.
- Enter
Support Processesin the Quick Find box and select Support Processes.
- Click New and complete the field details.
- Existing Support Process: Leave as Master
- Support Process Name:
Product Support Process - Description:
Support process for product support cases
- Click Save.
- In the Selected Values section, select On Hold and click Remove to remove this value from the list.
- Click Save.
Next, create an inquiry support process for customer inquiries.
- From the Support Processes setup page, click New and fill in the details.
- Existing Support Process: Product Support Process
- Support Process Name:
Inquiry Process - Description:
Support process for inquiries - Click Save.
- From the Selected Values list, select Product Defect Logged, Product Defect Fixed, and Escalated, and click Remove to remove the values.
- If necessary, move On Hold from Available Values to Selected Values.
- You should be left with New, Working, On Hold, and Closed in the Selected Values list.

- Click Save.
Add Ursa Major Solar’s products to the product field picklist for product support cases.
- From Setup, click the Object Manager tab.
- Select Case.
- Select Fields & Relationships and click Product (the picklist one, not the lookup).
- Under the Values related list, click New.
- Enter the following values, pressing the Enter key after each one.
Solar PanelsInvertersCharge Controllers-
Batteries
- Click Save.
- Scroll back down to the Values related list, and check Action to select all values in this list. Deselect the four values you just entered, then click Deactivate Selected, then OK. This ensures that your support team will only see the products that are relevant to Ursa Major Solar. When you’re finished you should only see Solar Panels, Inverters, Charge Controllers, and Batteries in the Values related list. All other values will be moved to the Inactive Values related list.

Add picklist values to the standard Type field for all cases to quickly view and track the type of case you are handling.
- Click Back to Case Fields.
- Click Type.
- In the Case Type Picklist Values section, click New. Make sure each item is listed on a separate line.
ProductShippingWarrantyProblemFeature RequestQuestion
- Click Save.
Create Case Page Layouts
Create a product support case page layout to show information specific to product-related cases.
- Click Back to Case Fields.
- Click Case Page Layouts in the left-side navigation.
- Click New and fill in the details for the Product Support Case Layout first.
- Existing Page Layout: leave as None
- Page Layout Name:
Product Support Case Layout - Select the Feed-Based Layout checkbox.
- Click Save.
- From the options in the pane at the top of the page, click and drag Case Reason, Product (choose the second Product field), and Type down to the Case Detail section.
- Click Layout Properties.
- Next to the Case Assignment checkbox, select the Show on edit page and Default checkboxes.
- Click OK.
- Click Save.
Next, create an inquiry case page layout.
- Click New and fill in the details for the Inquiry Case Layout.
- Existing Page Layout: Product Support Case Layout
- Page Layout Name:
Inquiry Case Layout - Select the Feed-Based Layout checkbox.
- Click Save.
- Hover over Product and click
 when it appears to remove the Product field. Do the same for Case Reason.

- Click Layout Properties.
- Under Case Assignment Checkbox, ensure the Show on edit page and Default checkboxes are selected.
- Click OK.
- Click Save.
Create Record Types
Now, create Product Support and Inquiry Record Types using the Case Page Layouts you just created. The Record Type will determine which case page layout you see when creating a case.
- From the Case object page, click Record Types.
- Click New and complete the field details.
Field |
Value |
|---|---|
Existing Record Type |
Master |
Record Type Label |
Product Support |
Record Type Name |
[leave as default] |
Support Process |
Product Support Process |
Description |
Record type for product support |
Active checkbox |
Check |
Make Available (in the Profile Name table) |
Check |
- Click Next.
- From the Select a Page Layout menu, select Product Support Case Layout.
- Click Save & New, and enter the details.
Field |
Value |
|---|---|
Existing Record Type |
Product Support |
Record Type Label |
Inquiry |
Record Type Name |
[leave as default] |
Support Process |
Inquiry Process |
Description |
Record type for inquiries |
Active checkbox |
Check |
Make Available (in the Profile Name table) |
Check |
- Click Next.
- Select Page Layout: Inquiry Case Layout
- Click Save.
Edit the case type picklist values for the Product Support and the Inquiry Layouts.
- While still on the Inquiry Record Type page, in the Picklist Available for Editing section, click Edit next to the Type.
- In the Selected Values section, hold the CTRL/command key and select these values:
- Mechanical
- Electrical
- Electronic
- Structural
- Feature Request
- Question
- Problem
- Click Remove. (You should be left with Other, Product, Shipping, and Warranty.)
- Click Save.
- Click Record Types.
- Select the Product Support record type.
- In the Picklist Available for Editing section, click Edit next to the Type field.
- In the Selected Values section, hold CTRL/command key and select all values except Feature Request, Question, and Problem.
- Click Remove.
- Click Save.
Create a Case to Test Your Support Processes
To test the inquiry process you set up, create an Inquiry case using the new Inquiry record type. Pat Stumuller, a customer contact at Pyramid Construction, called in to find out what kind of warranty his company has for their solar panels. Log a case to track the inquiry.
- Click the App Launcher
 and select Service.
- In the Global Search box, enter
Pat Stumullerand select Pat Stumuller when the name pops up.
- In the Cases related list, click New.
- Select Inquiry as the record type, and click Next.
- Complete the Inquiry case details.
- Type: Warranty
- Status: Working
- Case Origin: Phone
- Subject:
Warranty inquiry - Description:
What is the warranty on solar panels?
- Click Save.
You just created support processes that enable your support team to handle different types of incoming cases. Great job! Next, discover how to create case queues and assignment rules to route incoming cases to the appropriate teams.
Resources
- Salesforce Help: How Page Layout Elements Display in Lightning Experience
- Salesforce Help: Set Up Service Cloud Basics
- Salesforce Help: Create Record Types