Configure Einstein Service Replies
Set Up Einstein Service Replies for Messaging and Email
With Messaging and Bots in place and successfully tested, you’re ready to entrust your team with Einstein Service Replies to quickly and efficiently respond to customer inquiries using prewritten, customizable messages. Service Replies can be tailored to address common questions, provide standard information, or guide customers through specific processes in messaging and email conversations.
Service Replies require special permission assignments, enabling Einstein and grounding rooted in Knowledge Article and Case fields to provide the most appropriate guidance during customer interactions. Let’s set these up.
Assign Permission Sets
- Click
 and select Setup. In the Quick Find box, search for and select Users.
- In the View dropdown, change the selection from All Users to Admin Users.
- Click on the user with your name (assigned to the System Administrator profile).
- Hover over Permission Set Assignments, and click Edit Assignments.
- Move the following Available Permission Sets to the Enabled Permission Sets:
- Service Replies User
- Work Summaries User
- Service Replies User
- Click Save.
Enable Einstein Generative AI
- Click
 and select Setup. In the Quick Find box, search for and select Einstein Setup.
- Ensure the Turn on Einstein toggle is set to On.
Configure Service Replies
- In the Quick Find box, search for and select Einstein Reply Recommendations.
- Click the toggle for Service Replies to On.


Set Up Grounding for Knowledge and Cases
- In the Quick Find box, search for and select Service AI Grounding.
- Click the toggle for Service AI Grounding to On.
- From the Knowledge tab, click Edit.
- In the Title field dropdown, select Title.
- In the Summary field dropdown, select Summary.
- Select Answer and Question as additional fields for Einstein to use for Grounding by clicking the
 in the Selected column.
- Click Save and toggle Grounding with Knowledge to Active.

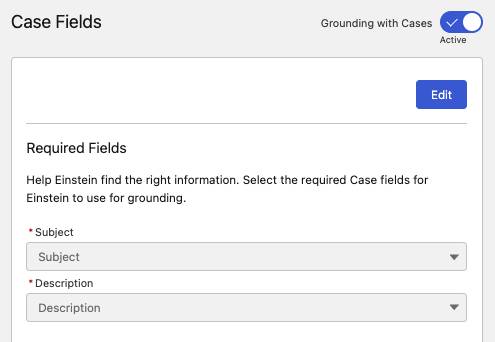
- Next to the Knowledge tab, select the Case tab, and click Edit.
- In the Subject field dropdown, select Subject.
- In the Description field dropdown, select Description.
- Click Save.
- Toggle Grounding with Cases to Active.
- In the Subject field dropdown, select Subject.
You’ve just added grounding to your Messaging Sessions for use in Service Replies based on Knowledge Articles and Case fields. Grounding indexes your objects and fields so that Einstein knows which information to base recommendations on. When you use grounding, you can add context and personalization to customer communications.
Next, you’ll add the Service Replies component to Messaging Session page layouts. You can test drive the experience where your reps receive recommendations generated from your Knowledge Base and case data when managing customer conversations.
Add Service Replies to the Messaging Session Lightning Page Layout
- Click
 , search for and select Service Console.
- From the dropdown menu, select Messaging Sessions.
- From the Recently Viewed list view, open a Messaging Session record.
- Click
 in the upper-right corner and select Edit Page.
- Under the components on the left-hand side of the page, drag the Einstein Replies component to the top of the right column. The Einstein Replies component displays on the page with a default header as Service Replies.
- Click Save.
- Click
 in the top-left corner to exit Lightning App Builder and return to the Service Console.
Test Messaging
- On the left side of the screen, click
 to expand the Omni-Channel sidebar. Click the
  next to the
 , and change your status in the Omni-Channel dropdown from Offline to Available Messaging.
- Click
 and select Service Setup. In the Quick Find box, search for and select Embedded Service Deployments.
- Click the
 down arrow to the right of your Help Site Messaging deployment, and select View.
- In the Test Messaging box, click Test Messaging. A page will load with the title, “Test Your Messaging Deployment”.
- Click the
 button in the lower-right portion of the screen to start the Embedded Messaging conversation. If the conversation icon isn’t visible right away, the page may still be loading.
- As the customer, enter your First Name, Last Name, Email, and
Order Status Water Bottleas the Subject, then click Start Conversation.
- Wait for the Bot’s prompts to load, click Report a Shipping Problem from the available options in the menu, then the Bot will transfer the conversation to a service representative.
- In the Service Console, as the Service Rep, verify that you received a conversation request, then click the check mark on the incoming message to view it and accept the transfer.
- As the customer, type:
I haven’t received my order yet. How can I check the shipping status for my water bottle?
- As the Service Rep, select any suggested reply generated by the Service Replies component, and click Post.
- As the Service Rep, go to the Case Details section of the Messaging Session record from the customer conversation.
- Click into the Case search bar, then click + New Case.
- Click into the Contact Name search bar, then click + New Contact
- Create a new Contact with your name and email (as the customer), then click Save.
- In the subject line, enter:
Order Status Water Bottle
- Click Save.
- Click into the Case search bar, then click + New Case.
- As the Customer, click
 on the top left-hand corner of the conversation window, then select End Chat.
Service Replies are now ready and will provide suggested replies for your service reps during customer conversations! These recommendations are refreshed each time the customer sends a message. You already set up grounding based on Knowledge Articles and Cases in a previous step. Next, you’ll set up Service Replies to draft emails and maximize conversation wrap ups with Einstein AI.
Enable Service Replies for Email
- Click
 and select Service Setup. In the Quick Find box, search for and select Einstein Service Replies for Email.
- Set the Einstein Service Replies for Email toggle to On.
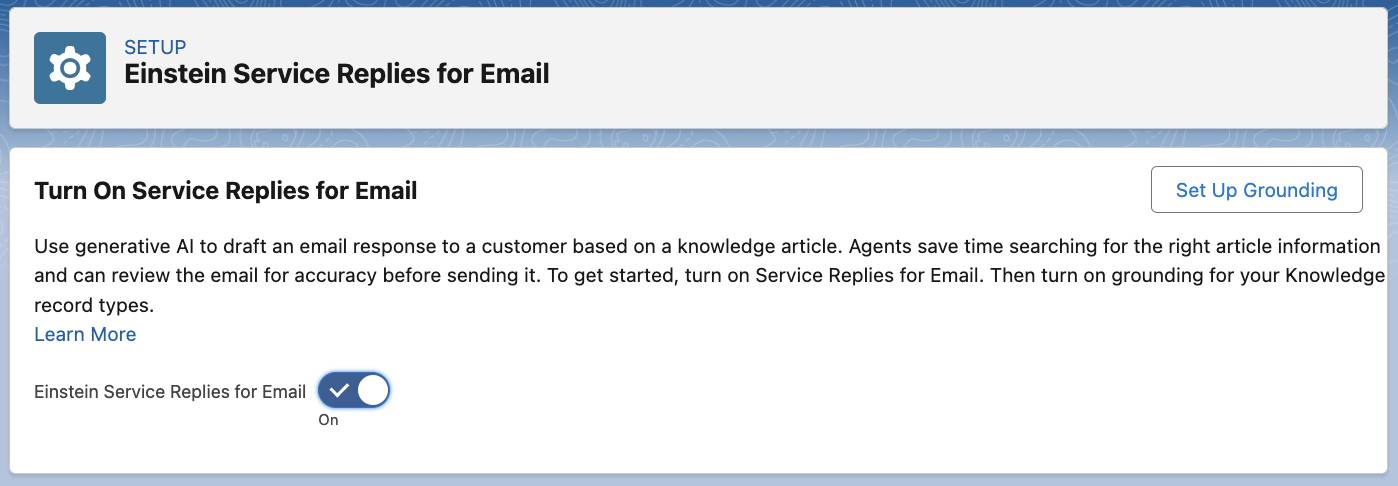
You already set up grounding in a previous step, so you can move on to complete the configuration for Einstein Service Replies for Email.
Allow Public Article Sharing
- In the Quick Find box, search for and select Knowledge Settings.
- Click Edit, then scroll down to Share Articles via URLs Settings and check the box Allow users to share articles via public URLs.
- Select the Community: Help Center site from the Available Sites box, and move it to the Selected Sites box.
- Click Save.

Provide Access with a Permission Set
- In the Quick Find box, search for and select Permission Sets.
- Select the Email Response User permission set, then click Manage Assignments.
- Click Add Assignment.
- Use the search bar to find your user.
- Click the checkbox to assign the Email Response User permission set to your user.
- Click Next, leave the default selection for no expiration date, then click Assign.
- Click Done.
Test Einstein Service Replies for Email in the Service Console.
- Click
 , search for and select Service Console.
- From the dropdown, select the Cases tab and select the All Open Cases List View.
- Open the Case that was created from the Messaging Session with the subject
Order Status Water Bottle.
- In the Knowledge Component, select Draft Einstein Email from the dropdown menu next to the article titled, “How can I check my Order Status?” If you don’t see any suggested articles, enter
How can I check my Order Statusin the Knowledge Component search box, click the Knowledge Article, refresh your browser, and return to the Case record. If you get an error message, “Error notification. The email publisher is unavailable. Contact your admin to enable the email publisher.”, there could be a connection issue. Click Draft Einstein Email again.
- Review the generated draft email for accuracy and safety, then click Send.
You’ve seen how Service Replies can benefit your team’s productivity in Messaging and Emails. Next, you’ll set up Work Summaries to help your reps close out their cases and wrap up their interactions with customers efficiently.