Onboard Data in Supplier 360
Learning Objectives
After completing this unit, you’ll be able to:
- Create a supplier record using the supplier business entity in Supplier 360.
- Create a contact record using the contact business entity in Supplier 360.
- Identify the required fields and validation steps when saving a new record in Supplier 360.
Put Structure into Practice
In the previous unit, you learned how business entities give every record the right structure from the start. Now it’s time to put that structure to work. In this unit, you create two types of records in Supplier 360—a supplier record and a contact record—and explore how the right business entity shapes what you capture.
Coral Cloud Resorts is ready to add new records to Supplier 360. Its procurement team needs to onboard PrimeLinens and Hospitality Goods Company as a supplier organization, and add Michelle Tran as PrimeLinens’s point of contact. Each record requires a different business entity, and the right choice determines which fields are available and what data can be captured.
Create a Supplier Record
When you add a vendor to Supplier 360, you use the supplier business entity. This entity provides the fields you need to capture details about a supplier organization, such as name, DUNS number, business type, and industry type.
Follow these steps to create a supplier record.
- In the Supplier 360 homepage, go to New | Record.
- Select Supplier as the business entity type.

- Enter the required fields.
- Select the checkmark icon to save the section.
- Enter the supplier's name in the Name field.
- Enter any other optional fields as required.
- Enter the supplier's name in the Name field.

- Enter any additional details, such as Alternate Names, Sourcing Manager, and Stock.
- Select Submit.
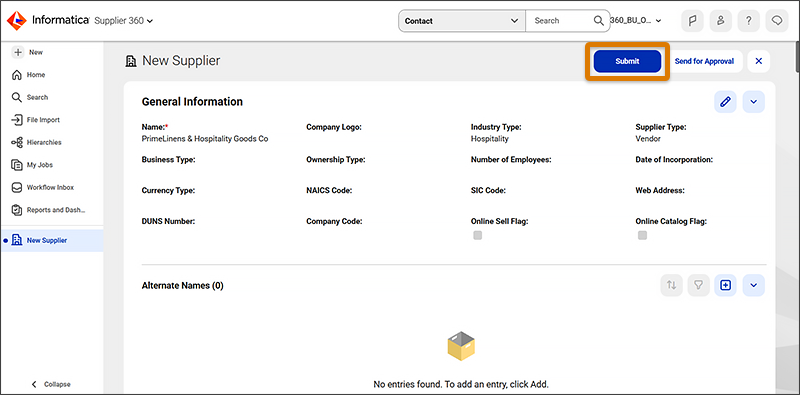
Supplier 360 validates the record before submitting. If any required fields are missing, an error message identifies the fields to complete. After the record is submitted, the Supplier record appears in the master database.

Create a Contact Record
When you add a point of contact to Supplier 360, you use the contact business entity. That entity provides the fields you need to capture individual-level details of the contact, such as name, job title, and department.
Follow these steps to create a contact record.
- In the Supplier 360 Homepage, go to New | Record.
- Select Contact as the business entity type.
- Enter the required fields.
- Select the checkmark icon to save the section.
- Enter the contact's first name in the First Name field.
- Enter the contact's last name in the Last Name field.
- Enter the contact's first name in the First Name field.
- Enter any additional details, such as job title and department.
- Select Submit.

Similar to the supplier record, Supplier 360 validates the contact record before submitting. After the record is submitted, the contact record appears in the master database.
Required Fields and Validation
Every record in Supplier 360 must pass validation before it’s submitted. Validation ensures that your master data is complete and consistent from the moment a record is created.
Here's what to expect during validation.
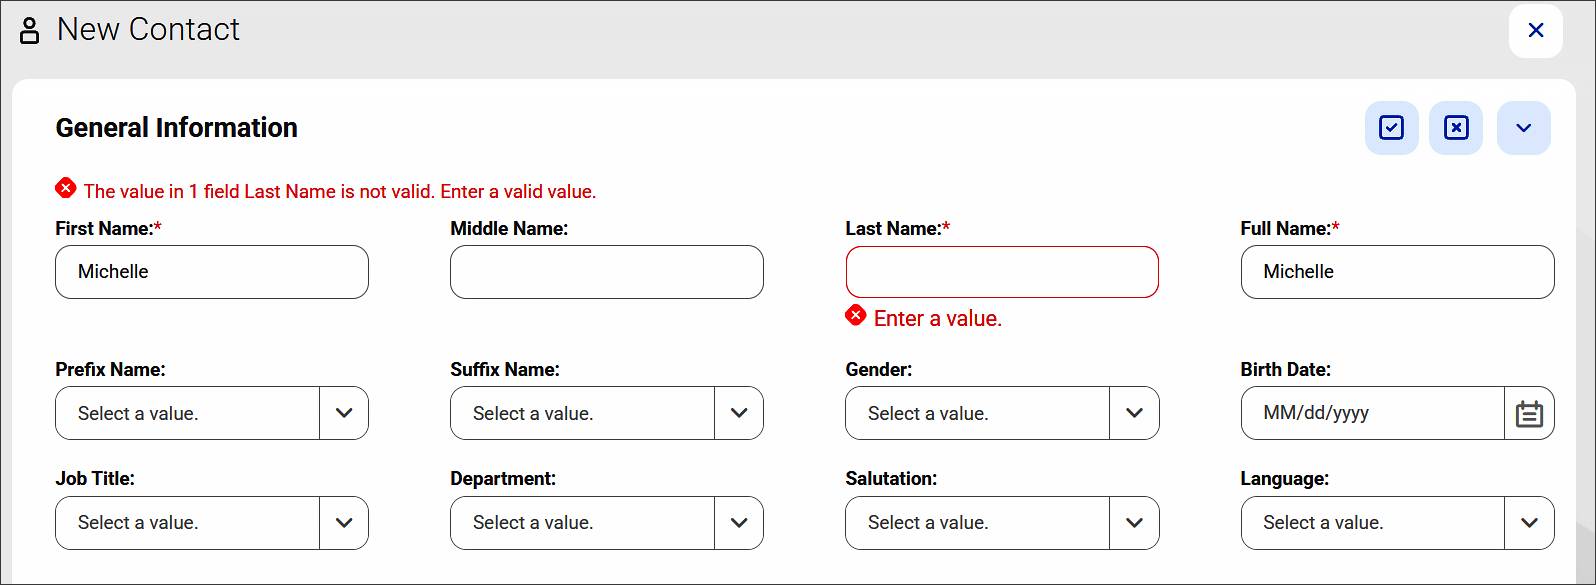
- Required fields must be completed before you can submit a record. These fields are marked with an asterisk (*) in the record form.
- Field-level validation ensures that your entered data aligns with the expected format, such as confirming that a DUNS number is structured correctly.
- Error messages identify any issues that need to be resolved before submitting.
For example, when the Coral Cloud Resorts procurement team adds PrimeLinens and Hospitality Goods Company as a supplier record, they must complete the required name fields before the record can be saved. When they add Michelle Tran as a contact record, the first name and last name fields are required. In both cases, validation ensures the record is complete and ready to serve as reliable master data.
Connect Your Records
The Coral Cloud Resorts procurement team has made real progress. PrimeLinens and Hospitality Goods Company is now a structured supplier record in Supplier 360, and Michelle Tran is established as a contact record. Both are properly validated, contain the correct fields, and are saved to the master database.
But a record alone only tells part of the story. Coral Cloud Resort’s relationship with Michelle Tran, the account executive at PrimeLinens and Hospitality Goods Company, matters and needs to be captured. In the next unit, you connect related records, explore the predefined relationship types available in Supplier 360, and learn when to submit a record directly versus when to send it through an approval workflow.
Resources
- Informatica Documentation: Supplier 360 SaaS Data Dictionary (login required)
- Informatica Documentation: Product 360 SaaS Data Dictionary (login required)
- Informatica Documentation: Customer 360 SaaS Data Dictionary (login required)