Loop Through a Repeater
Learning Objectives
After completing this unit, you’ll be able to:
- Loop through a repeater’s entries to add them to a single, unified collection.
- Update and create records simultaneously from a single collection.

Let’s continue working with the Mass Create & Update Contacts flow from the previous unit.
Loop to Modify Records and Add Them to a Collection
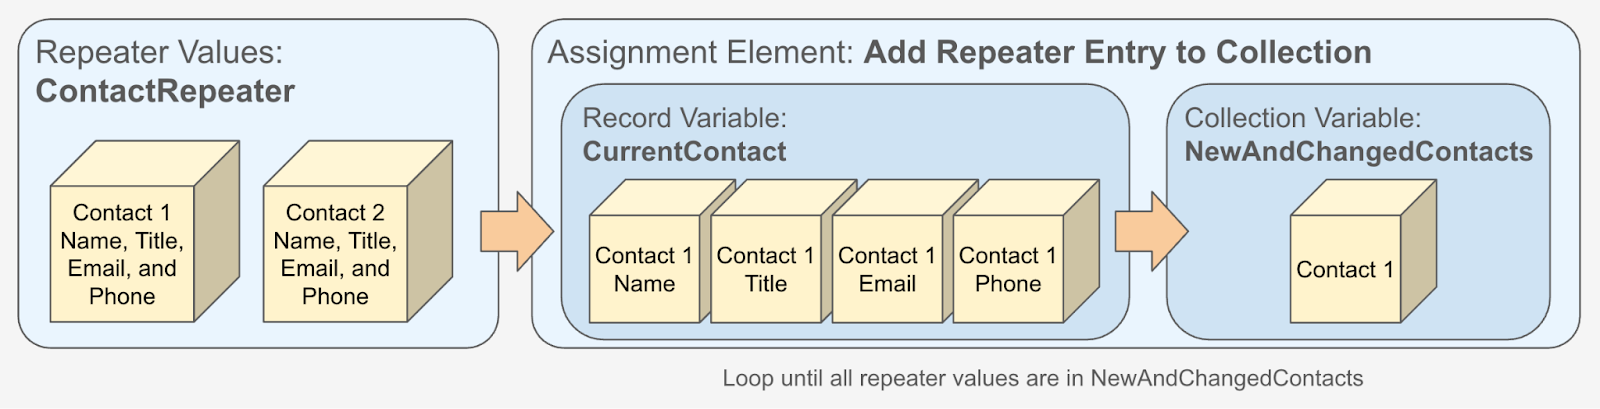
Your flow is ready to capture data, but the flow needs to organize that data into a structure that it can use: a record collection variable. Transform elements can’t work with repeater data, so use a Loop element and an Assignment element to add all of the repeated components’ values to a record variable. You can then use that same Assignment element to add the contents of that record variable to a new record collection variable.
When you reference a repeater’s values, you can select the repeater’s Added Items, Prepopulated Items, Deleted Items, or All Items.
-
Added Items contains only the repeater’s new records, and ignores its prepopulated records.
-
Prepopulated Items contains only the repeater’s prepopulated records, and ignores its new records.
-
Deleted Items contains only the records that the user deleted from the repeater.
-
All Items contains all of the repeater’s added, prepopulated, and deleted records.
Why are these options separated out? You might need to do different things with each group, such as using a Delete Records element to remove everything in Deleted Items from the org’s database. Make sure you use a separate loop to process each group of items.
In this flow, we don’t worry about deleted records, and at the end of the flow, we use a special method to create new records and update changed records all together. So here, we use the All Items option.
- Open the Mass Create & Update Contacts flow.
- After the Get Details element, add a Loop element.
- For Label, enter
LoopRepeater.
The API Name should auto-populate asLoopRepeater.
- For Collection Variable, select Get Details > ContactRepeater > All Items.
- For Label, enter
- Create a record variable to collect data from the components into a structure that the flow recognizes as a record.
- For Resource Type, select Variable.
- For API Name, enter
CurrentContact.
- For Data Type, select Record.
- For Object, select Contact.
- Click Done.
- For Resource Type, select Variable.
- Create a record collection variable to collect all of the repeater entries after each one has been structured as a record.
- For Resource Type, select Variable.
- For API Name, enter
NewAndChangedContacts.
- For Data Type, select Record.
- Select Allow multiple values (collection).
- For Object, select Contact.
- Click Done.
- For Resource Type, select Variable.
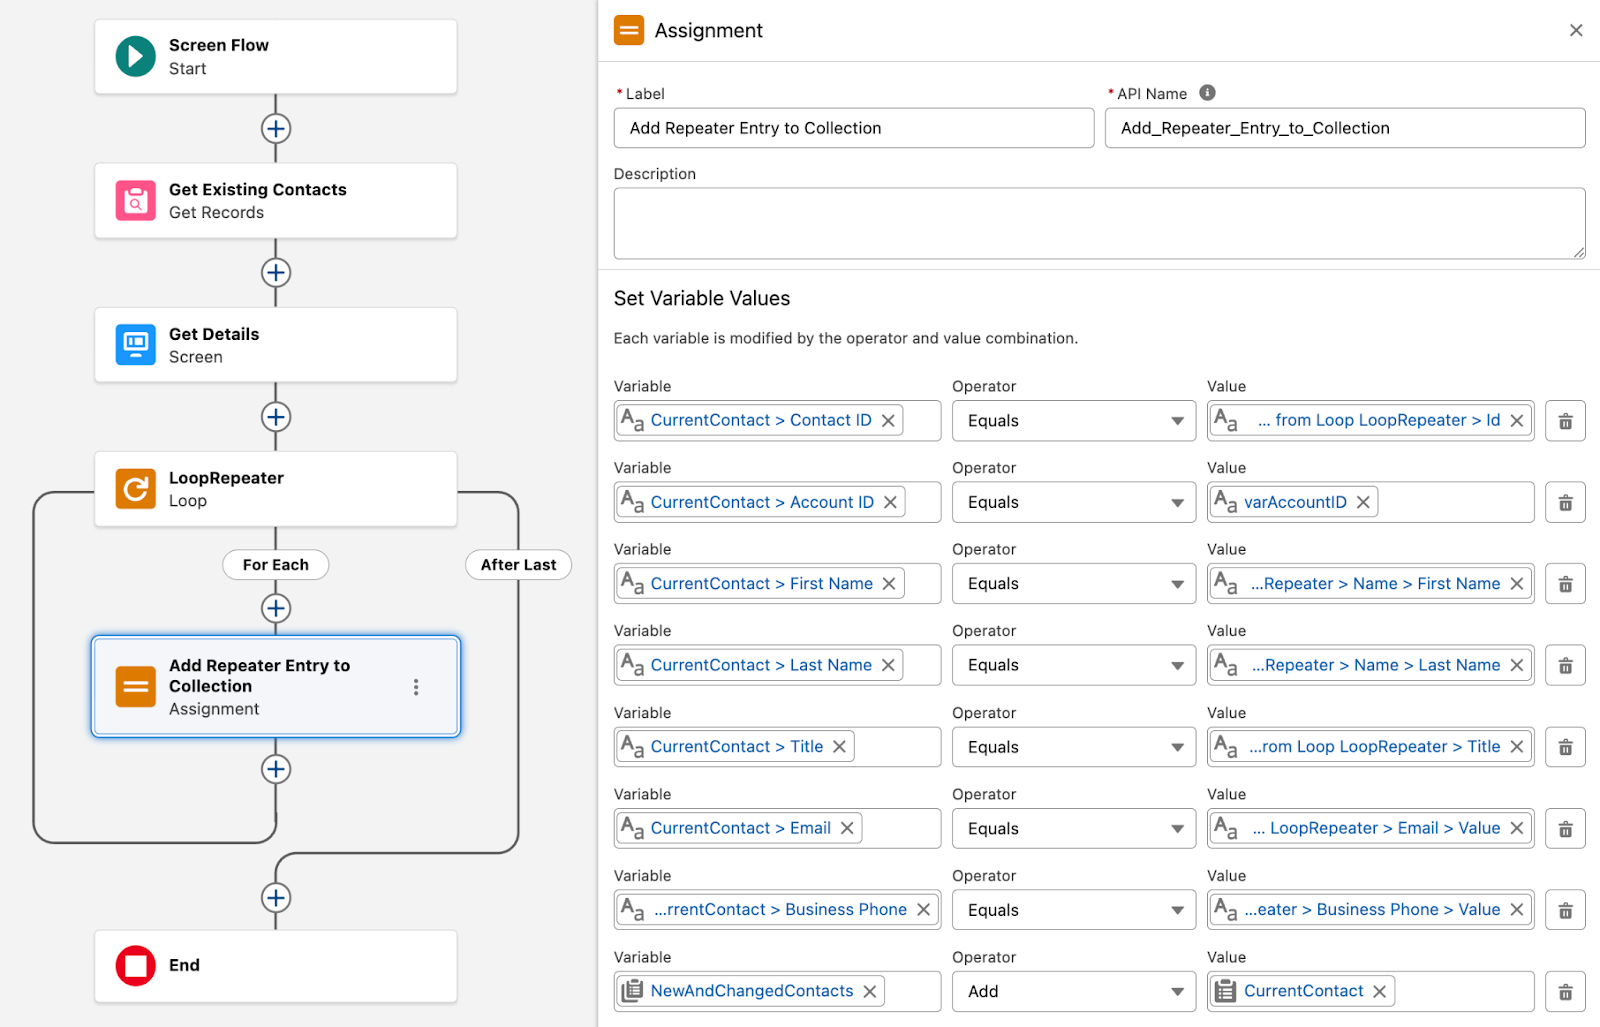
- On the For Each path, add an Assignment element.
- For Label, enter
Add Repeater Entry to Collection.
The API Name should auto-populate asAdd_Repeater_Entry_to_Collection.
- For Variable, select CurrentContact > Contact ID.
Even though there’s no ID field in the repeater, you must include the record’s ID in the records that go in the collection. Without the record’s ID, the flow doesn’t know which record in the repeater corresponds with which existing contact record. As a result, the flow creates a new record for each record in the repeater, even if that record already exists. (Duplicate data alert!)
- For Operator, select Equals.
- For Value, select Current Item from Loop LoopRepeater > Id.
- For Label, enter
- Click Add Assignment to add another assignment line.
- For Variable, select CurrentContact > Account ID.
- For Operator, select Equals.
- For Value, select recordId.
- For Variable, select CurrentContact > Account ID.
- Click Add Assignment to add another assignment line.
- For Variable, select CurrentContact > First Name.
- For Operator, select Equals.
- For Value, select Current Item from Loop LoopRepeater > Name > First Name.
- For Variable, select CurrentContact > First Name.
- Click Add Assignment to add another assignment line.
- For Variable, select CurrentContact > Last Name.
- For Operator, select Equals.
- For Value, select Current Item from Loop LoopRepeater > Name > Last Name.
- For Variable, select CurrentContact > Last Name.
- Click Add Assignment to add another assignment line.
- For Variable, select CurrentContact > Title.
- For Operator, select Equals.
- For Value, select Current Item from Loop LoopRepeater > Title.
- For Variable, select CurrentContact > Title.
- Click Add Assignment to add another assignment line.
- For Variable, select CurrentContact > Email.
- For Operator, select Equals.
- For Value, select Current Item from Loop LoopRepeater > Email > Value.
- For Variable, select CurrentContact > Email.
- Click Add Assignment to add another assignment line.
- For Variable, select CurrentContact > Business Phone.
- For Operator, select Equals.
- For Value, select Current Item from Loop LoopRepeater > Business Phone > Value.
- For Variable, select CurrentContact > Business Phone.
- Click Add Assignment one more time to add a final assignment line.
All of the lines before this line assembled a contact record in the CurrentContact record variable. This final line adds the contents of the CurrentContact record variable to the NewAndChangedContacts record collection variable.- For Variable, select NewAndChangedContacts.
- For Operator, select Add.
- For Value, select CurrentContact > Entire Resource.
- For Variable, select NewAndChangedContacts.
- Save the flow.
Upsert the New and Changed Contact Collection
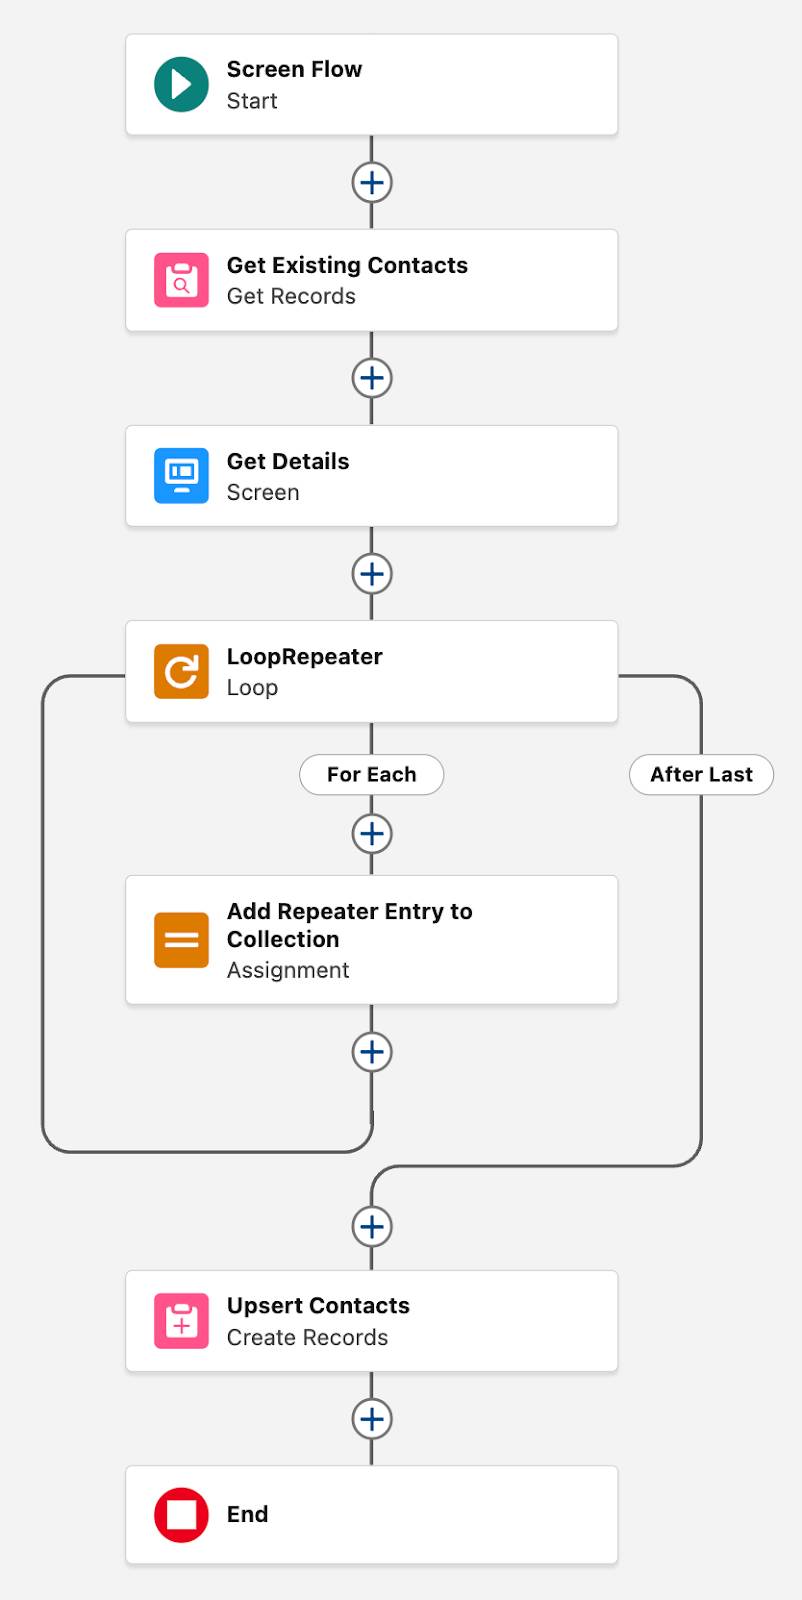
Finally, add a Create Records element after the loop to push the new and changed records to the database.
You may be thinking, “Wait a second, this collection contains new and changed records. Why am I only adding a Create Records element and not an Update Records element?” In this final Create Records element, you use a special feature to perform an upsert. An upsert is what it sounds like: a combination of an update and an insert. It’s a data statement that updates the records that already exist and creates the records that don’t already exist, all at the same time. As long as your collection’s records have a unique identifier field that Salesforce can look at and say, “Yup, that’s definitely the same record”, you can perform an upsert with a Create Records element.
- On the After Last path, add a Create Records element.
- For Label, enter
Upsert Contacts.
The API Name should auto-populate asUpsert_Contacts.
- For How to set record field values, select From a Record Variable.
- For How Many Records to Create, select Multiple.
- For Record Collection, select NewAndChangedContacts.
- For Label, enter
- Enable the Update Existing Records toggle.
This toggle enables the element’s upsert functionality.- Make sure “Field to use to identify existing records” is set to Record ID.
Remember, in the Assignment element, you included the Contact ID in the CurrentContact record variable. Because the upserting collection has the contact record’s ID, select the Record ID option here.
- Make sure “Field to use to identify existing records” is set to Record ID.
- Save the flow.
And that’s a complete flow! If you’d like, you can add this flow as a custom action button on an active account Lightning page, and test it out for yourself. Check out the Add a Flow as an Action on a Record unit in the Screen Flow Distribution badge for more information.
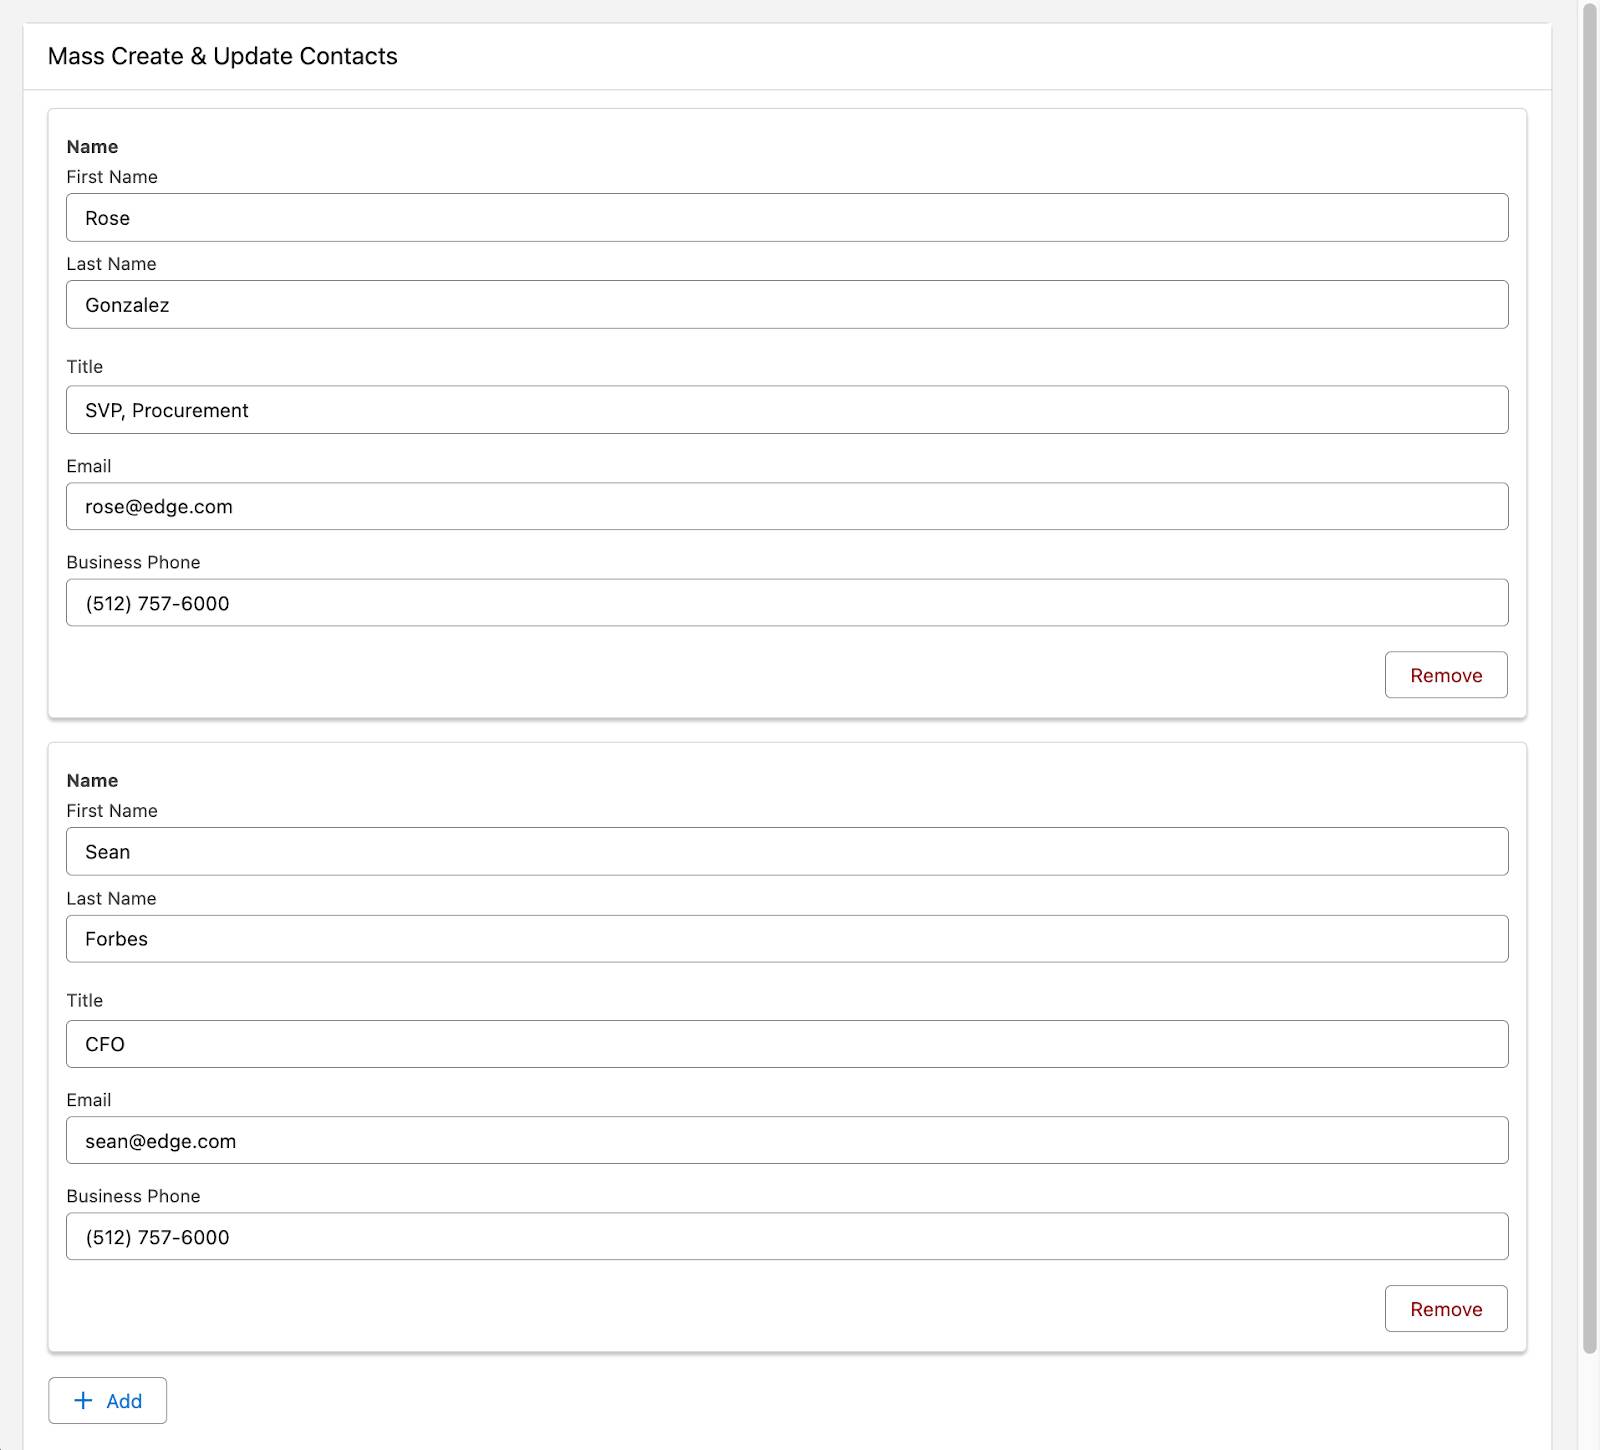
When you run the flow from an account, it displays any existing contacts for that account and allows you to enter details to create additional contacts.