Get Started with Product Catalog Management
Learning Objectives
After completing this unit, you’ll be able to:
- Explain the role and importance of product catalogs in Agentforce Revenue Management.
- Describe how Product Catalog Management helps organize and define product offerings.
- Identify key components of Product Catalog Management.
- Sign up for a special Developer Edition org for Agentforce Revenue Management.
Before You Start
Before you start this module, make sure you complete the following content. The work you do here builds on the concepts and work you do in that content.

A Product Catalog for the Digital Age
In running a business, you strive to make your products and services attractive and easily accessible to customers. Here’s where the product catalog comes into play. A modern product catalog is a structured, digital repository of detailed information about your company’s products or services, designed for easy search, navigation, and integration across business channels.
A well-designed product catalog can reshape how consumers discover, evaluate, and buy products. It can also transform how internal users, like sales teams, work with product information.
As you learned in the Quick Look module, Product Catalog Management is the part of Salesforce Agentforce Revenue Management that acts as the single source of truth for all product information. It gives you a powerful, centralized catalog solution for any type of business. With Product Catalog Management, you can:
- Accelerate and increase sales with personalized, browsable product offerings.
- Simplify complex catalog, product, and service management.
- Make sure that relevant products reach customers across all channels.
In this module, you learn how Product Catalog Management simplifies the design and maintenance of your product catalog.
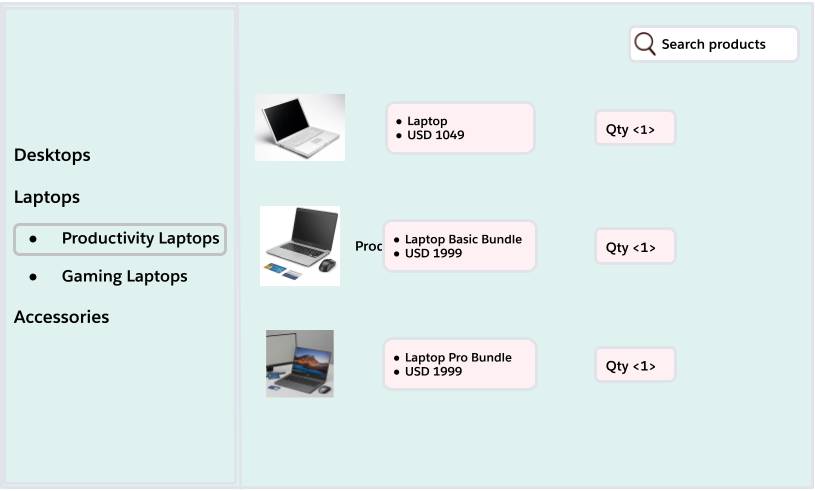
Meet the Product Catalog Management App
The Product Catalog Management app is where you manage all your products and services, which includes catalogs, product entities and relationships, categories, attributes, and business rules. The app gives business users a rich, intuitive, and easy-to-use interface. For instance, product designers can build and maintain your company’s product portfolio, while end users, like sales reps and customer service reps (CSRs) have a single source of truth for working with products.
The image shows the user interface of the Product Catalog Management app with a hardware catalog and product categories.

Using the app, teams can quickly find products and add them to quotes for customers.
A Logical Structure
Use Product Catalog Management to structure your catalog so that customers and business users can quickly find exactly what they’re looking for.
The diagram shows an example product-catalog structure with the main categories of Desktops, Laptops, and Accessories.
Logical groupings of categories and subcategories mean that both customers and internal business users can:
- Browse product categories and drill down to specific products instead of scrolling through hundreds of items.
- Perform a narrow search for and filtering of products to identify one or several similar products.
- Compare items side by side, such as in cross-selling and upselling scenarios.
Now, discover the building blocks for designing your catalog with Product Catalog Management. The main entities include products, bundles, product attributes, classifications, and categories.
Dynamic Product Attributes
In the Product Catalog Management: Quick Look, you learned that products have attributes or characteristics that describe them. In Product Catalog Management, you can create these attributes dynamically without the need for a Salesforce admin to do it for you.
The image shows a Mobile Phone product and its attributes: Color, Storage, Variant, and Operating System.
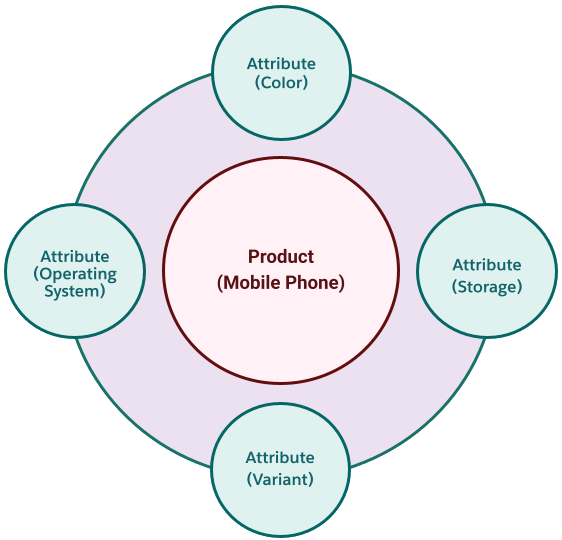
The product is defined by its various characteristics. Multiple products can share the same attributes, and you can also group related attributes.
Product Classifications
A product classification is a template with a set of specific attributes. Product designers use classifications to assign attributes to products. When you create a product from a classification, the product inherits all the attributes.
For example, the diagram shows a product classification called Mobile Phone, which has the attributes Storage, Color, and Display.

The products Mobile Phone A and Mobile Phone B inherit the attributes from the Mobile Phone classification, with specific values set for those attributes. In this way, product designers can quickly create many similar products without having to provide the same attribute information repeatedly. You can also override some attributes as needed.
Products and Bundles
A catalog can include simple products or product bundles. Simple products are standalone, while bundled products have a hierarchy of multiple items. With Product Catalog Management, you can create both types of products in the product catalog.
Product Categories
Organizing products into logical categories and subcategories is a foundational best practice when building a product catalog. In Product Catalog Management:
- Assign products to multiple categories or subcategories.
- Create multiple catalogs: Product Catalog for products and Service Catalog for services.
- Assign products and services.
Well-defined categories and subcategories make it easy for business users and customers to find the products they seek.
The Product-Catalog-Design Journey
The diagram shows the main stages in the process of designing and building a product catalog.

This flow is a bottom-up approach that starts with creating smaller product elements before moving on to the creation of actual products and bundles. The last stages involve defining the product categories and if needed, separate catalogs.
Using this method, you start by creating product features, like size, color, and data capacity. Then, you create product classifications, to which you assign individual products and bundles. Next, create the products themselves, and assign them to categories and subcategories for a logical structure. If you have many products and a broad range of product types, you can assign them to different catalogs.
You can complete the stages in a different order, depending on your workflow. For example, you can skip creating categories and subcategories.
Eager to get started with some hands-on practice? First, take a look at the home page of the Product Catalog Management app, your starting point. Click each button to learn more.
Now that you know the main parts of the home page, it’s time to explore a business scenario with a company called InfinitraBytes.
A Business Scenario
Manoj Wilson is a product designer at InfinitraBytes, a leading provider of electronic products and solutions.

Manoj and his team are on a mission to modernize the product-browsing experience. They’re moving away from outdated spreadsheets, where all product information is currently held, to the Product Catalog Management solution.
In this module, you work alongside Manoj to create products, product attributes, and the required categories and subcategories to design the InfinitraBytes product catalog.
Sign Up for a Developer Edition Org with Agentforce Revenue Management
To complete this module, you need a special Developer Edition org that contains Agentforce Revenue Management and our sample data. Get the free Developer Edition and connect it to Trailhead now so you can complete the challenges in this module. Note that this Developer Edition is designed to work with the challenges in this badge, and may not work for other badges. Always check that you’re using the Trailhead Playground or the special Developer Edition org that we recommend.
- Sign up for a free Agentforce Revenue Management Developer Edition org.
- Fill out the form.
- For Email, enter an active email address.
- For Username, enter a username that looks like an email address and is unique, but it doesn’t need to be a valid email account (for example, yourname@example.com).
- After you fill out the form, click Sign me up. A confirmation message appears.
- When you receive the activation email (this might take a few minutes), open it and click Verify Account.
- Complete your registration by setting your password and answering the challenge question. Tip: Save your username, password, and login URL in a secure place—such as a password manager—for easy access later.
- You’re logged in to your Developer Edition org.
Enable Pricing
Now that you have your org, you must take a few more steps to make sure it’s ready to use.
- From Setup, in the Quick Find box, search for and select Salesforce Pricing Setup.
- In the Sync Pricing Data section, click Sync.

- Confirm that you want to sync your org.
The sync might take a few minutes to complete, but you don’t have to wait. Move on to the next set of steps.
Rebuild the Index
Rebuild the index so that the required runtime systems have access to up-to-date product data.
- From the App Launcher, find and select Product Catalog Management.

- On the Product Catalog Management home page, click the Index and Search Configuration tile.
- Click Rebuild Index, select Full Index Rebuild, and click Rebuild. This generates the full index.
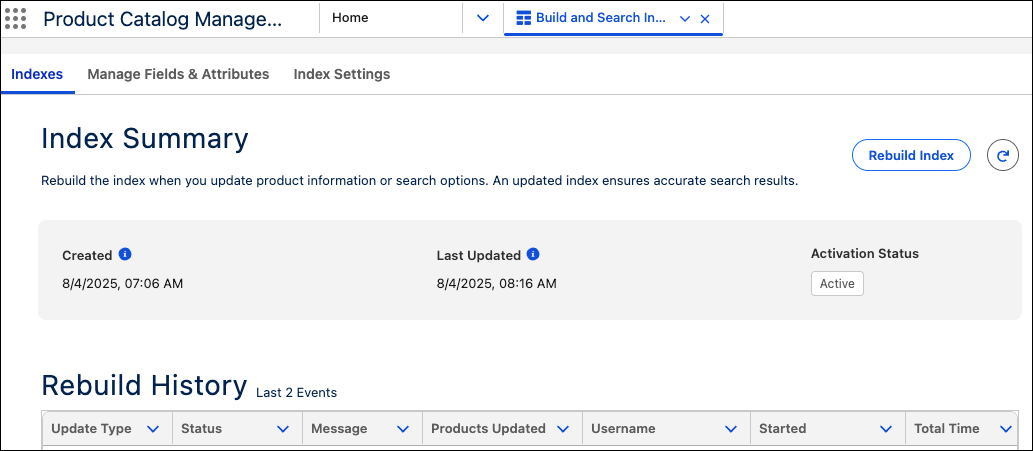
- Wait for the index rebuild to complete before starting the next set of steps.
To check whether the rebuild has finished, refresh the page every so often. The Rebuild History shows a status of Completed once finished. In the meantime, feel free to review the unit content, so you’re ready for the upcoming quiz.
Refresh the Decision Tables
Next, refresh the Product Qualification and Product Disqualification decision tables in your org.
- From Setup, in the Quick Find box, search for and select Decision Tables.
- From the list of decision tables, click Product Disqualification.
- Click the Refresh button.

- Similarly, refresh the Product Qualification decision table.
You’re all set to start using your Developer Edition org.
In this unit, you learned the importance of having a well-organized catalog for supporting business operations and the user experience. A well-structured catalog is your silent salesperson—guiding users, simplifying decisions, and increasing the chances of a sale. In the next unit, you get hands on with your Developer Edition org.