Update and Retrieve Multiple Records
Learning Objectives
After completing this unit, you’ll be able to:
- Update multiple records in a record-triggered flow using the Update Related Records menu option.
- Apply best practices for using collection variables.
- Create a collection variable using a Get Records element.

If you’ve completed the Trailhead badges in the Build Flows with Flow Builder trail, most of the scenarios you’ve completed involve creating or updating one record at a time. But many of Flow Builder’s elements are designed to work with multiple records as well. For example, if you want to create multiple cases or update multiple tasks, it’s usually best to use multirecord features. With multirecord features, you can create just one element that processes all the records instead of one element for each record.
Ready to Get Hands-on with Flows?
Create a new Trailhead Playground now to follow along and try out the steps in this module. Scroll to the bottom of this page, click the playground name, and then select Create Playground. It typically takes 3–4 minutes for Salesforce to create your Trailhead Playground. You also use the playground when it's time to complete the hands-on challenges.
Note: Yes, we really mean a brand-new Trailhead playground! If you use an existing org or playground, you can run into problems completing the challenges.
Next, follow the instructions here to launch a playground and install the package. You also use this package and playground when it’s time to complete the hands-on challenge.
Launch your Trailhead Playground by scrolling to the bottom of this page and clicking Launch.
- Click the Install a Package tab.

- Paste
04tKa000002f0NXIAYinto the Package ID field.
- Click Install.
- Select Install for Admins Only, then click Install.
When the app is finished installing, you see a confirmation page and get an email to the address associated with your playground.
Flowtastic! Now let’s start updating multiple records.
Update Multiple Records from a Triggered Record Change
Let’s start with an example based on a simple, common use case. Like all businesses, Pyroclastic, Inc. sometimes loses customers. Those former customers often have open cases with open tasks. When a retention opportunity is lost, the Support team wants to automatically defer all case tasks related to the account. Not only can you create a flow to close those cases, you can do it with just one element.
Because the automation should fire when an opportunity with specific criteria is lost, you need a record-triggered flow. Use an Update Records element to update all the open cases related to that opportunity. Make sure to add a filter condition so that the flow updates only open cases. You don’t need to close cases that are already closed. And if the account has been around for a while, the account might have many old, closed cases that can slow down the update or exceed governor limits.
When you create the Update Records element, select the Update Related Records menu option to create an element that’s automatically configured to update records related to the triggering record.
- Create a record-triggered flow:
- For Object, select Opportunity.
- For Trigger the Flow When, select A record is updated.
- In the Set Entry Conditions section:
- For Condition Requirements, select All Conditions Are Met (AND).
- For Field, select Name.
- For Operator, select Contains.
- For Value, enter
Retention.
- Click Add Condition.
- For the second Field, select Stage.
- For the second Operator, select Equals.
- For the second Value, select Closed Lost.
- For Condition Requirements, select All Conditions Are Met (AND).
- For When to Run the Flow for Updated Records, select Only when a record is updated to meet the condition requirements.
- For Object, select Opportunity.
- On the canvas, click
 .
.
- Select Update Related Records.
This option creates an Update Records element with the “Update records related to the opportunity record that triggered the flow” option preselected.- For Label, enter
Close Cases.
The API Name should auto-populate asClose_Cases.
- For How to Find Records to Update and Set Their Values, verify that Update records related to the opportunity record that triggered the flow is selected.
- For Records Related to Opportunity, select Triggering Opportunity, then Account ID, then Cases.
This selection finds the account related to the opportunity that triggered the flow, and selects all the cases related to that account.
- In the Set Filter Conditions section:
- For Condition Requirements to Update Record, select All Conditions Are Met (AND).
- For Field, select Status.
- For Operator, select Does Not Equal.
- For Value, select Closed.
- For Condition Requirements to Update Record, select All Conditions Are Met (AND).
- In the Set Field Values for the Case Records section:
- For Field, select Status.
- For Value, select Closed.
- For Field, select Status.
- For Label, enter
- Save the flow.
- For Flow Label, enter
Close Account's Cases from Retention Opp Lost.
The Flow API Name should auto-populate.
- For Flow Label, enter
That’s all, flow-lks! With just one element, your flow can update lots and lots of cases.

But that’s a simple record-triggered scenario. For many flows, you need to build something more complex.
Retrieve Multiple Records
To retrieve and store multiple records in one variable, you use the element that retrieves a single record but configure it differently.
As you know, the Get Records element retrieves a single record and stores it in a record variable. Well, you can also configure a Get Records element to retrieve multiple records and store all of them in a collection variable.
What Is a Collection Variable?
Collection variables are variables that can hold multiple text strings, numbers, dates, and more, as long as the values are all of the same data type. For example, a collection variable with a Number data type can’t store dates or alphanumeric text. It can, however, store lots and lots of numbers. Collection variables can also hold multiple records, including all of the fields in those records.
Why would you use a collection variable? You use collection variables to store related information that the flow processes in the same way, such as a group of records to evaluate and update, a collection of product descriptions to display to your salespeople, or a handful of email addresses to receive the same notice.
Create a Collection Variable with a Get Records Element
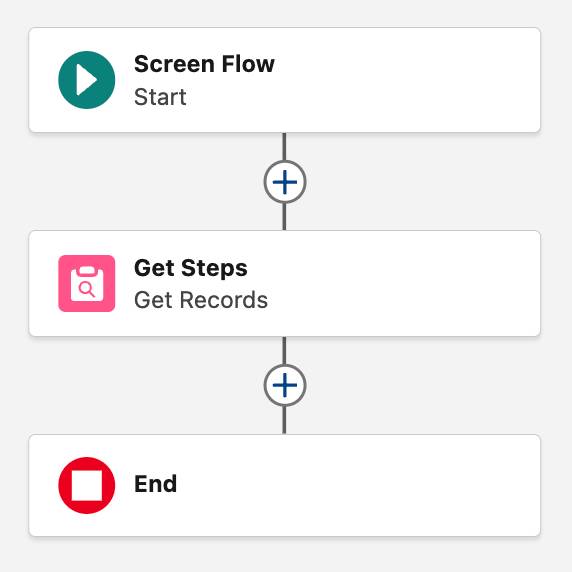
Let’s take a look at a scenario that uses a collection variable. Pyroclastic uses two custom objects, Onboarding Project and Onboarding Project Step, to track its new customer onboarding process. An onboarding project contains multiple onboarding project steps, and typically one Pyroclastic team member works on multiple steps at once. The Enablement team has requested a tool that can update the status of multiple steps at once. Let’s create a screen flow that asks a user to select multiple steps from one project, and set a new Status value for all of them.
- Create a screen flow.
- Create a variable to receive the project’s ID.
- For API Name, enter
recordId.
- For Data Type, select Text.
- For Availability Outside the Flow, select Available for input.
- For API Name, enter
- On the canvas, click
 and select Get Records.
- For Label, enter
Get Steps.
The API Name should auto-populate asGet_Steps.
- For Object, select Onboarding Project Step.
- For Condition Requirements, select All Conditions Are Met (AND).
- For Field, select Onboarding Project.
- For Operator, select Equals.
- For Value, select recordId.
- For How Many Records to Store, select All records.
- For How to Store Record Data, make sure Automatically store all fields is selected.
- For Label, enter
- Save the flow.
- For Flow Label, enter
Choose Steps to Update.
The Flow API Name should auto-populate asChoose_Steps_to_Update.
- Click Save.
- For Flow Label, enter
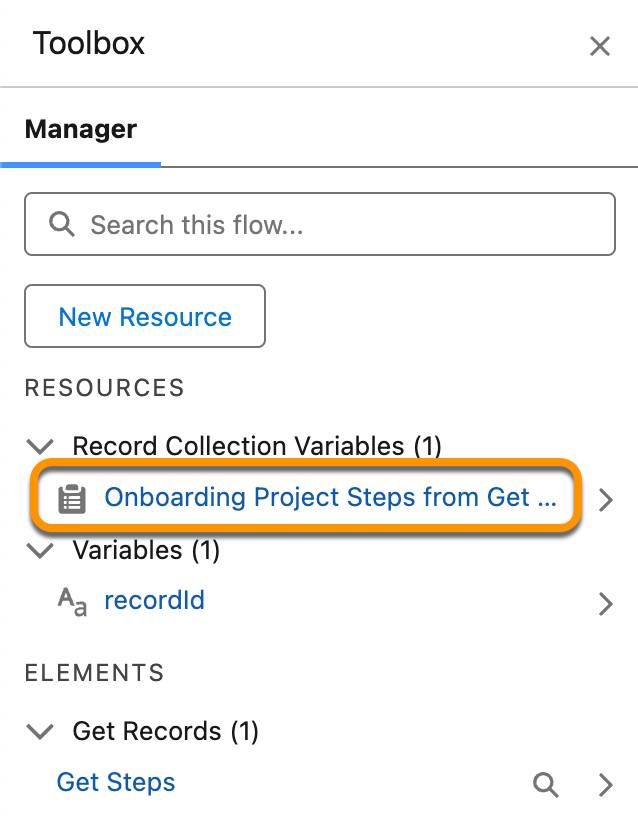
When you select All records and Automatically store all fields, the Get Records element stores every field from all the filtered records in a single collection variable. Don’t worry, all the data is kept neat and tidy, with each record maintaining its field structure and its ID. You can see the collection variable from the newly created Get Records element by clicking  and finding the Record Collection Variables section in the Resources list. It’s labeled Onboarding Project Steps from Get Steps, because it contains Onboarding Project Step records retrieved by the Get Steps element.
You continue building this flow in the next unit.