Work with Salesforce Data
Learning Objectives
After completing this unit, you’ll be able to:
- Appreciate the importance of choosing the best way to work with Salesforce data, based on a specific use case.
- Describe how Lightning Data Service compares to standard controllers in Visualforce.
- Explain how using Apex in Lightning web components is different from using Apex in Visualforce.
Data Access in Visualforce vs Lightning Web Components
As a Visualforce developer, you’re familiar with using standard controllers and binding Apex controller methods in your page to work with Salesforce data. In Lightning Web Components, your JavaScript code interacts with either the Lightning Data Service (LDS), or Apex code.
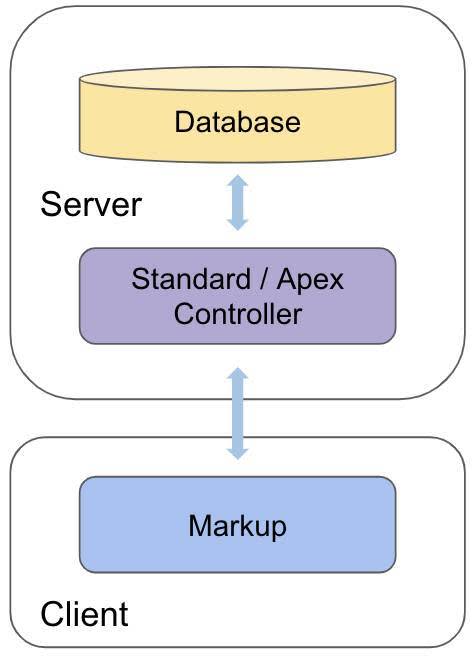
Traditional Visualforce Data Access |
Lightning Web Components Data Access |
|---|---|
|
|
Visualforce pages that retrieve or modify data use a standard controller or an Apex controller. Traditionally, the client invokes controller methods when the page loads or as actions. After a method runs, the Visualforce engine generates the final markup and sends it to the client. |
Lightning web components that retrieve or modify data use Lightning Data Service or Apex methods. The client uses JavaScript to call Lightning Data Service or an Apex method. After Lightning Data Service or an Apex method runs, the Lightning Web Components engine returns the minimal needed data to the client. JavaScript on the client processes the data and generates the final markup. |

Lightning Data Service vs StandardController
Lightning Data Service is the preferred (and easiest) way to work with Salesforce data in Lightning web components. Lightning Data Service is a similar concept to a Visualforce standard controller. Use Lightning Data Service in JavaScript to read, create, or modify single records, or to read some metadata, without writing Apex code. Lightning Data Service provides advanced capabilities such as caching and synchronization among components.

Apex in Visualforce vs Apex in Lightning Web Components
Lightning Data Service doesn’t meet the requirements of all use cases. For example, when you want to customize a single-record data transaction, or perform multi-record operations on a single transaction, you need Apex. Before you use Apex with Lightning web components, be aware that using Apex in a Lightning web component is different from using Apex in Visualforce. The main differences are:
- Methods are stateless.
- Methods must be
@AuraEnabled, and can be marked as cacheable.
- You import Apex methods and then call them.
- You bind components to record pages in a metadata xml file, and access the record Id in the JavaScript file.
- Proper error handling involves throwing exceptions, instead of using page messages.
Let’s explore these differences further.
View State vs Stateless Methods
Visualforce uses the view state to maintain state between server requests. The view state recreates the page and passes the state to different pages in wizards and guided workflows. In Lightning web components, server requests are stateless. This has important implications for how you write Apex calls. Every time you make an Apex call, you must pass all the information that the method needs, and the method must return all the information that the component needs. Additionally, to call an Apex method from a Lightning web component, the method must be annotated with @AuraEnabled.
Let’s examine a Visualforce Apex controller.
AccountListControllerVisualforce.cls
public with sharing class AccountListControllerVisualforce {
    public List<Account> accounts { get; private set; }
    public Integer numberOfEmployees { get; set; }
    public void queryAccounts() {
        // In real world, probably more complex logic here
        this.accounts = [
            SELECT Name
            FROM Account
            WHERE NumberOfEmployees = :numberOfEmployees
        ];
    }
}
Code highlights:
- Lines 2–3: The
accountsandnumberOfEmployeesproperties are defined as instance variables, and they are part of the controller view state.
- Lines 6–9: The
queryAccountsmethod stores a list of Accounts filtered bynumberOfEmployeesin theaccountsvariable, which we can reference in the Visualforce page.
Here’s how to transform that AccountListController for Visualforce into a controller for a Lightning web component.
- Annotate the Apex methods with
@AuraEnabled, with or without thecacheableattribute. (By default, data is not cacheable in the client.)
- Ensure that methods are stateless by making them
staticand independent of all instance variables and properties.
- Pass everything that a method requires as parameters.
- Make sure each method returns everything the component needs.
Here's the controller as adapted for use by a Lightning web component.
AccountListControllerLwc.cls
public with sharing class AccountListControllerLwc {
    @AuraEnabled(cacheable=true)
    public static List<Account> queryAccounts(Integer numberOfEmployees) {
        return [ // Return whatever the component needs
            SELECT Name
            FROM Account
            WHERE NumberOfEmployees >= :numberOfEmployees
        ];
    }
}
Code highlights:
- Line 2: We annotate the
queryAccountsmethod with@AuraEnabled, and we set itscacheableattribute to true.
- Line 3: We make the
queryAccountsmethodstatic, and definenumberOfEmployeesas an Integer parameter.
- Lines 4–8: The
queryAccountsmethod returns the filtered list of accounts.
Calling Apex in Visualforce vs Lightning Web Components
In Visualforce, to reference an Apex method in the component markup, you bind an Apex controller to the Visualforce page by specifying it as an attribute in the <apex:page> tag. In Lightning Web Components, instead of binding the controller and referencing the Apex methods in the page, we import the methods into the JavaScript file and then invoke the methods in JavaScript.
import queryAccounts from '@salesforce/apex/AccountListControllerLwc.queryAccounts';
There are two ways to interact with Apex methods from Lightning web components: Either wire the method or call the method imperatively. Wiring a method delegates control to the Lightning Web Components engine and creates a reactive service. Calling Apex imperatively results in a one-time invocation. Exactly when and how to use each option is beyond the scope of this module. To learn more, see the Lightning Web Components and Salesforce Data module.
Accessing a Record Id in Visualforce vs Lightning Web Components
In Visualforce, accessing a record Id within an Apex controller is pretty simple. Using a standard controller, you retrieve the record Id from the ApexPages.StandardController object.
For instance, consider this Apex controller, which shows contacts related to an account by extending a page that uses the Account standard controller.
AccountControllerVisualforce.cls
public with sharing class AccountControllerVisualforce {
    public List<Contact> contacts { get; private set; }
    private ApexPages.StandardController standardController;
    public AccountControllerVisualforce(ApexPages.StandardController standardController) {
        this.standardController = standardController;
        this.contacts = new List<Contact>();
    }
    public void queryRelatedContacts() {
        this.contacts = [
            SELECT Name, Title, Email, Phone
            FROM Contact
            WHERE AccountId = :standardController.getId() // (2)
        ];
   }
}
Code highlights:
- Line 4: We receive a
standardControllerobject into the constructor, because the page uses the Account standard controller.
- Line 12: To get the
Idof the Account record that the page refers to, we call thegetIdmethod on thestandardControllerobject. This way, we can query the contacts for the related Account record, filtering for itsId.
In Lightning web components, accessing a record Id in Apex is a little less straightforward. To access a record Id:
- Expose the component so that it’s available on record pages.
- In JavaScript, declare
recordIdas a public property. The parent component (the record Flexipage) populates the value of therecordIdproperty.
- Pass the
recordIdas a parameter in Apex method calls.
Let’s review an example.
accountDetails.js-meta.xml
<?xml version="1.0" encoding="UTF-8" ?>
<LightningComponentBundle xmlns="http://soap.sforce.com/2006/04/metadata">
    <apiVersion>48.0</apiVersion>
    <isExposed>true</isExposed>
    <targets>
        <target>lightning__RecordPage</target>
    </targets>
</LightningComponentBundle>
accountDetails.js
import { LightningElement, wire, api } from 'lwc';
import queryRelatedContacts from '@salesforce/apex/AccountControllerLwc.queryRelatedContacts';
export default class AccountInfo extends LightningElement {
    @api recordId;
    @wire(queryRelatedContacts, { accountId: '$recordId' })
    contacts;
}
AccountControllerLwc.cls
public with sharing class AccountControllerLwc {
    @AuraEnabled(cacheable=true)
    public static List<Contact> queryRelatedContacts(Id accountId) {
        return [
            SELECT Name, Title, Email, Phone
            FROM Contact
            WHERE AccountId = :accountId
        ];
    }
}
Code highlights:
accountDetails.js-meta.xml
- Lines 4–7: We set
isExposedto true and addlightning__RecordPageas a target for the component, making the component available on record pages.
accountDetails.js
- Line 4: We declare the
recordIdproperty and make it public by decorating it with@api. The Flexipage populates therecordIdproperty.
- Lines 5–6: We pass the
recordIdproperty as an argument to thequeryRelatedContactsApex method’saccountIdparameter. (In this case we’ve used@wire, but we could have called Apex imperatively.) The result is stored in thecontactsproperty.
AccountControllerLwc.cls
- Line 3: The
queryRelatedContactsApex method receives theaccountIdas an argument. Remember, the method is stateless.
- Lines 4-8: The
queryRelatedContactsmethod usesaccountIdto return the Account’s Contacts.
Server Errors in Visualforce vs Lightning Web Components
In Visualforce, you use tags such as <apex:pageMessages> and <apex:pageMessage> to show errors in different ways on a Visualforce page. For these tags to work well, you must handle exceptions in the Apex controller and add Messages to the page, like this:
try {
    // Perform logic that may throw an exception.
} catch (Exception e) {
    ApexPages.addMessages(e);
}
In Lightning web components, we handle exceptions in the JavaScript file. As a developer, you decide whether to let exceptions propagate or to gain more control over what’s shown to the user by throwing an AuraHandledException or a custom exception. Throw a custom exception like this:
try {
    // Perform logic that may throw an exception.
} catch (Exception e) {
    throw new MyCustomException('Records could not be retrieved at this time. Try again later');
}
Handling server errors is covered in more detail in the Lightning Web Components and Salesforce Data module.
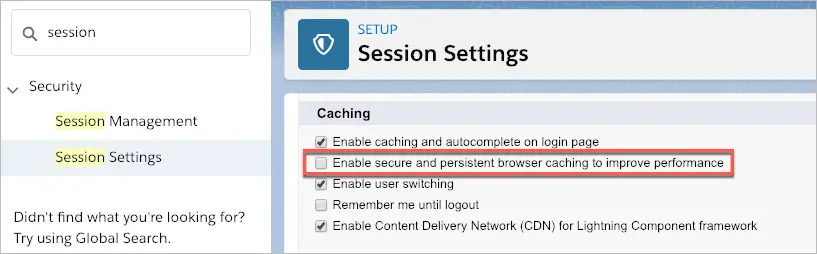
Disable Lightning Component Caching
Lightning Experience uses secure data caching in the browser to improve page performance by avoiding additional round trips to the server. While this is helpful and recommended in production environments, disable caching during development to see the effect of any code changes without needing to empty the cache or wait for the cache to expire.
- From Setup, enter session in the Quick Find box, then click Session Settings.
- Deselect the checkbox: Enable secure and persistent browser caching to improve performance.
- Click Save.
Invoke Apex to Retrieve Filtered Records
In the accountSearch component that you created, let’s retrieve a list of accounts filtered by the number of employees provided.
- Create an AccountListControllerLwc Apex class:
- In the Visual Studio Code command palette, select (or enter) SFDX: Create Apex Class and then press Enter.
- For the filename, enter
AccountListControllerLwcand then press Enter.
- Accept the default location (classes), and then press Enter.
- Add this method to your AccountListControllerLwc class:
@AuraEnabled(cacheable=true) public static List<Account> queryAccountsByEmployeeNumber(Integer numberOfEmployees) { return [ SELECT Name FROM Account WHERE NumberOfEmployees >= :numberOfEmployees ]; } - Save the AccountListControllerLwc class.
- In your accountSearch.js file, import the
wiredecorator and thequeryAccountsByEmployeeNumberApex method by replacing the first line of code with this code:
import { LightningElement, wire } from 'lwc'; import queryAccountsByEmployeeNumber from '@salesforce/apex/AccountListControllerLwc.queryAccountsByEmployeeNumber'; - Finally, after the
resetmethod, add this code:
@wire(queryAccountsByEmployeeNumber, { numberOfEmployees: '$numberOfEmployees' }) accounts; - Save the accountSearch.js file.
- In the accountSearch.html file, after
</lightning-button>, add this code:
<template lwc:if={accounts.data}> <template for:each={accounts.data} for:item="account"> <p key={account.Id}>{account.Name}</p> </template> </template> - Save the accountSearch.html file.
- Deploy the AccountListControllerLwc class file to your Trailhead Playground: Right-click the classes folder and select SFDX: Deploy Source to Org.
- Deploy the accountSearch component files to your Trailhead Playground: Right-click the accountSearch folder and select SFDX: Deploy Source to Org.
- If your Trailhead Playground isn’t already open, open it. (In the command palette, select (or enter) SFDX: Open Default Org.)
- Navigate to the LWC Visualforce Devs page and test your component by entering a value in the Number of Employees field. The list of accounts should be updated when you change the Number of Employees.
You just accessed data from the Salesforce org in a Lightning web component. Well done! Now try one on your own by completing the hands-on challenge.
Resources
- Lightning Web Components Developer Guide: Lightning Data Service
- Lightning Web Components Developer Guide: Work with Records Using Base Components
- Lightning Web Components Developer Guide: Use the Wire Service to Get Data
- Lightning Web Components Developer Guide: Call Apex Methods
- Lightning Web Components Developer Guide: Handle Errors in Lightning Data Service
- Salesforce Blog: Caching and Synchronizing Component Data with Lightning Data Service