Build the Orchestration
Learning Objectives
After completing this unit, you’ll be able to:
- Build a simple orchestration using Flow Orchestration.
- Assign flows to a step.
- Assemble steps to create a stage.
Follow Along with Trail Together
Want to follow along with an expert as you work through this step? Take a look at this video, part of the Trail Together series.
(This clip starts at the 41:56 minute mark, in case you want to rewind and watch the beginning of the step again.)
Let’s Build the Orchestration
All our flows are built. We’ve identified our steps and stages. Now it’s time to put our orchestration together!
- From Setup, enter
Flowsin the Quick Find box, then select Flows.
- Click New Flow.
- In the New Automation window, in the Search automations field, enter
orch.
- Select Record-Triggered Orchestration.
We chose this option because we want the orchestration to start when a Position record is created.
From the canvas, you will automatically be in edit mode for the Start element.
- For Object, select Position.
- For Trigger the Orchestration When, select A record is created.
- For Condition Requirements, select All Conditions Are Met (AND).
- For Field, select Status.
- For Operator, select Equals.
- For Value, select New.

- Click Save.
- For Orchestration Label, enter
Recruiting Orchestration - Exercise.
- For Description, enter
Candidate recruiting process from initial screening to offer of employment. - Click Save.
Add a Stage
Next, we add our first stage, Recruiter Screening.
- On the path after the Start element, click
 .
.

- Click Stage.
- For Label, enter
Recruiter Screening.
The API Name is automatically updated toRecruiter_Screening.
- For Description, enter
Recruiter screening including entering the job application, scheduling and conducting the recruiter phone screen. - For Select When to Complete the Stage, select When all steps have been marked Complete, the stage is marked Completed.

- Click Save and then click the X in the upper right corner to close the Edit window for the stage.

Add the First Step to the Stage
Now that we have our stage, it’s time to add our steps. In the previous unit, we identified three steps for this stage.
- Enter the job application
- Schedule the phone screen
- Conduct the phone screen
- In the Stage element, click Add Step.
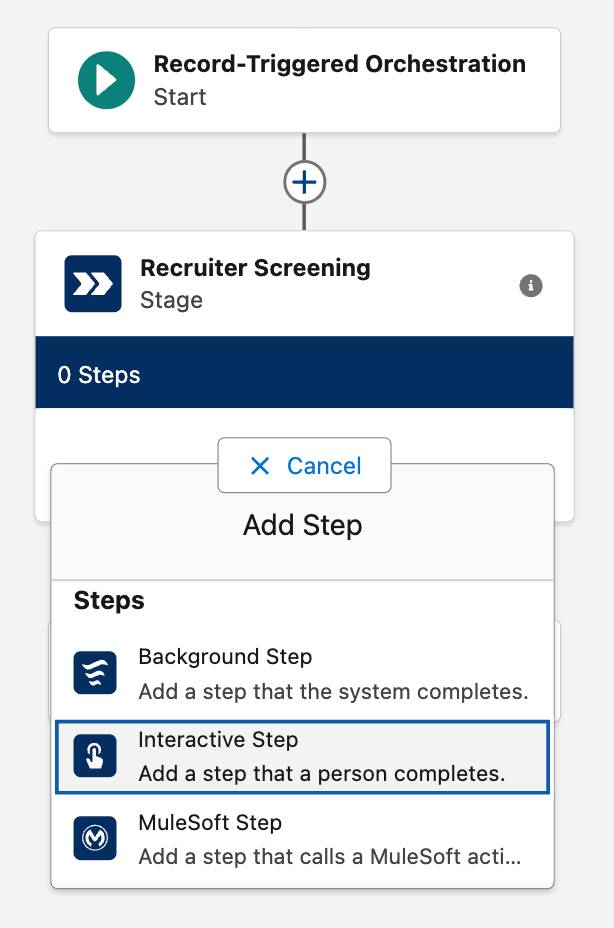
- Click Interactive Step.
- For Label, enter
Create a job application.
The API Name is automatically updated toCreate_a_job_application.
- For Description, enter
Screen flow to create a job application. - For Select When to Start the Step, select When the stage starts, the step starts.

- For Select an Action to Run, click in the Action field and select the Enter Job Application flow.
- For Set Input Values, click in varPositionId and select Triggering Position__c > Record ID.
Use values from earlier in the flow to set the input variables for the referenced flow. Here we’re retrieving the Position ID for the job application we're creating.
- In the Select Someone to Complete the Action section, click the Assignee Type field and select Resource.
The Resource setting allows you to specify a field, variable, formula, or other resource that contains a user’s username.
- Click the Resource field and select Triggering Position__c > Owner ID (User) > Username.
The orchestration assigns the appropriate work item to the triggering position’s owner immediately after the record is created. Avoid hard-coding user names (in other words, typing a specific username directly into a field) in any automation.
- In the Select Where to Complete the Action section, click the Related Record ID field and select Triggering Position__c > Record ID.
We use this setting to link the specified record page to all assigned users. Work is completed in the Orchestration Work Guide component on the specified record page.
- For Select When to Complete the Action, select When the assigned user has completed the action, the step is marked Completed.

- Click the X in the upper right corner to close the edit mode for this step.
Add the Second Step to the Stage
- Click Add Step.
- Select Background Step.
- For Label, enter
Notify candidate.
The API Name is automatically updated toNotify_candidate.
- For Description, enter
Notify candidate of screen. - For Select When to Start the Step, select When another step is marked Complete, the step starts.
- For Step Name, select Create a job application.
- In the Select an Action to Run section, click the Action field and select the Interview Email Notification flow.
- Under Set Input Values, click in varCandidateId and select Recruiter Screening > Create a job application > Outputs > varCandidateId.
This uses a variable from a previous step (Create a job application) as an input for the current step (Notify candidate) to link the job with the phone screen.
- Click the X in the upper right corner to close the edit mode for this step.
Add the Third Step to the Stage
- Click Add Step.
- Select Interactive Step. This step is going to ensure that the screen flow shows up in the work guide for the Recruiter.
- For Label, enter
Recruiter phone screen.
The API Name is automatically updated toRecruiter_phone_screen.
- For Description, enter
Screen flow to screen candidate. - For Select When to Start the Step, click the Condition field and select When another step is marked Complete, the step starts.
- For Step Name, select Notify candidate.

- In the Select an Action to Run section, click the Action field and select the Interview Screen flow.
- Under Set Input Values, click the jobApplicationId field and select Recruiter Screening > Create a job application > Outputs > varJobApplicationId.

- In the Select Someone to Complete the Action section, click the Assignee Type field and select Resource.
- Click the Resource field and select Triggering Position__c > Owner ID (User) > Username.
- In the Select Where to Complete the Action section, click the Related Record Id field and select Triggering Position__c > Record ID.
- In the Select When to Complete the Step section, click the Condition field and select When the assigned user has completed the action, the step is marked Completed.

- Click the X in the upper right corner to close the edit mode for this step.
The Recruiter Screening stage is complete!

Add a Decision
Now it’s time to add the decision. This element performs the equivalent of an if-then statement. IF something is true, THEN take action; otherwise check if something ELSE is true. So, IF the candidate’s score is under 3, THEN they will not proceed in the hiring process. IF the score was greater than or equal to 3, THEN the candidate will be scheduled for an interview with the hiring manager.
- Between the Recruiter Screening stage and the End element, click
 .
.
- Click Decision.

- For Label, enter
Go to next round.
The API Name is automatically updated toGo_to_next_round.
- For Description, enter
Will the candidate advance to the next round. - Under OUTCOME DETAILS, for Label, enter
Yes.
The API Name is automatically updated toYes.
- For Condition Requirements to Execute Outcome, select All Conditions Are Met (AND).
- Click in Resource and select Recruiter Screening > Recruiter phone screen > Outputs > varReviewScore.
- For Operator, select Greater Than or Equal.
- For Value, enter
3.
The candidate will advance if their score is greater than or equal to 3.
- Under OUTCOME ORDER, click Default Outcome.
- For Label, enter
No.
- Click the X in the upper right corner to close the edit mode for this step.
- Click Save. You may see warnings that pop-up, you can close these for now.
- Click Activate.
This button makes the orchestration available to the Work Guide component, which you configure in the next unit.

Completed Orchestration
Great job so far! There’s a lot more to do in order to have a complete working orchestration. We’ve already done that work for you in the orchestration called Recruiting Orchestration.
But before you dive into the hands-on challenge, let’s look at that additional work. After creating the decision, we added two additional stages: Hiring Manager Interview and Candidate Rejected. The Decision element determines which stage is executed.

Hiring Manager Interview Stage (1)
This stage contains two steps. The candidate advances to the hiring manager interview if their overall score from the initial screening is greater than or equal to 3 out of 5. An interview is then scheduled with the Hiring manager (Notify candidate of hiring manager interview Background Step). Now it's up to the hiring manager to conduct the final interview (Hiring Manager review Interactive Step). They also use a screen flow to give their feedback.
Decision (2)
When the rating is submitted, the decision (Make offer) checks if the manager wants to recommend this candidate for hire.
Candidate rejected Stage (3)
This stage contains only one step. If the candidate is rejected, a background step (Thank you for your interest Background Step) runs to create an automated email. The candidate is informed that their application won’t advance in the hiring process.

Activate the Orchestration
You can have multiple versions of an orchestration in Salesforce, but only one version can be active at a time. So if you’ve made changes to your orchestration, follow these steps.
- Click Save As New Version.
- Click Save.
- Click Activate on the button bar.
The Activate button activates the current version and automatically deactivates any previous version that’s already activated.
Resources
- Salesforce Help: Deploy an Orchestration
- Salesforce Help: Flow Orchestration Resource: Global Variables