Crear un agente empleado

Es el momento de crear un agente y ver el aspecto que tiene y cómo funciona en la aplicación. A la hora de configurar agentes en un entorno, puede empezar con un solo agente o crear todos los que necesite.
Crear un agente general
El primer agente que su empresa le pide crear es uno que interactúe con los empleados en respuesta a solicitudes relacionadas con datos del sistema de CRM. Esto incluye consultar un registro, elaborar el borrado de un correo electrónico, resumir registros, actualizar registros y mucho más. Para ello, decide crear un agente con el nombre General Agent (Agente general).
Después de ver los subagentes disponibles y las acciones asociadas, llega al siguiente subagente.
- Se llama General CRM (CRM general); observe que debe personalizarlo para agregar y eliminar una acción.
Initial Agent Setup (Configuración de agente inicial)
- Haga clic en
 para abrir App Launcher (Iniciador de aplicación) y, luego, busque y seleccione Agentforce Studio.
- En el menú Build (Desarrollar), haga clic en Agents (Agentes).
- Haga clic en New Agent (Nuevo agente).
- En Or (O), empiece con una sección de plantilla, busque Agentforce Employee Agent (Agente empleado de Agentforce) y haga clic en Details (Detalles). De esta manera, se muestra todo lo que se incluye en la plantilla, como la descripción, los subagentes y las variables. Así, se proporciona un buen punto de partida.

- Haga clic en Select Template (Seleccionar plantilla).
- En Agent Name (Nombre del agente), agregue
General Agent(Agente general).
- La sección Developer Name (Nombre del desarrollador) se completa automáticamente de la siguiente manera:
General_Agent.
- Haga clic en Let’s Go (¡Vamos allá!).
Agregar un subagente al agente
Para este agente, vamos a agregar un subagente adicional desde la biblioteca de activos.
- A la derecha del cuadro Search (Buscar) que aparece en la parte superior, haga clic en el símbolo + y seleccione Add from Asset Library (Agregar desde la biblioteca de activos).

- Busque General CRM (CRM general), haga clic en Select (Seleccionar) y en Add to Agent (Agregar al agente). Ahora, General CRM (CRM general) aparece en la lista Subagents (Subagentes).
- Haga clic en la flecha que apunta hacia la derecha que aparece a la izquierda del subagente General CRM (CRM General). Se expande y se muestran las acciones asociadas con el subagente.
- Pase el cursor sobre General CRM (CRM general), haga clic en el símbolo + y seleccione Add from Asset Library (Agregar desde la biblioteca de activos).
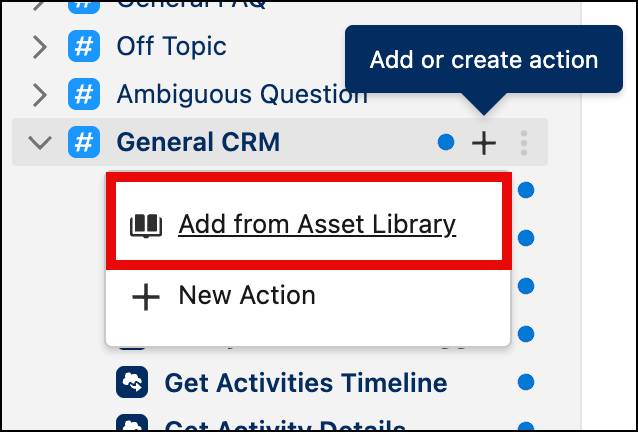
- Busque Summarize Record (Resumir resumen) y haga clic en Select (Seleccionar).
- Haga clic en Add to Agent (Agregar al agente). Ahora, Summarize Record (Resumir registro) aparece en la lista de acciones en General CRM (General CRM).
Eliminar un subagente
Antes de poder probar su agente, debe eliminar el subagente General FAQ (Preguntas frecuentes generales). Esto se debe a que este utiliza Data 360, que no está habilitado en este entorno.
- Pase el cursor sobre el subagente General FAQ (Preguntas frecuentes generales), haga clic en los tres puntos y seleccione Delete (Eliminar).
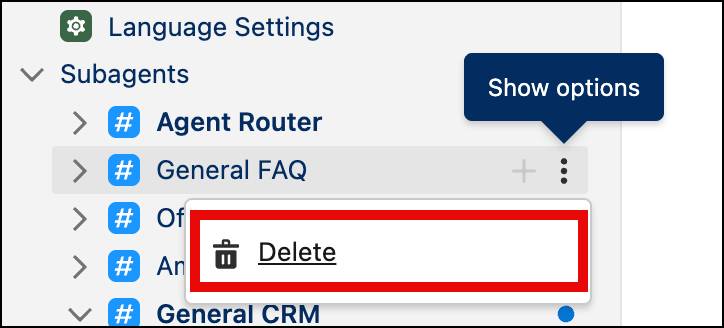
- En la ventana emergente, haga clic en Yes, Delete (Sí, eliminar). Al hacerlo, el subagente (General FAQ (Preguntas frecuentes generales) aparece tachado y en rojo, de manera que pueda deshacer la eliminación en caso de ser necesario. Déjelo como está por ahora; al guardar más adelante, se eliminará.
- Haga clic en Save (Guardar).
Realizar una vista previa y activar
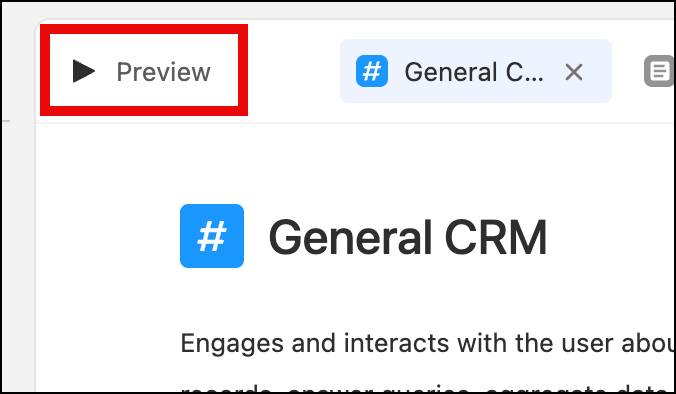
Antes de activar el agente, es importante probarlo y asegurarse de que funciona como es debido.
- En la sección central del generador, haga clic en Preview (Vista previa).
- Haga clic en la flecha hacia abajo que aparece junto a Live Test Mode (Modo de prueba en tiempo real). Observe que tiene dos opciones para probar el agente; puede hacer una simulación con datos ficticios o ejecutar una prueba en tiempo real con datos en tiempo real. En este caso, haga clic en Live Test (Prueba en tiempo real).
- En el cuadro Let’s chat! (Vamos a hablar), introduzca
Provide me an overview of Edge Communications(Proporcióneme una descripción general de Edge Communications).
- Lea la información facilitada sobre Edge Communications. Es posible que se le pregunte si quiere agregar información adicional y puede continuar respondiendo o realizando preguntas si lo desea; sin embargo, para este ejemplo, no es necesario que lo haga.
- Haga clic en Save (Guardar).
- Haga clic en Commit Version (Confirmar versión) y, en la ventana emergente, haga clic en Commit Version (Confirmar versión).
- Haga clic en Activate (Activar) y, en la ventana emergente, haga clic en Activate (Activar).
¡Enhorabuena! Ha creado un agente empleado funcional. A continuación, creará un conjunto de permisos y probará el funcionamiento de su nuevo agente.