Integrate Salesforce Payments with Salesforce Commerce
Learning Objectives
After completing this unit, you’ll be able to:
- Add the Salesforce Payments component to a checkout page.
- Configure the Payment component to use the payment methods accepted by your store.
- Customize the Salesforce Payment component to complement your checkout flow.
- Examine payment intents and in the Payments workspace.
- Access the Salesforce Payments Reports.
- Review payment report data.
Easy Integration with Salesforce Commerce
Salesforce Payments easily integrates with Agentforce Commerce applications like, Salesforce Commerce and Salesforce Order Management. For example, the Salesforce Payments component drops right into your store checkout page. Add Salesforce Order Management to the mix and you can review payments in an order summary, and add refund capability to order management services.
Ursa Major Solar has licenses for Salesforce Payments as well as Salesforce Commerce, and Salesforce Order Management. Maria Jimenez, the Ursa Major Solar administrator, has completed the Salesforce Payments Setup and is ready to integrate Payments with the Ursa Major Solar B2B and B2C stores. She starts by creating an integration plan.
Make an Integration Plan
- Add the Payments LWR component to the B2B and B2C store checkout page.
- Select a Payment Method set for the store.
- Customize the Salesforce Payments component.
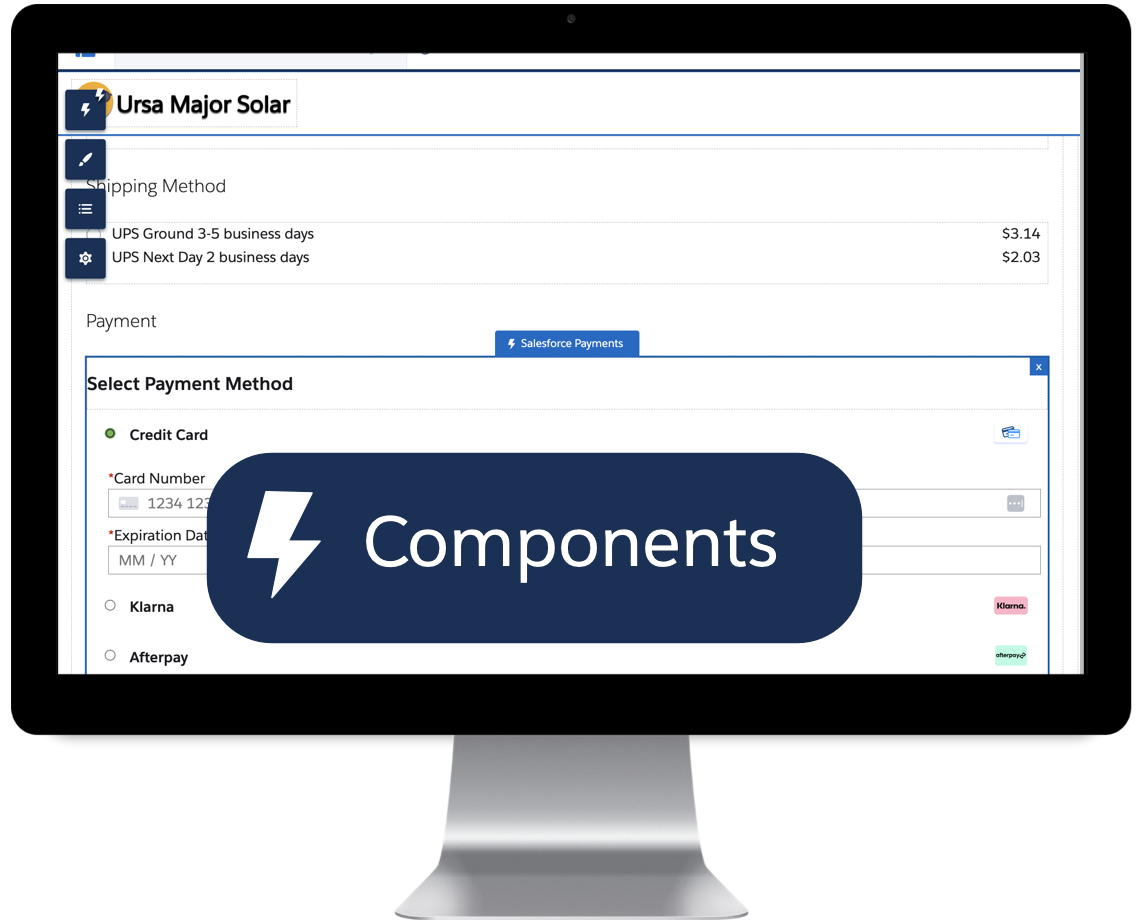
Add Salesforce Payments to a Store Checkout
With Salesforce Payments set up in your org, it’s easy to add payments to your checkout page. Just drag the Salesforce Payments component to your checkout page, and add a payment method set to the component.
Here’s how Maria adds the component and payment method set to a B2C AMER-US store checkout page.
- Launch the Commerce app.
- From the Stores tab, select the B2C store.
- Open Experience Builder.
- From the Pages dropdown, select Checkout.
- If the checkout page has an existing Payments component, delete it.
- Click the Components icon, and drag the Salesforce Payments component to the payment placeholder.
- Add the payment method set.
- Click the Salesforce Payments component.
- In the component properties, select Payment Method Set.
- Enter the Method Set key, which is typically the name you assigned to the set.

The Salesforce Payments component is now set as the payment service for Ursa Major Solar’s B2C Store.
Maria uses the same steps to add the component to a B2B store. When adding the component to a B2B store, the component includes a Purchase Order payment option tab.
Access Salesforce Payments Workspace and Reports
Maria has successfully integrated Salesforce Payments with the Ursa Major Solar development org. Before she migrates the setup to production, Maria ensures that the finance team can access the payment data and reports they need for daily tracking, planning, and forecasts.
Maria learns that Salesforce Payments gathers payment transaction data and makes it available in the Payment Workspace.
Review Payment Activity in the Payment Workspace
The Payments Workspace is a summary view of payment transaction details. Payment details are referred to as payment intents. The Payment workspace configures data in four default tables.
Payment Intent Table |
Description |
|---|---|
All Payments |
All payments, regardless of status. |
Authorized |
An authorized payment is one for which the issuing bank has verified that the account is active and has enough credit or funds to make the transaction. The funds haven’t been transferred to the merchant account. |
Captured |
A captured payment is a legally binding step that takes place after a payment authorization. It’s the moment when a pending payment becomes a completed payment and your company authorizes the issuing bank to transfer funds into your merchant account. |
Refunded |
A fully or partially refunded payment. |
You can also customize a Payment Workspace list or create your own with filters and data types that support your business needs.
Maria likes the default lists but she wants to create a custom table using a custom set of filters, and the data fields the finance team requested. Here’s how she creates a custom table.
- From the Payment Home tab, select Payments Workspace.
- From the list view controls dropdown, select New.
- In the List Name field, enter a list name.
- (Optional) In the List API Name, enter the API name.
- Select a view option.
- Click Save.
- Set the list filters
- Click the filter icon.
- Click Add Filter.
- From the field dropdown select the field you want to add.
- From the Operator dropdown select the operation you want the filter to run
- In the Value field, enter or select a value.
- Click Done.
- For each filter, repeat steps a-f.
- Set the list columns
- From the List View Controls dropdown, select Select Fields to Display.
- Use the field picker to select the fields that show as columns in the list.
- Click Save.
Salesforce Payments Reports
Salesforce Payments includes a variety of payment reports that provide a view of payment activity linked to your Payments merchant account. You can examine data about payment authorizations, payment captures, payment processing, and refunds.
Note: To view reports based on sales channel activity, Order Management must be installed and configured on the same org as Payments.
For a custom view of payment data, you can edit or create a custom report with the Payments Report Builder. For more information, see Reports and Dashboards.
Create or Edit a Payments Report
Lincoln Ulrich, an account executive, is the top salesperson at Ursa Major. During the past quarter, he closed a record number of deals.

With so many new clients, he wants a daily report that lists captured merchant payments. Lincoln is experienced with Reports and Dashboards and knows he can customize existing payment reports or create a report to meet his needs. He determines that the Captured by Merchant and Month report has all the info he needs, but he wants to make some customizations.
With a few steps, he customizes the report to show the daily data he wants to follow.
- From the Payments Home tab, select Reports | All Reports.
- Locate the Captured by Merchant and Month report.
- To launch Report Builder, click Edit.
- From the Filters tab, click the equals LAST 360 DAYS filter.
- Change the Relative Date field to YESTERDAY and click Apply.
- From the Save dropdown, select Save As.
- Update the report name and description.
- Save the report.
Lincoln now has a report that he can use to track merchant payments daily. He can also add the report to the Payment Home page.
To customize which charts you see on the Payments Home page.
- Click the gear icon and select Edit Page.
- Add, remove, or replace a report component and save your changes.
Let’s Wrap It Up
In this unit you learned how to integrate Salesforce Payments into your Salesforce Commerce B2B and B2C stores. You also learned how to access and customize both the Salesforce Payment workspace and Salesforce Payments reports. Now take the final quiz to earn your new badge.
Resources
- Salesforce Help: Salesforce Payments
- Salesforce Help: Commerce Checkout
- Salesforce Help: Payments Reports
- Salesforce Help: Reports and Dashboards