Explore Specs
Learning Objectives
After completing this unit, you’ll be able to:
- Summarize child specifications and root products.
- Define metadata.
- Explain how to assign attributes.
- Describe the process to modify attributes.
- Recognize how to add products to a price book.
Create Child Specs and Root Products
Child specs and root products have much in common. They’re both specs you create as product records; they have similar fields for metadata; you can assign attributes to them; and you add them to a pricebook. For root products, you also add child specs and link them to a rating procedure.
When you create a new product, determine the spec type by choosing the record type.
- Product
- Coverage Spec
- Insured Item Spec
- Insured Party Spec
- Rating Fact Spec
The names for most record types are as you’d expect. For a root product spec, choose Product record type.
Define Metadata
After you select the record type, define the field values. This information is known as metadata.
-
Product Name: This is a mandatory field. You and end users see this field often in the display. Example: Emergency Services
-
Product Code: Although not required to create a product initially, a product code is a unique identifier required for everything to work, such as quoting. You can also use product code in rules and troubleshooting. Example: SG_Emerg_Serv
It’s good to establish a naming convention for Product Name and Code and keep both descriptive. Because you sometimes must type the Product Code in multiple places, it’s helpful if this is also short.
Although other fields are not required, they are still important. For more details on them, check out Create Child Specs.
After creating a spec, you will find current field values on the Details tab. Use Edit to make changes.
Assign Attributes
Assigning attributes is especially important when defining child specs because attributes differentiate one spec from another. Visit Add Attributes to a Child Spec to learn the precise steps.
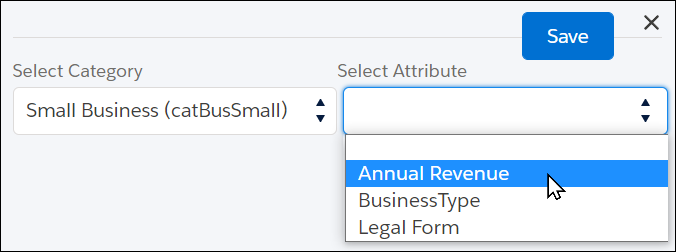
After you select the category, choose from a list of the attribute categories. Any attributes already added to this product do not appear in the list.

[Alt text: The attribute selection screen with the Select Category option.]
Here, Justus first selects the Small Business category and then selects the Annual Revenue attribute from a dropdown list.
After selecting the attribute, configure its properties. Then, click Save to finish assigning the attribute. If the attribute is on a child spec, the attribute and its properties carry through when you add the child spec to a root product.
However, you can override some attribute properties when configuring the root product. Be aware that assignment properties affect each other and ultimately impact the end user.
Now, it’s time to learn about some important attribute properties.
Attribute Name and Name
Initially, when you assign an attribute, the Name value matches the Attribute Name value. If you wish, override the Name to be different from the Attribute Name. 
For example, Justus reuses a generic Limit attribute for Liability coverage but overrides the Name to read as Liability Limit. During quoting flows, the end user immediately understands which coverage the limit is associated with.
Is Checkboxes
A couple of checkboxes determine how an attribute behaves.
-
Is Configurable: Select this checkbox to allow users to set, change, or override the attribute value.
-
Is Hidden: Select this checkbox to hide an attribute from users during quoting and other guided processes.
Both of these boxes remain deselected by default.
Value Data Type
Value Data Type is the only property you must set before you can save the assignment. Set how you want to specify and allow the value of this attribute to be controlled. Some choices for Value Data Type provide a second dropdown box for additional control refinement, such as using sliders. For more information about the different data types available, visit Add a Configurable Value to an Attribute on a Child Spec.
Value
Specify a value or a set of possible values. If you specify a single value, then it’s the default value. If you don’t select Is Configurable, then a single value becomes the actual value.

[Alt text: The checkbox and picklist options selected in the Value Data Type field. ]
The value you set depends on the data type. If the data type is Checkbox, then you choose whether to select the box. If the type is Picklist, a second control choice is a radio button or dropdown, and you add a list of possible values.
If you add the child spec to multiple root products, then in the child spec you define the complete set or superset of possible values for anywhere the child spec is added. You can narrow available values for each root product at the root product level.
Rating
Select this checkbox to specify that the rating calculation uses this attribute. Then, specify two more pieces of information.
-
Rating Attributes Use: Choose if it stores input to the rating calculation or output from it.
-
Rating Input or Output Mapping: Enter the variable name your rating procedure uses for this value. Coordinate carefully with whoever is setting up the rating procedure to map the necessary attributes with correct variable names.

[Alt text: The rating section of the Root Product with the Rating option enabled.]
Modify Attributes
After you assign attributes, you can still make changes in the future. Use the New button to add another attribute or select an existing attribute to make changes to it.

[Alt text: The New and Update buttons for the Deductible attribute.]
-
New: Add another attribute.
-
Update: Make changes to the assignment settings of an attribute. To update an attribute, select, modify, and then click Update.
-
Delete: Delete an attribute by selecting it and clicking
 . Be careful, though. There is no additional confirmation, and the Update and Delete buttons are close together.
-
Reorder: Drag and drop attributes in the list to change their display sequence order for this spec.
Add Products to a Price Book
Salesforce requires each product, including all child specs and root products, to have a price in a price book.
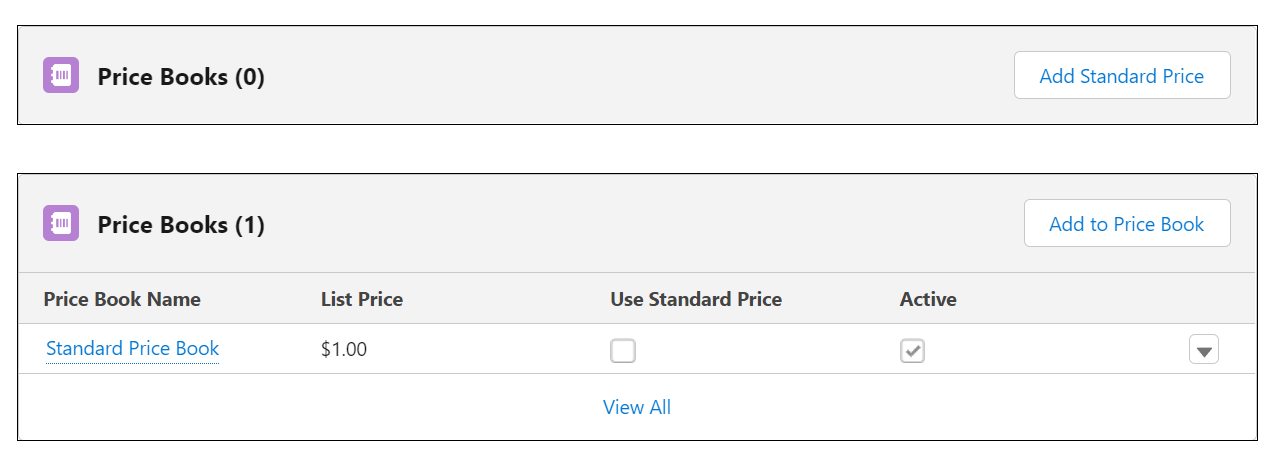
On the Related tab, under Price Books, click Add Standard Price to set a price. Remember that the rating calculation doesn’t use this price, so you can enter any value. For example, here, the list price is 1, but the value you enter is a placeholder. The actual price comes from the rating procedure calculation.

[Alt Text: The Related tab of the Root Product with the Standard Price Book added.]
In this unit, you learned about creating product specs. In the next unit, look at the final considerations for completing a root product, such as linking it to a rating procedure.
