Map and Retrieve Data in Action Steps
Learning Objectives
After completing this unit, you’ll be able to
- Map data in action steps.
- Retrieve data in action steps.
Map Data in Action Steps
In a nutshell, a flow is an extract, transform, load (ETL) process. You extract data from the source system in a previous step of the flow. Then transform the data into a format acceptable to the target system in the current step, and load the results into the target system.
As the first step of this ETL process, you map data that comes from the previous steps of the flow to the fields of the target object in the current action step. Keep in mind the following.
- Output data that comes from a trigger or a previous action step is input data for the current action step.
- Output data is contained in variables called data pills.
- Output data of the current action step is input data for the next steps.
To map data, you assign the fields of a target object in the current action step to different source values. The following are source values.
- text strings
- numbers
- data pills
- picklist values from data pills
The source values can also be mixtures of text strings, numbers, and data pills and employ functions and formulas. You learn how to transform data using functions and formulas in unit 4.
Most of the time, you map data by assigning the fields of a target object in the current action step to different data pills from the previous steps.
Here’s how to map the fields of a target object to various source values.
If You Need to Map a Field to |
Then |
|---|---|
A text string or number |
Enter the text string or number in the field. |
A data pill |
Click in the field and select the relevant data pill. |
A picklist value from a data pill |
Click the search icon of the field, select Pick from List, and then select a value from the picklist. |
Let’s look at an example of how to map data. You want to create a flow that syncs Salesforce customer service cases to Jira issues. The flow must perform the following tasks.
- Find any new case in the NTO org’s Service Cloud.
- Create an issue in Jira.
Assume a Jira project called Customer Support has been created in Jira. To learn how to perform this task, take Jira Automation with MuleSoft Composer.
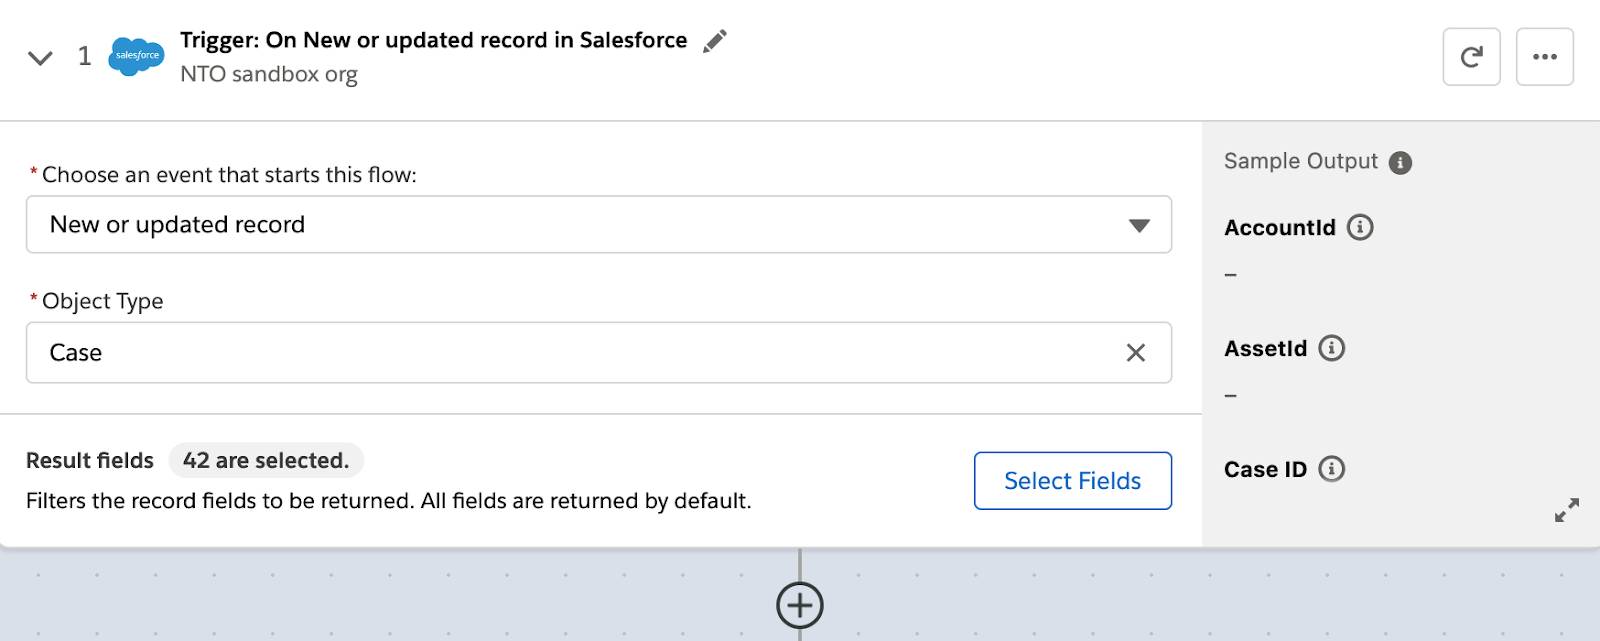
First, create a trigger that starts every time a new case is created or updated in Service Cloud. You learned how to perform this task in unit 1.
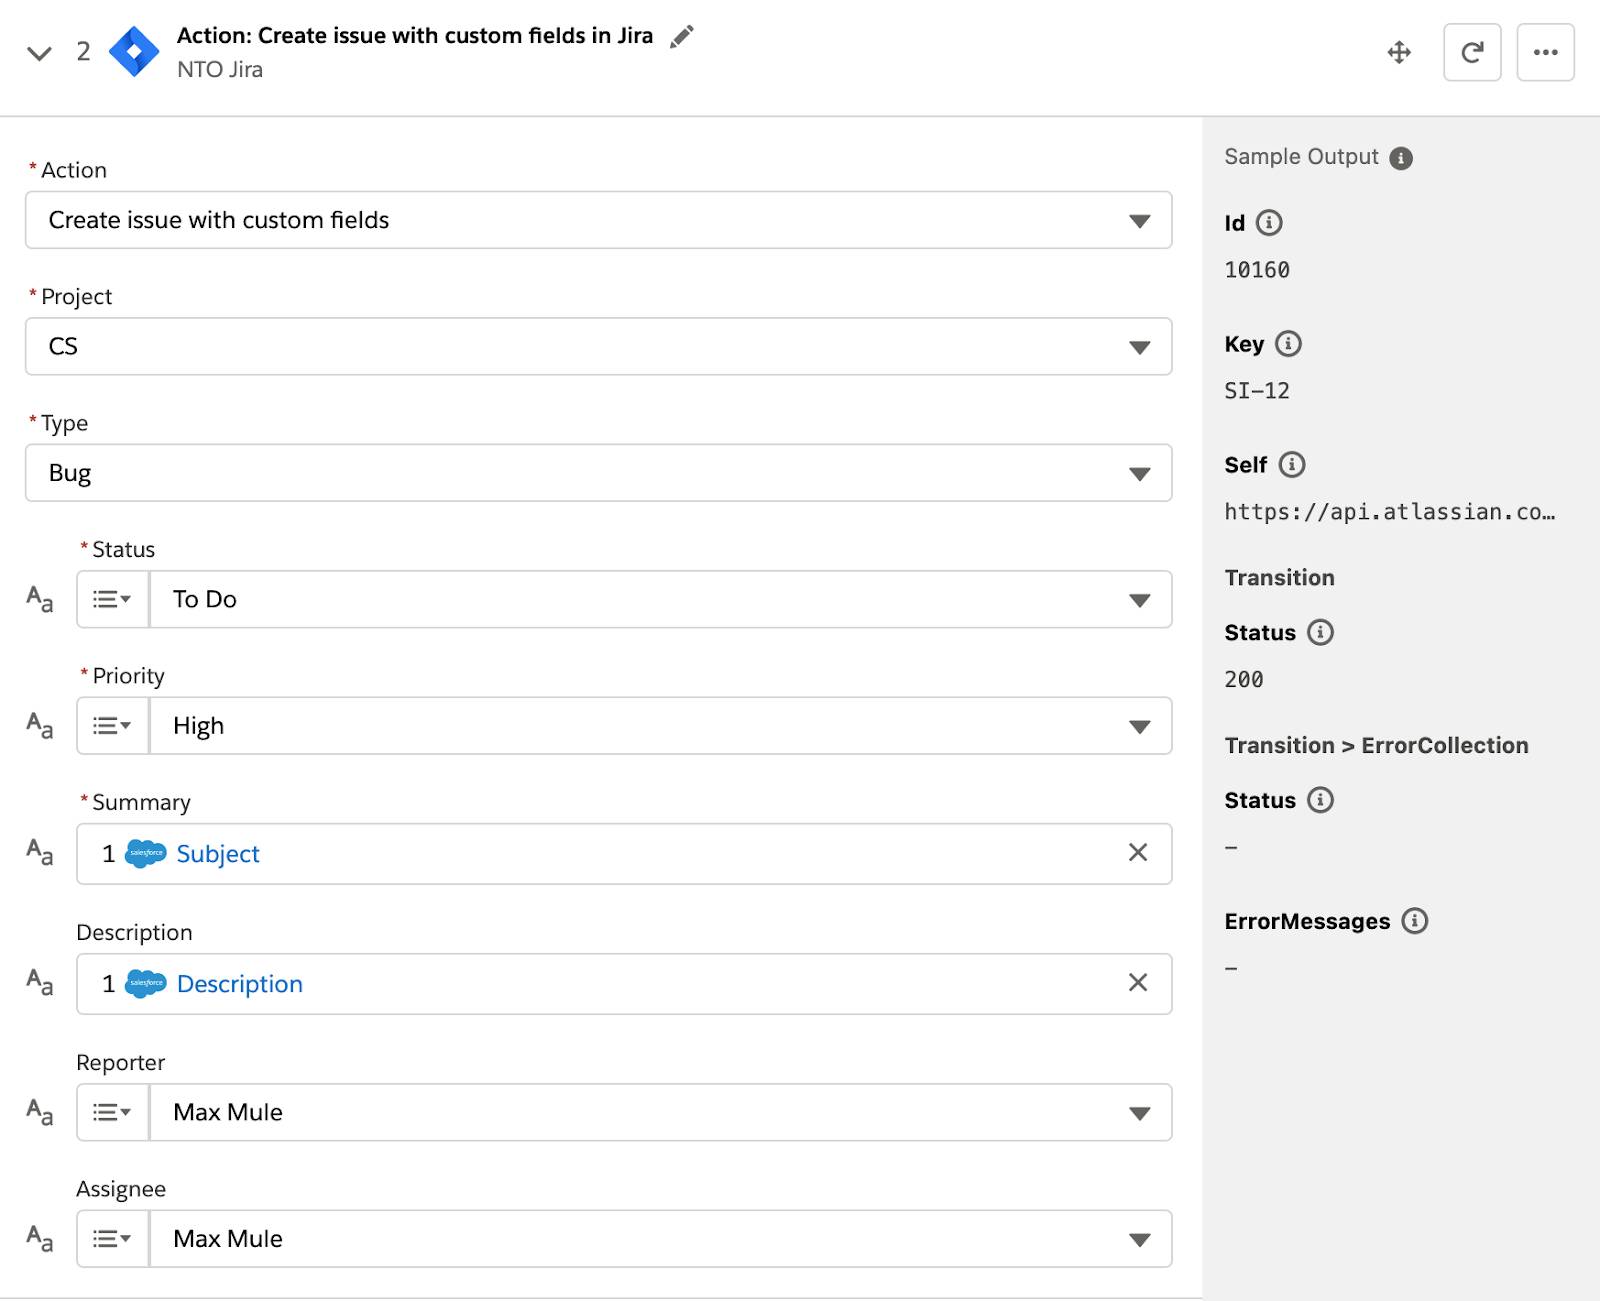
Next, add an action step that connects to Jira and uses the Create issue with custom fields action. You learned how to perform this task in unit 1.
Follow these steps to map the fields of the Case object to various source values.
- Click in the Project field and select CS. This is the key for the Customer Support project.
- Click in the Type field and select Bug.
- Click the search icon of the Status field, select Pick from List, and then select To Do.
- Click the search icon of the Priority field, select Pick from List, and then select High.
- Click in the Summary field and select Subject from step 1 of the flow.
- Click in the Description field and select Description from step 1 of the flow.
- Click the search icon of the Reporter field, select Pick from List, and then select a Jira username of your choice.
- Click the search icon of the Assignee field, select Pick from List, and then select a Jira username of your choice.

Retrieve Data in Action Steps
As data flows from one action step to another through your flow, you may need to retrieve data that comes from the previous steps of the flow and filter the results based on one or more conditions. To do this, you perform one or more of the following tasks in each step.
- Select fields for an object in the current action step.
- Filter input data for the selected fields based on one or more conditions.
- Optionally, sort the filtered data in ascending or descending order.
Select Fields for an Object in the Current Action Step
Selecting fields for an object in the current action step is the same as selecting fields for an object in the trigger. You learned how to perform this task in unit 1.
Filter Input Data for Selected Fields Based on One or More Conditions
After you’ve selected the fields, you can filter input data for the selected fields using one or more conditions. Each condition typically consists of three components as described in the following table.
Component |
Description |
|---|---|
Field |
Specifies the field of the object in the current action step. |
Operator |
Compares the field to the value. Here are the operators.
|
Value |
Can be a text string, a number, a data pill, or any combination of these values. |
If the input data meets a specified condition, it’s filtered based on that condition. Here are examples of some conditions.
- Account ID Equals Account ID from step 1 of the flow
- Account Name Starts with
A - Account Rating Equals
Hot
Also, you can filter input data that satisfies multiple conditions. To combine multiple conditions, use the logical operators AND or OR. Follow these guidelines.
To Filter Data that Meets |
Use |
|---|---|
All the specified conditions |
All conditions must be met (AND) |
At least one of the specified conditions |
Any condition can be met (OR) |
For example, you want to retrieve all accounts containing the following.
- Have the same account ID as the triggering account.
- Have a name that begins with the letter A.
- Have a rating of Hot.
You would use the following conditions.
- Account ID Equals Account ID from step 1 of the flow
OR
- Account Name Starts with
AOR
- Account Rating Equals
Hot
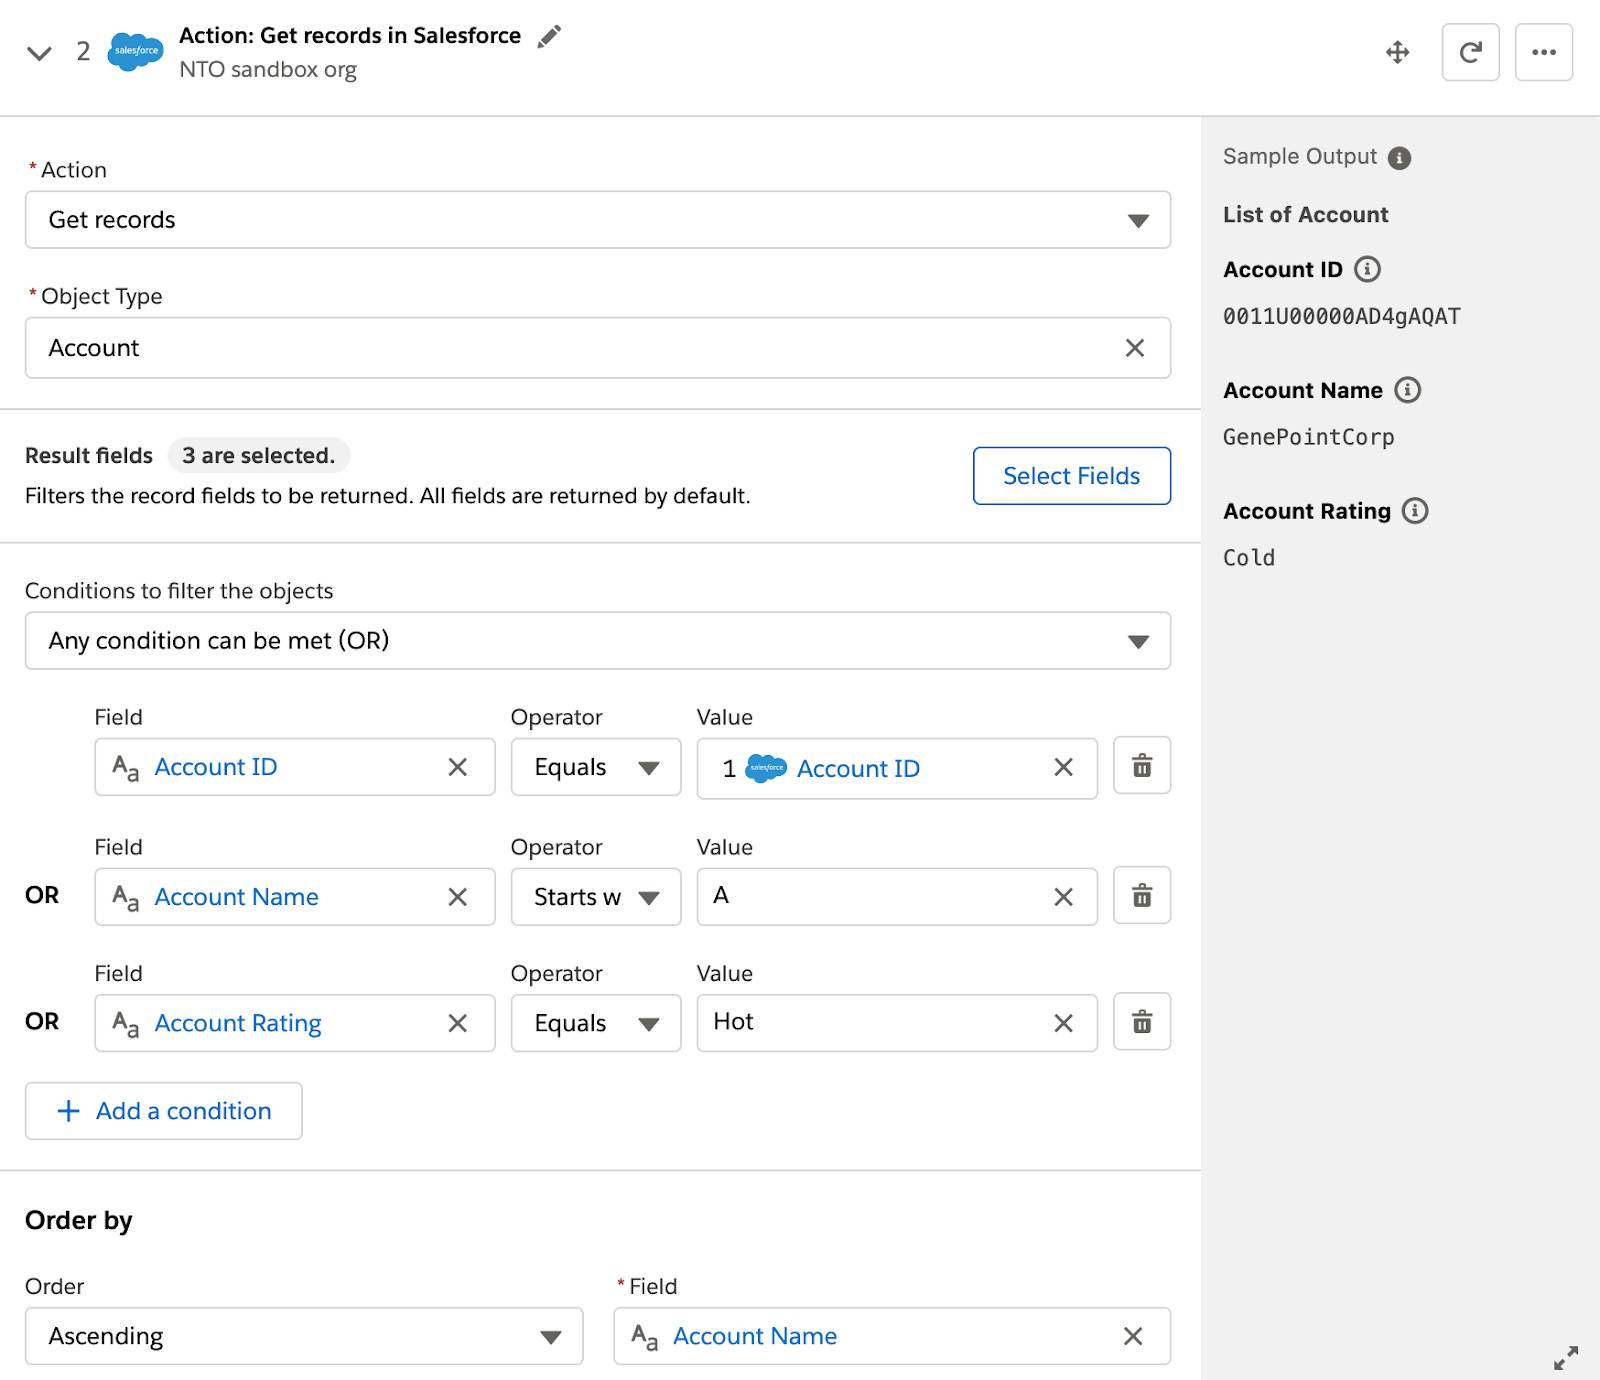
Let’s say you have a flow that starts when an account is created or updated in the NTO sandbox org. In the next step, you want to retrieve data from the Account object.
Here’s how to create and configure an action step to retrieve all accounts that have the same account ID as the triggering account, whose names begin with the letter A, or that have a rating of Hot.
- Click the plus icon to add a step.
- Click Salesforce and then click NTO sandbox org.
- Click in the Action field and select Get records.
- In the Object Type field, enter
Account.
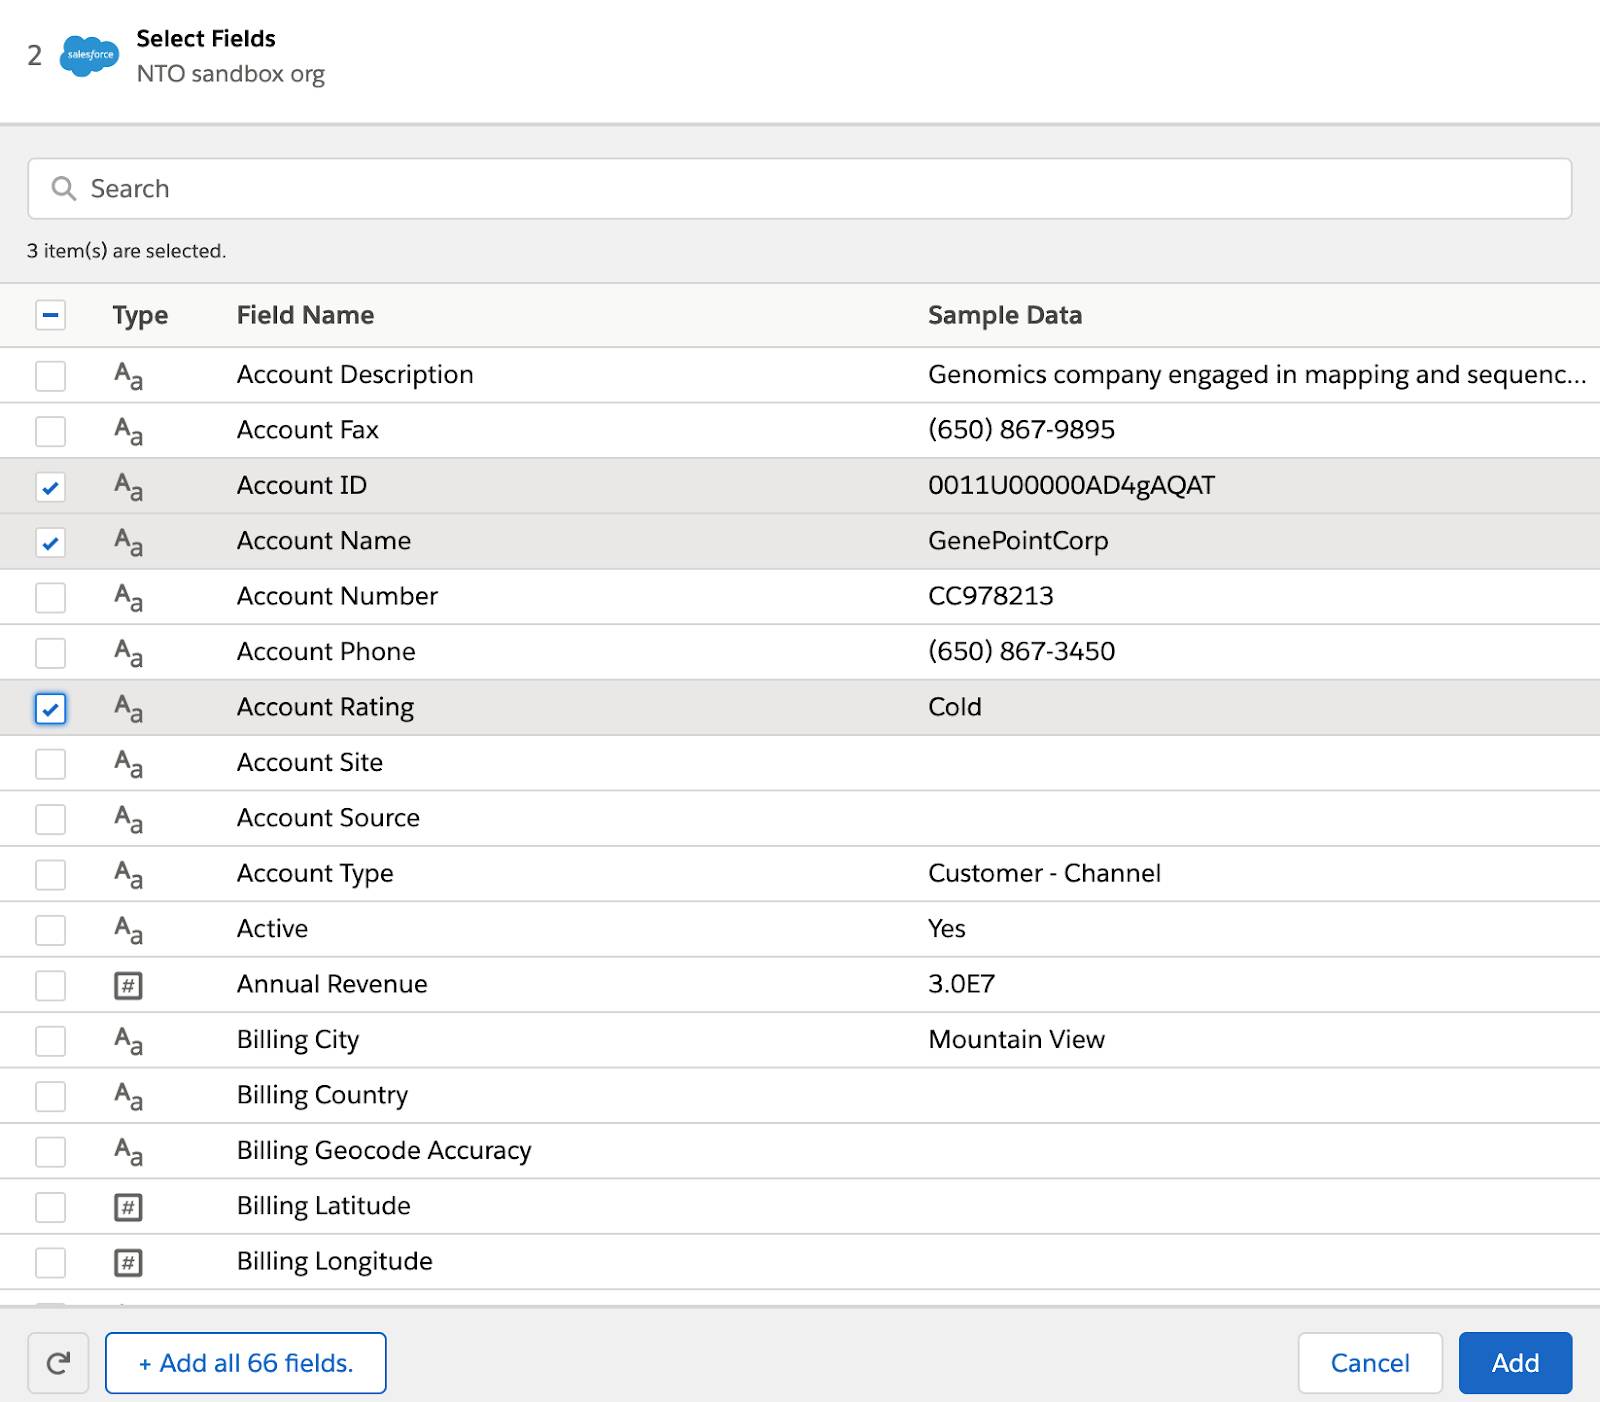
- Click Select Fields. Use this to select which fields of the object are to be returned. These are the output fields of the Get records action.
- Deselect all the fields by clicking the checkbox next to the Type column.
- Using the search field, find and select the fields of your choice, and then click Add.
- In the Conditions to filter the objects picklist, select Any condition can be met (OR).
- Select Account ID as the field, Equals as the operator, and Account ID from step 1 of the flow.
- Click Add a condition. Notice OR is the logical operator between the conditions.
- Select Account Name as the field, Starts with as the operator, and enter
Aas the value.
- Click Add a condition. Notice OR is still the logical operator between the conditions.
- Select Account Rating as the field, Equals as the operator, and enter
Hotas the value.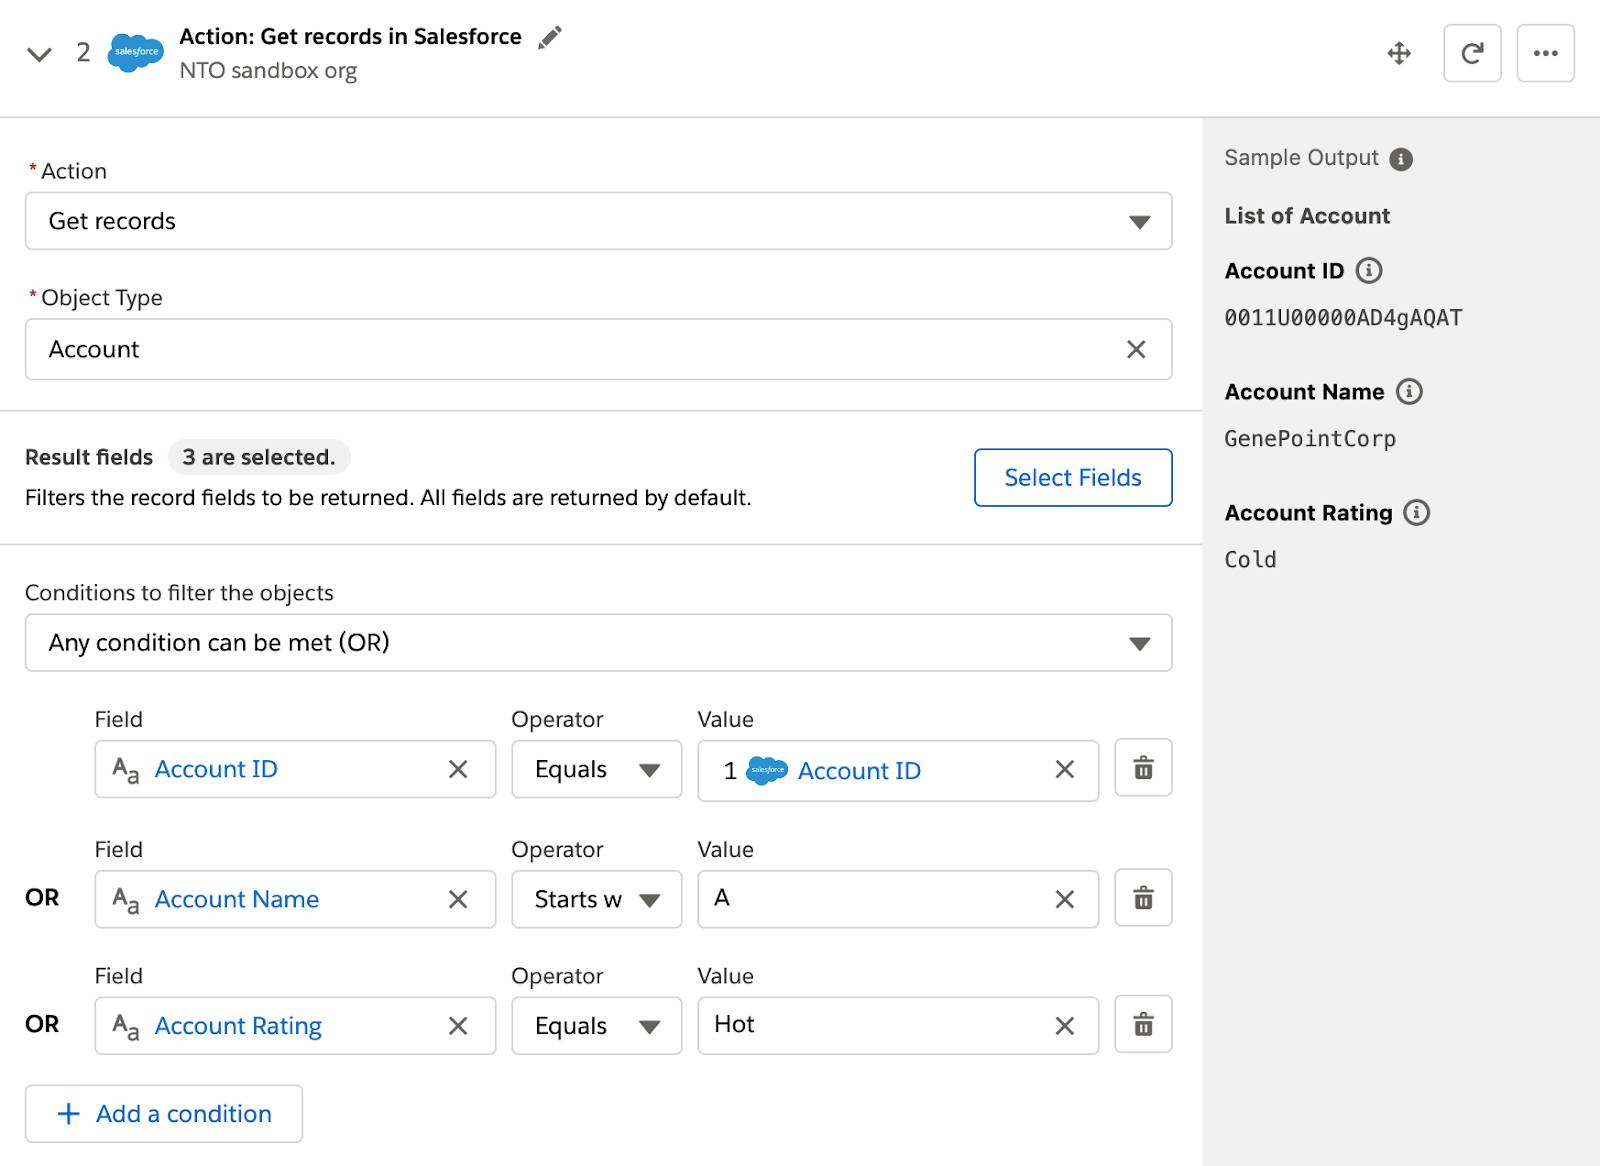
Sort Filtered Data in Ascending or Descending Order
After you’ve filtered the data based on specified conditions, you can sort the filtered data in ascending or descending order. In the step, select Ascending or Descending in the Order picklist, and then select the Order by field.
Here’s an example of sorting the filtered data in ascending order based on Account Name as the Order by field.
Excellent! You’ve learned how to map and retrieve data in the action steps of a flow. In the next unit, you learn how to make decisions and perform repetitive actions in your flow.