Manage Users and Roles
Learning Objectives
After completing this unit, you’ll be able to:
- Plan the implementation of Marketing Cloud Engagement in your company.
- Name standard Marketing Cloud Engagement roles.
- Set up a Marketing Cloud Engagement user.
Implementation Plan
Now that you’ve completed the basic setup of your new Marketing Cloud Engagement account, it’s time to plan for how your account will be used and who will use it. Use the following questions and checklist to help you plan. Then, in the next units, you’ll learn how to set up some of these items.
Plan of Action |
Questions to Ask |
|---|---|
Identify business units needed. |
What is the organizational structure of your business? Does that structure impact how Marketing Cloud Engagement will be used? |
List each user, their anticipated Marketing Cloud Engagement role, and map to business units if applicable. List any additional stakeholders. |
Who needs to access Marketing Cloud Engagement? What level of access does each person need? |
Map the anticipated data flow between Marketing Cloud Engagement and other systems and third-party vendors. |
Are you connecting Marketing Cloud Engagement to other Salesforce clouds or external CRMs? |
Identify sample data feeds in .csv or .txt format and a data schema or dictionary of field names, lengths, types, and so on. |
Do you know what data feeds you’ll use in Marketing Cloud Engagement and how you will use them? |
List subscriber attributes, such as city or gender, used to organize the segmentation logic needed for sending customized messages to your subscribers. |
How will your subscriber data be organized? |
Identify any external programs you will use in addition to Marketing Cloud Engagement reports to track analytics. |
How are you tracking analytics? |
Marketing Cloud Engagement User Management
Marketing Cloud Engagement includes standard roles and permissions for how areas of the application can be accessed and used. Roles are convenient because they package a set of permissions that you can grant to a user, rather than having to manually grant individual permissions to each user. A permission grants a user access to something and determines what they can do with it. For example, you can grant a user permission to read something, but not create something.
-
Marketing Cloud Engagement Administrator—This role assigns Marketing Cloud Engagement roles to users and manages channels, apps, and tools. (Hint: this is you!)
-
Marketing Cloud Engagement Viewer—This role views cross-channel marketing activity results in Marketing Cloud Engagement.
-
Marketing Cloud Engagement Channel Manager—This role creates and executes cross-channel interactive marketing campaigns and administers specific channels like Email Studio.
-
Marketing Cloud Engagement Security Administrator—This role maintains security settings and manages user activity and alerts.
-
Marketing Cloud Engagement Content Editor/Publisher—This role creates and delivers messages through applicable channel apps.
You can copy and customize a table like this to organize your list of users.
User Name |
Email Address |
Role (Choose One) |
Business Unit |
|---|---|---|---|
|
Don’t see a role that fits a particular user? You can customize roles or create additional roles in Marketing Cloud Engagement. Let’s try it.
Create a Role
- Navigate to Marketing Cloud Engagement Setup.
- Use Quick Find to navigate to Roles.
- A list of all the standard roles appears. Select an existing role to edit it or click Create to make a new one.
- Give the new role a name and select the permissions to Allow or Deny for the role.
- Save the role.
Create a User
With your roles ready to go, you can now add users to Marketing Cloud Engagement and apply a role to that user.
- Navigate to Marketing Cloud Engagement Setup.
- Use Quick Find to navigate to Users.
- Click Create.
Review Add a User in Salesforce Help to learn how to complete specific fields when creating a user. There are options to specify if and how the email address for that user can be used for Marketing Cloud Engagement email sends. You can also specify time zone, language settings, and more.
User Preferences
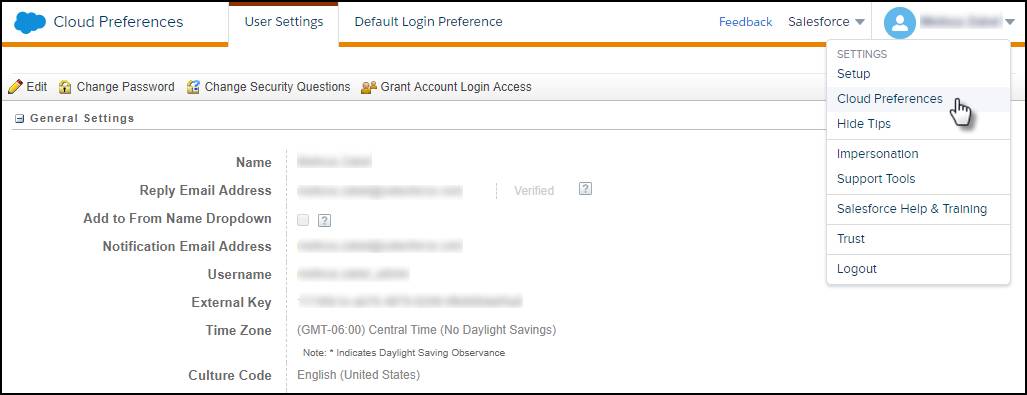
After logging in, your Marketing Cloud Engagement users can adjust their preferences in Marketing Cloud Engagement to manage their own user experience. Preferences include Time Zone, Culture Code (language), Name, and more.
- To adjust your individual Marketing Cloud Engagement preferences, click Cloud Preferences under your username.
- In User Settings, click Edit to change things such as your display name, reply email address, time zone, culture code (language), and more.
- In Default Login Preference, select which Marketing Cloud Engagement app opens automatically when you log in to Marketing Cloud Engagement.

SSO Authentication
We understand that some companies want to use a third-party identity provider to authenticate their Marketing Cloud Engagement users. Good news! You can enable single sign-on (SSO) authentication for Marketing Cloud Engagement. Keep in mind the following when setting up SSO Authentication.
- Marketing Cloud Engagement supports identity providers that utilize the SAML 2.0 specification. The configuration must trust the Marketing Cloud Engagement product as a service provider, sometimes called a relying party.
- You need to create an encryption key for Marketing Cloud Engagement activities.
- After you engage and configure your service provider and create a key, you must configure Marketing Cloud Engagement to use that identity provider.
- Test your SAML enablement on a single user before enabling others on your account. You can better resolve any configuration issues or errors when dealing with a single user.
Review Single Sign-On Authentication Via SAML 2.0 on Salesforce Help for step-by-step instructions.
Resources
- Salesforce Help: Marketing Cloud Engagement Roles
- Salesforce Help: Marketing Cloud Engagement User Preferences
- Salesforce Help: Marketing Cloud Engagement Users
