Learn How to Manage a Claim
Learning Objectives
After completing this unit, you’ll be able to:
- Describe the basic business processes for managing a claim.
- Explain how the solution components support the claims-management process.
Claims Adjuster Workbench
After a claimant submits the first notice of loss, it’s usually time for the adjuster to take over. Using the powerful skills-based routing tools of Agentforce Financial Services, claims supervisors can set up sophisticated rules that assign each claim to the right adjuster.
Home base for claims adjusters is the Adjuster Dashboard. It’s where they manage their entire volume of work, including claims, tasks, and approval requests. Adjusters also use their dashboard for insight into key performance indicators (KPIs).
Once an adjuster uses their workbench to dive into a claim, they have a powerful set of tools to hand. The adjuster can see essential information about the claim, such as the financial summary, policy terms standing, and claim participants. And now they can take action, such as to open new claim coverages, add loss and expense items, and make payments.
Adjusters can perform all these tasks with simple, declarative steps. Let’s learn more about how Claims Management makes it a snap for adjusters to manage and resolve claims.
Opening Claim Coverages
Typically, adjusters start by opening claim coverages. Recall that claim coverages are the financial building blocks of a claim and open against a specific insurance policy coverage.
Claim coverages can open automatically during the first notice of loss process based on claim product rules. Alternatively, claims adjusters can open coverages manually from their handy workbench.
For the end user, the process of opening a claim coverage is easy because dedicated services work behind the scenes to do the heavy lifting.
This diagram shows the main steps in opening claim coverages.
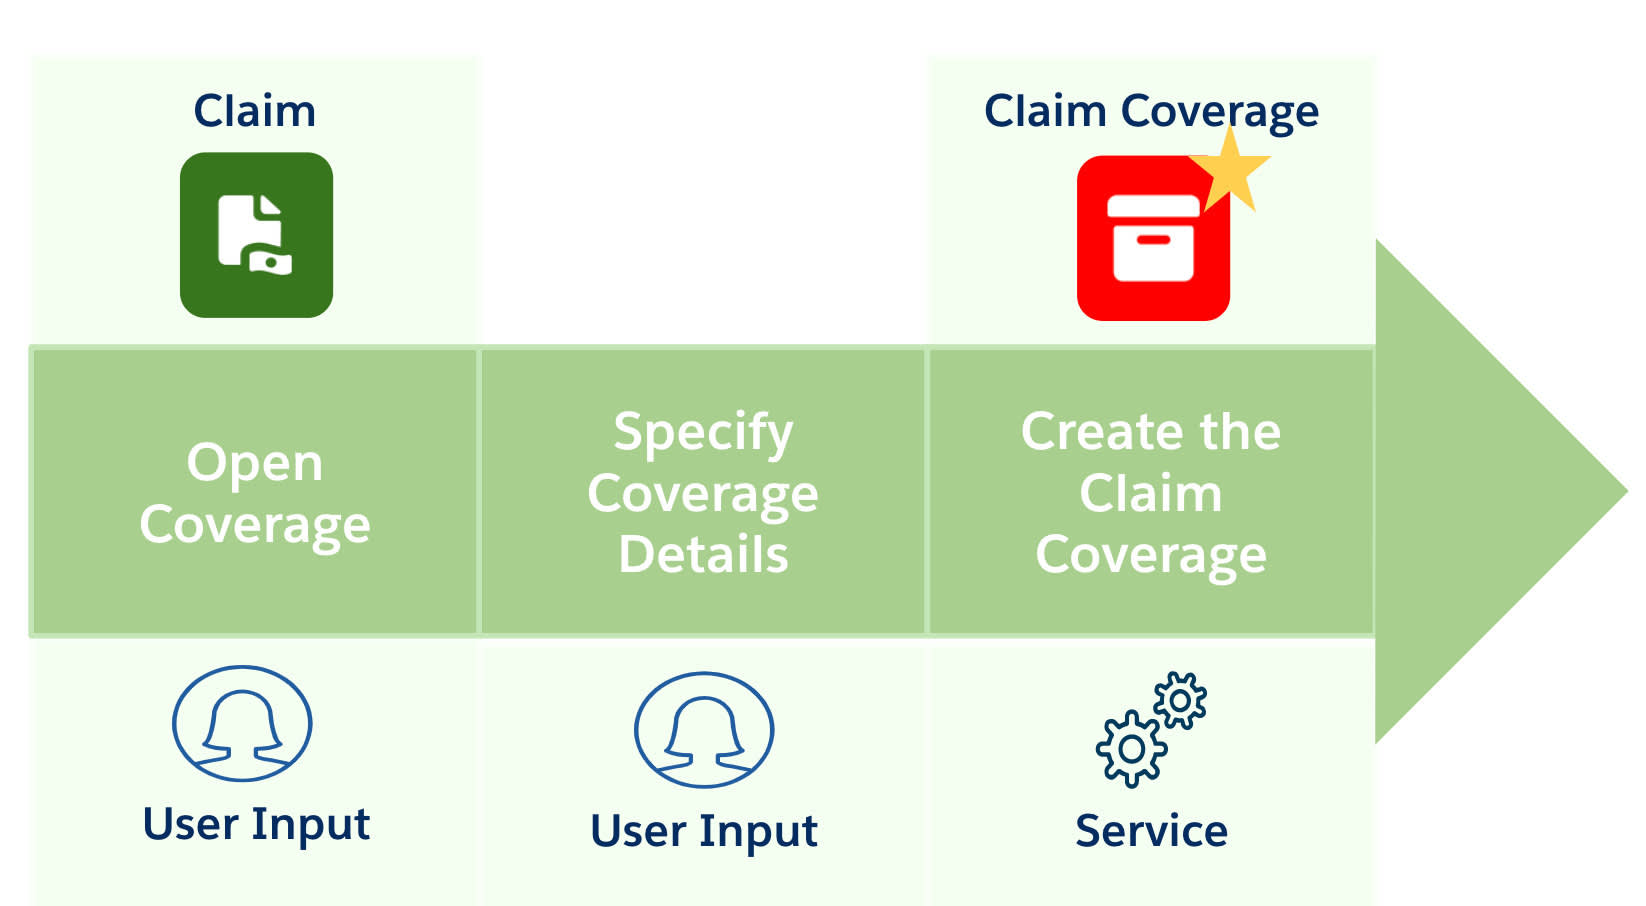
And here’s a brief summary of each stage.
Stage |
Description |
|---|---|
Open claim coverage |
On the Financials tab of the claim record, the adjuster clicks the Open Coverage button. |
Specify claim coverage details |
The adjuster enters some basic details about the claim coverage, including the claimant, involved item, insured item, coverage, and loss reserve amount. |
Create claim coverage |
A dedicated service creates the claim coverage record and all its relevant details and relationships. |
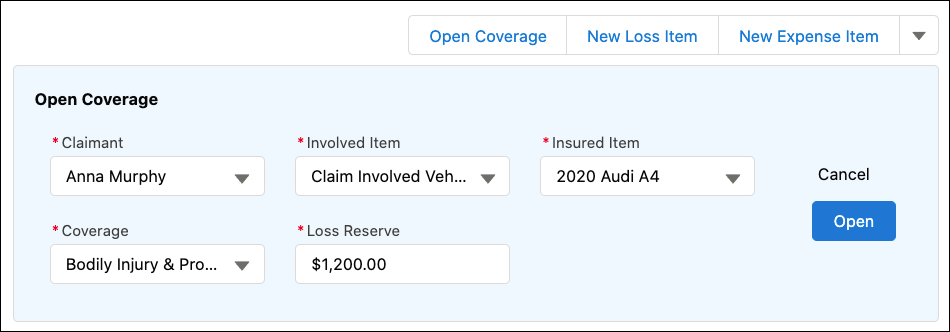
Let’s now see how Phil the adjuster opens a claim coverage on Anna’s claim.
Opening the Claim Coverage
Phil wants to open the Bodily Injury & Property Damage coverage on Anna’s claim with a Loss Reserve of $1,200. A loss reserve is an estimate of the loss that sets expectations for the overall liability of the insurer.
All Phil needs to do is open a coverage and specify the claimant, involved item, and insured item. Then, he selects the coverage and loss reserve. That’s it. The claims-management system handles everything else.
This screen capture shows the Open Coverage modal window.
Now Anna’s claim has three open coverages, each with their own loss reserve. Remember, the loss reserve is just an estimate of the actual losses.
This screen capture shows the three claim coverages open on Anna’s claim.
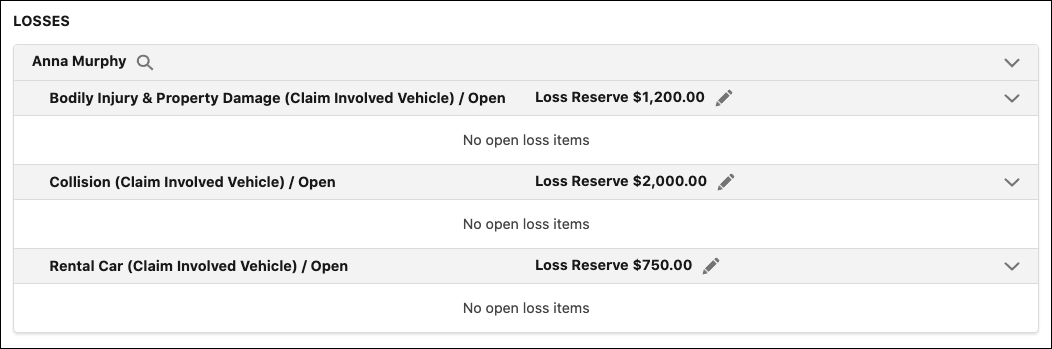
Notice that the claim coverages don’t have any open loss items. Loss items only appear after the adjuster adds payment details to the claim coverages.
Updating the Financial Summary Chart
After Phil opens the claim coverage, the Financial Summary chart instantly updates to reflect the impact of the new claim coverage to the total financial exposure. For Anna’s claim, the Remaining Reserves now total $4,400.
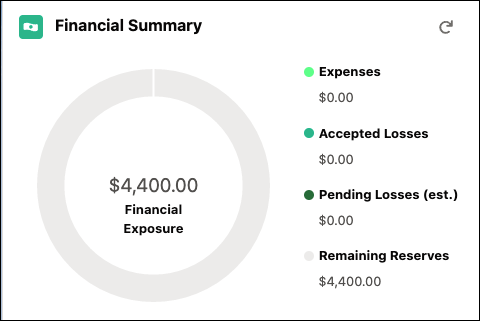
The chart doesn’t yet display any expenses, accepted losses, or pending losses. These only appear once Phil adds payment details to the claim coverages.
Updating the Policy Terms Standing
Additionally, the Policy Terms Standing chart automatically updates to include any power attributes associated with the claim coverage. For the Bodily Injury & Property Damage coverage, Anna’s policy has a limit of $25,000. This limit now appears in the chart and has a pending amount of $1,200, which equals the reserve amount.

As you can see, opening a claim coverage is a breeze, and the claims system keeps the adjuster continually informed on how each claim coverage impacts the overall claim and policy terms.
Adding Loss and Expense Payment Details
After opening a claim coverage, the logical next step for the adjuster is to add loss and expense payment details. These items capture the details about the actual losses and expenses, such as an auto-body bill for an auto claim. The difference between loss and expense items is that loss items apply towards the terms of the coverage, including limits and deductibles, while expense items do not.
You add all loss and expense payment details to a specific coverage, and a single claim coverage can have multiple payment details.
Just like opening a claim coverage, specifying loss and expense details is as easy as 1-2-3 for the adjuster. They simply select the appropriate claim coverage, add some basic details about the loss or expense, and then let the services work their magic.
This diagram shows the main steps in creating payment details.
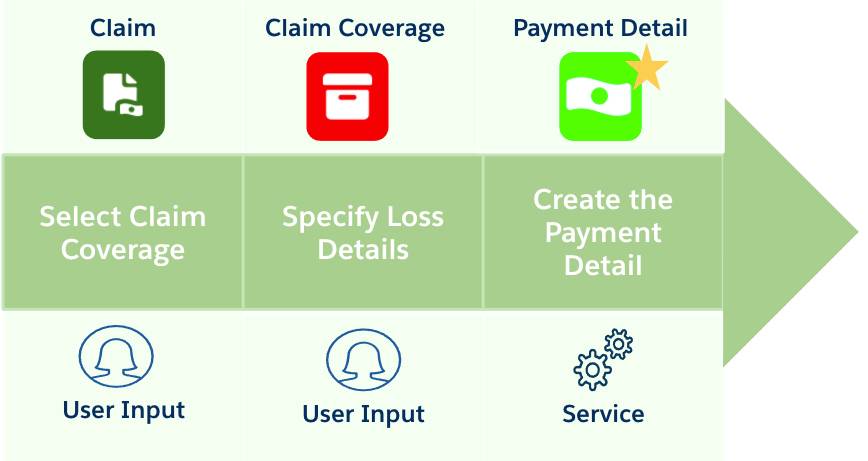
And here’s a summary of each stage.
Stage |
Description |
|---|---|
Select claim coverage |
The adjuster specifies the appropriate claim coverage to which the loss or expense item applies. |
Specify loss details |
The adjuster adds details about the loss or expense, including the claim amount and payee. If any adjustments are needed, the system automatically calculates the adjusted amount. |
Create the payment detail |
A number of insurance services work together to create the payment detail and some associated records, including the Payment Adjustment and Policy Term Tracking Entry. |
For Anna’s claim, Phil receives an itemized body shop bill for $1,900 and adds the bill details as a new loss payment to her Collision coverage.
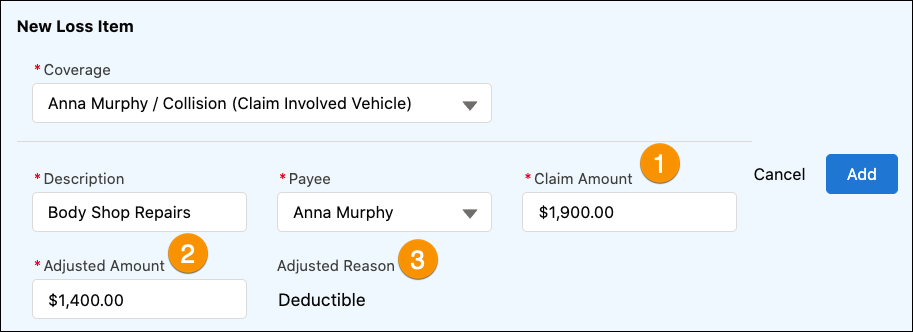
Notice that Claim Amount (1) is $1,900, but Adjusted Amount (2) is $1,400. That’s because this coverage for Anna’s policy contains a $500 deductible. The system automatically calculates the adjusted amount and then provides the Adjusted Reason (3) as Deductible. This illustrates one of the many benefits in integrating a claims-management system with the policy-administration system.
After adding the new loss payment detail, claims services get to work and automatically create and update all the appropriate records.
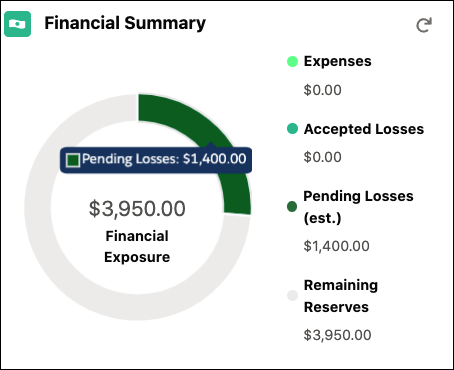
Again, the Financial Summary chart instantly updates, with the $1,400 of pending losses now displayed.
Paying a Claim
After creating the claim coverages and adding all eligible loss and expense items, the claim adjuster often investigates the claim further, seeks approvals, and prepares the settlement. Many Salesforce tools are available to assist in each of these key steps, such as claims history, action plans, and approval processes.
As a final step, the adjuster pays the claim.
Once again, the services do all the hard work; the claims adjuster simply selects the appropriate loss and expense payment details, clicks Pay, and voila!
A lot goes on behind the scenes to actually create the appropriate payment details and summaries. In addition to updating the claim and all its associated records, the system must also update all of the policy and policy term records to reflect the payment.
For now, just know that the prebuilt, dedicated services handle all this complex coordination and make it practically invisible to the end user.
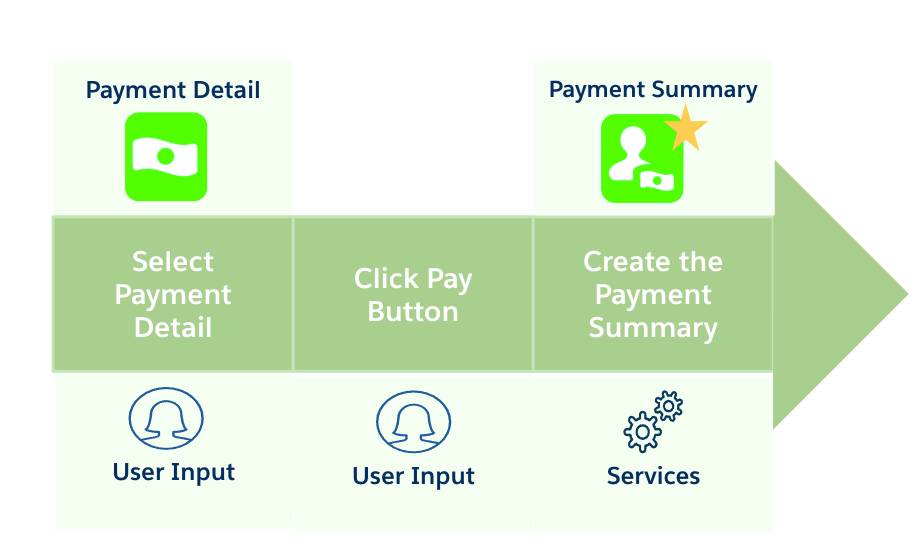
Here’s a summary of each stage.
Stage |
Description |
|---|---|
Select payment detail |
The adjuster selects which loss and expense payment details to pay. |
Click pay button |
The adjuster can either pay one, some, or all the payment details with a single click. |
Create the payment summary |
A number of insurance services work together to create the payment summary and update a number of associated records, including the Payment Detail and Policy Term Tracking Entry. |
Flash forward to the final stages of Anna’s claim. Phil adds various loss items to the different coverages after completing his investigation into Anna’s claim.
Through automated approval processes, he gets the go-ahead from his supervisor to issue payment for the defined losses.
Now, all Phil needs to do is select all the payable items and click Pay Selected Items.
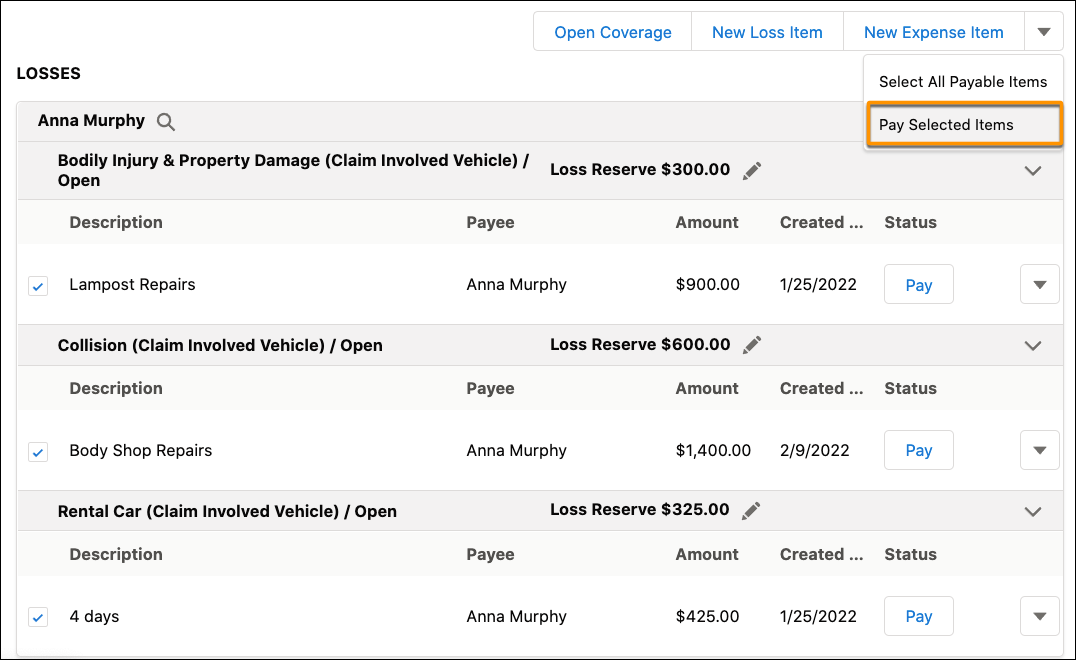
As the music swells in anticipation, a series of powerful claims services orchestrate in harmony to create the payment record and update all other related records.
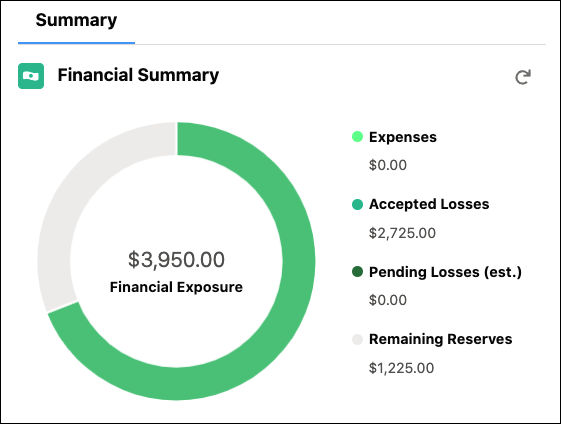
Once again, the trusty Financial Summary chart updates, with Pending Losses now moving to green as Accepted Losses. The claim uses only $2,725 of the estimated $3,950. If there are no other losses to report for the claim, then it comes in well under expectation.
After reviewing the claim and policy records one last time, Phil is pleased with how things look and he soon closes out the claim. He then returns to his trusty dashboard to tackle the next claim in his queue.
Anna instantly receives a message about her pending payment. From her policyholder portal, she reviews all details about the settlement and her policy terms. She can easily reach out to the claims team if she has any further questions or issues with the claim.
All in all, this was a walk in the park for all involved and turned what was initially a stressful situation into a pretty pleasant and smooth process for Anna. She’s definitely a satisfied Cumulus customer.