Customize the Cloned DPE Definition
Learning Objectives
After completing this unit, you’ll be able to:
- Add and edit fields in each node of a DPE definition.
- Update the Aggregate by Member DPE definition with custom logic.
Recap and the Way Ahead
So far, Rishi has set up a rebate program and its benefits based on the requirements he received from account managers in AMER. To account for product category and total discounted transaction amount data, he collaborated with Cindy to create custom fields in objects Transaction Journal, Rebate Member Product Aggregate, and Program Rebate Type Benefit. Cindy has cloned the Aggregate by Member definition and discussed the existing nodes with Rishi.
It’s now time to customize the Aggregate by Member_AMER Rebate Program Aggregation definition.
Do you recall the additional requirements from Unit 1? Rayler Parts wants the aggregation object, Rebate Member Product Aggregate, to group records by Product Category and show aggregated data for Total Discounted Transaction Amount.
Let’s follow along as Cindy and Rishi customize the cloned definition to meet the additional field requirements.
Define Your Data Sources
First, Cindy adds the new fields for Transaction Journal and Rebate Member Product Aggregate to the corresponding data sources.
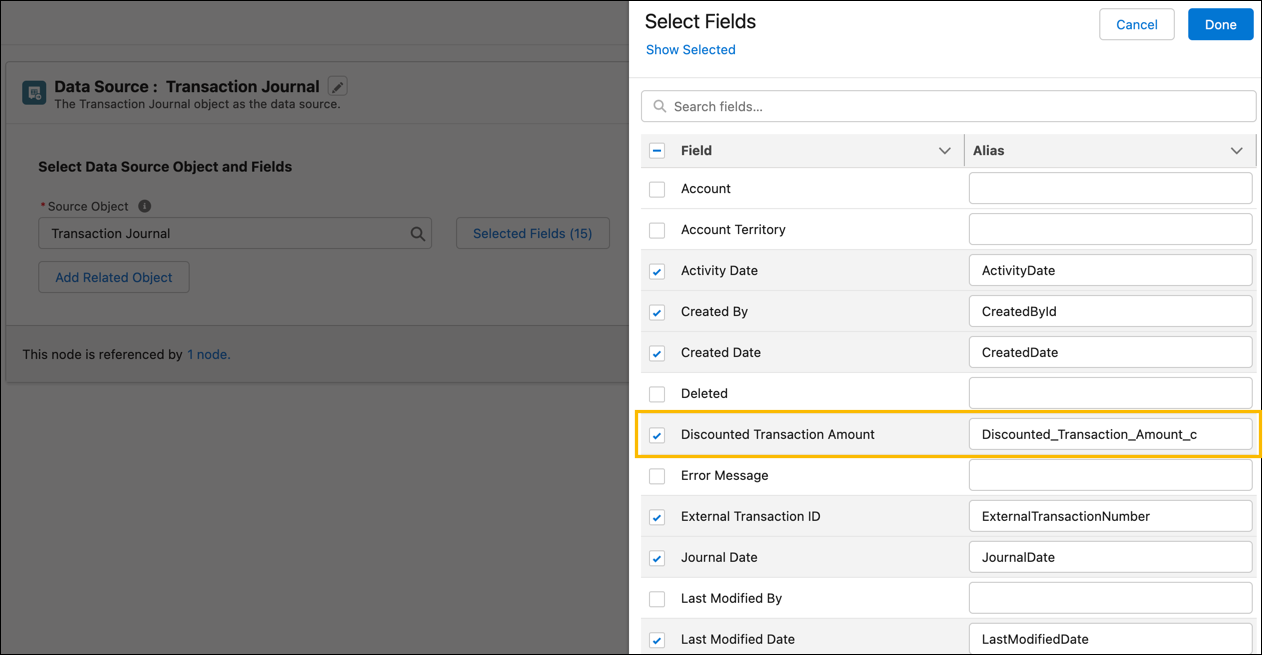
- On the Nodes tab, click Transaction Journal.
- Click Selected Fields.
- Select Discounted_Transaction _Amount_c.
- Click Done and Done.
- On the Nodes tab, click Rebate Member Product Aggregate.
- Click Selected Fields.
- Select ProductCategory_c.
- Select Total_Discounted_Transaction_Amount_c.
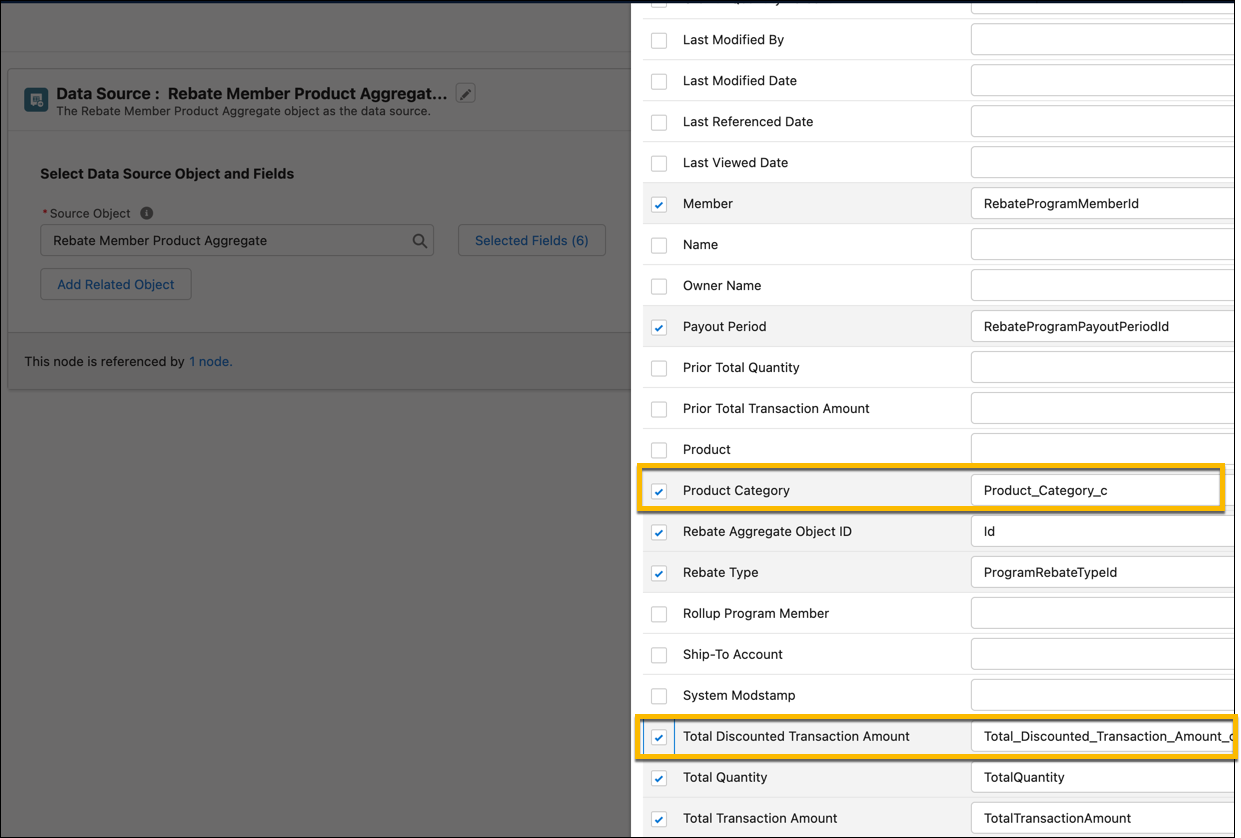
- Click Done, and Done.
Surface the Total Discounted Transaction Amount for Aggregation
Now that Rishi and Cindy have added the fields, they concentrate on the first requirement. The Rebate Member Product Aggregate object is only showing the aggregate value for the total transaction amount. Rayler Parts wants to add a similar aggregate field that shows the total transaction amount after discounts have been applied by account managers.
Rishi notices that each node has information about the next node where the current node is referenced and used. Cindy follows this trail to make changes in the intended sequence.
Here’s what they do to add a new aggregate value field.
- Click the Transaction Journal data source node and ensure that Discounted_Transaction _Amount_c is a selected field. Click the link to the reference node.
- There are no changes required in the Filter Journals to Usage Type node. Click the link to the reference node.
- On the Add Rebate Type and Payout Period to Transaction Journals join node, click Selected Fields for the First Node (Filter Journals by Usage Type) to add the Discounted_Transaction_Amount_c field.
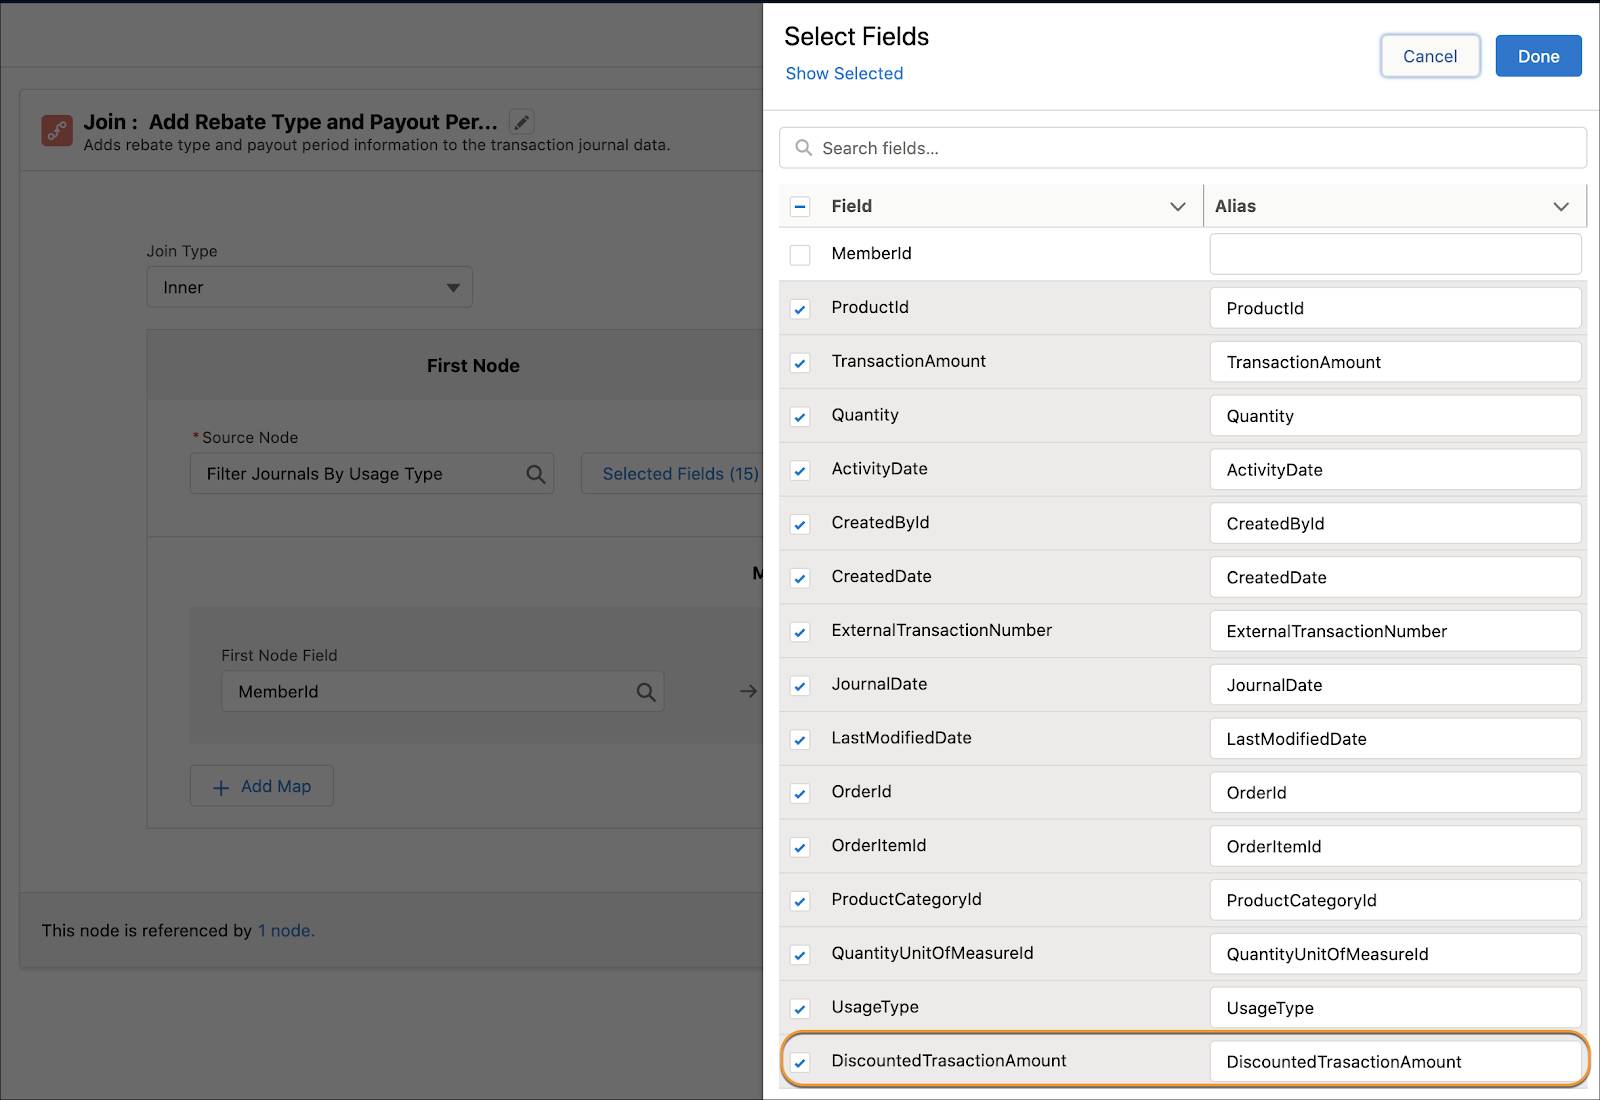
- Click Done and Done.
- There are no changes required in the following nodes.
- Compute Transaction Journals With Activity Dates
- Filter Transaction Journals With Valid Activity Dates
- On the Valid Activity Dated Journals with Program Rebate Type Product node, click Selected Fields for the first node (Filter Transaction Journals With Valid Activity Dates) to select the Discounted_Transaction_Amount_c field. Click the link to the reference node.
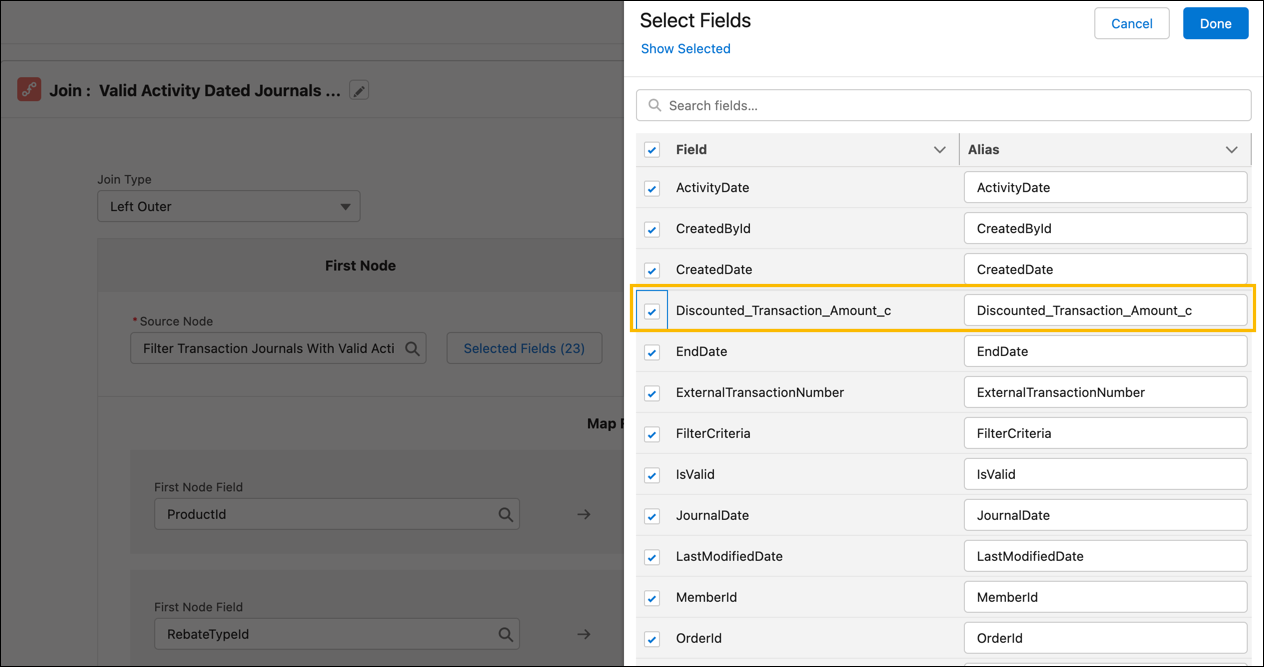
- There are no changes required in the following nodes:
- Filter Journals For Valid Products node.
- Compute Valid Transaction Journals Per Rebate Type
- Filter Valid Transaction Journals For Rebate Types
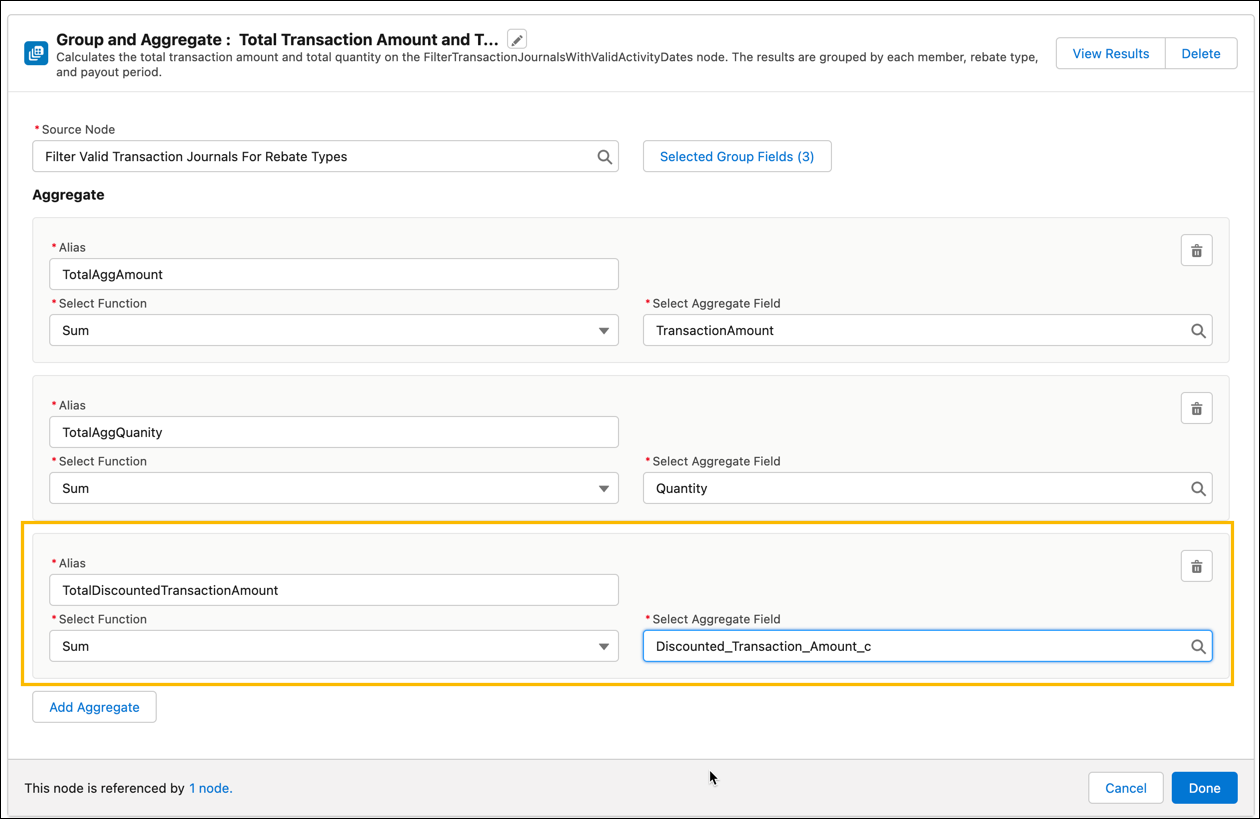
- On the Total Transaction Amount and Total Quantity group and aggregate node, click Add Aggregate.
- Provide the following details.
- Select Function: Sum
- Select Aggregate Field: Discounted_Transaction_Amount_c.
- Click Done.
- On the Look Up Existing Aggregate Data join node, click Selected Fields for the First Node (Total Transaction Amount and Total Quantity) to add the TotalDiscountedTransactionAmount field.
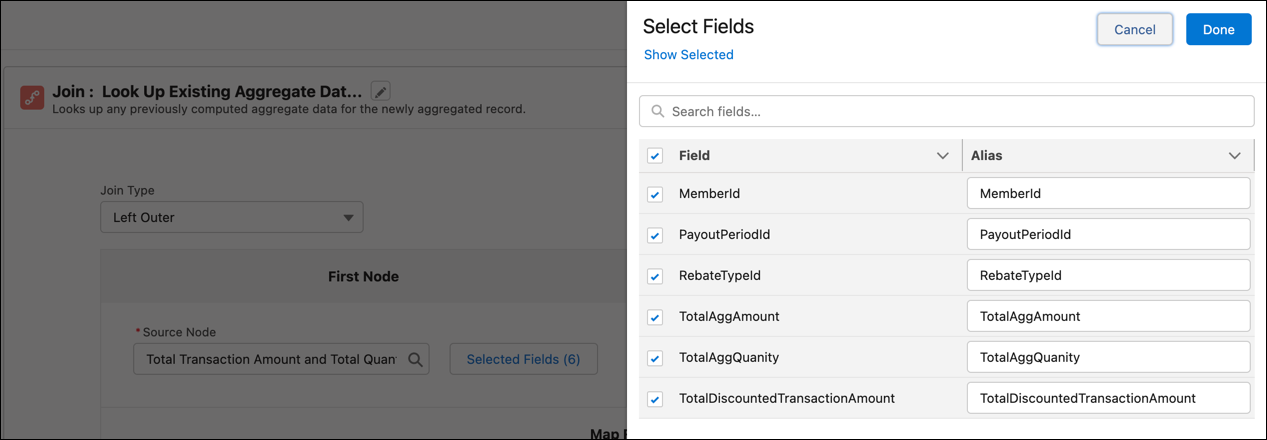
- Click Selected Fields for the Second Node (Rebate Member Product Aggregate) to add the TotalDiscountedTransactionAmount field.
- Click Done.
- On the Compute New Or Updated Aggregate Records formula node, change the formula to the following:
“IF(({TotalAggQuanity} == {TotalQuantity}) && ({TotalAggAmount} == {TotalTransactionAmount}) && ({TotalDiscountedTransactionAmount} == {TotalDiscountedTransactionAmount}), 0,1)”.Validate the syntax and click Done.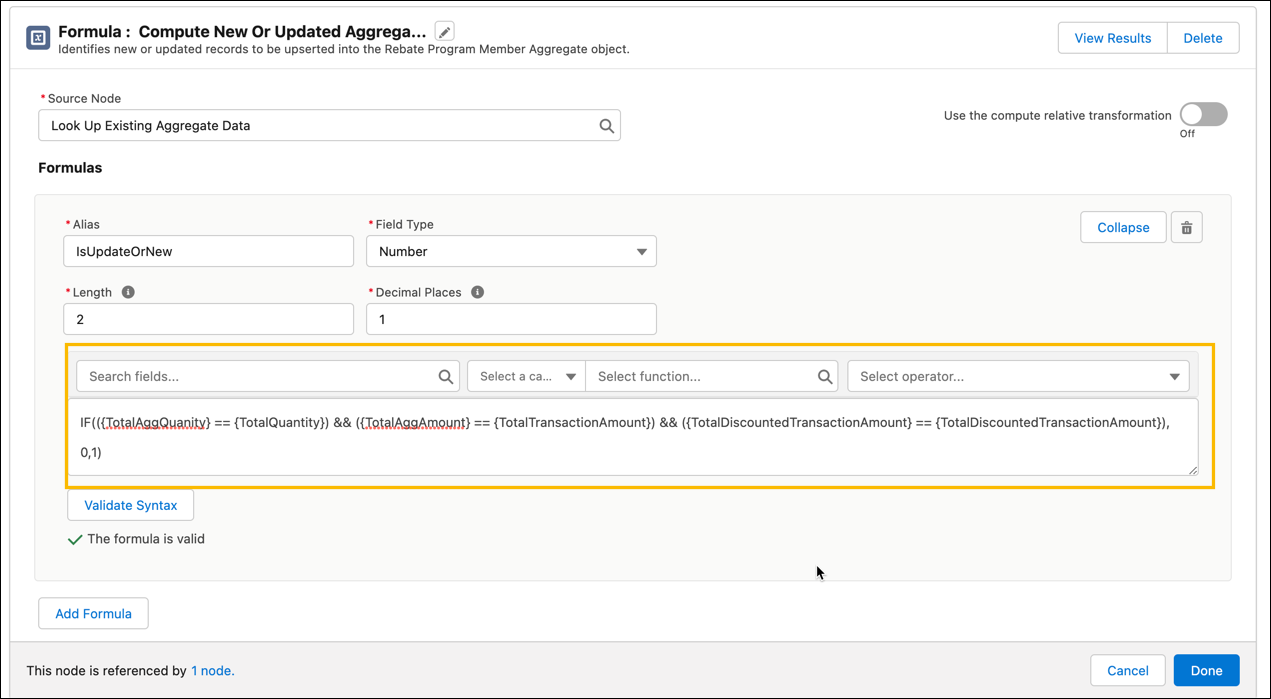
- There are no changes required in the Filter New or Updated Aggregate Records node.
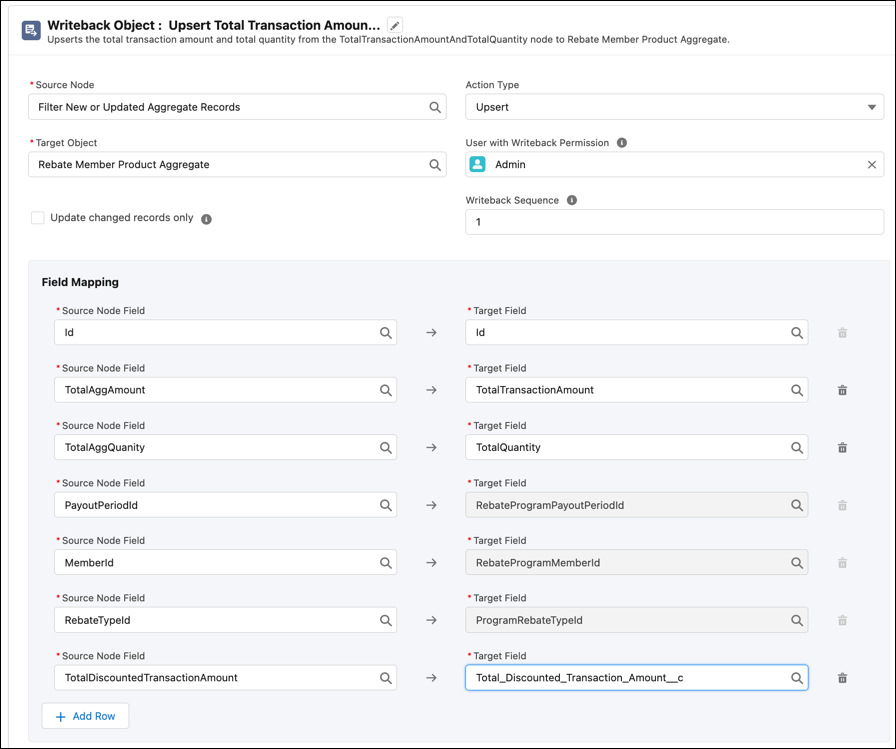
- On the Upsert Total Transaction Amount and Total Quantity writeback node, click Add Row.
- Select the Source Node as TotalDiscountedTransactionAmount, and the Target Field as Total_Discounted_Transaction_Amount_c.
- Click Done.
- Click Save on the header of the builder.
Cindy has successfully created a new aggregation field on the Rebate Member Product Aggregate object and tied it to the existing rules of the predefined definition Aggregate by Member. The field will sum up the values of Discounted Transaction Amount across all valid transaction journal records to provide a single aggregate value per member row.
Group Data by Product Category
Rishi turns to the second requirement. Currently, each aggregation row in the Rebate Member Product Aggregate object shows data per program member. For a particular rebate type and a specific payout period, a single row is created for a program member. But account managers would like to see one row per program member, per product category. To take an example, even if Haven Enterprises had transactions for both hammers and compactors, the aggregate record would show no indication of that.
- Haven Enterprises, Jan’21, Volume Rebate, 300 qty, $30,000
The aggregate records need to be also grouped by product category to show transactions across both the products.
- Haven Enterprises, Hammers, Jan’21, Volume Rebate, 200 qty, $10,000
- Haven Enterprises, Compactors, Jan’21, Volume Rebate, 100 qty, $20,000
Let’s follow along as Cindy and Rishi tweak the DPE definition to get the desired results.
There are two parallel paths from the following data source nodes where Cindy must make changes.
- In the Rebate Member Product Aggregate source node, Cindy already added Product Category as a field.
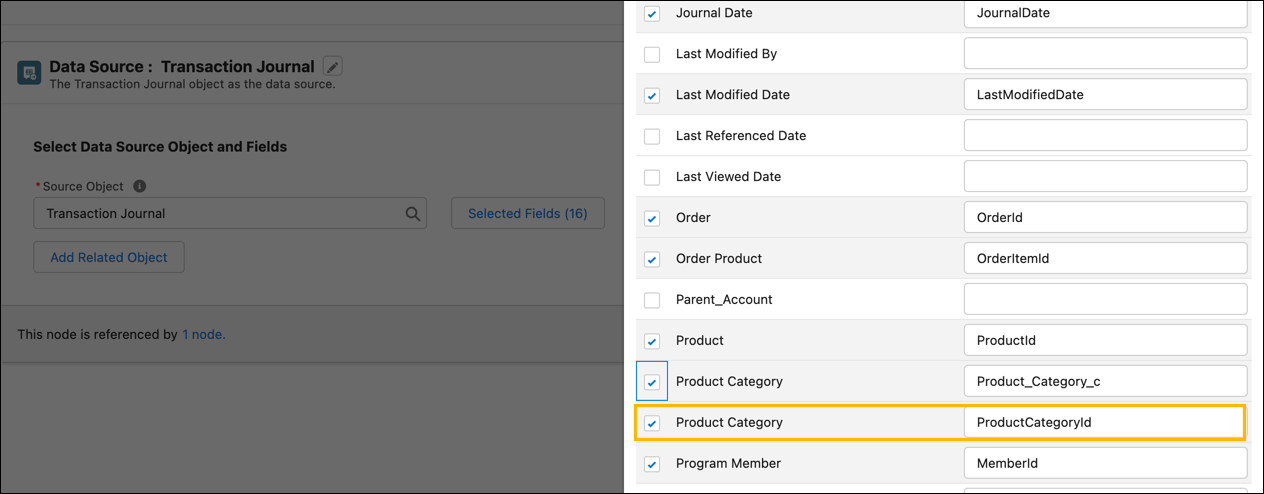
- In the Transaction Journal source node, Product Category ID is available as an out-of-the-box field but Cindy needs to select it.
First up, Cindy follows the trail of referenced nodes for Transaction Journal to make updates.
- Click the Transaction Journal data source node and ensure that ProductCategory is a selected field. Click the link to the reference node.
- There are no changes required in the Filter Journals by Usage Type node.
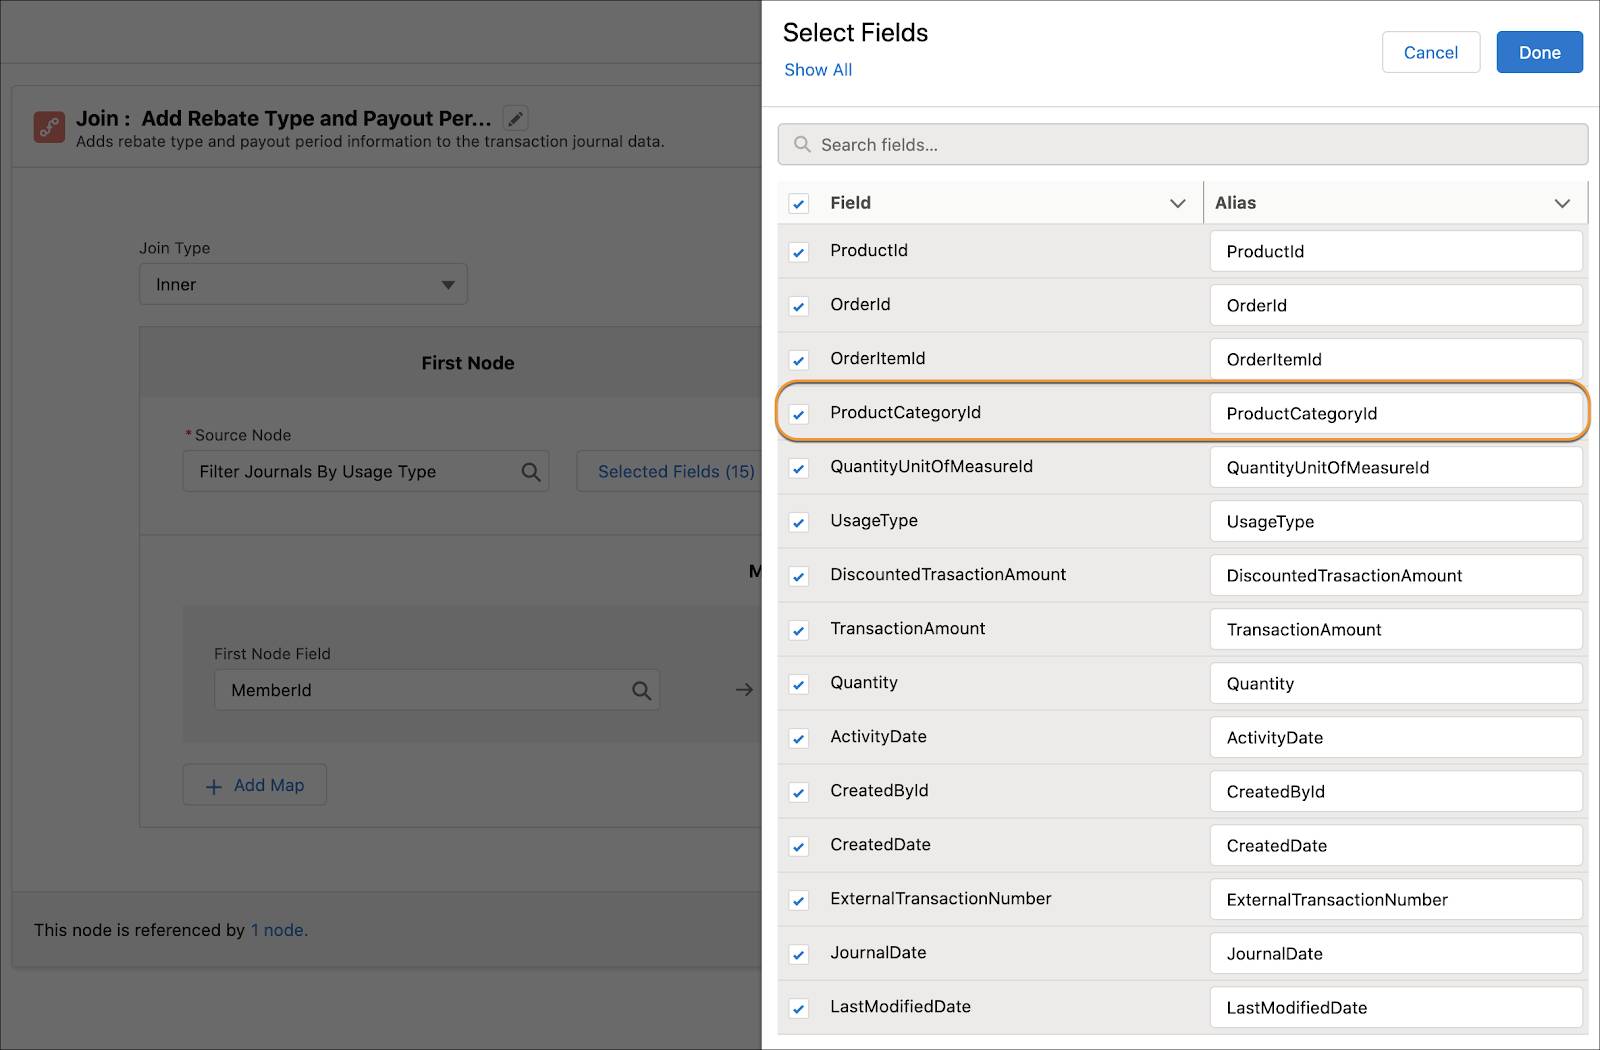
- On the Add Rebate Type and Payout Period to Transaction Journals join node, click Selected Fields for the First Node (Filter Journals By Usage Type), and select ProductCategoryId.
- Click Done and Done.
- There are no changes required in the next two reference nodes.
- Compute Transaction Journals With Activity Dates.
- Filter Transaction Journals With Valid Activity Dates
- On the Valid Activity Dated Journals with Program Rebate Type Product node, click Selected Fields for the first node (Filter Transaction Journals With Valid Activity Dates) to select the ProductCategory field. Click the link to the reference node.
- There are no changes required in the following nodes:
- Filter Journals For Valid Products
- Compute Valid Transaction Journals Per Rebate Type
- Filter Valid Transaction Journals For Rebate Types
- On the Total Transaction Amount and Total Quantity group and aggregate node, click Selected Group Fields.
- Select ProductCategoryId.
- Click Done, and Done.

- On the Look Up Existing Aggregate Data join node, click Selected Fields for the First Node (Total Transaction Amount and Total Quantity), and select ProductCategoryId. Add the alias
ProductCategoryId.
- Click Done.
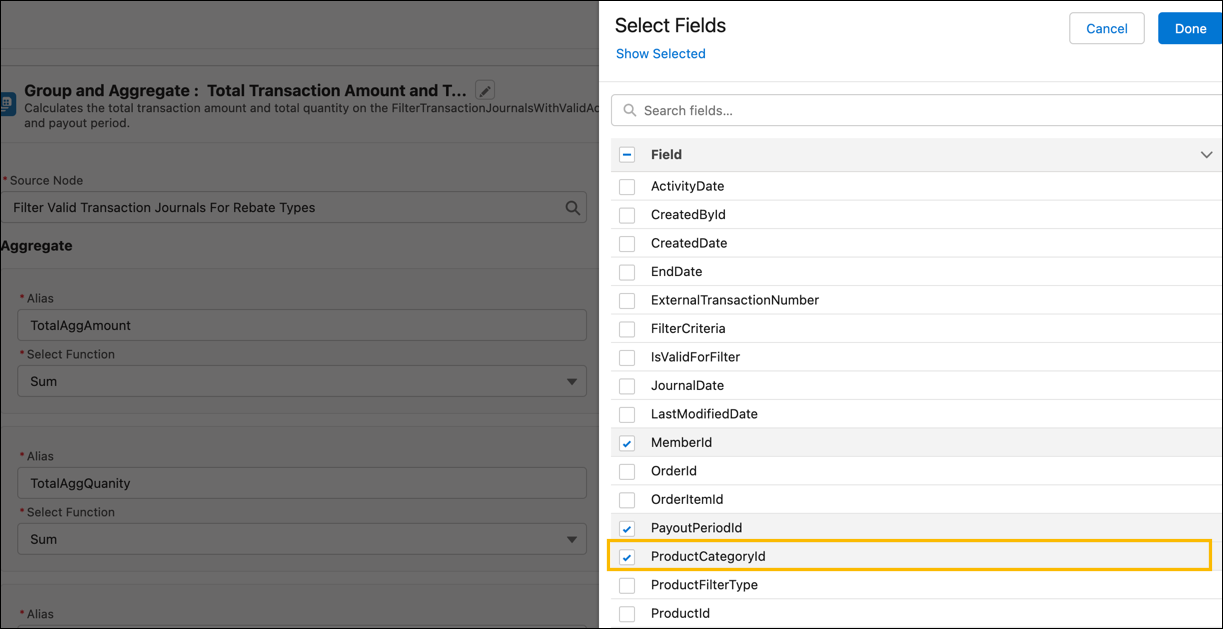
- On the Look Up Existing Aggregate Data join node, click Selected Fields for the First Node (Total Transaction Amount and Total Quantity), and select ProductCategoryId.
- Click Done.
- Click Add Map, and select the following.
- First Node Field: ProductCategoryId
- Second Node Field: Product_Category
- Click Done.

- There are no changes required in the next two reference nodes.
- Compute New Or Updated Aggregate Records
- Filter New or Updated Aggregate Records
- Click Save.
Next, Cindy follows the trail of referenced nodes for Rebate Member Product Aggregate to make updates.
- Click the Rebate Member Product Aggregate data source node, and click the link to the referenced node.
- On the Look Up Existing Aggregate Data join node, click Selected Fields for the Second Node (Rebate Member Product Aggregate), and select Product Category.
- Click Done and Done.
- There are no changes required in the next two reference nodes.
- Compute New or Updated Aggregate Records
- Filter New or Updated Aggregate Records
- Click Save.
Following both trails, Cindy ends up in the final writeback node. Now, it’s time to connect the dots.
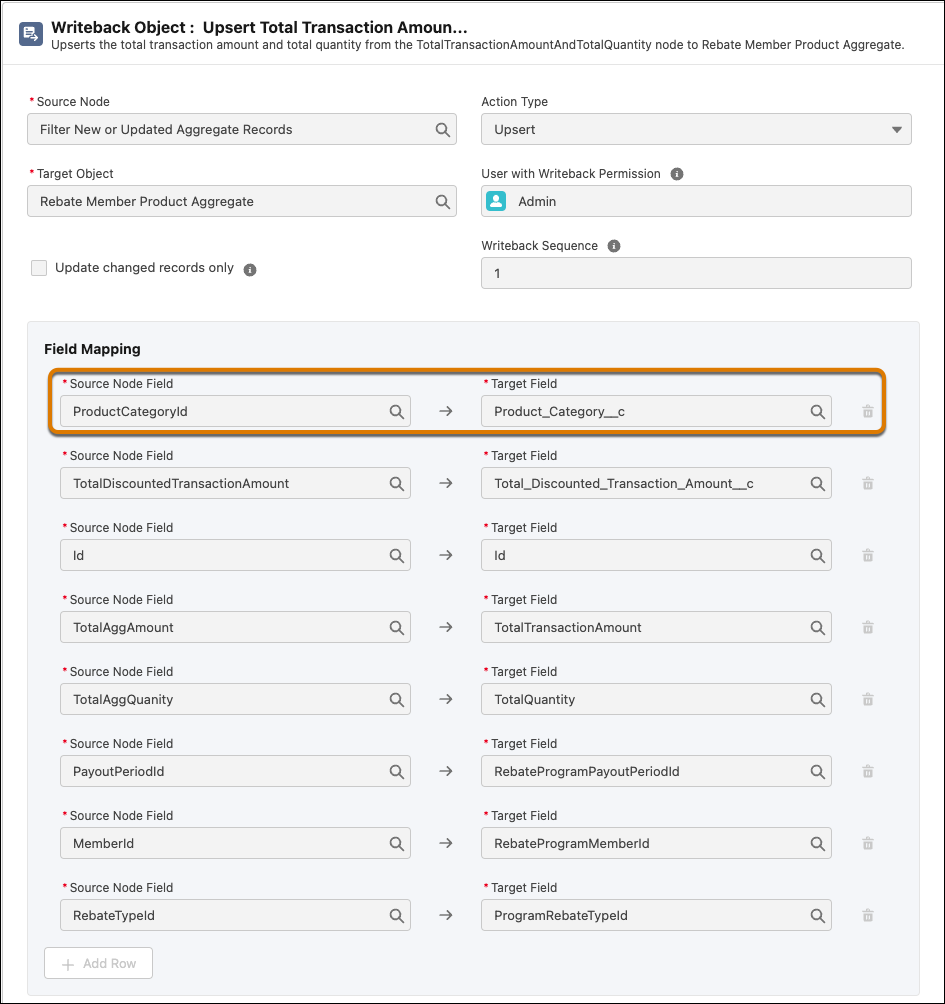
- On the Upsert Total Transaction Amount and Total Quantity writeback node, click Add Row.
- Select the following.
- Source Node Field: ProductCategoryId (derived from Transaction Journal)
- Target Field: Product_Category__c (derived from Rebate Member Product Aggregate)
- Click Done.
- Click Save.
Cindy and Rishi have customized the Aggregate by Member DPE definition to group and aggregate data in new ways for a rebate program. Account managers can track transaction amounts both before and after the discount. And they have granular visibility into eligible payout data for specific product categories for each partner. In the next unit, we do a test run of the DPE definition and check the output.
Resources
