Use Filtered Measurements
Learning Objectives
After completing this unit, you’ll be able to:
- Create filtered measurements in Marketing Cloud Intelligence.
- Differentiate between calculated measurements and filtered measurements.
What Are Filtered Measurements?
Let’s talk about filtered measurements: what they are, how to create them, and how they compare to calculated measurements.
A filtered measurement is a new field that’s based on an existing measurement. This means that you can take any of the measurements you mapped in any of your data streams and filter them for specific dimension values. Suppose you want to filter clicks for a certain publisher. Filtered measurements are the easiest way to do that.
Remember that you can apply a filtered measurement to only one system measurement at a time. You can’t filter two measurements in one filtered measurement. More importantly, you can’t filter a calculated measurement using a filtered measurement. Because the filters you apply must be based on dimensions that exist in your data streams, you can’t use a calculated dimension in a filtered measurement.
So, what’s the difference between filtered measurements and calculated measurements? In a nutshell, filtered measurements are a user-friendly, simple way to accomplish a specific thing. Calculated measurements encompass a world of possibilities, and thus, can be more complex to use. If you just want to narrow the scope of an existing measurement, filtered measurements are definitely the way to go. However, if you’re looking to generate a new calculation, one that’s not based on one of your measurements, then use a calculated measurement instead.
Create and Use Filtered Measurements
If you can satisfy your use case by using a filtered measurement, create one this way: Go to Connect & Mix, click Measurements to expand it, click Filtered Measurements, and then click Add new. The calculated measurements dialog appears, displaying two sections: General and Filter.
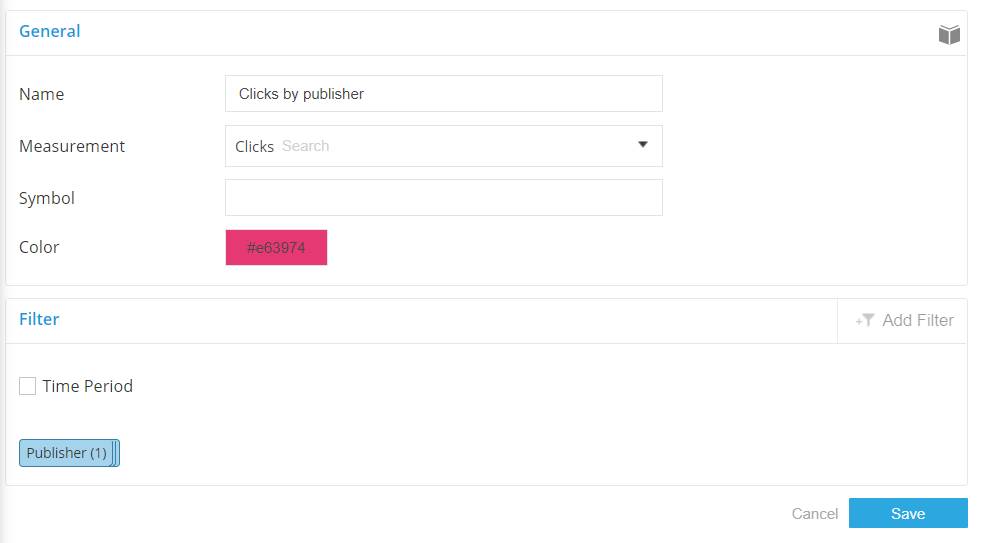
The General section is where you specify which system measurement you want to apply a filter to. The Filter section is where you apply the filter. Going back to the clicks by a specific publisher example, this is what that filtered measurement would look like.

There are two types of filters. The first type is a simple dimensions filter that allows you to choose one or multiple existing values of a specific dimension. It’s important to note that this filter lets you choose only dimensional values that currently exist in your workspace.

The second type is a custom dimension filter, which gives you a bit more flexibility when it comes to the values you can filter on. You can type in the dimension values that the filter should apply to, whether they exist in the database now or not. That allows you to add values that don’t exist yet, but that you anticipate may be found in your data in the future.
The custom dimensions filter lets you add multiple values that should be taken into account, combined by an AND or OR operator. It also supports these operators: equals, not equals, contains, not contains, start with, end with, is empty, not empty, and matches either.

Sum It Up
In this module, you learned what custom calculations are and what types of calculations exist in Marketing Cloud Intelligence. You learned how to use calculated dimensions and measurements as well as filtered measurements. And you learned the difference between calculated and filtered measurements. Head over to the platform and see for yourself how you can use custom calculations to get more out of your data.