Create Promotions
Learning Objectives
After completing this unit, you’ll be able to:
- Explain why it’s important to select qualifying and discounted products carefully.
- Explain how exclusivity works.
- Describe what you must do for an Alert on Approaching setting.
- Explain the difference between promotion types.
Introduction
Brandon Wilson is ready to create promotions for his Spring sports campaign. With so many options available in Salesforce B2C Commerce, right now he just wants to focus on promotions that meet his immediate needs. Later, he can explore other possibilities, building on the experience he gains here.
Brandon has a lot of confidence in his plan. Here’s what he has in mind.
Class |
Discount Type |
Discount |
Exclusivity |
|
|---|---|---|---|---|
20% off Brand-X SuperSpeed running shoes |
Product |
Without qualifying products |
% off |
CLASS |
Free baseball with a pair of baseball shoes |
Product |
With qualifying products |
Bonus |
CLASS |
Buy one, get one half-off Brand-Y Xcel athletic shorts and t-shirts |
Product |
Buy X/ Get Y |
Buy one / Get one |
CLASS |
15% off orders over US$50 |
Order |
Without qualifying products |
% off |
NO |
Free shipping orders over $100 |
Shipping |
With amount of shipment qualifying products |
Free Shipping |
NO |
Product Promotions
Here are the product promotions he wants to create.
- 20% off Brand-X SuperSpeed running shoes
- Free baseball with a pair of baseball shoes
- Buy one, get one half off Brand-Y Xcel athletic shorts and t-shirts
He assigns the CLASS exclusivity setting to all of them, because he doesn’t want shoppers to get more than one discount. The CLASS exclusivity means that a shopper can’t use a promotion with another promotion in the same class.
Brandon selects qualifying and discounted products carefully. For example, even though shoppers can’t order a base product, Brandon can configure a base product as a discounted product so that the discount applies to all variations of the base product. He can select from these product types.
- Standard product
- Variation product
- Product set
- Product bundle
Create Promotion: 20% Off Brand-X SuperSpeed Running Shoes
Here’s how he creates this promotion.
- In Business Manager, click App Launcher, and select Merchant Tools | Online Marketing | Promotions.
- Click New.
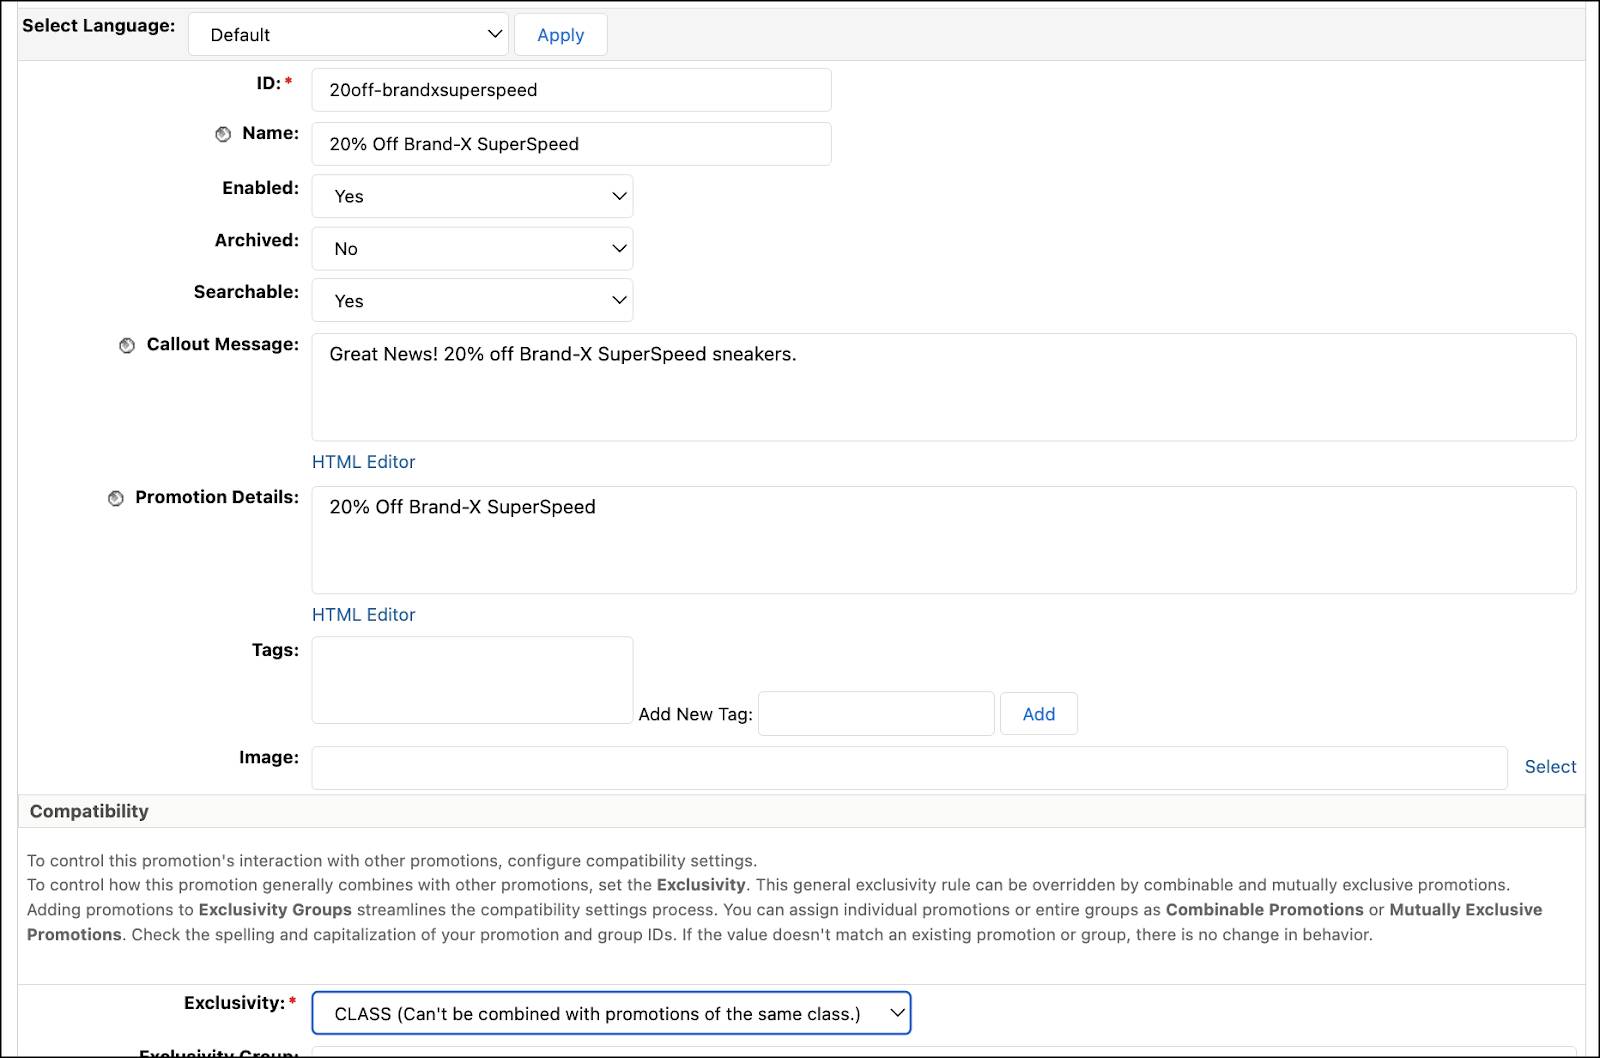
- Enter or select the general promotion information.
- Enter the ID:
20off-brandxsuperspeed - Enter the name:
20% Off Brand-X SuperSpeed - Enable it and make it searchable.
- Enter the callout message:
Great News! 20% off Brand-X SuperSpeed sneakers! - Enter the promotion details:
20% Off Brand-X SuperSpeed - Select an image.
- Select exclusivity: CLASS
- Click Apply.
- Scroll down to the rules section.
- Select the promotion class: Product
- Select a promotion type: Without Qualifying Products
- Enter
20. This applies to each applicable line item.
- Select the discount: Percent off
- Click Edit beside Discounted Products
- Select Brand, equals, and the brand: Brand-X
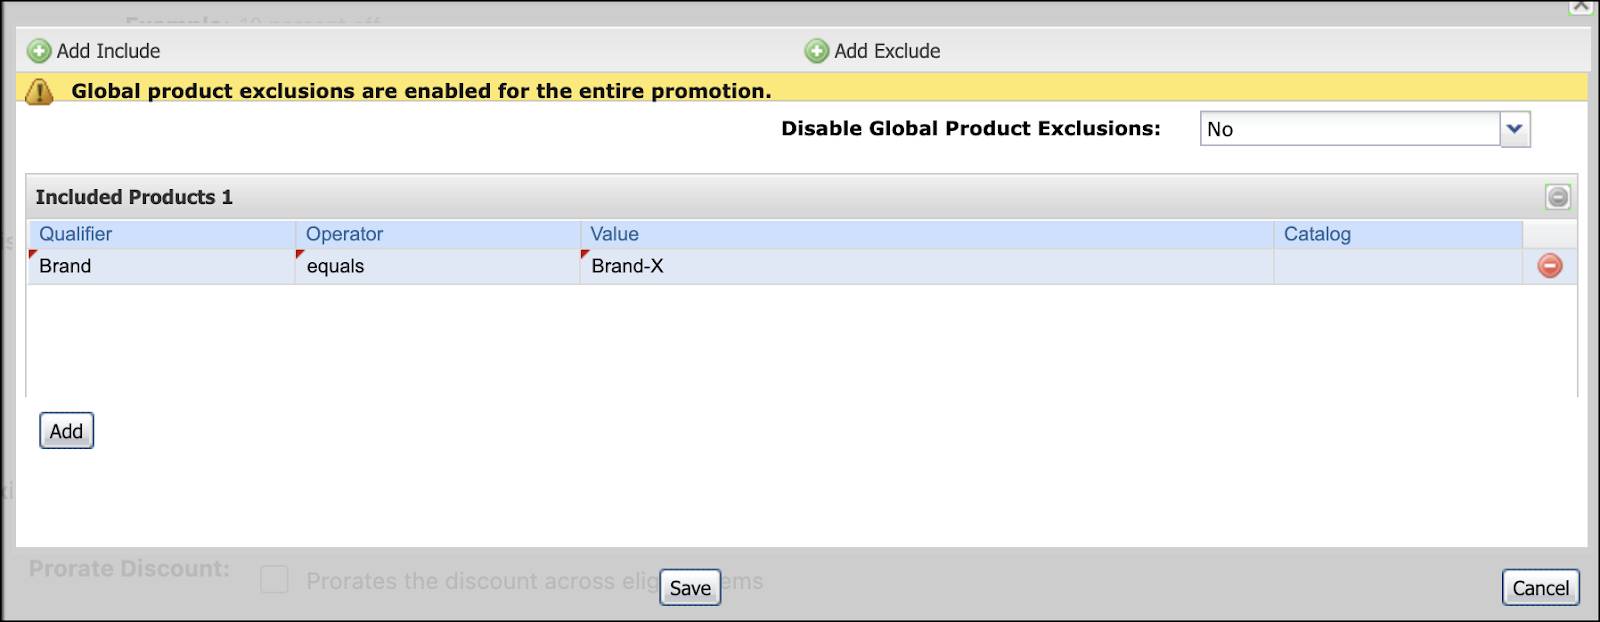
- Click Save.
- Leave the Maximum Applications field empty. This discount applies to every product that qualifies in the cart.
- Test the promotion on the storefront.
Create Promotion: Free Baseball with a Pair of Baseball Shoes
Brandon is thrilled to offer a new baseball to lucky shoppers. Here’s how he does it.
- In Business Manager, click App Launcher, and select Merchant Tools | Online Marketing | Promotions.
- Click New.
- Enter or select the general promotion information.
- Enter the ID:
freebaseballwithbaseballshoes - Enter the name:
Free baseball with a pair of baseball shoes - Enable it and make it searchable.
- Enter the callout message:
Pitch a new baseball wearing your new baseball shoes. One per order. Always tell the shopper about the discount’s limitations. - Enter the promotion details.
- Select an image.
- Select exclusivity: CLASS
- Click Apply.
- Scroll down to the rules section.
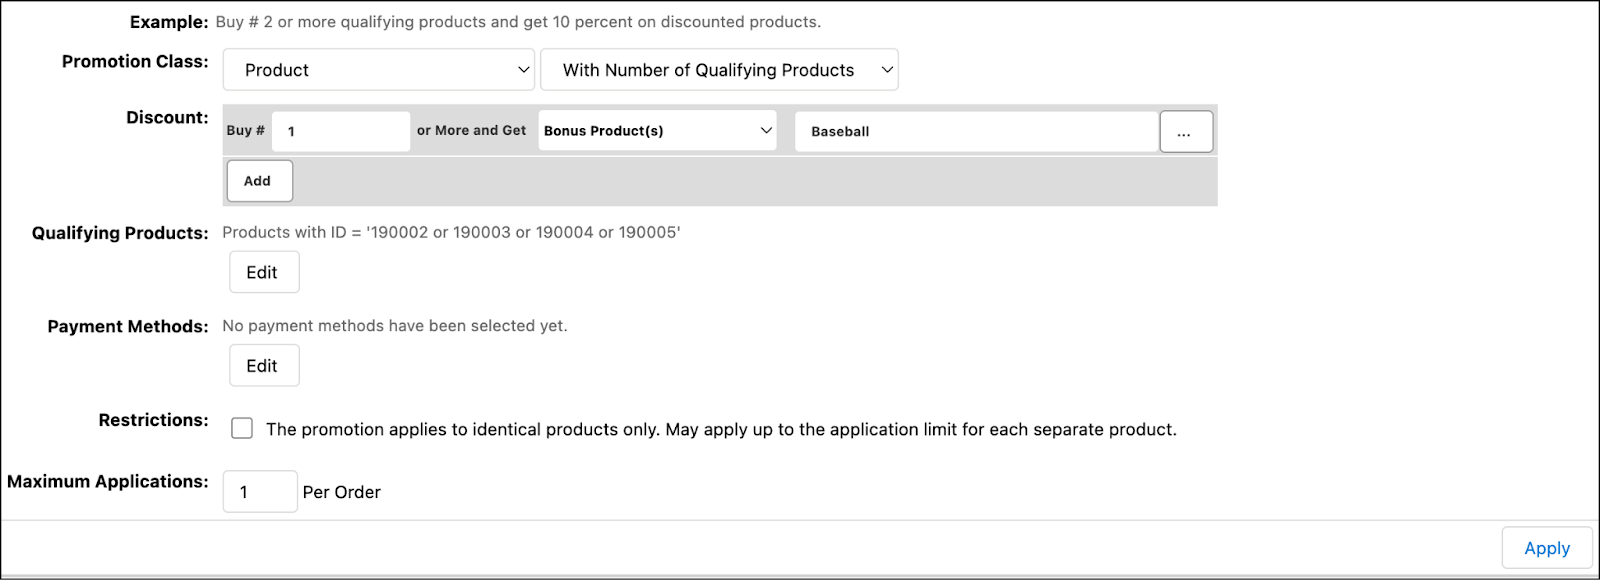
- Select the promotion class: Product
- Select a promotion type: With Number of Qualifying Products
- Enter
1.
- Select Bonus Product.
- Select the bonus product.
- For Qualifying Products, click Edit. Select the qualifying products by ID (all the baseball shoes).
- Enter the maximum application:
1. Brandon wants shoppers to get only one baseball per order.
- Click Apply.
- Test the promotion on the storefront
Create Promotion: Buy One Get One Half Off Brand-Y Xcel Athletic Shorts and T-Shirts
Brandon wants to push this great brand. He’s a huge fan.
Here’s how he creates this promotion.
- In Business Manager, click App Launcher, and select Merchant Tools | Online Marketing | Promotions.
- Click New.
- Enter or select the general promotion information.
- Enter the ID:
buyonegetonehalfoff-brand-y - Enter the name:
Buy one get one half off Brand-Y Xcel - Enable it and make it searchable.
- Enter the callout message:
Buy One Get One Half Off Brand-Y Xcel Athletic Shorts and T-Shirts! You’ll love this awesome new brand! - Enter the promotion details.
- Select an image.
- Select exclusivity: CLASS
- Click Apply.
- Scroll down to the Rules section.
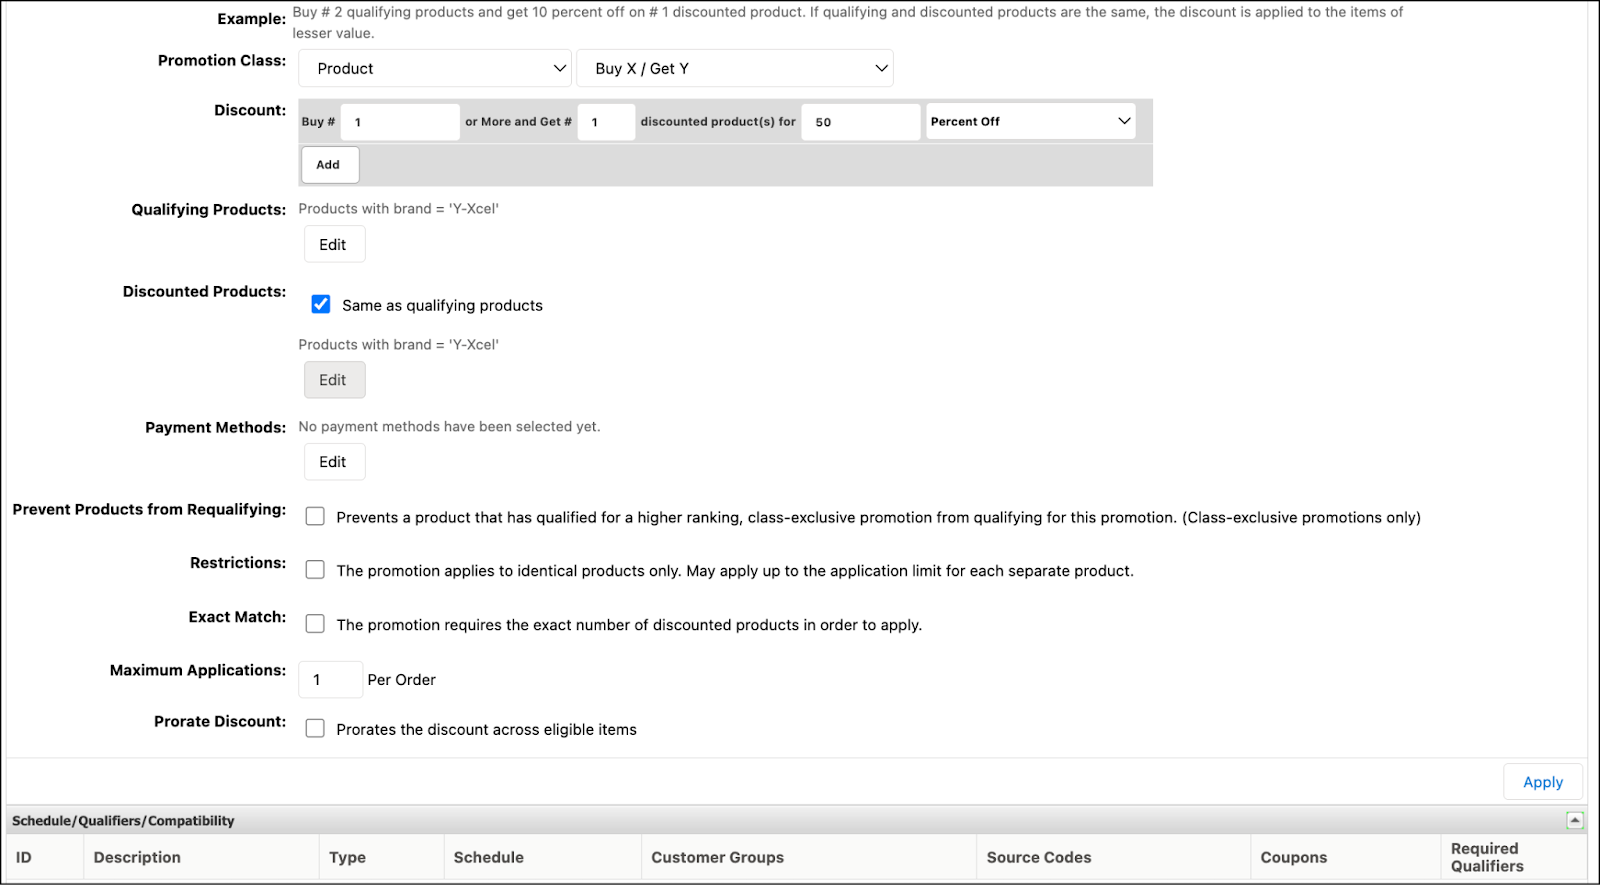
- Select the promotion class: Product
- Select a promotion type: Buy X / Get Y
- Enter and select:
Buy 1 or more and get 1 discounted product for 50 Percent Off - Select the qualifying products with attribute Brand equal to Y-Xcel.
- Select Discounted Products: Same as qualifying products
- Enter maximum application:
1 - Click Apply.
- Test the promotion on the storefront.
Order Promotions
Brandon wants to offer an order promotion where orders over $50 get 15% off. He also wants to alert the shopper when their order value approaches this discount by $10. The code for this feature is included in the Storefront Reference Architecture (SFRA) and SiteGenesis.
Brandon takes these steps.
- In Business Manager, click App Launcher, and select Merchant Tools | Online Marketing | Promotions.
- Click New.
- Enter or select the general promotion information.
- Enter the ID:
15%off-ordersover$50 - Enter the name:
15% off orders over $50 - Enable it and make it searchable.
- Enter the callout message:
Thanks for your business! Get 15% off orders over $50. - Enter the promotion details.
- Select an image.
- Select exclusivity: NO. It can be combined with any promotion.
- Click Apply.
- Scroll down to the rules section.
- Select the promotion class: Order
- Select: With Amount of Qualifying Products
- Enter and select:
Buy 50 or more and get 15 Percent Off - Don’t select any products because it doesn’t matter which products the shopper buys.
- Select Return as approaching promotion. This is the alert on approaching feature.
- Enter
10as the approaching value. When the order value is $10 away from the discount, the storefront displays a message.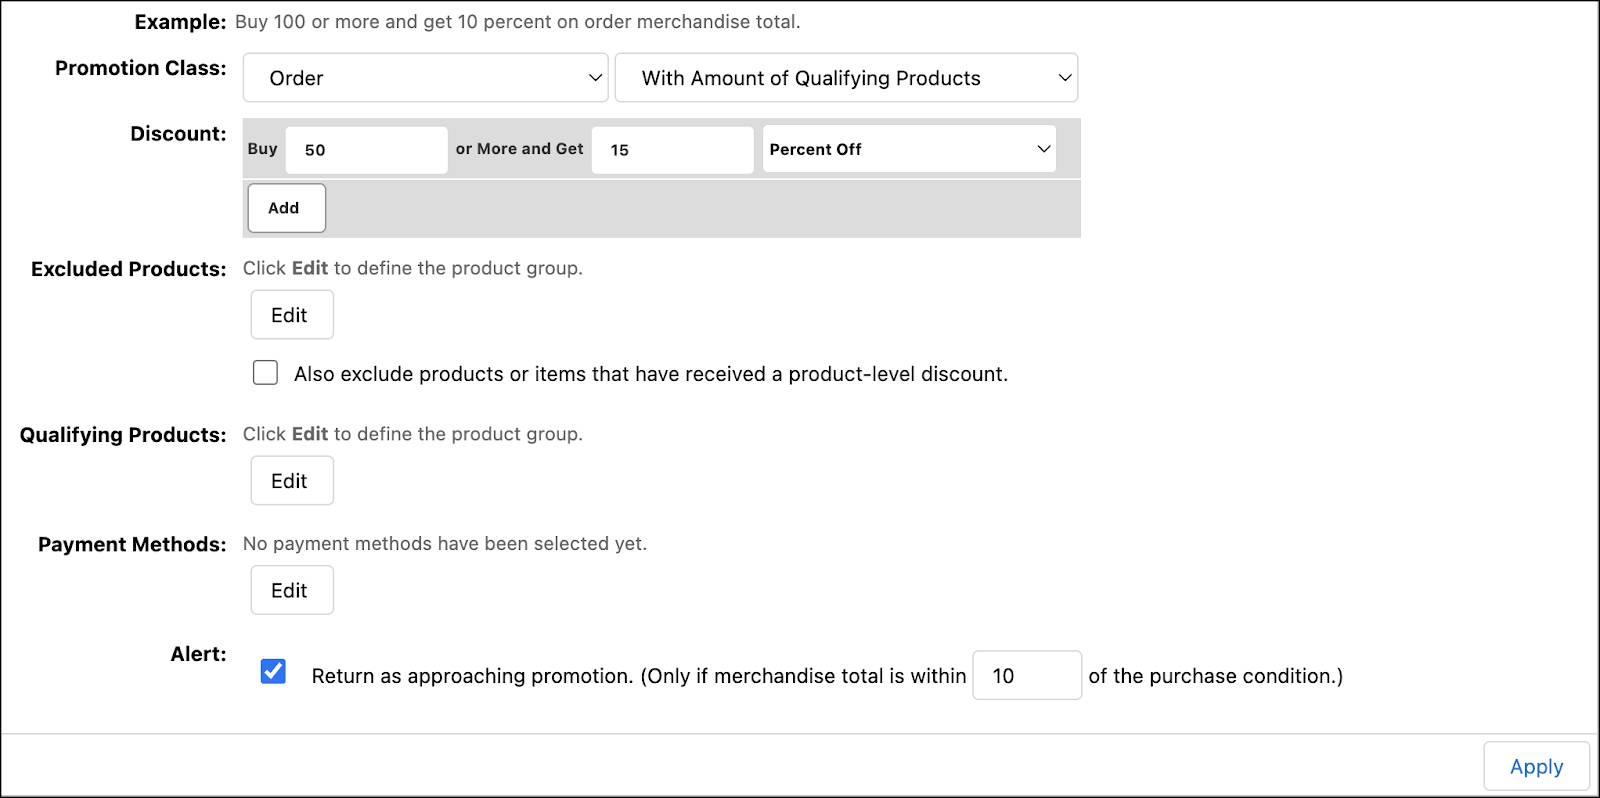
- Click Apply.
- Test the promotion on the storefront.
Shipping Promotions
Brandon wants to create a promotion with free shipping on orders over $100. He also wants to alert the shopper when their order value approaches this discount by $10. He first works with a developer to add code for the alert on approaching functionality. His developer refers to documentation in the B2C Developer Guide. Once the developer has completed the code, Brandon takes these steps.
- In Business Manager, click App Launcher, and select Merchant Tools | Online Marketing | Promotions.
- Click New.
- Enter or select the general promotion information.
- Enter the ID:
freeship-ordersover100 - Enter the name:
Free shipping on orders over $100 - Enable it and make it searchable.
- Enter the callout message:
Great News! Free shipping on orders over $100! - Enter the promotion details.
- Select an image.
- Select exclusivity: NO. It can be combined with any promotion
- Click Apply.
- Scroll down to the rules section.
- Select the promotion class: Shipping
- Select With Amount of Shipment-Qualifying Products.
- Enter and select:
Buy 100 or more and get Free shipping - Don’t select any products because it doesn’t matter which products the shopper buys.
- Select the shipping methods to trigger the discount.
- Select Return as approaching promotion to alert the shopper that they are about to get a discount.
- Enter
10as the approaching value.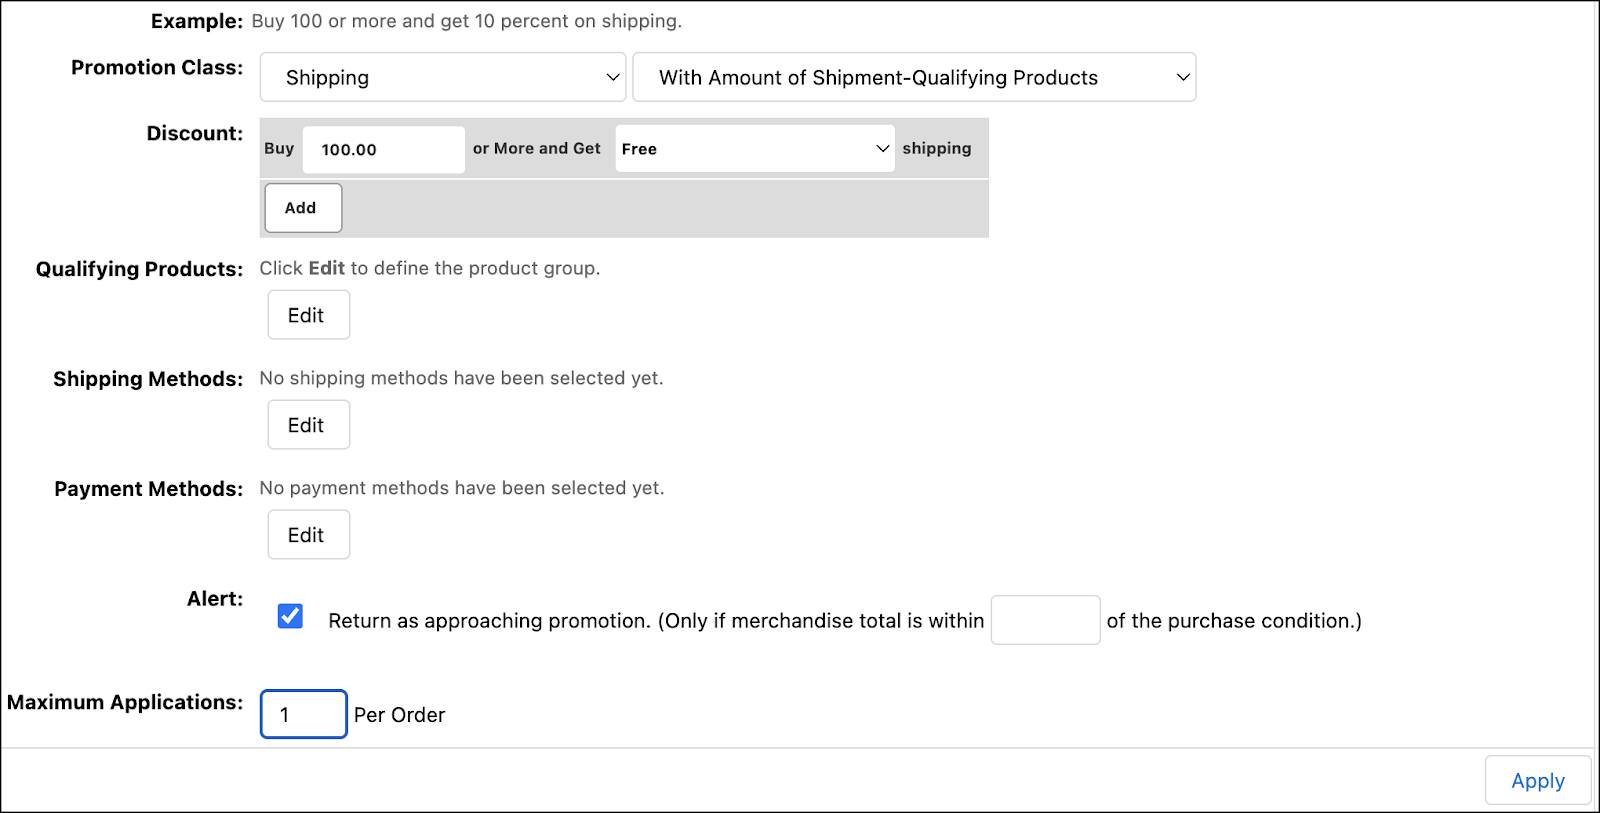
- Enter Maximum application
1per order.
- Click Apply.
- Test the promotion on the storefront.
Best Practices
As Brandon gains experience, he learns some best practices that help ensure smooth sailing.
Create a Test Plan
He creates a simple test plan that documents all the variations of his promotions to ensure that:
- Qualifiers work as intended.
- Descriptions appear as intended.
- Discount rules are applied only when the conditions are met.
- A discount is removed when the qualifying condition is removed
Using this plan, he pretends to go shopping to see each promotion.
He tests his promotions in the staging environment using the Storefront Toolkit. For each promotion, he uses the Storefront Toolkit to specify a promotion’s active dates. After a data replication to the production instance, he validates that his promotions also work correctly in production.
Messaging in the Storefront
He always shows a message in the storefront about promotion restrictions, limitations, exclusions, or conditions. Here are some examples.
- While supplies last
- One discount per order
- Following brands not eligible for this promotion
Promotion Workflow
Brandon develops a workflow for creating his promotions. The workflow shows:
- Who can add content assets
- How promotion requests are made
- Who builds promotions
- Who manages promotions once they go live
- Who needs to approve the promotions and discounts, and at which steps
- What are the timelines and deadlines
Next Steps
We followed along as Brandon created several promotions to include as experiences in his new Spring campaign. We also learned about best practices. Next, Brandon uses the qualifiers and promotions he configured to create a campaign.
Resources
