Activar y configurar el coach de ventas de Agentforce
Objetivos de aprendizaje
Después de completar esta unidad, podrá:
- Activar y crear un usuario para el coach de ventas de Agentforce.
- Otorgar acceso al coach de ventas de Agentforce, configurarlo y activarlo.

Activar el coach de ventas en Agentforce
Para activar y ejecutar el coach de ventas, primero hay varios servicios que debe activar. El asistente de configuración del coach de ventas de Agentforce hace que resulte más sencillo activar todas las funciones compatibles necesarias, ya que muestra una lista de las funciones que necesita y cuáles están activadas.
Activar funciones compatibles
- En la página de inicio, haga clic en el icono de engranaje
 y seleccione Salesforce Go. De esta manera, se abre la página de inicio de Salesforce Go en Setup (Configuración). Si ya se encuentra en la página de configuración, puede utilizar Quick Find (Búsqueda rápida) para buscar y seleccionar Salesforce Go.
- Deslícese hasta la sección Get Started with Agentforce (Primeros pasos con Agentforce) y haga clic en Set Up (Configuración) en la tarjeta Agentforce for Sales.

- Haga clic en Turn On (Activar) pata habilitar Agentforce en su organización.

- Haga clic en Confirm (Confirmar). La activación de Agentforce puede tardar unos minutos. Una vez activado, Agentforce hace que los agentes relacionados con las ventas estén disponibles en la configuración. Por ejemplo, Agentforce for Sales ya incluye dos agentes: coach de ventas y agente de SDR. Tras la activación, se podrá acceder a estos agentes desde esta página. Aquí, puede activar el agente que quiera que sea coach de ventas para este módulo.
- Active la opción Agentforce Sales Coach (Coach de ventas de Agentforce).
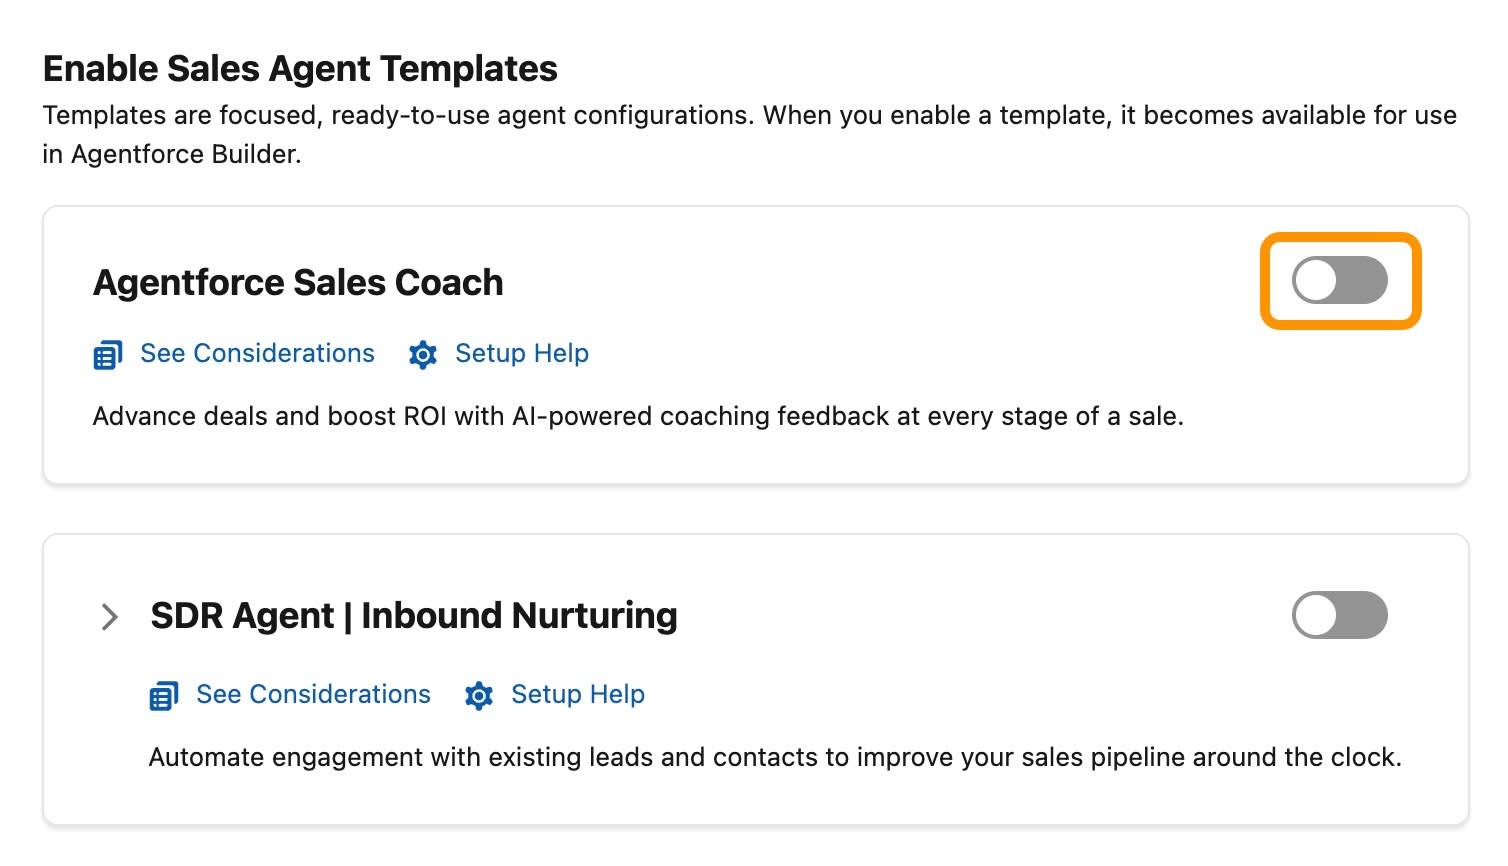
- Haga clic en Confirm (Confirmar) en el cuadro de diálogo. La activación del agente puede tardar unos minutos. Una vez activado, estarán disponibles los pasos de configuración que debe completar. Como se muestra, uno de los pasos requeridos, la activación del agente, ya se ha completado. Su agente ya se ha habilitado y está listo para configurarse.
Otorgue a los usuarios acceso a coaching de ventas
Para este proyecto, se debe asignar acceso para poder configurar y operar el agente de coach de ventas.
- En la sección de configuración Agentforce Sales Coach (Coach de ventas de Agentforce), haga clic en Manage (Gestionar) en la sección Manage User Access (Gestionar el acceso de los usuarios).

- En la ficha Manage Agentforce Sales Coach (Gestionar coach de ventas de Agentforce), haga clic en el menú desplegable Recently Viewed (Visto recientemente) y cámbielo a All Users (Todos los usuarios).
- Localice su nombre y marque la casilla que aparece junto a YOUR NAME (SU NOMBRE).
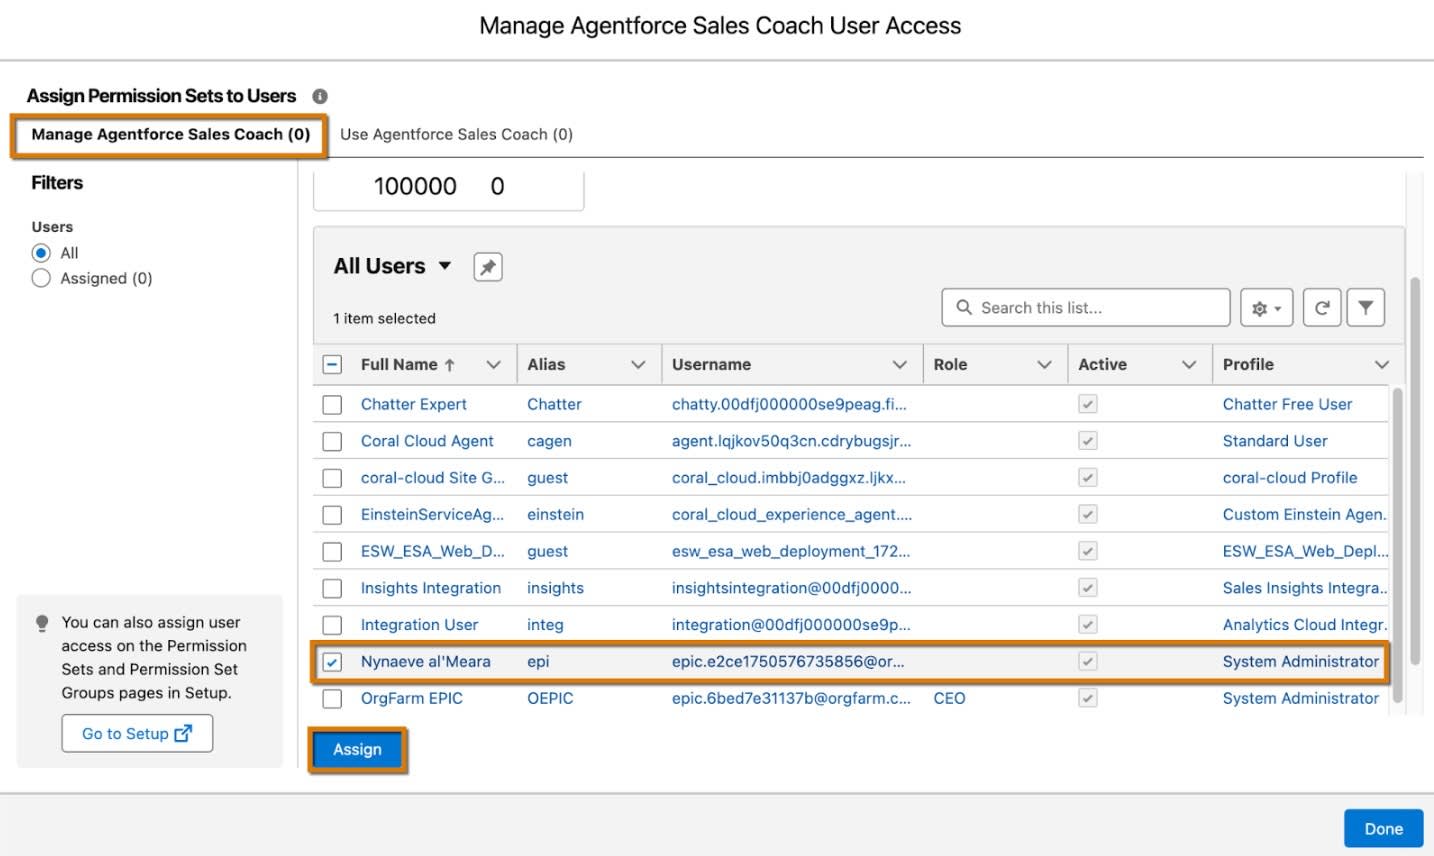
- Haga clic en Assign (Asignar). Ahora ya se ha proporcionado la capacidad de gestionar el coach de ventas de Agentforce.
- Haga clic en la ficha Use Agentforce Sales Coach (Utilizar el coach de ventas de Agentforce) y cambie el menú desplegable Recently Viewed (Visto recientemente) a All Users (Todos los usuarios).
- Seleccione la casilla de verificación que aparece junto a YOUR NAME (SU NOMBRE). Haga clic en Assign (Asignar) y, a continuación, en Done (Listo).

- Ahora debería ver una casilla de verificación marcada en el paso Manage User Access (Gestión del acceso de los usuarios), mostrando que este paso se ha completado. Ha otorgado los permisos necesarios para el agente de coach de ventas correctamente.
Agregar el coach de ventas de Agentforce a las páginas de la oportunidad
Ahora que cuenta con los permisos adecuados, vamos a agregar el coach de ventas de Agentforce a la página Opportunity (Oportunidad). Esta es la interfaz principal en la que puede interactuar con el coach de ventas una vez que esté activado y configurado. Este paso marca el tercer requisito en el proceso de configuración del coach de ventas de Agentforce.
- Vuelva a la configuración del coach de ventas de Agentforce haciendo clic en Salesforce Go desde el icono Setup (Configuración); a continuación, haga clic en la flecha hacia abajo que aparece junto a Agentforce Sales Coach (Coach de ventas de Agentforce) para expandir la sección.
- En la sección Add Components, Fields, and Actions to Lightning Record Page (Agregar componentes, campos y acciones a la página de registro Lightning), haga clic en Manage (Gestionar).
- Haga clic en Open in App Builder (Abrir en App Builder) junto a la opción predeterminada Opportunity Grouped View (Vista agrupada de la oportunidad). Si no la ve, es posible que tenga que deslizarse hacia la derecha. Lightning App Builder (Generador de aplicaciones Lightning) se abre en una nueva ficha. Aquí es donde puede editar el diseño de la página Opportunity Record (Registro de oportunidades).
- En el panel Components (Componentes), haga clic y arrastre Agentforce Sales Coach (Coach de ventas de Agentforce) hasta la sección Related Lists (Listas relacionadas).

- Haga clic en Save (Guardar) y, a continuación, en Activate (Activar).
- Haga clic en Assign as Org Default (Asignar como predeterminado de la organización).
- Deje Desktop (Escritorio) como vista predeterminada y haga clic en Next (Siguiente).
- Haga clic en Save (Guardar). Ya ha terminado con esta ficha, por lo que puede cerrar la ficha Lightning App Builder (Generador de aplicaciones Lightning).
- Una vez que esté de vuelta en la página Setup (Configuración), haga clic en Done (Listo). Actualice la página.
- Marque la casilla de forma manual para señalar este paso como completado.
Crear un usuario de coach de ventas
Su coach de ventas de Agentforce funciona como un usuario en Salesforce. Como tal, necesita permisos de gestión, generación de informes y realización de registros, al igual que otros usuarios de su organización. A continuación, cree un tipo específico de usuario para su agente de ventas autónomo y asígnele los permisos adecuados.
- En Quick Find (Búsqueda rápida), busque y seleccione Users (Usuarios).
- Haga clic en Nuevo usuario.
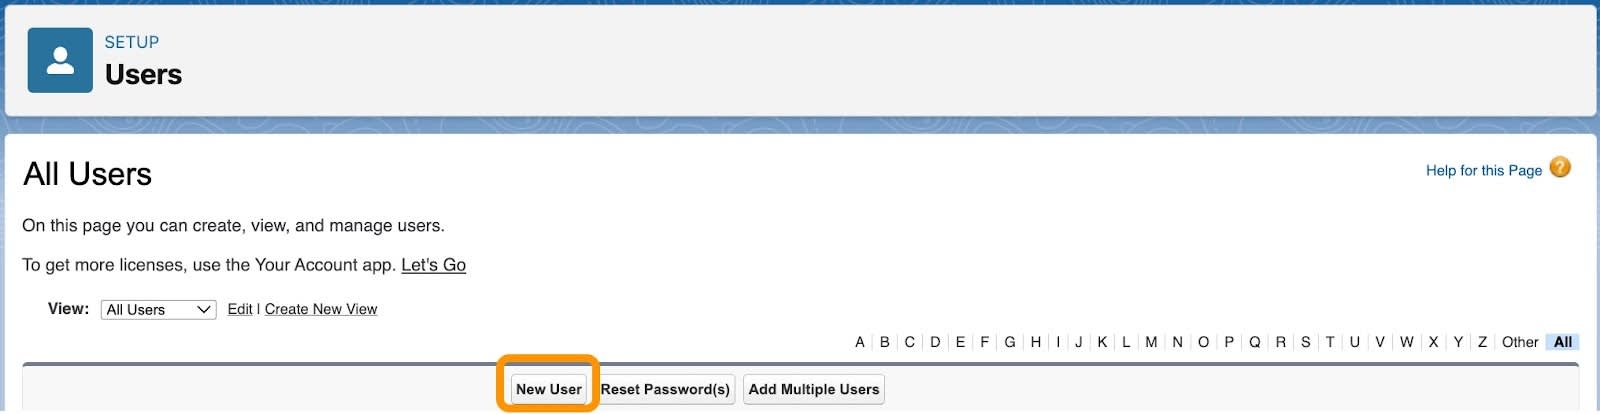
- Se abre una nueva ficha donde puede crear un usuario nuevo. Complete los campos de usuario nuevo de la siguiente manera:
- First Name (Nombre):
Sales Coach(Coach de ventas) - Last Name (Apellido):
Agent - Alias: se completa automáticamente
- Email (Correo electrónico): introduzca su dirección de correo electrónico
- Nombre de usuario: El nombre de usuario debe ser único.
- Nickname (Apodo): se completa automáticamente
- Company (Empresa):
Acme - User License (Licencia de usuario): Agente de Einstein
- Profile (Perfil) Einstein Agent User (Usuario agente de Einstein)
- First Name (Nombre):

- Haga clic en Save (Guardar). Se ha creado el registro de usuario de coach de ventas de Agentforce.
- Deslícese hacia abajo hasta la sección Permission Set Assignments (Asignaciones de conjuntos de permisos) y haga clic en Edit Assignments (Modificar asignaciones).
- Mueva Agentforce Sales Coach (Coach de ventas de Agentforce) de la sección Available Permission Sets (Conjuntos de permisos disponibles) a la sección Enabled Permission Sets (Conjuntos de permisos habilitados).
- Haga clic en Save (Guardar).
Ya casi ha terminado de configurar el agente. Una vez que termine de configurar el coach de ventas de Agentforce y lo active, podrá comenzar a personalizarlo.
Configurar y activar el coach de ventas de Agentforce
Ahora que ya se ha realizado el trabajo previo, está listo para configurar y activar el coach de ventas.
- Si todavía no está en la página Salesforce Go, haga clic en
 y seleccione Salesforce Go. De esta manera, se abre la página de inicio de Salesforce Go en Setup (Configuración). Si ya se encuentra en la página de configuración, puede utilizar Quick Find (Búsqueda rápida) para buscar y seleccionar Salesforce Go.
- Deslícese hasta la sección Get Started with Agentforce (Primeros pasos con Agentforce) y haga clic en Keep Going (Continuar).
- En la tarjeta Agentforce Sales Coach (Coach de ventas de Agentforce), haga clic en
 para desvelar los pasos de configuración. Llegados a este punto, deberían completarse 3 de los 4 pasos obligatorios.
- Haga clic en Go (Ir). De esta manera, Agentforce Builder se abre en una nueva ficha con el coach de ventas ya seleccionado.

- Se abre una nueva ficha donde puede seleccionar el agente que quiere crear. El tipo de agente, Agentfoce Sales Coach (Coach de ventas de Agentforce), ya se ha seleccionado.
- En el paso Select Your Agent’s Subagents (Seleccionar los subagentes de su agente), asegúrese de que todos los subagentes disponibles se hayan agregado. Haga clic en Next (Siguiente).
- En el paso Customize your agent (Personalizar su agente), rellene los campos de la siguiente manera:
- Name (Nombre):
Agentforce Sales Coach(Coach de ventas de Agentforce) - API Name (Nombre de la API):
Agentforce_Sales_Coach - Description (Descripción): se rellena automáticamente
- Role (Función): personalice las especificaciones de su empresa.
- Company (Empresa): personalice las especificaciones de su empresa.
- Agent User (Usuario agente): Seleccione Sales Coach Agent (Agente de Coach de ventas) en la lista.
- Marque el cuadro Keep a record of conversations with Enhanced Event Logs to review agent behavior (Conservar un registro de las conversaciones con registros de eventos mejorados para revisar el comportamiento del agente).
- Name (Nombre):
- Haga clic en Next (Siguiente).
- En la sección Select Language and Tone (Seleccionar el idioma y el tono), deje la configuración predeterminada tal y como está y haga clic en Next (Siguiente).
- A modo de opción, si quiere utilizar la generación aumentada por recuperación (RAG), en Select a Library (Seleccionar una biblioteca), haga clic en New Library (Nueva biblioteca). De esta manera, se crea la biblioteca del coach de ventas de Agentforce automáticamente. Actualmente, la biblioteca solo es compatible con archivos de Knowledge o archivos cargados. Tenga en cuenta que Data 360 debe estar activado para que esto aparezca.
- Cargue o conecte sus recursos y haga clic en Save (Guardar).
- Haga clic en Create (Crear). Mantenga abierta esta ficha, ya que la utilizará en la siguiente unidad.
Una vez que haya terminado de crear su agente, puede cargar más recursos haciendo clic en el icono de libro que aparece en la parte izquierda de la barra del menú lateral.
Ahora ya sabe cómo activar el coach de ventas, crear un usuario de coach de ventas, otorgar a los usuarios acceso al coach de ventas y configurar y activar su coach de ventas de Agentforce. A continuación, aprenderá a personalizarlo.