Build a Loop
Learning Objectives
After completing this unit, you’ll be able to:
- Create a Loop element in a flow.
- Avoid flow errors by placing data elements outside of a flow loop.

Use Actions in a Loop
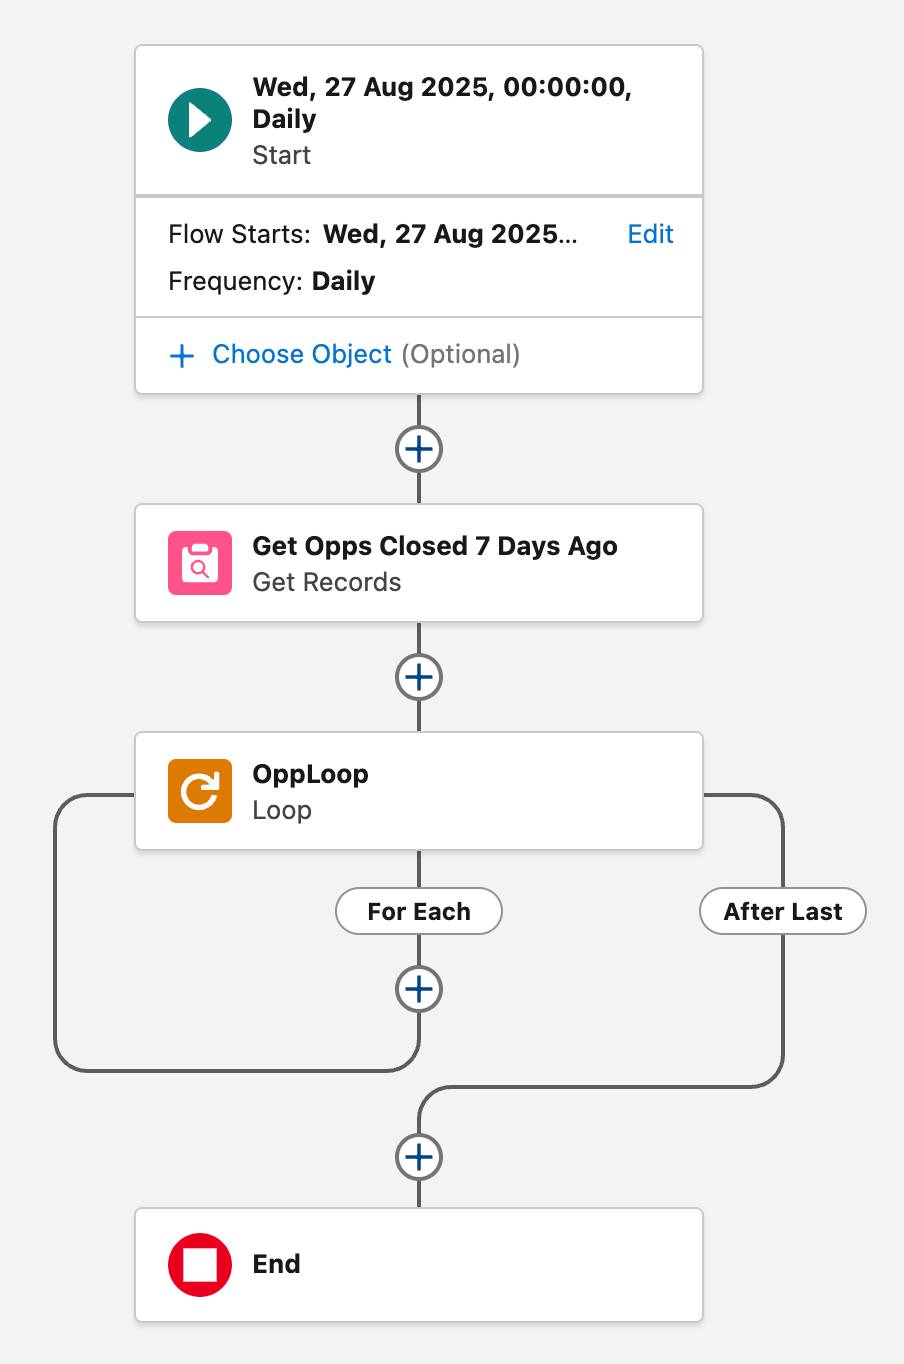
It’s time to build a loop in Flow Builder. Let’s build the flow that Pyroclastic Inc. was using in the previous unit: a flow that runs every day, identifies all opportunity records that have been closed for 7 days, locks those opportunity records, and posts to the opportunities’ Chatter feeds.
Create a Scheduled Flow and Get the Opportunities
First, create a scheduled flow that runs daily. Then use a Get Records element to retrieve all opportunities whose Close Date is at least 7 days old. In many cases, you can retrieve the opportunities in the flow’s Start element, but you need a formula to determine which date is 7 days ago. Start elements don’t support formulas, so you use a Get Records element.
- Create a schedule-triggered flow.
- In the Set a Schedule panel, for Start Date, select today’s date.
- For Start Time, select 12:00 AM (or 00:00).
- For Frequency, select Daily.
- On the canvas, click
 .
.
- Select Get Records.
- For Label, enter
Get Opps Closed 7 Days Ago.
The API Name should auto-populate asGet_Opps_Closed_7_Days_Ago.
- For Object, select Opportunity.
- For Condition Requirements, select All Conditions Are Met (AND).
- For Field, select Close Date.
- For Operator, select Less Than or Equal.
- For Value, click New Resource to create a new formula.
- For Resource Type, select Formula.
- For API Name, enter
SevenDaysAgo.
- For Data Type, select Date.
- For Formula, enter
TODAY()-7.
- Click Done.
- For Resource Type, select Formula.
- For How Many Records to Store, select All records.
- For How to Store Record Data, make sure Automatically store all fields is selected.
- For Label, enter
Create a Loop Element
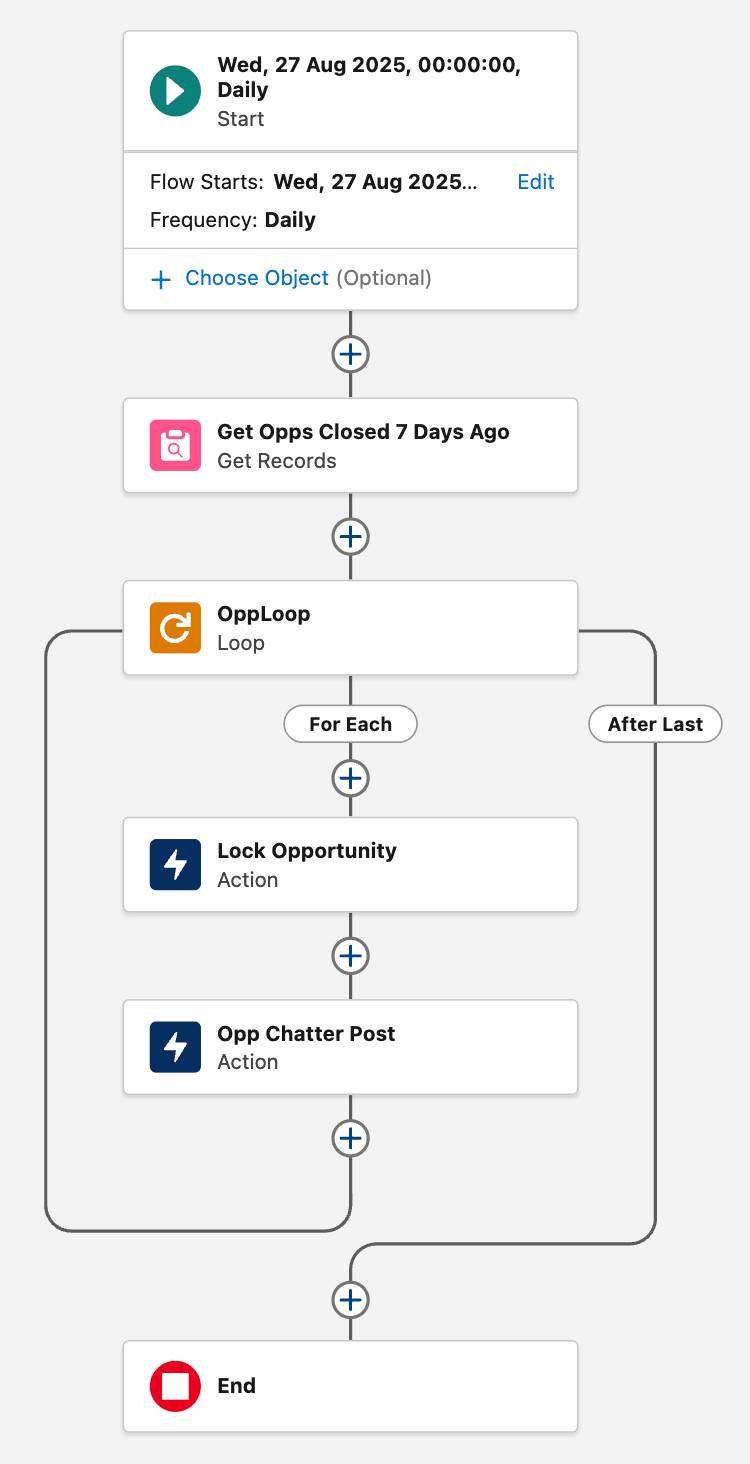
Now create the Loop element to cycle through the collection of opportunities.
- After the Get Opps Closed 7 Days Ago element, click
 .
.
- Select Loop.
- For Label, enter
OppLoop.
The API Name should auto-populate asOppLoop.
- For Collection Variable, select Opportunities from Get Opps Closed 7 Days Ago.
- For Label, enter
Create the Looped Actions
Finally, create the Action elements that run in the loop, once for each opportunity record in the collection.
These elements use a special variable called Current Item from Loop that all Loop elements generate. Every time the loop starts, a different opportunity from the collection is placed in this Current Item from Loop variable, and all of that opportunity’s field values are available to the elements in the loop. When the loop restarts, all the data in the Current Item from Loop variable is deleted to make room for the next opportunity’s field values.
- On the For Each path, click
 and select Action.
- For Search Actions, search for and select Lock Record.
- For Label, enter
Lock Opportunity.
The API Name should auto-populate asLock_Opportunity.
- For Action, enter
Lock.
Make sure you don’t select any picklist options like “Lock Opportunity”. Type the word “Lock” into the field.
- For Record ID, select Current Item from Loop OppLoop, then select Opportunity ID.
Each time this element runs in the loop, it uses the Opportunity ID for whichever opportunity is currently running through the loop.
- For Allowed ID, change the toggle to Included, then select Current Item from Loop OppLoop > Owner ID > Manager ID.
Make sure you select the Manager ID field (the second Manager ID in the list), not the Manager ID record.
- For Label, enter
- On the For Each path, after the Lock Opportunity element, add another Action element.
- For Search Actions, search for and select Post to Chatter.
- For Label, enter
Opp Chatter Post.
The API Name should auto-populate asOpp_Chatter_Post.
- For Message, click New Resource to create a new text template.
- For Resource Type, select Text Template.
- For API Name, enter
PostBody.
- For Body, enter Yes, the Current Item from Loop variable (in this case, !OppLoop) works in resources too! Use it in text templates, formulas, and variable default values. Remember, the Current Item from Loop variable always contains the values of whichever record is currently moving through the loop.
@[{!OppLoop.OwnerId}] - This opportunity has now been locked. If you need to make changes, talk to your manager.
- Click Done.
- For Resource Type, select Text Template.
- For Target Name or ID, select Current Item from Loop OppLoop > Opportunity ID.
- For Label, enter
- Save the flow.
- For Flow Label, enter
Lock Closed Opps.
The API Name should auto-populate asLock_Closed_Opps.
- For Flow Label, enter
That’s a simple loop because it just contains some actions, but things get more complex when you want to create or edit records.
Update Multiple Records with a Loop
Don’t put Get Records, Create Records, Update Records, or Delete Records elements inside a loop.
You might be tempted to update a group of records by putting an Update Records element in a loop so that it runs once for every record. But Get Records, Create Records, Update Records, and Delete Records elements run a SOQL query or DML operation. Flows are limited to 100 SOQL queries and 150 DML operations. Multiplying the number of elements by the number of records processed in the loop can easily exceed those limits and cause the flow to fail.
So how can you avoid hitting those limits? Place Get Records, Create Records, Update Records, and Delete Records elements outside the loop.
- Get Records: Before the loop
- Create Records, Update Records, and Delete Records: After the loop
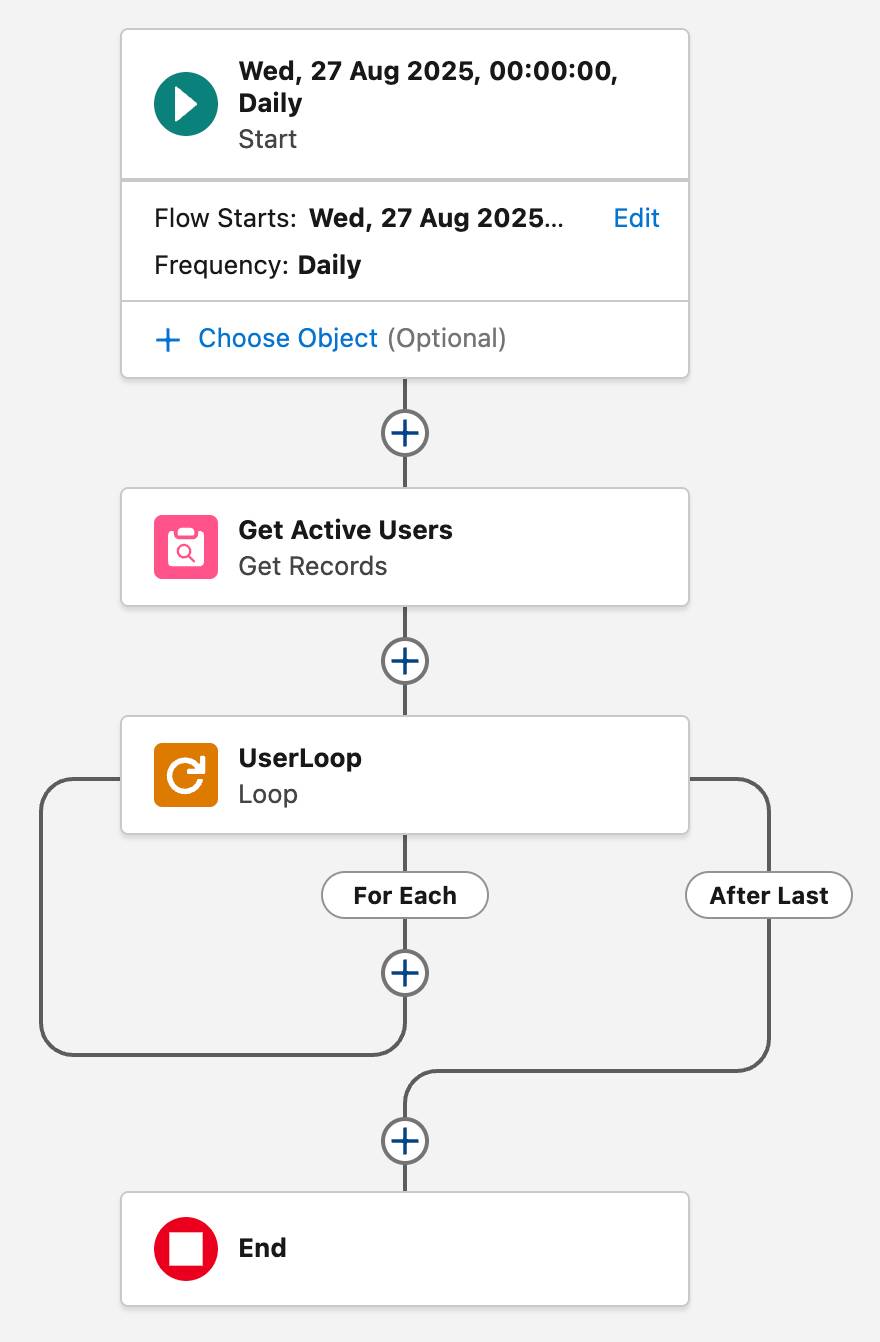
Let’s build an example together. Pyroclastic Inc. wants to make sure its users are logging in to Salesforce regularly. First, the flow should email users a warning on their 25th–29th days of inactivity. If there’s still no activity within 30 days, the user should be deactivated.
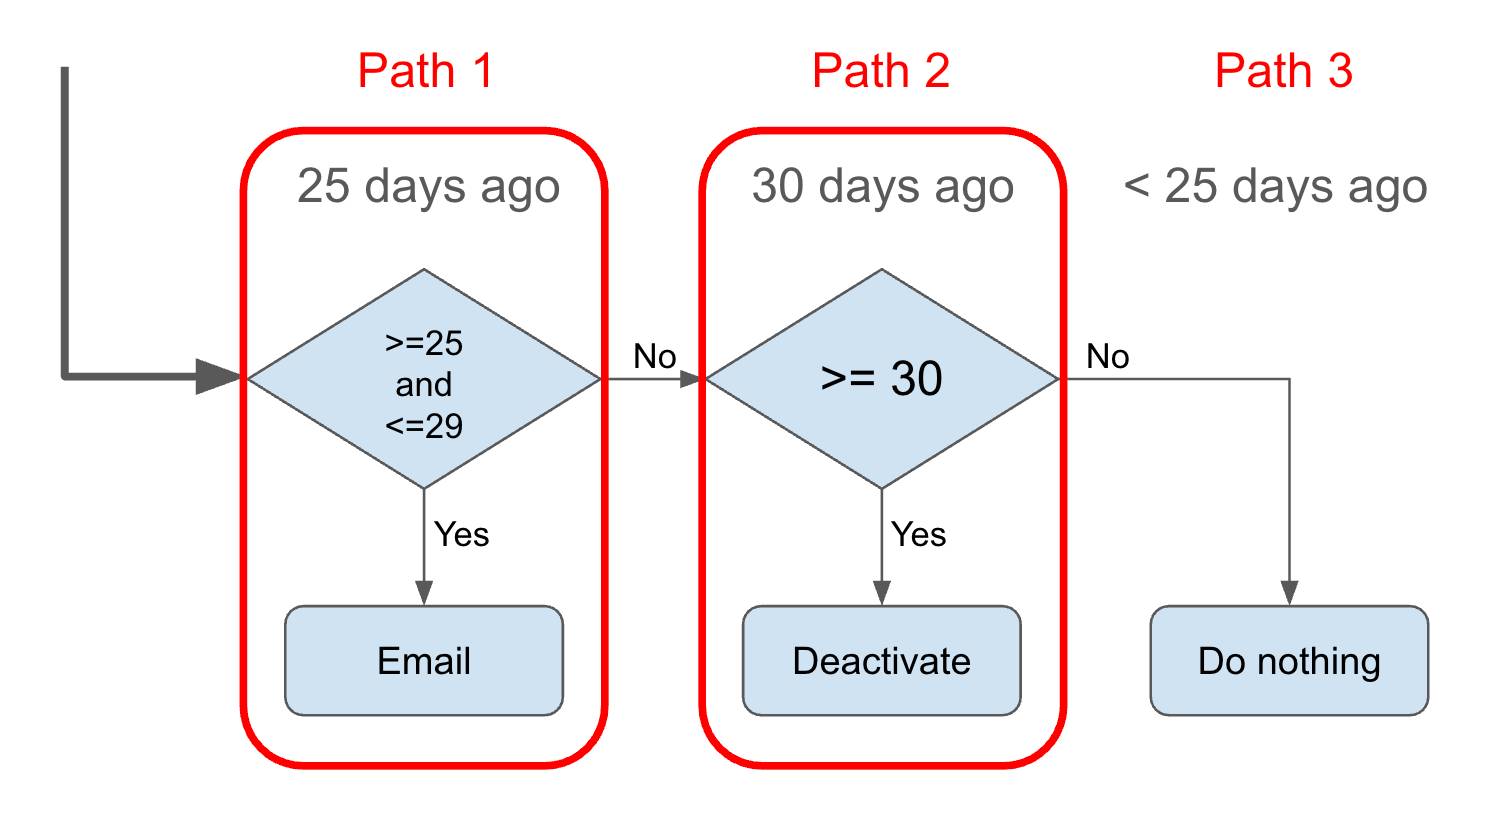
After retrieving all of the org’s user records, use a Loop element to cycle through those users. In the loop, use a Decision element to determine which action to take, and an Assignment element to change the Active value to False for any user record that meets the 30-day criteria. Finally, use an Update Records element after the loop to save the record changes to the database. The flow also needs formulas to calculate the date ranges for the Decision element’s criteria.
For this badge, we skip the action element that sends the email so we can focus on the record updates.
Create a Scheduled Flow and Its Formulas
First, create a scheduled flow that runs daily. Then create a formula that contains the date 25 days ago, and another formula that contains the date 30 days ago.
- Create a schedule-triggered flow.
- In the Set a Schedule panel, for Start Date, select today’s date.
- For Start Time, select 12:00 AM (or 00:00).
- For Frequency, select Daily.
- Create a formula resource to calculate the date 25 days ago.
- For Resource Type, select Formula.
- For API Name, enter
DaysAgo25.
- For Data Type, select Date.
- For Formula, enter
TODAY()-25.
- Click Done.
- For Resource Type, select Formula.
- Create another formula resource, this time to calculate the date 30 days ago.
- For Resource Type, select Formula.
- For API Name, enter
DaysAgo30.
- For Data Type, select Date.
- For Formula, enter
TODAY()-30.
- Click Done.
- For Resource Type, select Formula.
- Save the flow.
- For Flow Label, enter
Select Users to Deactivate.
The Flow API Name should auto-populate asSelect_Users_to_Deactivate.
- For Flow Label, enter
Get the User Records
Next use a Get Records element to retrieve all the User records.
- On the canvas, click
 .
.
- Select Get Records.
- For Label, enter
Get Active Users.
The API Name should auto-populate asGet_Active_Users.
- For Object, select User.
- For Condition Requirements, select All Conditions Are Met (AND).
- For Field, select Active.
- For Operator, select Equals.
- For Value, click True.
- For How Many Records to Store, select All records.
- For How to Store Record Data, make sure Automatically store all fields is selected.
- For Label, enter
Create a Loop Element
Now create the Loop element to cycle through the users.
- After the Get Active Users element, click
 .
.
- Select Loop.
- For Label, enter
UserLoop.
The API Name should auto-populate asUserLoop.
- For Collection Variable, select Users from Get Active Users.
- For Label, enter
- Save the flow.
Create Multiple Outcomes with a Decision Element
Next, add a Decision element to determine what should happen with each user. This element creates multiple paths within the loop, and each item in the collection takes one of those paths. Every time the loop starts, it takes the path for the decision outcome that matches the criteria of the loop’s current item. For example, the flow could take the 30+ path on the first item, the Less than 25 path on the second item, the 25 to 29 path on the third item, and so on, depending on the Last Login date for each of those users.
- On the For Each path, click
 .
.
- Select Decision.
- For Label, enter
Days Since Last Login.
The API Name should auto-populate asDays_Since_Last_Login.
- For Label, enter
- In the Outcome Details:
- For Outcome Label, enter
25 to 29.
The Outcome API Name should auto-populate asX25_to_29.
- For Condition Requirements to Execute Outcome, select All Conditions Are Met (AND).
- For Resource, select Current Item from Loop UserLoop, then select Last Login.
- For Operator, select Less Than or Equal.
- For Value, select DaysAgo25.
- Click Add Condition.
- For the second Resource, select Current Item from Loop UserLoop, then select Last Login.
- For the second Operator, select Greater Than.
- For the second Value, select DaysAgo30.
- For Outcome Label, enter
- Create a new outcome with the following details:
- For Outcome Label, enter
30+.
The Outcome API Name should auto-populate asX30.
- For Condition Requirements to Execute Outcome, select All Conditions Are Met (AND).
- For Resource, select Current Item from Loop UserLoop, then select Last Login.
- For Operator, select Less Than or Equal.
- For Value, select DaysAgo30.
- For Outcome Label, enter
- In the Outcome Order, select Default Outcome.
- For Label, enter
Less than 25.
- For Label, enter
- Save the flow.
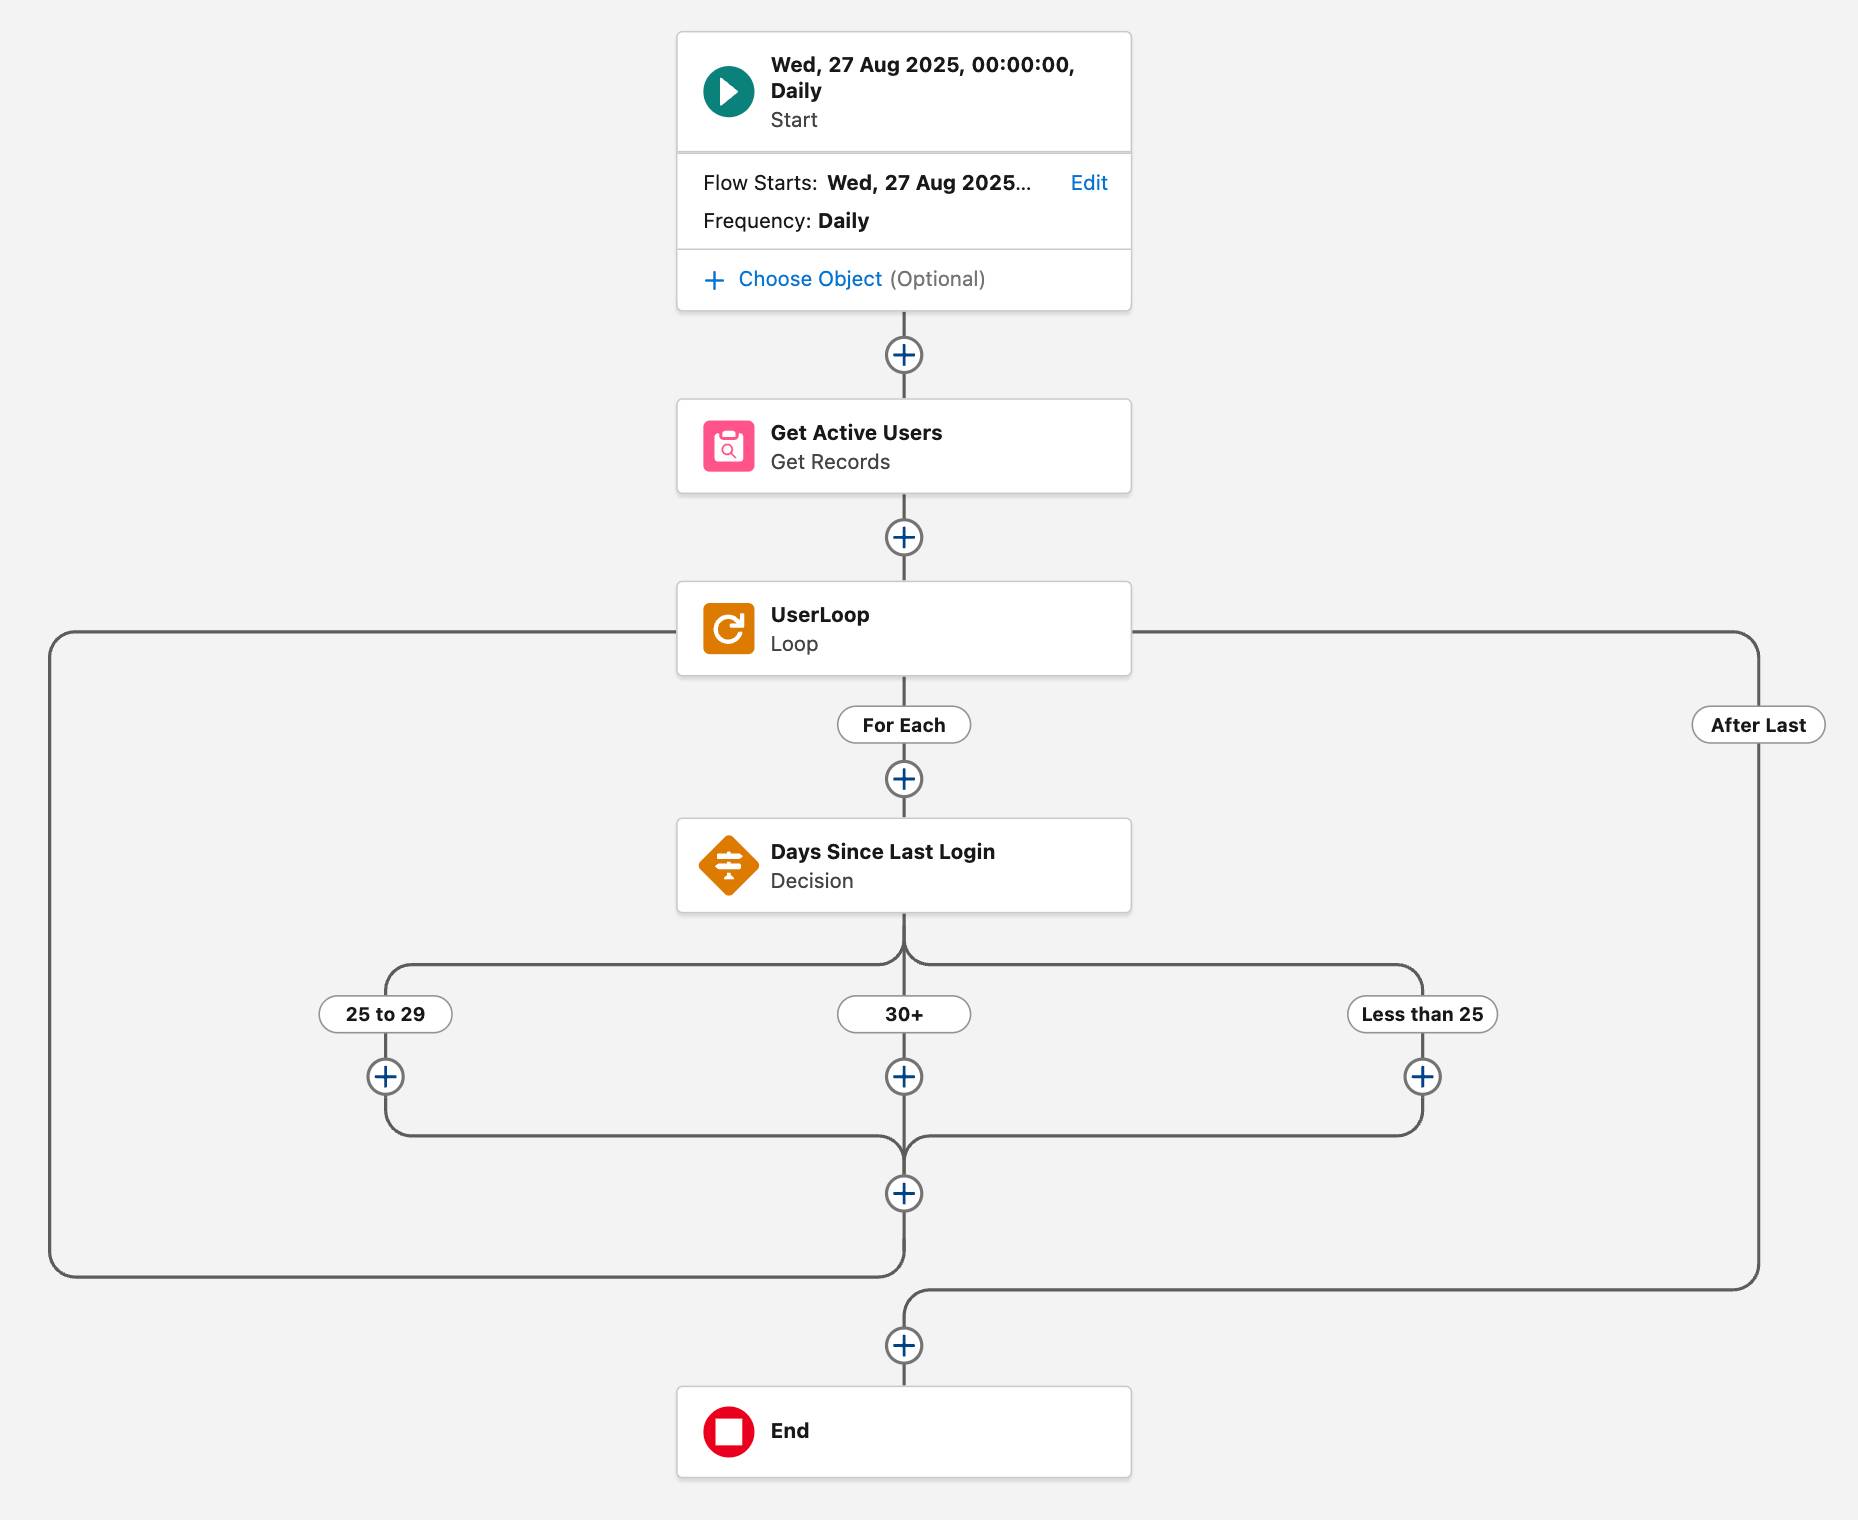
Edit and Save Data with an Assignment Element
Placing an Update Records element in the loop is risky, so instead you use an Assignment element to update the Current Item variable’s record: setting the Active field to False.
- On the 30+ path, click
 .
.
- Select Assignment.
- For Label, enter
Deactivate Current User.
The API Name should auto-populate asDeactivate_Current_User.
- For Variable, select Current Item from Loop UserLoop, then select Active.
- For Operator, select Equals.
- For Value, select False.
- For Label, enter
The Current Item variable now contains the changed value, but remember, the flow deletes the contents of the Current Item variable every time the loop restarts. To save the assigned change, you need another variable to store the changed data, kind of like saving a copy of a file. Create a record collection variable called DeactivateUsers to hold all of the changed records, and use the Assignment element to add a copy of the Current Item variable to the DeactivateUsers variable.
- In the Assignment panel, click Add Assignment.
- For the second Variable, select New Resource.
- For Resource Type, select Variable.
- For API Name, enter
DeactivateUsers.
- For Data Type, select Record.
- Select Allow multiple values (collection).
- For Object, select User.
- For Resource Type, select Variable.
- Click Done.
The second Variable now contains the DeactivateUsers variable.
- For the second Operator, select Add.
This operator sounds like math, but it’s not just for sums! It can add other things, such as adding (concatenating) text to other text, and in this case, adding a copy of a single-value variable (Current Item from Loop UserLoop) to a collection variable.
- For the second Value, select Current Item from Loop UserLoop, then select Entire Resource.
- Save the flow.

Commit Changes to the Records with an Update Records Element
When the loop finishes processing all the user records in the Users from Get Active Users collection, the flow exits the loop and takes the After Last path. With all the changes ready to go and the loop complete, now’s the best time to update the actual user records. Use an Update Records element to make all the record updates that are stored in the DeactivateUsers collection.
- On the After Last path, click
 .
.
- Select Update Records.
- For Label, enter
Deactivate User Collection Records.
The API Name should auto-populate asDeactivate_User_Collection_Records.
- For How to Find Records to Update and Set Their Values, make sure Use the IDs and all field values from a record or record collection is selected.
- For Record or Record Collection, select DeactivateUsers.
- Save the flow.
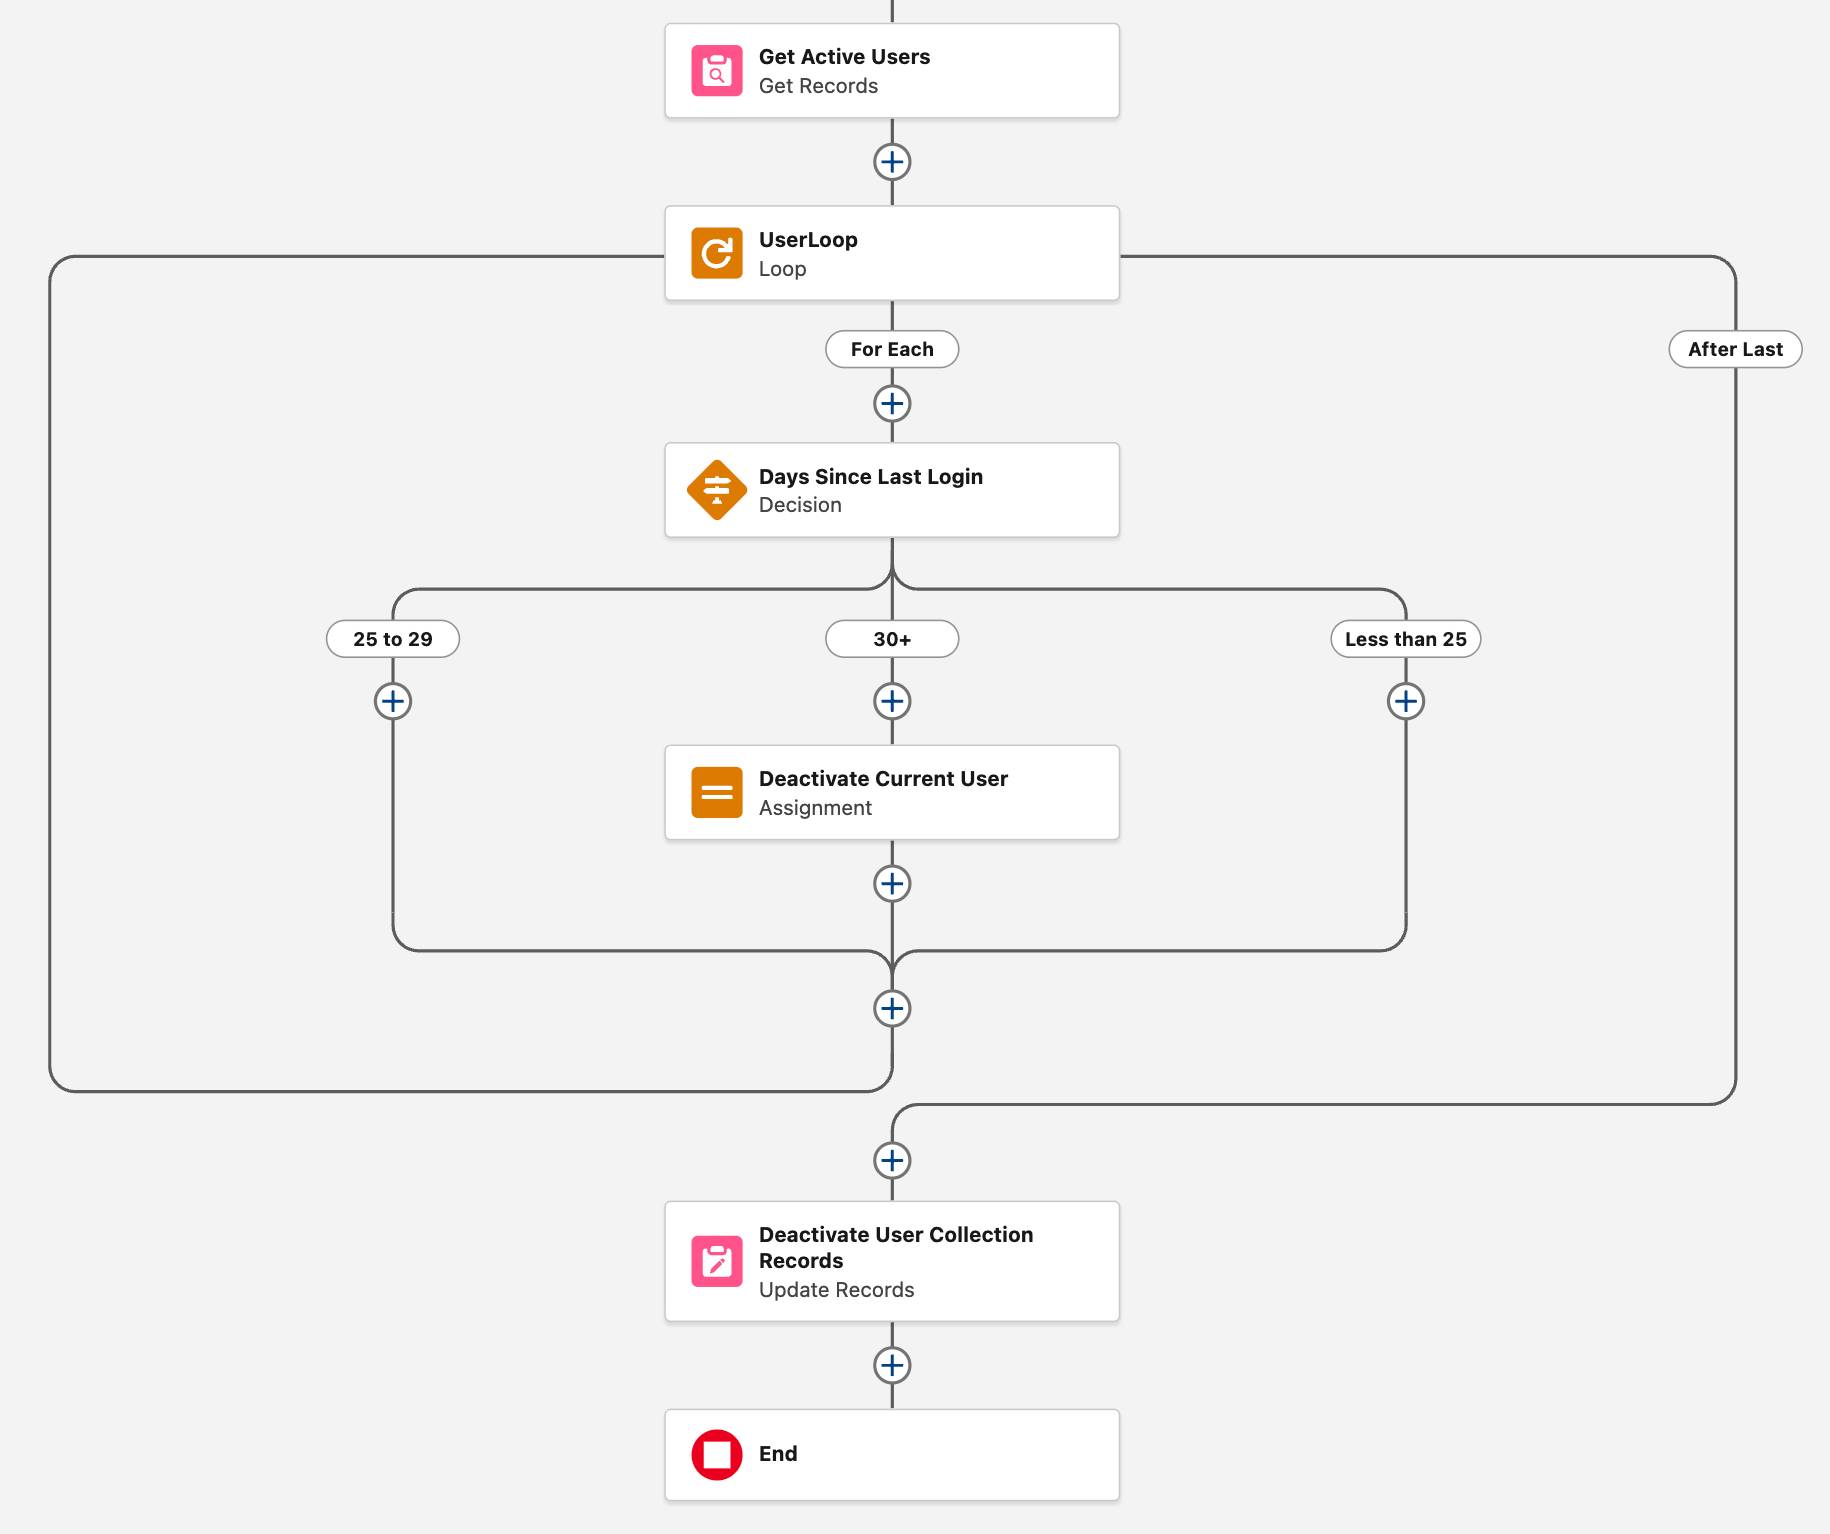
And that’s how you use a loop to make changes to a collection! If you have trouble remembering the right way to build a loop, just remember: Get all the data you need before the loop, and make changes to records after the loop.