Create Basic Service Channels
Learning Objectives
After completing this unit, you’ll be able to:
- Add an email service channel.
- Turn questions from the web into cases.
Plan for Web and Email Channels
With some basic case management set up, you’re ready to start collecting cases from customers. After all, until customers’ cases find their way into Salesforce, there’s nothing to track, route, escalate, or answer.
Before you create basic email and web form channels, ask your service team some planning questions. Here are some examples of questions and answers to prepare for your email and web channels.
Question |
Answer |
|---|---|
What is the maximum size of email attachments to support? |
Under 25 MB is fine. |
Should outgoing emails from Salesforce route through our email servers for security or compliance reasons? |
No, outgoing emails can route through Salesforce. |
Does customer service use email templates, and if so, are there branding requirements? |
No, we don’t use email templates, but we should in the future for consistency. We should also add our logo to email templates at some point. |
Can we add a code snippet to our customer website to display a web form? |
Yes, no problem. |
Do we need to create any custom case fields to capture information for the web form? |
No, not now. Let’s see how this thing works first. |
With some planning done, you’re ready to add two simple channels.
Add Email Service
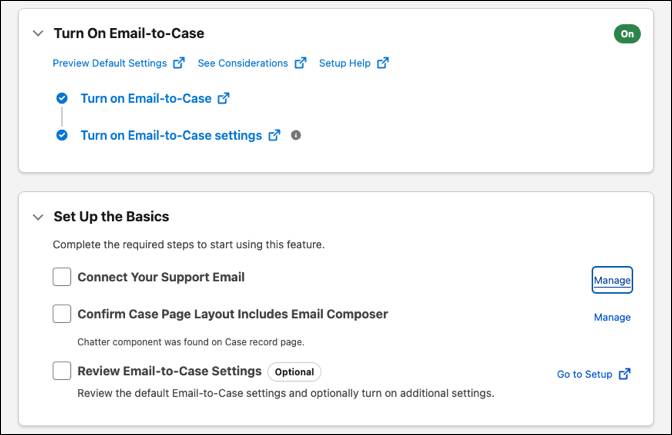
Head to Salesforce Go. There, follow a simple guided setup for Email-to-Case.
- Select Salesforce Go from the Setup Menu.
- In Search features, enter
Email-to-Caseand select it.

- Click Get Started, then Turn on.

- Click Confirm to initiate setup.
- Next to Connect Your Support Email, click Manage.
- Click Start.
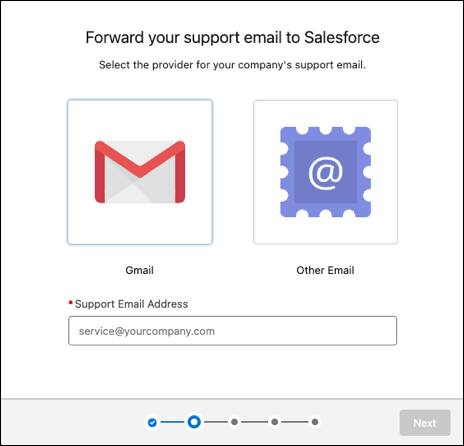
- Select your email provider. For this exercise, choose Other Email.
- Enter your support email address, which is the email address that appears to customers. Since this is an exercise, we suggest you use an email address that’s not that important to you or your company. Likewise, don't use your Trailhead account email. Click Next.
- Choose some details to automatically add to your cases when they're submitted, such as priority or origin, then click Next.
- Follow the message to open your email in another browser tab, and to click the verification email sent to you by Salesforce.

- On the new tab that appears verifying your routing address, click Verify Email Address, then Continue.

You’re redirected to the Service Console and can close the tab.
- On the tab with the guided email setup, select the box that you’ve verified your email address, and click Next.

- Copy the email-forwarding link that appears.
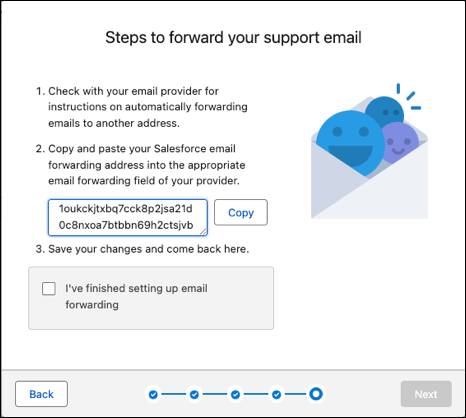
- Paste the email address into your email application’s appropriate email forwarding field. For instructions, you may have to look in your email application’s online help.
- Select the box that confirms you’ve set up email forwarding, and click Next.

- After Salesforce tests that your email forwarding works, click Done.
Now when customers send emails to the address provided, they automatically route to Salesforce as cases.
To start connecting with customers on the new email channel, advertise the email address on websites, brochures, business cards—anywhere customers look for help.
Add Web Form Service
One of the easiest ways your team can provide service is with online forms. You can use Web-to-Case to create a form of case fields that customers fill out and submit to service reps from a website.
Web-to-Case can help your team collect up to 5,000 new cases a day. Here’s how it works: (1) decide which case fields display on the form; (2) generate the HTML for the form; (3) send the HTML to a web developer who puts the form on a website. Here’s how to set it up.
- Select Salesforce Go from the Setup Menu.
- In Search features, enter
Web-to-Caseand select it.

- If Web-to-Case isn’t turned on, click Turn On. When you turn on Case Management, some Web-to-Case features are automatically turned on too.
- If any reCAPTCHA settings are selected, deselect them. This exercise isn’t going to cover reCAPTCHA.

- Click Set Case Origin to Web.
- Select a response template to automatically notify customers that their case was created. Choose any template to see how this works.

- Click Hide Record Information to prevent case information from appearing in the email sent to customers—this is only in the unlikely event that a case fails to create.
- If you’d like to use an email signature that’s different from the one in the response template, enter a new signature.
- Save your changes. Now you’re ready to generate the HTML form to send to your web developer.
- From the Web-to-Case page in Salesforce Go, click Go to Setup next to Generate and Test Your Web-to-Case form.

- Add the case fields you want on the form.
- Enter the URL to appear after customers submit their case, such as a “thank you” page.
- If Include reCAPTCHA in HTML is selected, deselect it. We’re not going to cover reCAPTCHA here.
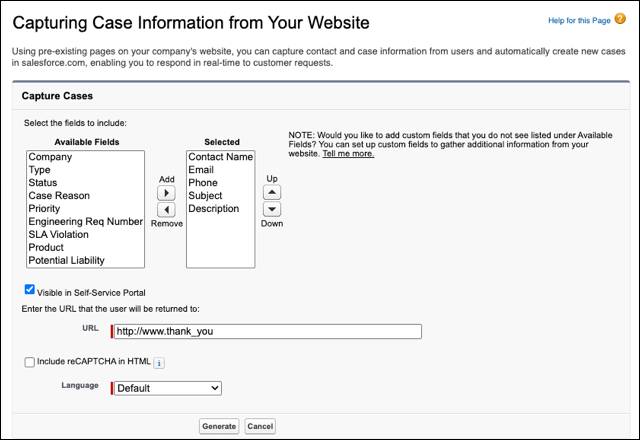
- Click Generate.
- Copy the HTML code and send it to your web developer to post on your website.
- Click Finished.
Now your web support is established. Customers can contact your service team at their convenience and create cases over the web.
Wrap Up
Congratulations on taking your first steps on your Agentforce Service administration journey! You’ve learned how to use and customize the Service Console as the unified workspace for your team. You reviewed the stages of a wider service center implementation and saw how to use Salesforce Go and Service Setup to quickly find and deploy foundational features for case management. Finally, you configured basic email and web channels to start collecting customer cases directly in Salesforce. You’re well on your way to adding even more service features to support your customers and simplify tasks for your service reps.
Resources
- Salesforce Help: Provide Web Forms with Web-to-Case
- Salesforce Help: Send and Receive Emails with Email-to-Case
- Salesforce Knowledge Article: Configure Email Forwarding from Gmail to Salesforce for Email-to-Case