Manage Recurring Donations
Learning Objectives
After completing this unit, you’ll be able to:
- Describe the purpose of recurring donations.
- Modify recurring donation settings.
- Set up additional fields.

Introduction to Recurring Donations
Recurring donations in NPSP help you efficiently track gifts that donors give in regular intervals. The Details page on a Recurring Donation record gives you a high-level view of donor information and the payment schedule.

NPSP supports open-ended and fixed-length recurring donations. When a user creates a recurring donation, they determine the type by setting the Recurring Type field.
Before your team begins using recurring donations, you'll want to understand, confirm, and possibly modify your recurring donation settings.
To view the recurring donation settings:
- Click the NPSP Settings tab or find and select it using the App Launcher (
 ).
).
- Click Recurring Donations and then Recurring Donations again.
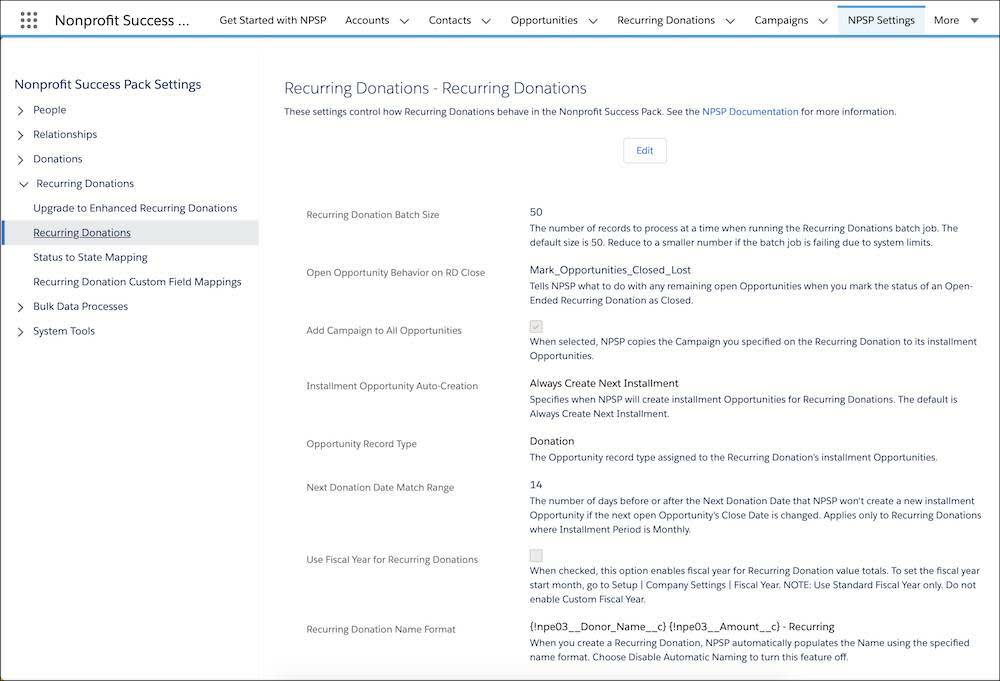
Gorav, the No More Homelessness (NMH) admin, begins by reviewing the default Recurring Donation Name Format.

He looks at the other format options but decides to stick with the default recurring donation naming: {!npe03__Donor_Name__c} {!npe03__Amount__c} - Recurring. In practice, that format would look like this: Cloud Kicks $2,500 - Recurring or Candace Evans $100 - Recurring.
Most organizations find the default settings meet their needs, but again, you can change these values at any time. Check out the NPSP documentation listed in the Resources section of this unit for more details on settings, such as Next Donation Date Range Match and Use Fiscal Year for Recurring Donations.
Map Recurring Donation Fields to Custom Opportunity Fields
Use recurring donations custom field mapping to copy custom fields from Recurring Donation records to the related installment Opportunities whenever you create a new recurring donation. With custom field mapping, details from the Recurring Donation record appear in child Opportunity records, which makes for easier referencing and reporting.
NMH, for instance, tracks an accounting code on their Opportunity records. Gorav wants to be sure that the accounting code that users typically enter on their opportunities also gets added when installment Opportunities are created through the Recurring Donation interface.
Let’s follow along as Gorav maps that custom field on the Recurring Donation object to an Opportunity record. Mapping requires that you have two fields (one on the Recurring Donation and one on the Opportunity) of a matching type in order to create a mapping between them.
- Click the NPSP Settings tab.
- Click Recurring Donations then Recurring Donations Custom Field Mappings.
- Click New Custom Field Mapping.
- In Recurring Donation Field, select the custom field you created on the Recurring Donation object. Gorav’s is called “Accounting Code”.
- In the Opportunity Field list box, select the corresponding field on the Opportunity object. Gorav’s is called “Accounting Code”.
- Click Create Custom Field Mapping.

The new field mapping now appears in the mapped fields list.
Add Custom Fields to the Recurring Donation Entry Form
NPSP overrides the standard New and Edit buttons for recurring donations with a custom entry form. This makes it easier for users to choose the correct field values depending on whether they’re entering an Open-Ended or Fixed recurring donation.
When you add a custom field to the Recurring Donation object, it won’t automatically appear on the form unless you add it to the entry form. Luckily for Gorav, this is pretty straightforward.
Let’s follow along as he adds his new Accounting Code field to the Recurring Donation entry form:
- In Setup, go to Object Manager then Recurring Donation.
- Click Field Sets.
- Click Recurring Donations Entry Form Custom Fields.
- Click and drag Accounting Code into the field set.
- Click Save.
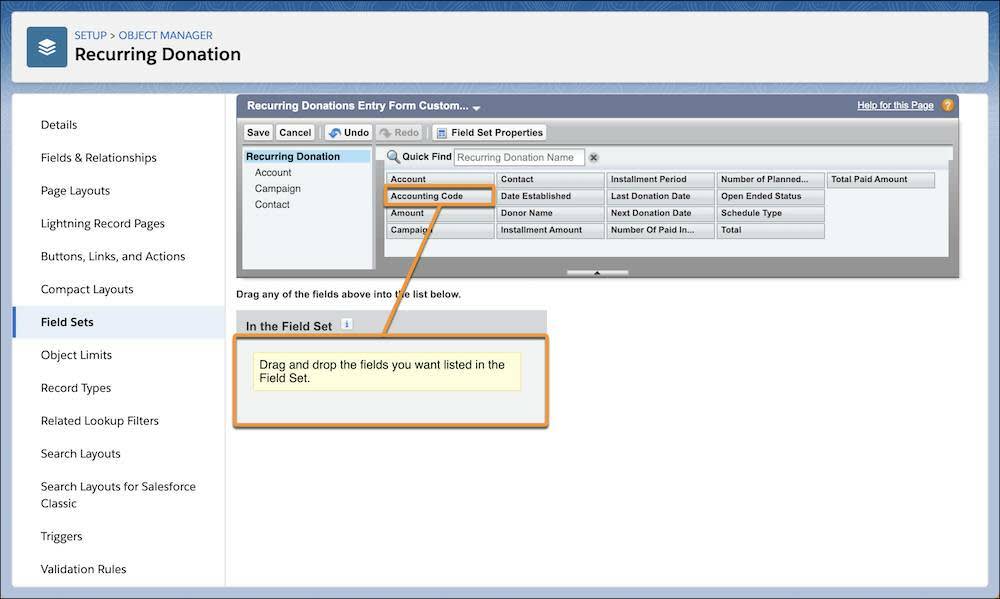
Now, Gorav’s new field appears in the Custom Fields section of the Recurring Donations entry form.

Add a Recurring Donation Status Reason
There are three statuses for recurring donations: Active, Lapsed, and Closed. NPSP also provides a way to pause recurring donation installments using the Pause button in the record's quick actions.
-
Active: The donor is actively donating. NPSP creates installment Opportunities as defined by the recurring donation schedule.
-
Lapsed: The donor isn’t making donations as expected, but NPSP still creates installment Opportunities as defined by the recurring donation schedule.
-
Closed: The donor stopped making donations for this recurring donation. NPSP doesn’t create any new installment Opportunities.
When users pause or close a recurring donation, they’re asked to provide a reason. NPSP includes the most common reasons, and you can add additional picklist values to the Recurring Donation Status Reason field in Setup.
Automate Donation Status Changes
You can also automate when a recurring donation moves from Active to Lapsed to Closed status if a donor misses payments after a certain number of days. For example, if a donor doesn't make a payment for 60 days the recurring donation can automatically move to Lapsed status, then move to Closed status if the donor doesn't make a payment in 90 days.
To set your automatic status change:
- Click the NPSP Settings tab or find and select it using the App Launcher (
 ).
).
- Click Recurring Donations then Status Automation.
- Click Edit.
- Enter values for Number of Days for Lapsed, Lapsed Status Value, Number of Days for Closed, and Closed Status Value.
-
Save the settings.
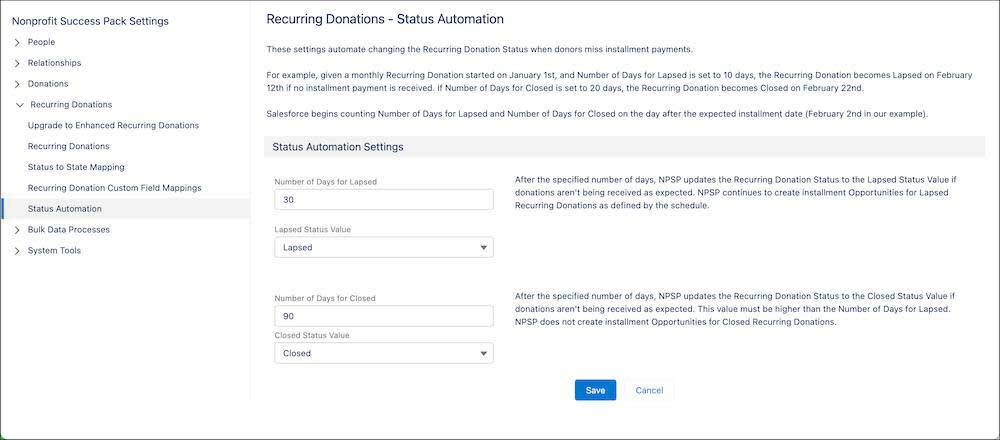
Check out Automate Recurring Donation Status Changes in Salesforce Help for more details and examples.
Recurring Donations Batch
The recurring donations batch process runs every night to update Total Paid Amount and Number of Paid Installments fields. Upcoming Installments are displayed in the component based on installment date, so you won’t see any changes reflected until the following day.
If you’ve updated many records and want to check your work without waiting overnight, you can prompt the system to run sooner. Go to NPSP Settings and, under Bulk Data Processing > Recurring Donations > Recurring Donations Batch, click Run Batch. Or, you can update the rollups on a single record by clicking Recalculate Rollups on the Recurring Donation record. That’s it!
In this module, you learned how sales process and path are configured in NPSP, how to configure soft credits, how to enable custom rollups, how to configure general accounting unit (GAU) allocations and payments, and how to set up recurring donations for your team. Now it’s time to get out there and put it all into action! Good luck!
Resources
- Trailhead: Donation Management Basics with NPSP
- Salesforce Help: Recurring Donations Overview
- Salesforce Help: Configure Recurring Donations
- Salesforce Help: Automate Recurring Donation Status Changes
- Salesforce Help: Which Version of Recurring Donations Am I Using?
- Salesforce Help: Enhanced Recurring Donations Upgrade Guide
- Salesforce Help: Map Recurring Donation Fields to Custom Opportunity Fields