Create Custom Relationships
Learning Objectives
After completing this unit, you’ll be able to:
- Explain the relationships settings.
- Configure relationship settings.
Relationships Overview
Relationships in Nonprofit Success Pack (NPSP) are a custom object that connects two contacts in your Salesforce org. The nonprofit No More Homelessness (NMH) uses relationships to connect friends and family members who are clients, donors, or volunteers. On a contact record, the Relationships related list may show other contacts and their relationship to the current contact, like Son or Wife or Child.
In many languages, these relationship terms convey information about the person's gender: for example, son is a male child and wife is a female spouse. Some organizations collect information about their contacts' gender identity and use that information not only to describe relationships, but also to personalize communications, tailor services, or report program results.
Salesforce encourages everyone to think carefully about how we collect and use personal data like gender identity. This will make sure that our clients, donors, volunteers, and employees feel seen and respected. In Salesforce, including in NPSP, you have tools to customize how and when you use gender information about your contacts. Check out the Guide to Privacy and Ethical Use of Gender-Related Data for considerations around gender and Saleforce.

NPSP comes with 24 preconfigured relationships, all managed in the Relationship object in Salesforce Setup, not NPSP Settings.
To review the existing relationship types:
- From Setup, click the Object Manager tab.
- From the list of objects, select Relationship.
- Click Fields & Relationships.
- Click the field labeled Type.
- Scroll down to the Values list.
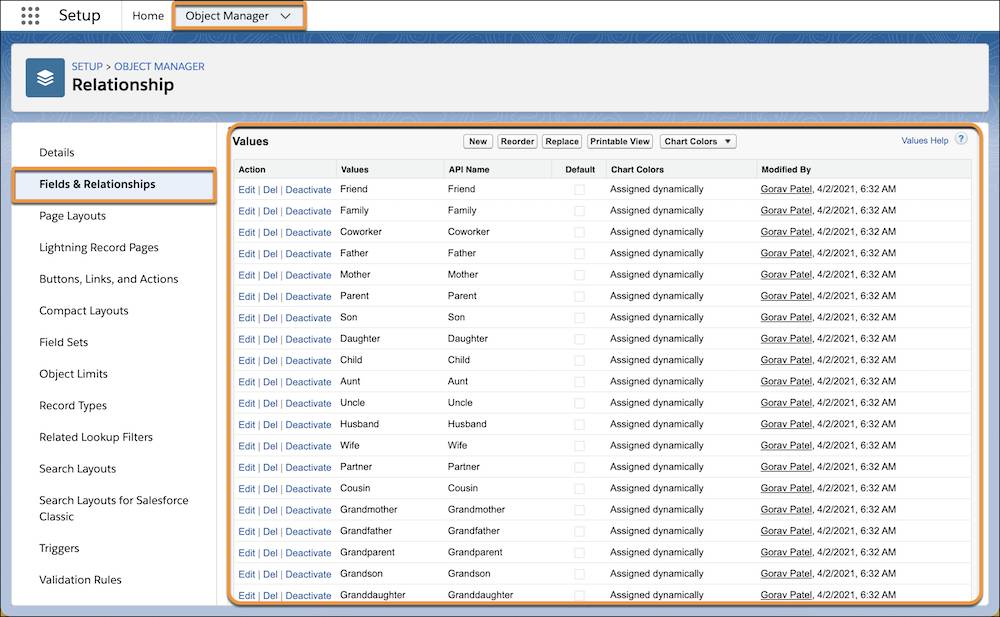
Those 24 preconfigured relationships meet the needs of many nonprofits, and you can Deactivate any relationship to remove it if you’d like a shorter list. And, as we mentioned, the system allows for configuration and customization if you need more or different relationships. Let’s dig into that now.
NPSP Relationship Settings
To navigate to relationships settings for NPSP, click NPSP Settings in the navigation bar, or find and select it through the App Launcher ( ), click Relationships, then click Relationships from within the expanded menu to see all the settings.
Let’s check out the four settings that control how relationships behave in NPSP.
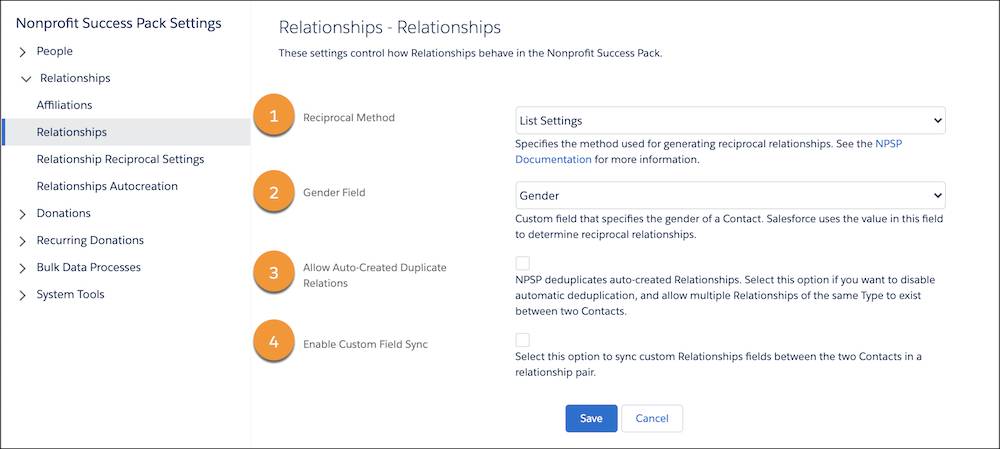
Reciprocal Method (1) determines how NPSP assigns the correct corresponding relationship when you relate one contact record to another. The options are:
-
List Settings, the default, works together with gender and other settings to assign the appropriate reciprocal relationship. For example, if you connect a boy as Son on a woman’s contact record, she automatically gets the relationship type of Mother on his record. Most admins choose List Settings for their orgs. Here’s how List Settings determines the appropriate gender-specific relationship type:
- First, it checks the values in the specified Gender field on contact records.
- If NPSP can’t identify a gender on the contact, it evaluates the Salutation field to determine gender, assigning a male value to the Mr. salutation and so on.
- If Salesforce can’t determine a contact’s gender based on either method, it assigns a gender-neutral value such as Parent or Spouse.
-
Value Inversion, which doesn’t rely on a gender field. Instead, you create picklist values in the Relationship object's Type field for both Mother-Daughter and Daughter-Mother. The key is to enter a type with a delimiter that allows the system to swap the relationship types. For example, a relationship with a type of Mother-Daughter receives a reciprocal type of Daughter-Mother.
The Gender Field (2) setting specifies which field tracks a contact’s gender to create a reciprocal relationship for the List Settings Reciprocal Method. For example, if you create a relationship from a Mother contact record to a female contact record, NPSP creates a reciprocal relationship of Daughter and not Son or Child.
The Gender field is a picklist on the contact record with out-of-the-box values, but you can also create and use your own custom picklist values. If the gender picklist value isn't Male or Female, the reciprocal relationship created will be gender neutral.
The Allow Auto-Created Duplicate Relations (3) setting is specific to the feature that auto-creates relationships based on a custom lookup field. By default, when an auto-created relationship is triggered, and a relationship between those contacts of the same Type exists, NPSP won’t create a new, duplicate relationship. You can override this behavior by checking this box and Salesforce will create a new relationship each time the auto-create is triggered, regardless of any existing relationships.
The Enable Custom Field Sync (4) setting allows you to sync custom relationship fields between the two contacts in a relationship pair. So if your organization adds a custom field to the relationships object, you’ll want to review this setting.
The Reciprocal Relationships List in Action
If you choose List Settings for the Reciprocal Method (the default), then the reciprocal relationships list determines reciprocal relationships.
Remember, this is when NPSP and Salesforce try to determine a contact’s gender—based on the Gender field setting or Salutation—then create a reciprocal, gendered relationship, such as Husband or Mother. If no gender is specified, Salesforce uses a gender-neutral value, such as Spouse or Parent.
Let’s follow along to see an example of how this works at NMH. Sofia Rivera, a Development Associate at NMH, created a new contact record for Roberto Alvarez earlier in this module. Sofia selected Male in the Gender field based on how Roberto identifies. Sofia adds another contact to the household, Alex Alvarez, and selects Unknown (a custom value NMH created) in the Gender field.
Sofia knows that these two contacts live together and that Alex is Roberto's child. So, Sofia creates a relationship record from Roberto's contact record and chooses the Child relationship type, instead of Son or Daughter, because Alex's gender isn't known. Meanwhile, NPSP automatically creates the reciprocal relationship record Father for Roberto because his gender is listed as male.

Add a New Reciprocal Relationship
The Development department at NMH requests a way to track the deceased spouse of a donor on the contact record in NPSP, a common need for many nonprofits. Gorav Patel, the Salesforce Admin at NMH, gets to work creating the reciprocal relationship his team needs. Let’s follow along.
First, Gorav needs to update the relationship type picklist field to add the value of “Deceased Spouse.”
- From Setup, click the Object Manager tab.
- Find and select Relationship.
- Click Fields & Relationships.
- In the list of fields, click Type. You may have to click View All to find the field.
- Under Values, click New.

- Type the new values into the text box, placing each on separate lines. In this case, Gorav just adds values for
Deceased Spouse,Widow,Widower, andSurviving Spouse.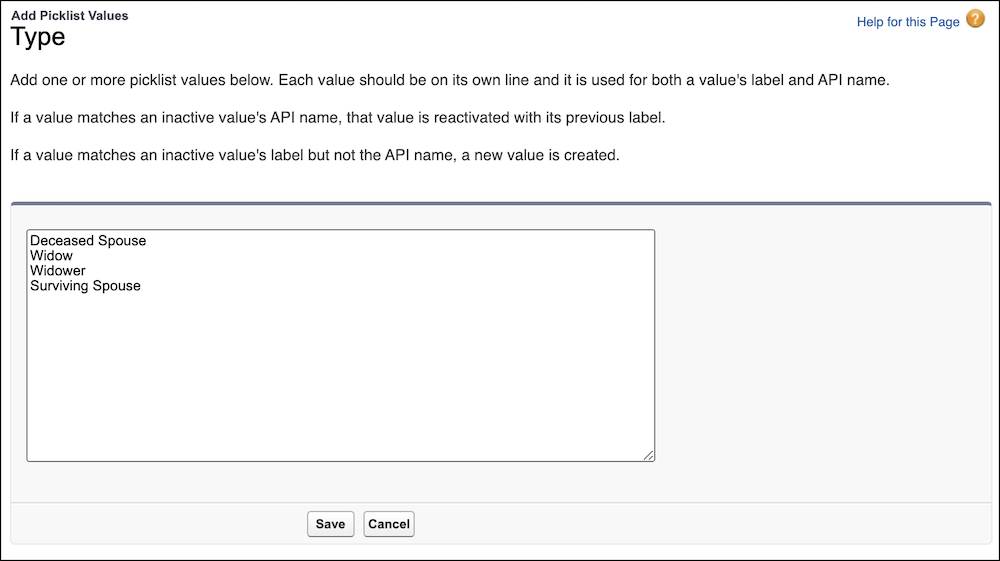
- Click Save.
Now Gorav needs to create a new reciprocal relationship. He does this in NPSP Settings.
- Navigate to NPSP Settings by finding and selecting it in the App Launcher (
 ).
).
- Click Relationships, then Relationship Reciprocal Settings.
- Click New Reciprocal Relationship.

- In the New Reciprocal Relationship interface you’ll see fields for a Name, Male value, Female value, and Neutral value. Gorav enters these values:
- Name:
Deceased Spouse - Male:
Widower - Female:
Widow - Neutral:
Surviving Spouse
- Click Create Reciprocal Relationship.
Gorav repeats the new reciprocal relationship process for Widower, Widow, and Surviving Spouse.
Then he creates Former Spouse as well, to record divorces and separations. NMH doesn’t want to mistakenly seat divorced spouses together at a fundraiser.

Add a New Auto-Created Relationship
Auto-created relationships also give you the ability to use a custom contact lookup field on Contact or Campaign Member to automatically create a new relationship. You use the relationships autocreation setting to automatically connect two contacts with a relationship record.
NMH operates a career counseling program that includes a mentorship component. The NMH staff wants to be able to see this mentor/mentee relationship on client contact records.

Before Gorav can add a new auto-created relationship, he creates a custom contact lookup field on the Contact object called Mentee. We don’t cover the process for creating a custom field here, but you can complete Custom Fields: Quick Look on Trailhead to learn how to create a custom field.
Gorav also updates the picklist values in the Type field on the Relationship object and adds a new reciprocal relationship in NPSP Settings for Mentor and Mentee.
Now Gorav is ready to add his new auto-created relationship. Let’s follow along:
- In the App Launcher (
 ), find and select NPSP Settings.
- Select Relationships, then Relationship Autocreation.
- Click New Automatic Relationship.
- Make the following selections:

- Select the Object with which you want to make the association. Gorav chooses Contact.
- Select the Field that triggers the autocreation. Gorav chooses Mentee.
- Choose the Relationship Type. The reciprocal type will automatically be created as well. Gorav chooses Mentee.
- Click Create Automatic Relationship.
Now an NMH program staffer can easily connect a mentor and mentee by using the new lookup field on the Contact record. For example, someone at NMH adds program participant Tim Hill as Roberto’s mentee in the Mentee field on Roberto’s contact record, it also creates new relationship records.

All right, you learned how to customize household naming, how address management works, and how to create custom relationships between contacts.
Next, you explore an issue that plagues nearly every CRM implementation—duplicate data!
Resources
- Salesforce Help: Manage Relationships Settings
- Video: Nonprofit Salesforce How-To-Series: NPSP Add New Relationship Types
- Downloadable PDF: Guide to Privacy and Ethical Use of Gender-Related Data