Register an External Service
Learning Objectives
In this project, you’ll:
- Define a Named Credential for your external web service.
- Add an external web service using a provided API spec.
- Explain how the External Service actions relate to the schema definition within your API spec.
- Find your External Services actions in the Flow Builder toolbox.
- Create a simple flow with your External Services actions.
Prerequisites
Before taking this badge we recommend you complete the following.
- Complete the External Services module. This module provides a high-level overview of External Services.
Create a New Trailhead Playground
For this project, you need to create a new Trailhead Playground. Scroll to the bottom of this page, click the down arrow next to Launch, and select Create Playground. It typically takes 3–4 minutes to create a new Trailhead Playground.
Introduction
In the External Services module, you saw how a REST-based bank API can be used to define a schema. Now let’s use that example to deliver a more personalized experience for your fictionalized bank. And then show how Salesforce can be used to track sales activity on bank accounts.
The bank’s new business process should let bank reps add bank accounts from within Salesforce. It should ensure that bank account details like bank account type and bank account ID are synchronized between the Salesforce User record and the bank’s backend service. More than one rep will be adding accounts. So your business logic needs to be able to check for an existing bank account or to create a new bank account.
To automate this process, you’re going to register the bank web service as an External Service. Once your bank service is registered, the bank service’s account API operations (add, update, retrieve) are visible and accessible for use within Salesforce with the Flow Builder tool.
At this point, you have everything you need! You create a flow that automatically adds a new bank account or updates an existing bank account's details. And it sends any new information from the bank service to Salesforce each time a bank rep accesses the account.
Steps to Complete This Flow
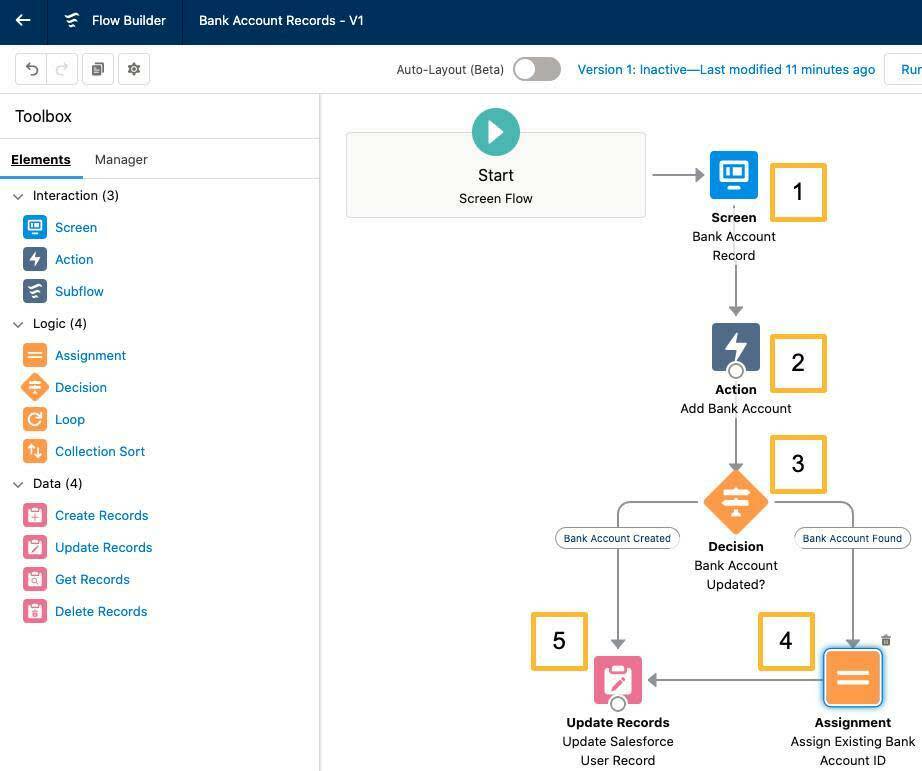
Before you start, let’s look at the stages and logic so you can see how the information flows. Note the five “steps” that you make to complete this flow.

-
Screen: Bank Account Record. Captures account name and account type from information that the bank representative enters on the screen.
-
Action: Add Bank Account. Having registered the bank service’s API specification with External Services, all API operations defined in our spec are now available for use within the flow as matching actions. We use the addAccount action and specify the API’s inputs and outputs that we assign to variables to use between the Salesforce org and the bank service.
-
Decision: Bank Account Updated? Logic evaluates if a bank account exists and needs updating, or creates a new bank account, if needed.
-
Assignment: Assign Existing Bank Account ID. If a bank account exists, it assigns the account ID of the existing bank account and uses this value to update the Salesforce User account.
-
Update Records: Update Salesforce User Record. If the Salesforce user’s last name matches a bank account record, then our flow updates the Salesforce user record with the bank account type and the bank account ID. If no Last Name match is found at the bank service and a new bank account record is created, then it updates the Salesforce user record (if there’s a matching name in Salesforce) with the new bank account type and bank account ID.
Watch this video to see a detailed walkthrough of this entire project from start to finish.
Named Credentials and Endpoint Access
In the External Services module, you covered API specs and what constitutes a valid and supported one for External Services. In addition to a valid and supported schema, you need a simple way to secure your external web service and your Salesforce org. For this task, you can use Named Credentials to authenticate your callouts to the bank service endpoints.
Typically, the external web service provider supplies the elements for a Named Credential. Those elements include both the URL of a callout endpoint and its required authentication parameters. In the External Services badge, you learned that API specs contain the endpoint information and authentication parameters for REST-based API web services. You’re going to use this information to define a Named Credential for your org.
- From Setup, enter
Named Credentialsin the Quick Find box, and select Named Credentials.
- From the dropdown menu next to the New button, select New Legacy.
- For Label, enter
Bank.
- For Name, enter
Bank(in English).
- For URL, enter
https://th-external-services.herokuapp.com - Leave other fields as they are and click Save.
Note that in a real-world example, you would also set the Authentication Protocol in Named Credentials and specify your Auth Provider definition (both configured in Setup).
Register Your Web Service Using the External Services Wizard
Now that you have a valid API spec, adding your bank external service in External Services tells Salesforce how it interacts.
- From Setup, enter
External Servicesin the Quick Find box, then select External Services.
- Click Add an External Service.
- On the Select an API Source page, select From API Specification.
- Click Next.
- For External Service Name, enter
BankService(no space).
- For Select a Named Credential, select Bank (the Named Credential we just created).
- For Service Schema select Relative URL.
- For URL enter
/accounts/schema. This string is added to the Named Credential we just made. It's the relative URL that points to the API spec. Together, they form the full URL from our service provider. For example: https://th-external-services.herokuapp.com/accounts/schema.
- Click Save & Next.
- Select all of the Operations.
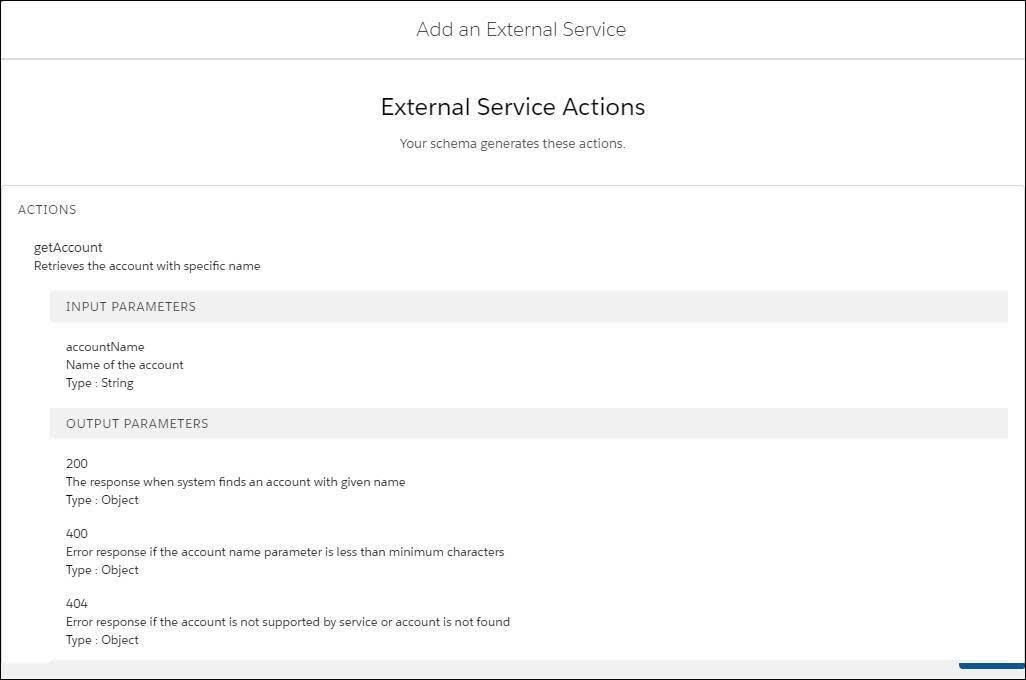
- Click Next. A list of External Service Actions appears. These actions are now available to you in Flow Builder. Use the scrollbar to view them all. The operations in your API spec have now become invocable actions in Salesforce.
- Click Finish.
Here’s an example of the External Service Actions page.

You can also view the list of actions by clicking on BankService in the main External Services page.
Let’s look at the getAccount action and some of its parameters.
- The getAccount action retrieves account information.
- The accountName parameter specifies the account.
- There are several output parameters for the getAccount action, too. The codes, such as 200, correlate to specific response codes defined in the API spec. We discuss these more in the next unit, but you can also see these definitions nicely formatted in the Swagger Editor when you validate the API spec’s schema.
Next, you create a simple flow and learn how to find the actions in the Flow palette.
Resources
- Salesforce Help: Register an External Service
- Salesforce Help: Named Credentials
- Salesforce Help: Authentication Protocols for Named Credentials
