Communicate Using the Action Element
Learning Objectives
After completing this unit, you’ll be able to:
- Build a flow that sends an email.
- Use text templates to compose formatted messages that Flow Builder can use.
- Build a flow that creates a Chatter post.
- Build a flow that submits a record for approval.

It’s wonderful that you can use flows to create, update, and delete records, but it’s not always wonderful to do those things silently. Flows can also:
- Inform one or more of your users of a change.
- Help users send a notification to a customer.
- Allow users to request approval of a change before it’s committed.
These are all forms of communication that you can automate with Flow Builder, ensuring that your users and customers have the information they need.
Introducing the Action Element
To make all this wonderful communication happen, you use one element: the Action element. Despite its basic name, this element has a wealth of superpowers, like a real action hero!
The Action element can communicate with users, customers, and external systems. It can also perform some advanced automation tasks, but in this module, we focus on communicating with people.
Send an Email with an Email Alert
The sales department at Pyroclastic wants to notify the account owner immediately when key details change in an account. Flo asks you to create a flow that emails the account owner when a change occurs.
There are multiple ways to send an email in a flow, but we recommend using the Action element to select an Email Alert workflow action. This method has the most features and is easy to set up if you have existing email alerts from workflow rules.
If you don’t already have the email alert you need, create it first.
Create an Email Alert
- From the Activity tab on an account record, click
 to create an email.
- Subject:
Account change notice - Body:
Your account record has changed.Feel free to add more elaborate text or merge fields as you wish.
- Related To: verify that an account is selected
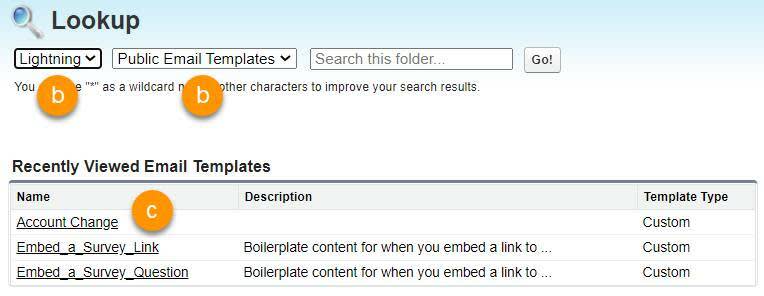
- Click
 and select Save as new template.
- Template Name:
Account Change - Folder: Public Email Templates
- From Setup, enter
Email Alertsin the Quick Find box and then click Email Alerts.
- Click New Email Alert.
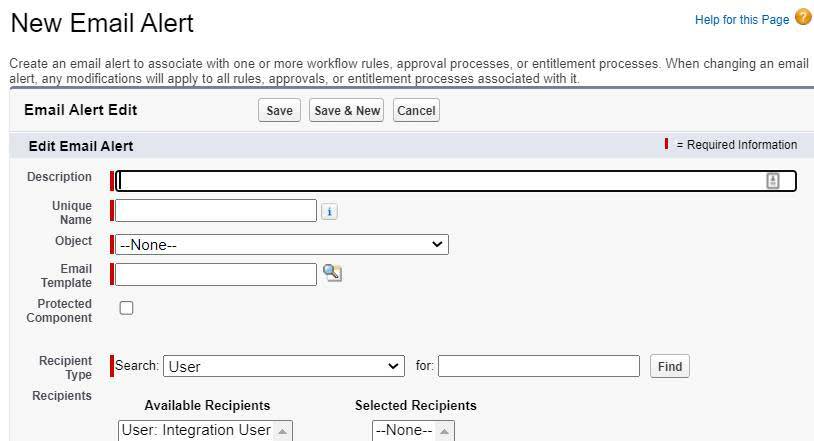
- For Description, enter
Notify Owner of Account Change.
Descriptions should be, well, descriptive, because it’s how you find the email alert you want in a long list of actions.
- For Unique Name, keep the default:
Notify_Owner_of_Account_Change.
- For Object, select Account.
Email Alerts are each tied to a specific object because the object defines the possible recipients. For example, because this email alert is related to the Account object, it has access to account-specific recipients such as Account Team members.
- Select an email template to use:
- Click the magnifying glass (
 ) next to the Email Template field.
- In the Lookup window, select Lightning and Public Email Templates.
- Click the Account Change email template.
- For Recipient Type, select Owner.
- Under Recipients, move Account Owner from the Available Recipients list to the Selected Recipients list.
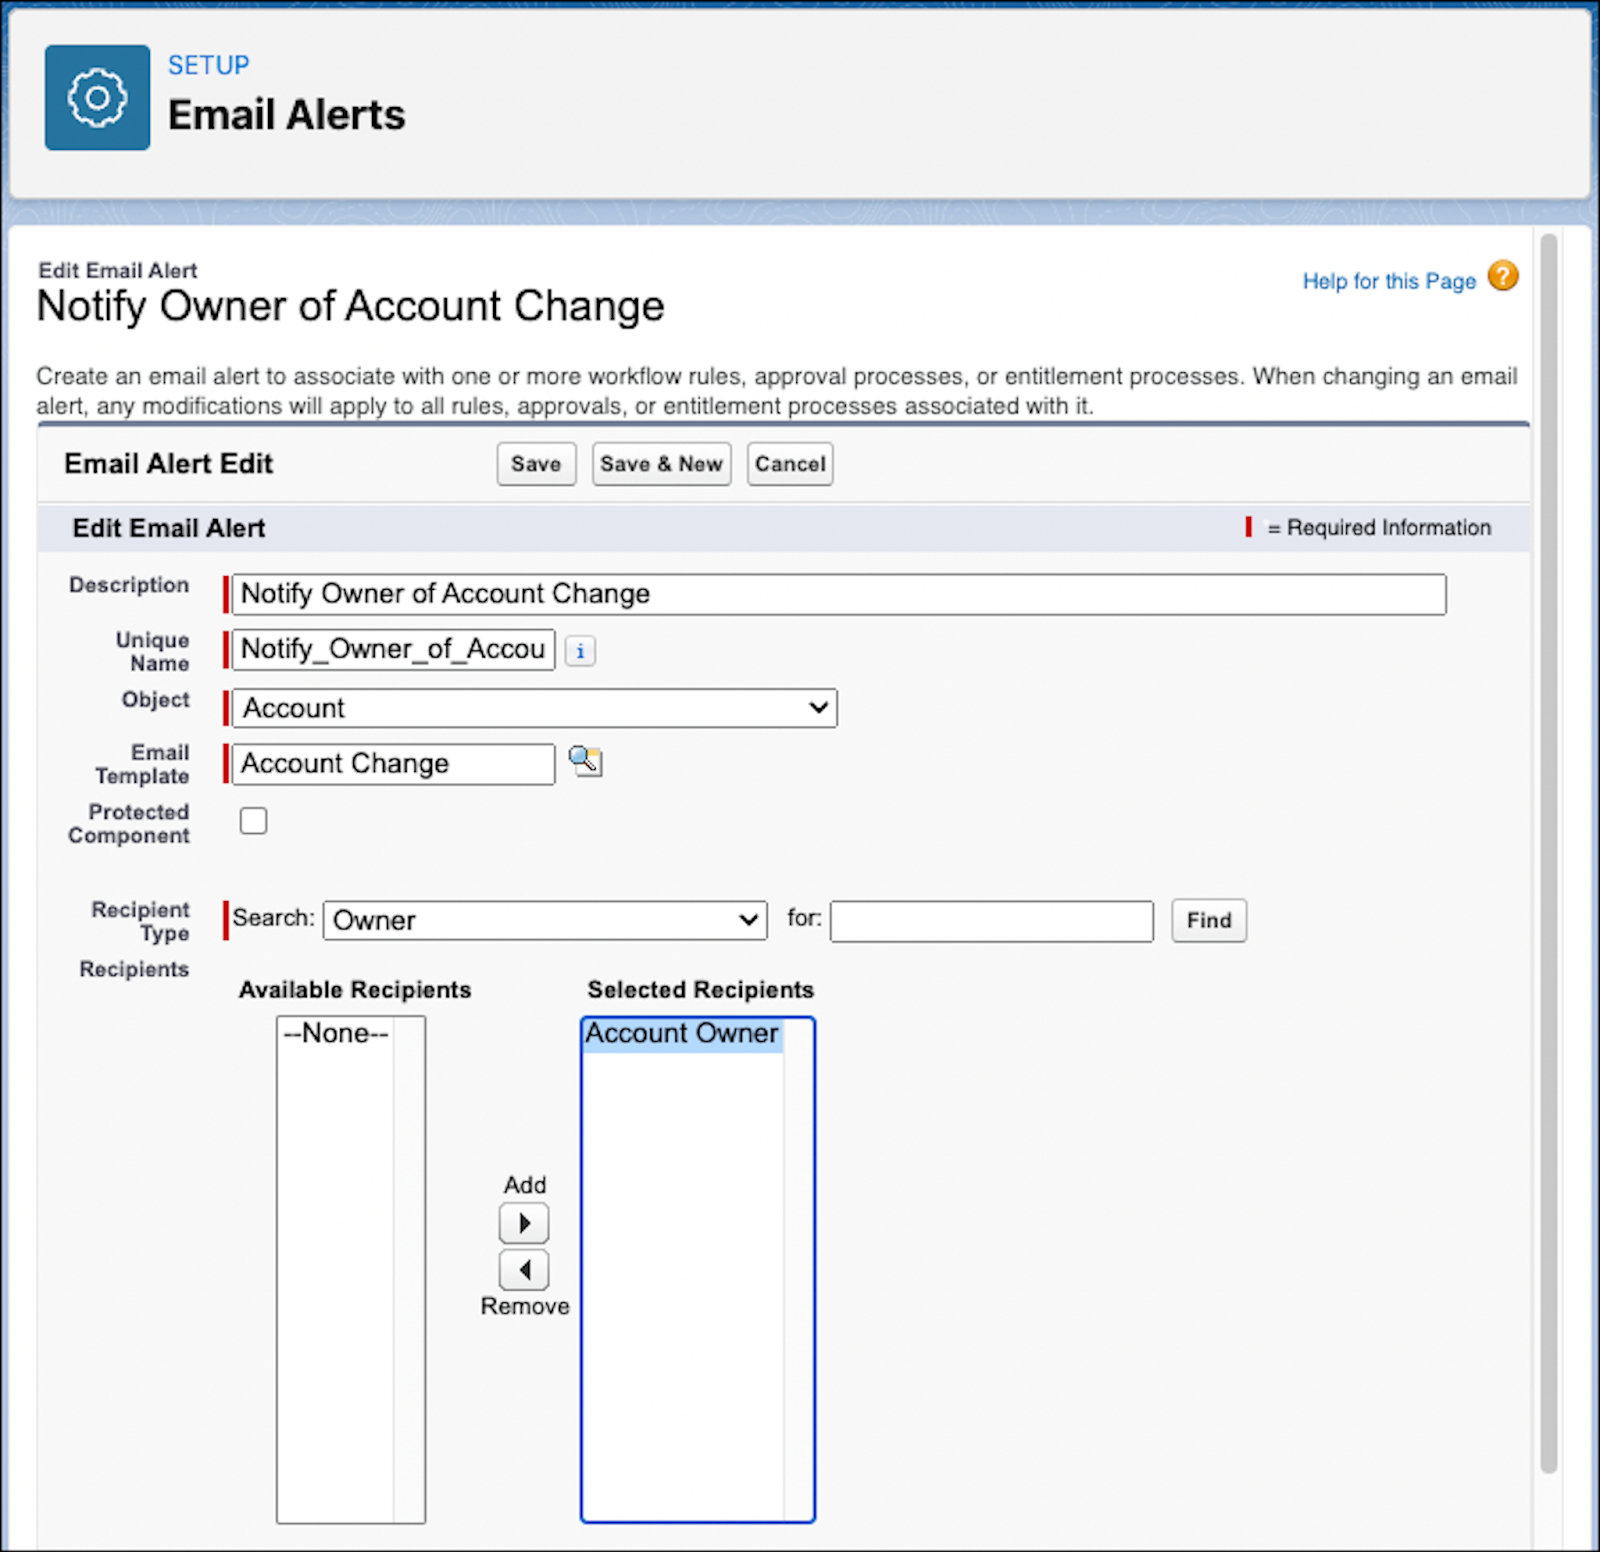
- Click Save.
Create a Flow That Uses the New Email Alert to Send an Email
Your email alert is ready to go. To build a flow that sends the email, follow these steps.
- Create a record-triggered flow:
- Object: Account
- Trigger the Flow When: A record is updated
- Condition Requirements: Any Condition Is Met (OR)
- In the Filter Records section, define conditions that tell the element which records to retrieve.
- First condition:
- Field: Account Number
- Operator: Is Changed
- Value: True
- Field: Account Number
- Second condition:
- Field: Annual Revenue
- Operator: Is Changed
- Value: True
- Field: Annual Revenue
- Third condition:
- Field: Account Name
- Operator: Is Changed
- Value: True
- Field: Account Name
- Fourth condition:
- Field: Account Rating
- Operator: Is Changed
- Value: True
- Field: Account Rating
- First condition:
- On the flow canvas, on the path after the Start element, click
 . Select Action.
(When you’re in a record-triggered flow, you can instead click Send Email Alert. Then the only Actions available are email alerts.)
- In the Search… bar, type
emailAlertto display a list of the available email alerts, then select Notify Owner of Account Change.
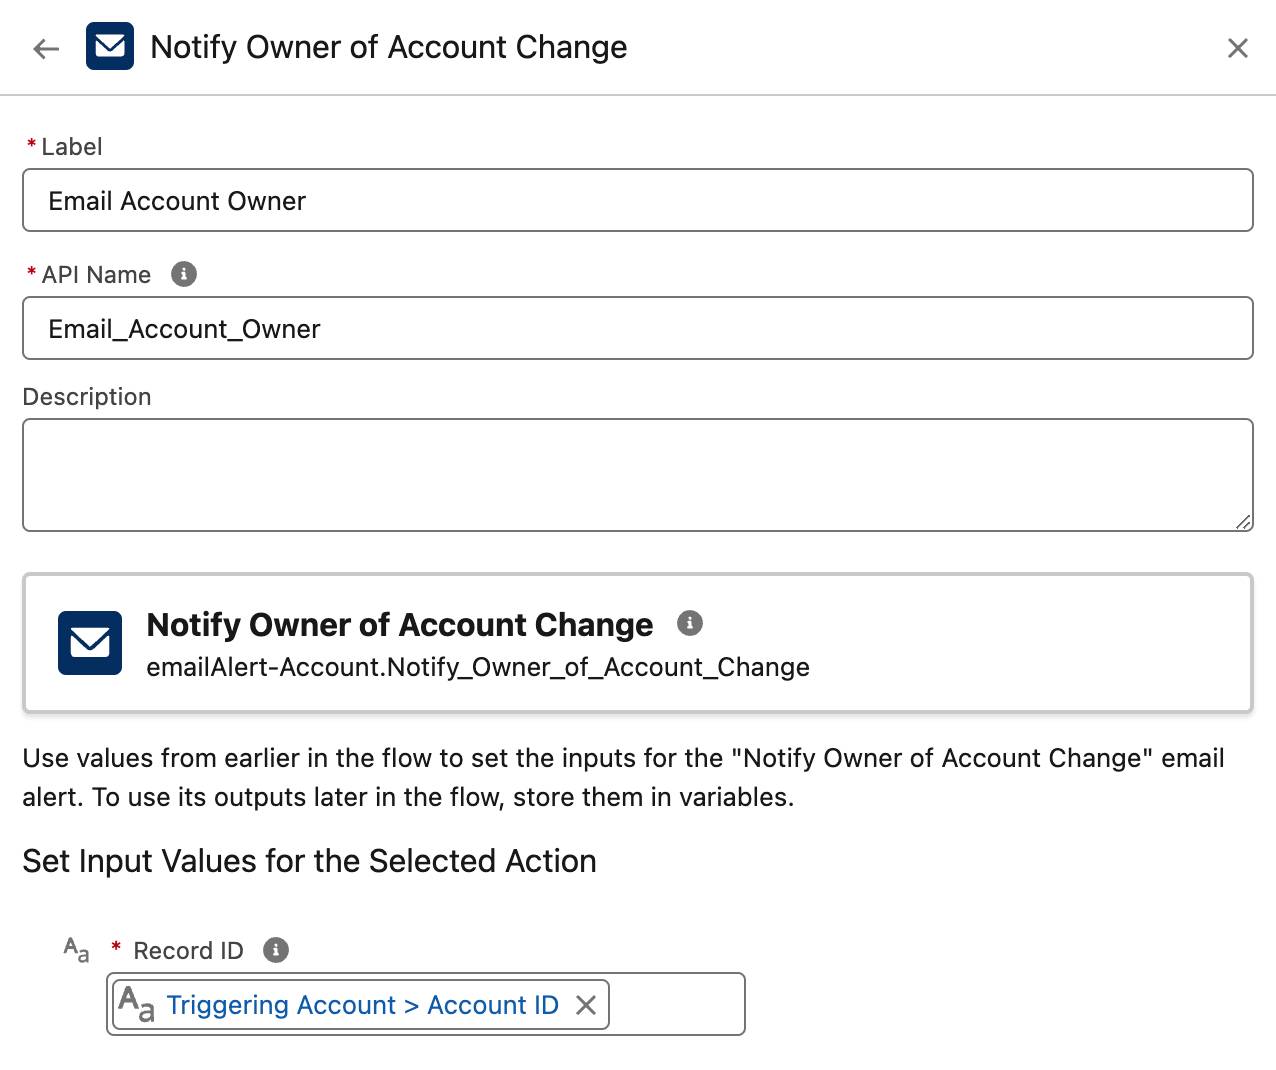
- For Label, enter
Email Account Owner.
- For Record ID, select Triggering Account > Account ID.
- Save the flow. For Flow Label, enter
Send Email on Account Change.
And there you have it! Your flow can now speak the language of email.
Post to Chatter
If sending an email isn’t your style and you’d rather send a message within Salesforce, you can use the Action element to create a Chatter post. You can post to a record, a Chatter group, a user’s feed, or any other place that has a Chatter feed. But first, you need two things.
- A text template that contains what you want to post
- A resource that contains the ID of the place where you want to post
Because this flow will do the same thing as the Send Email on Account Change flow, we’ll edit the Send Email on Account Change flow and then save it as a new flow.
The Text Template, Your Communication Friend
Because you can’t type a long, formatted message into the Action element directly, you need something else to store that message. That’s when the text template becomes your communication friend.
In Flow Builder, text templates are resources that can contain a chunk of text. The text can be one word, one sentence, or many paragraphs, and can contain merge fields.
Create a Text Template
- In the Send Email on Account Change flow, if the Toolbox isn’t already open, click
 to open it.
- Click New Resource.
- For Resource Type, select Text Template.
- For API Name, enter
ChatterBody.
- Next to the Resource Picker field, change View as Rich Text to View as Plain Text.
- In the Resource Picker field, select Triggering Account > Owner ID (the one without > in the line).
A merge field for the owner’s name is inserted at the beginning of the message body.
- Add square brackets [ ] around the merge field, like this:
[{!$Record.OwnerId}] - Add an @ symbol at the beginning, like this:
@[{!$Record.OwnerId}]
When followed by a value enclosed in square brackets, the @ symbol inserts the value as a mention in the Chatter post.
- After the closing bracket, enter
, your account record has changed.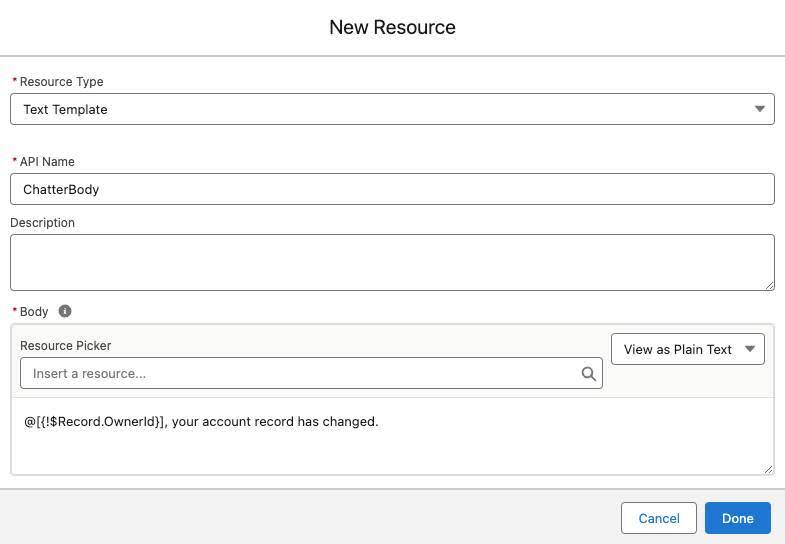
- Click Done.
- In the button bar, click
 next to the Save As New Version button and select Save As New Flow. This option avoids overwriting the Send Email on Account Change flow.
- For Flow Label, enter
Post to Chatter on Account Change.
- Click Save.
Your new text template can now be referenced in any Flow Builder field where you can select a text resource.
Create an Element That Uses the New Text Template to Post to Chatter
- If the Post to Chatter on Account Change flow isn’t already open, open it now.
- On the flow canvas, hover over the Email Account Owner element and click
 .
.
- Select Delete Element.
- On the flow canvas, click
 . Select Action.
- In the Search… bar, enter
postand then select Post to Chatter.
- For Label, enter
Chatter Notification.
- For Message, select the ChatterBody text template.
- For Target Name or ID, select Triggering Account > Owner ID (the one with > in the line) > Username.
- Enable Target Type to include the Target Type field on this Action element.
- For Target Type, enter
User.
Because the Target you entered is a user, you must enterUseras the Target Type, even though it doesn’t appear as a suggested option. If the Target were a Chatter group, you’d enterGroup. When the Target is a record, you can leave Target Type disabled.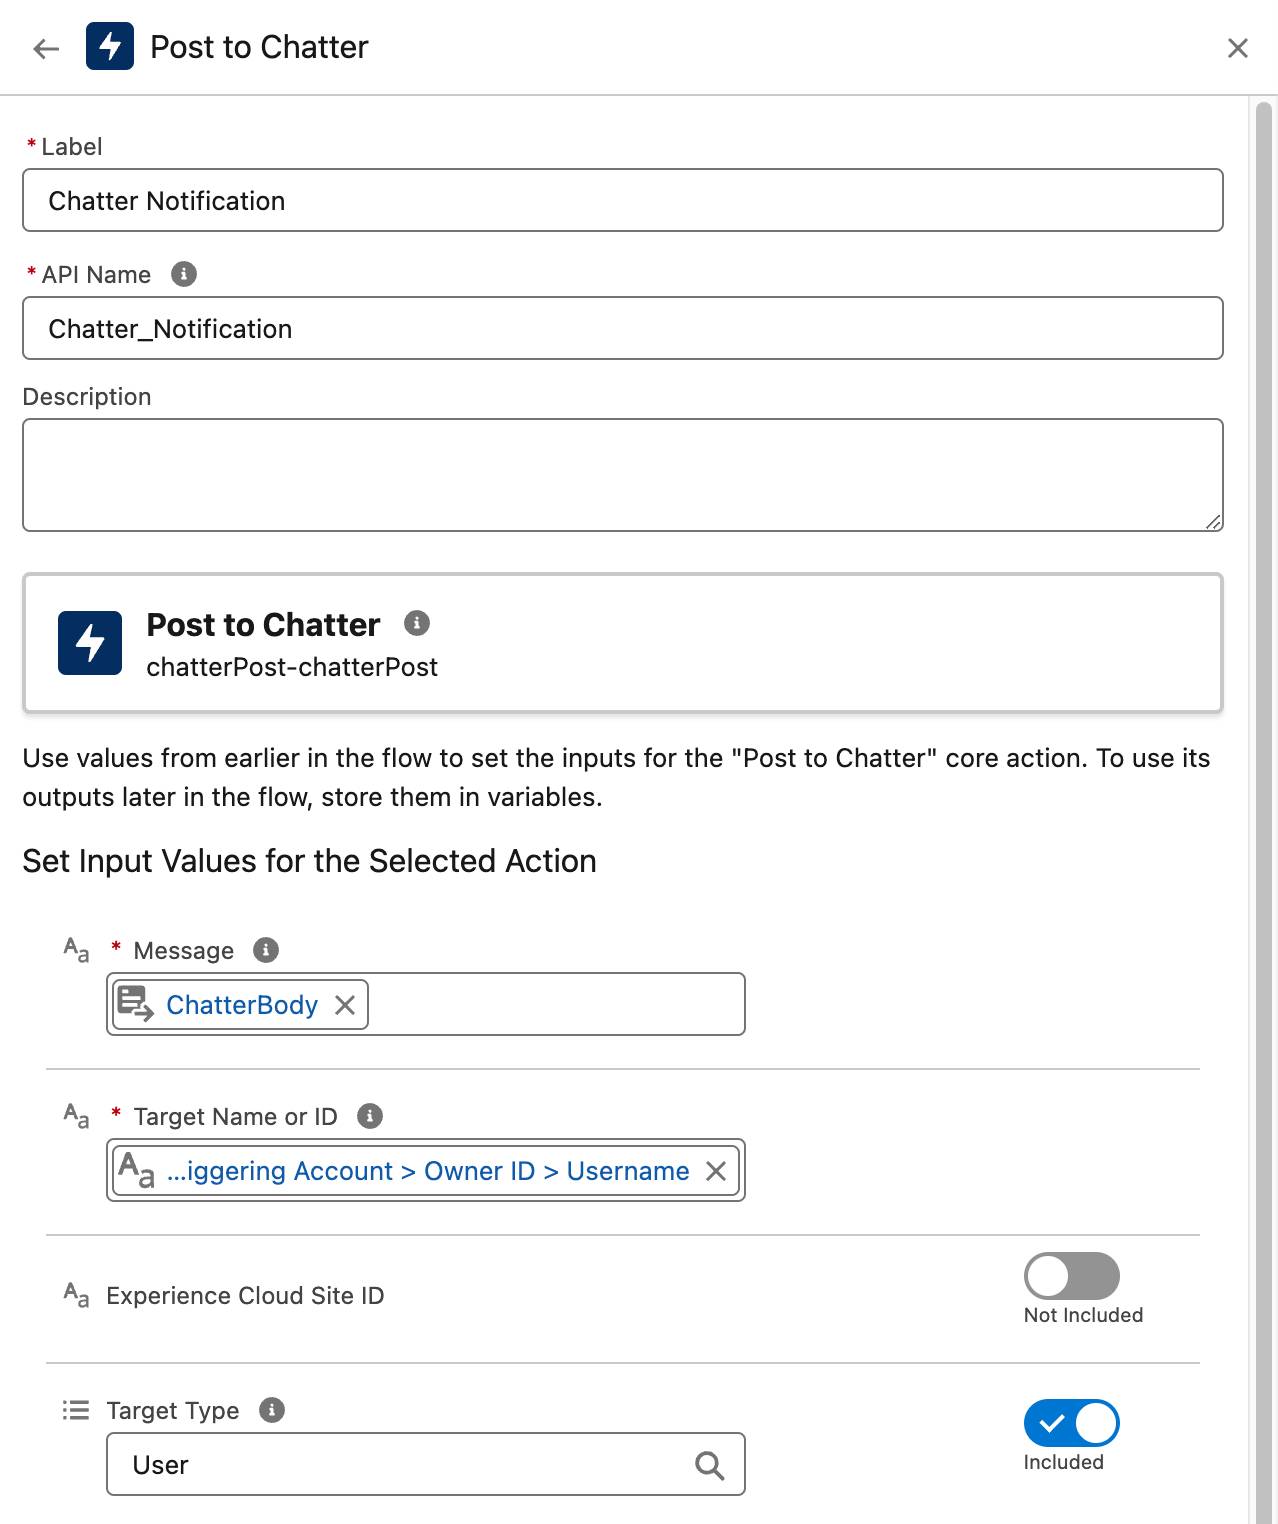
- Save the flow.
Voilà! Your flow now speaks Chatter quite eloquently.
Submit a Record for Approval
Pyroclastic’s sales teams rely on approval processes to request management approval for opportunity discounts. But Flo hears through the grapevine that salespeople sometimes forget to click the Submit for Approval button when a deal is ready. Wouldn’t it be great if the opportunity were automatically submitted for approval when it reaches a certain stage? It can be, using flows!
Take a guess: Which element do you use to send approval requests?
That’s right, the Action element. Before you create an action to send approval requests, you need:
- An active approval process
- A variable or other resource that contains the ID of the record to be approved
- Optional:
- A text template with the text to be sent to the approver
- A variable or other resource that contains the ID of the submitter
Follow these steps to build a flow that submits a record for approval.
- Create a record-triggered flow:
- Object: Opportunity
- Trigger the Flow When: A record is created or updated
- Condition Requirements: All Conditions Are Met (AND)
- Field: Stage
- Operator: Equals
- Value: Proposal/Price Quote
- When to Run the Flow for Updated Records: Only when a record is updated to meet the condition requirements
- Optimize the Flow for: Actions and Related Records.
- On the flow canvas, on the path after the Start element, click
 . Select Action.
- In the Search… bar, type
submitand then select Submit for Approval.
- For Label, enter
Request Opp Approval.
- For Record ID, select Triggering Opportunity > Opportunity ID.
- Enable Approval Process Name or ID, and enter
PriceQuoteApproval.
If you leave this field blank, the flow follows the normal method for determining which approval process to run: the first active approval process on the current object whose entry criteria are met.
- Enable Submitter ID, and enter Triggering Opportunity > Owner ID.
Use the Submitter ID when you want someone other than the user who ran the flow to be the submitter. If the submitter isn’t an allowed submitter for the approval process, or the selected approval process has entry criteria that aren’t met, the flow fails.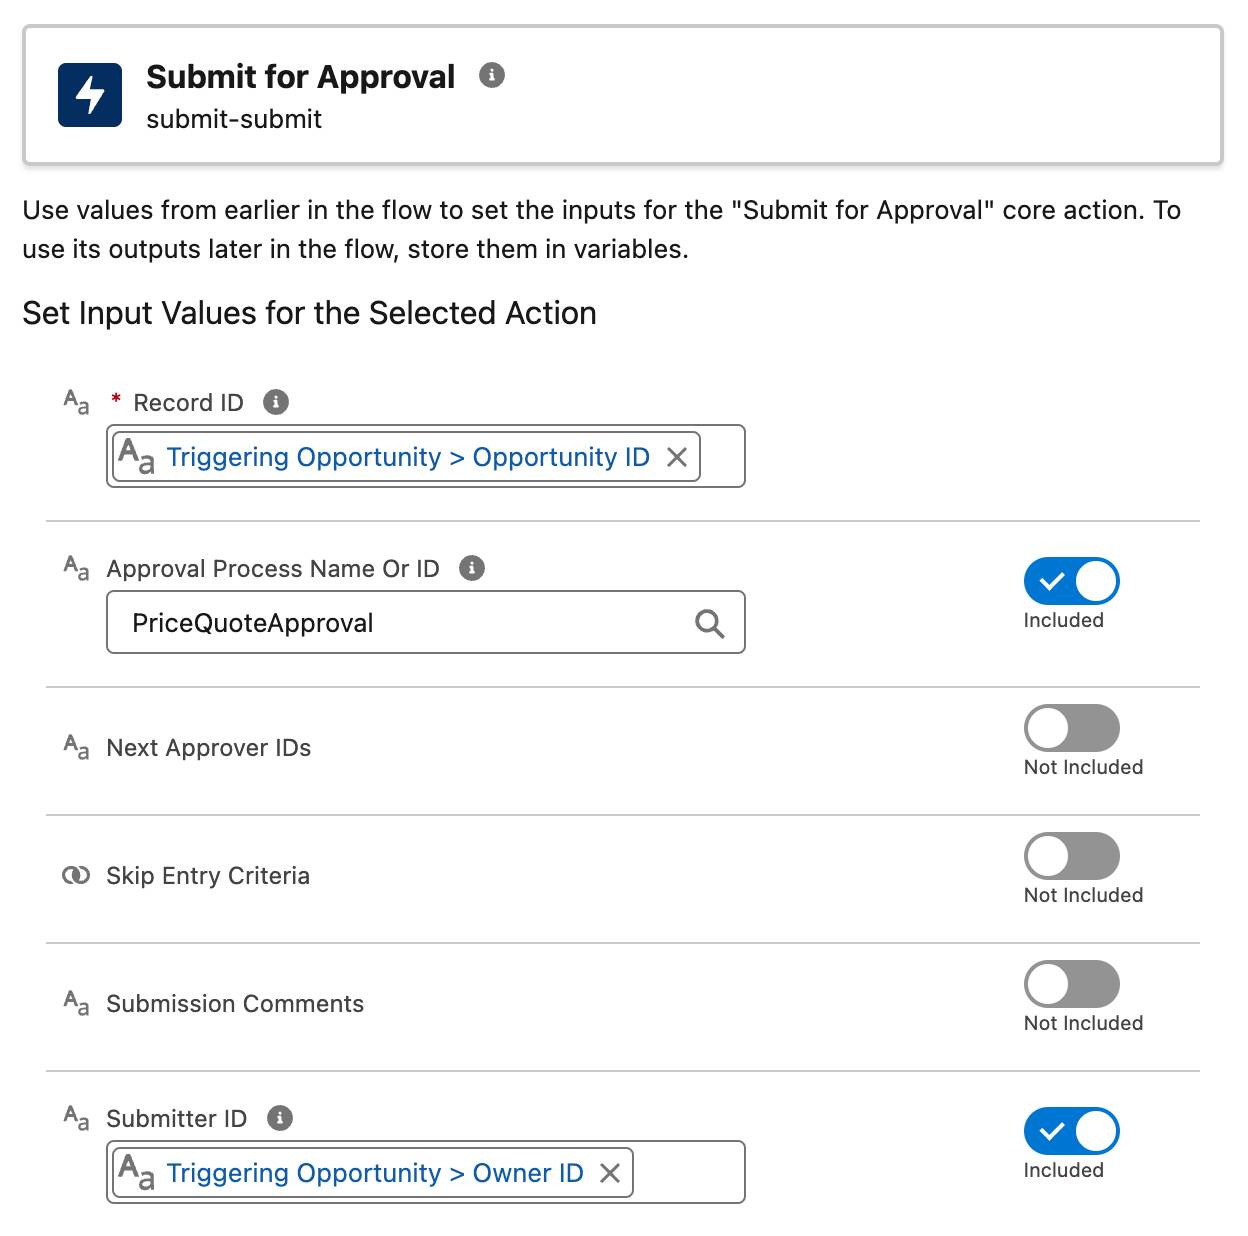
- Save the flow. For Flow Label, enter
Price Quote Approval.
Congratulations, your flow is now fluent in multiple forms of communication! In the next unit, you learn another way to retrieve data that can help with your flow’s communication.
Resources
- Documentation: Create an Email Template in Lightning Experience
- Documentation: Email Templates in Salesforce Classic
- Documentation: Sending Emails in a Flow
- Trailhead: Chatter Administration for Lightning Experience
- Trailhead: Build a Discount Approval Process