Combine Variables and Data Elements
Learning Objectives
After completing this unit, you’ll be able to:
- Use the variables generated by some elements.
- Retrieve data from Salesforce records to use in your flows.
- Use record variables in Create Records and Update Records elements.

Variables Generated by Elements
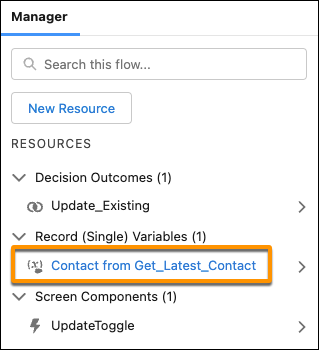
Variables are incredibly useful in flows, but if you had to create a variable for each separate data value in a flow, you’d get tired of making variables pretty quickly! Thankfully, some flow elements create their own variables, so you don’t have to. These variables have labels that match their source element, so you always know where they came from: [Record type] from [API name].
For example, if you have a Get Records element that retrieves a contact record and has an API name of Get_Latest_Contact, that element creates a record variable with Contact from Get_Latest_Contact as the label.
Let’s look at the Get Records element, how it works, and how it creates that variable for you.
Retrieve Values from a Single Record
To do almost anything in Flow Builder, you need data. Flows can access your Salesforce record data, but you have to tell the flow what data to get. The flow temporarily stores a record’s values so they can be used later in the flow.
To retrieve data from a Salesforce record, use the Get Records element. Check out this video on how the Get Records element works.
When retrieving record values, you can get all the field values from a single record or from a whole collection of records. The flow stores the retrieved values in a single variable.
Let’s look at an example. Pyroclastic, Inc. tracks critical contacts on an opportunity in the related Opportunity Contact Role object. The sales department wants opportunity owners to reach out to the contact with the Decision Maker role when an opportunity is lost. Flo asks you to create a flow that generates a task when a high-value opportunity is lost. The Decision Maker is stored not on the opportunity, but on a different object: Opportunity Contact Role. You need the flow to retrieve the Decision Maker from the opportunity contact role before creating the task.
Let’s outline the flow before you start to build it.
First, the flow runs when an opportunity is lost with an Amount over 100,000. (You do this with a record-triggered flow that runs when an opportunity is updated, and a condition requirement: StageName = Closed Lost.)
Second, the flow retrieves opportunity contact role records whose Role is Decision Maker. (You do this with a Get Records element for the Opportunity Contact Role object. In the Get Records element, you define two filters: (1) the opportunity contact role’s Opportunity = the triggering opportunity’s ID; and (2) the Role on the opportunity contact role = Decision Maker.)
Third, you want to store only the most recent decision maker. (You do this with three settings in the Get Records element: (1) How many records to store: Only the first record; (2) Sort By: CreatedDate; and (3) Sort Order: Descending.)
Finally, the flow creates a task that reminds the opportunity owner to follow up with the decision maker. (You do this with a Create Records element for the Task object. You set field values for the task using the opportunity’s Owner ID, the opportunity’s ID, and the opportunity contact role’s Contact ID.)
Now you’re ready to start building the flow.
- Create a record-triggered flow:
- Object: Opportunity
- Trigger the Flow When: A record is updated
- Condition Requirements: All Conditions Are Met (AND)
- Condition:
- Field: Stage
- Operator: Equals
- Value: Closed Lost
- Field: Stage
- Click +Add Condition:
- Field: Amount
- Operator: Greater Than or Equal
- Value:
100000
- Field: Amount
- When to Run the Flow for Updated Records: Only when a record is updated to meet the condition requirements
- Optimize the Flow for: Actions and Related Records
- Object: Opportunity
- On the flow canvas, on the path after the Start element, click
 . Select Get Records.
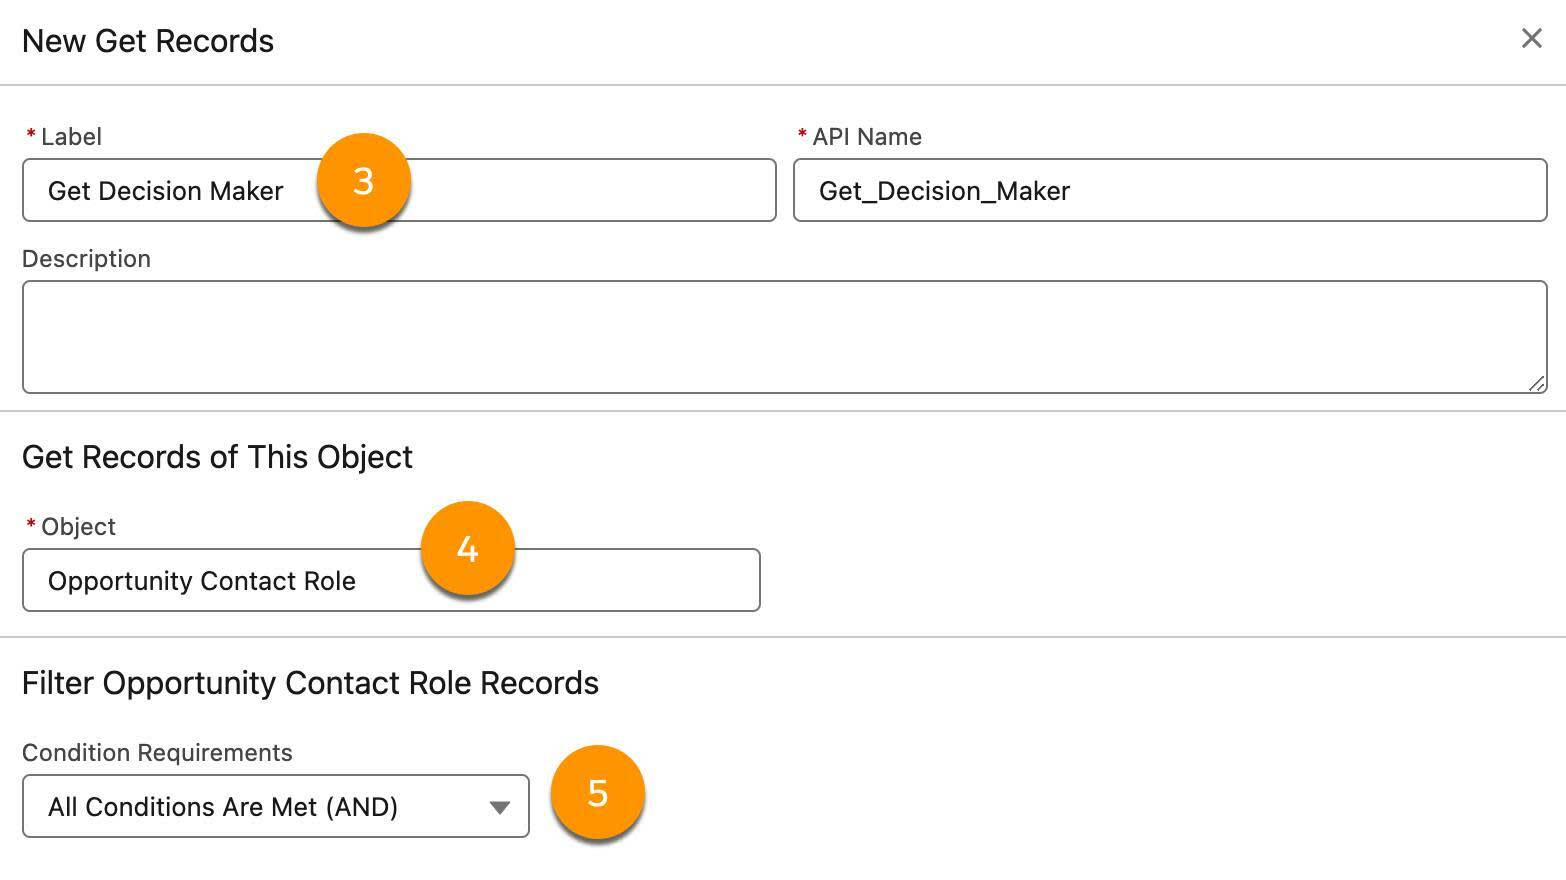
- For Label, enter
Get Decision Maker.
Remember, this name is used to label the generated variable, so it’s a good idea to use a descriptive name.
- For Object, select Opportunity Contact Role.
- For Condition Requirements, select All Conditions Are Met (AND).
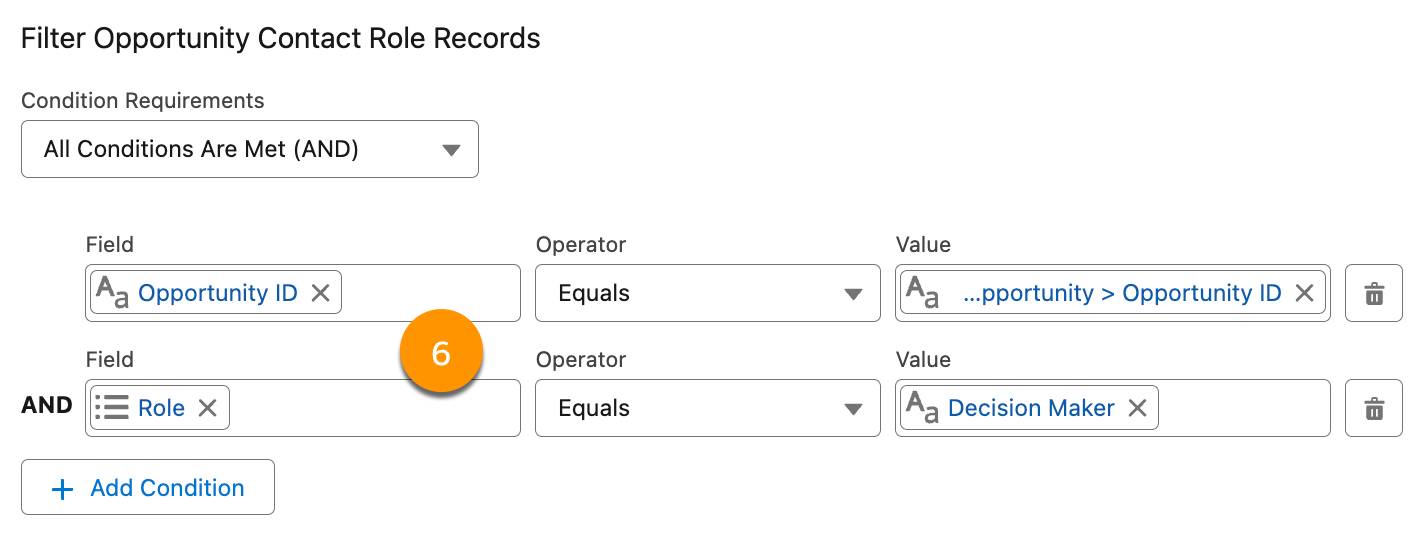
- In the Filter Records section, define conditions that tell the element which records to retrieve.
- First condition:
- Field: Opportunity ID
- Operator: Equals
- Value: Triggering Opportunity > Opportunity ID
- Field: Opportunity ID
- Second condition:
- Field: Role
- Operator: Equals
- Value: Decision Maker
- Field: Role
- First condition:
- For Sort Order, select Descending.
- For Sort By, select CreatedDate.
- For How Many Records to Store, select Only the first record.
When you select Only the first record, the element stores just one record in the output variable.
When you select All records, it outputs all the records that meet your filter conditions.
- For How to Store Record Data, select Automatically store all fields.
This option is the default, and for good reason. With this option enabled, the element automatically creates a record variable for you and stores the data in it. Don’t worry, even though the whole record is stored in a single variable, you’ll still be able to retrieve individual field values as needed.

- Save the flow. For Flow Label, enter
Create Follow-Up with Decision Maker.
Combining the How Many Records to Store and Sort Settings
In the Get Decision Maker element, you wanted to find one decision maker so you opted to store only the first record. If multiple records match the filter conditions, how do you know which one will be stored? You can use the Sort Order and Sort By settings to dictate which record comes first. You sorted in descending order by creation date so that the flow returns the most recently created Decision Maker role.
Now your flow can get the information it needs to create the reminder task. Next, you add a Create Records element to create that task.
Use the Retrieved Values
After the Get Records element runs, its variable contains that sweet, juicy data! Now your flow’s elements can drink that data for anything they need, like a cold glass of flow-range juice.
Let’s return to our example. The flow retrieves the data for the Decision Maker contact role, but it still needs to create a task. Let’s make a Create Records element. Use the variable created by the Get Records element (Opportunity Contact Role from Get Decision Maker) to set the task’s contact (Name ID).
- In the Create Follow-Up with Decision Maker flow, add a Create Records element after the Get Decision Maker element:
- Label:
Create Task - How to set record field values: Manually.
- Object: Task
- Label:
- Define the field values for the new task record.
- Field: Assigned To ID, Value: Triggering Opportunity > Owner ID (Scroll down and select the Owner ID field that doesn’t have a > at the end of the line.)
- Field: Priority, Value: Normal
- Field: Status, Value: Not Started
- Field: Subject, Value:
Closed Lost Follow-Up
- Field: Related To ID, Value: Triggering Opportunity > Opportunity ID
- Field: Name ID, Value: Opportunity Contact Role from Get Decision Maker > Contact ID (Scroll down and select the Contact ID field that doesn’t have a > at the end of the line.)
- Field: Assigned To ID, Value: Triggering Opportunity > Owner ID (Scroll down and select the Owner ID field that doesn’t have a > at the end of the line.)
- Save the flow.
After the flow is activated, when an opportunity is set to Closed Lost, the flow creates a follow-up task on the opportunity and on the most recent contact with the Decision Maker role.
In the next unit, you learn about other elements that communicate with your users.
Resources
- Flow Video Resource: Get Records
- Trailhead: Lightning Experience Customization
- Trailhead: Reports & Dashboards for Lightning Experience