Create an Automation with Flow Builder
Pleasing customers is very important at Ursa Major Solar. To make sure large accounts get all the attention they need, use Flow Builder to set up an automation that notifies product support specialist Ada Balewa of new cases for large accounts.
Build a Template and Alert
Before creating the automation, an email template and email alert need to be created. These will be referenced in the automation.
- Click the gear icon
 and select Setup.
- Enter
Classic Email Templatesin the Quick Find box and select Classic Email Templates.
- Click New Template.
- Select Text, and click Next.
- Fill in the details for the email template.
Field |
Value |
|---|---|
Folder |
Unfiled Public Classic Email Templates |
Available for Use |
Select |
Email Template Name |
Notification of New Case for Large Account |
Template Unique Name |
Leave as default |
Encoding |
Leave as default |
Subject |
New Case: {!Account.Name} |
Email Body |
This is a notification that there was a new case created for {!Account.Name}. Please see the details below: {!Case.Origin} {!Case.Reason} {!Case.Type} {!Case.Product__c} |
- Click Save.
Next, create an email alert that the automation can reference.
- In Setup, enter
Email Alertsin the Quick Find box and select Email Alerts.
- Click Continue.
- Click New Email Alert and fill in the details.
Field |
Value |
|---|---|
Description |
Email Alert notifying support agents of new case at large account |
Unique name |
Leave as default |
Object |
Case |
Email Template |
Notification of New Case for Large Account (Tip: Click the lookup icon and select Notification of New Case at Large Account.) |
Recipient Type |
User |
Selected Recipients |
Ada Balewa (Click Add to add to Selected Recipients.) |
Additional Emails |
Add your email |
From Email Address |
Current User’s email address |
- Click Save.
Create an Automation with Flow Builder
Using Flow Builder, you can quickly and easily automate notifications of new cases for large accounts.
- Click the App Launcher (
 ).
).
- In the Search apps and items box, enter
autoand then select Automation.
- In the Flows panel, click New.
- Under Frequently Used, select Record-Triggered Flow. Note: Make sure Record-Triggered Flow is selected.
- For Object, enter
Caseand select Case.
- In Configure Trigger, make sure A record is created is selected.
- In Condition Requirements, make sure None is selected.
- Make sure Actions and Related Records is selected.
Add a Decision Element
Now add the action you want to happen when your conditions are met. In this case, you want to add a decision element.
- On the path before the End component, click
 .
.
- Search and select Decision.
- Enter the following details:
- Label:
Large Account?
- API Name:
Large_Account
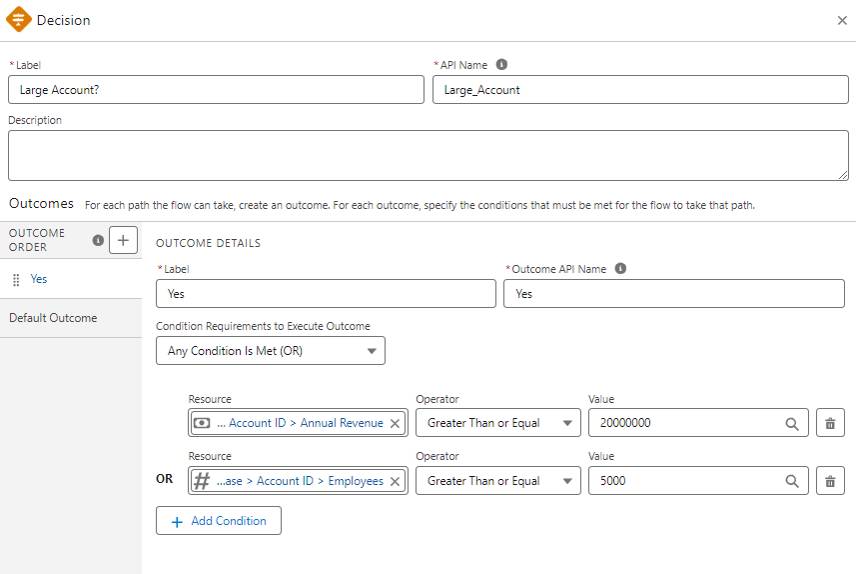
You create two paths from this Decision element: the Yes outcome and the No outcome. First, create the Yes parameters.
- Label:
- With the New Outcome option selected in the Outcome Order, enter the following information:
- Label:
Yes - Outcome API Name:
Yes - Condition Requirements to Execute Outcome: Any Condition is Met (OR)
- For Resource, select Triggering Case > Account ID > Annual Revenue.
Note: Make sure you select the Account ID option that has a Record data type, signified by a > in its row.
- Operator: Greater Than or Equal
- Value:
20000000(That’s seven zeros.)
- Label:
- Click Add Condition and enter the following details:
- For Resource, select Triggering Case > Account ID > Employees.
- Operator: Greater Than or Equal
- Value:
5000
Don't close the panel yet. Next, you define the default outcome.
- For Resource, select Triggering Case > Account ID > Employees.
- Click Default Outcome in the Outcome Order.
- For Label, enter
No.
Create an Alert for the Yes Outcome
- On the path below the Yes component, click
 .
.
- Search and select Send Email Alert.
- In the Email Alert panel, select Email Alert notifying support agents of new case at large account.
- Enter the following details:
- Label:
Notification of Case for Large Account - API Name:
Notification_of_Case_for_Large_Account - For Record ID, select Triggering Case > Case Id.
- Label:
Save and Activate the Flow
- Click Save in the upper right.
- For Label, enter
Notification: Case for Large Account.
- Make sure the Flow API Name is
Notification_Case_for_Large_Account.
- For Description, enter
Notify Product Support Specialist regarding new cases for large accounts.
- Click Save.
- Click Activate.
- Click the back arrow button
 in the upper left.
Test the Automation
Now, test the process you just built to verify that it works.
- Click the App Launcher
 and select Service.
- Click the Accounts tab.
- In the dropdown list, choose All Accounts.
- Click United Oil & Gas Corp.
- Click the Details tab, and notice the Annual Revenue and Employee count. This is a large account.
- Click the Related tab.
- Click New under the Cases related list.
- For Record Type, select Product Support.
- Click Next and enter these details.
Field |
Value |
|---|---|
Type |
Problem |
Case Reason |
Breakdown |
Status |
New |
Case Origin |
Phone |
Subject |
Charge Controllers Replacement |
Description |
The charge controllers are not working and need to be replaced. |
Product |
Charge Controllers |
- Click Save.
- Check your email to make sure you received the alert.
Now, anytime there’s a new case at a large account, you and Ada will be notified. In the next step, set up Entitlements to identify the level of service reps should be providing for Ursa Major Solar customers.
Resources