Install the Managed Package
Enable Field Service
Before you can start working with Field Service, you must enable it.
- In your Field Service Playground, click
 then select Setup.
- Enter
field servicein the Quick Find box, then select Field Service Settings.
- Click the toggle to enable Field Service and wait for the message that says your changes are saved.

Look at all the shiny new settings! For now, leave those settings alone—you can adjust them all you want after you finish the project.
Install the Managed Package
Now you’re ready to install the goodness of the Field Service Managed package right into your Trailhead playground. Salesforce regularly releases new versions of the Field Service managed package as part of their standard Spring, Summer, and Winter releases so it's up to date.
- Open an incognito browser window in Chrome.
- In the incognito window, paste the download link into the address bar to install the managed package.
- Click the link to install the most recent managed package to your Trailhead playground production org. For a business org, you may want to install new packages in a sandbox org first to test them. If you get an error message saying the managed package isn't yet available on your Trailhead playground, try completing this project again in a few days.
- On the Salesforce login screen, enter the username and password for your Trailhead Playground, then click Log In and enter the verification code from your email.
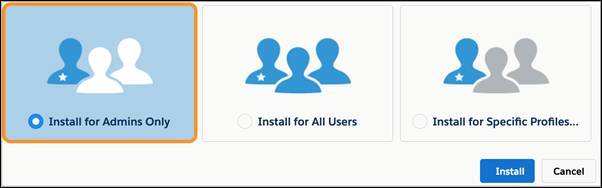
- Select Install for Admins Only, then click Install.
- Approve the request to grant access to third-party websites for geolocation and optimization services.
- Wait for a message telling you that you’ll be notified by email when the package is installed, and click Done. Spend a few minutes doing something fabulous while you’re waiting for the email.
If you’re having trouble finding your username and resetting your password, see this article. If you have trouble installing the package, see the Install Apps and Packages in Your Trailhead Playground unit of the Trailhead Playground Management module.
When you receive the email, head back to your playground and open the App Launcher  . Notice the brand-new tools! Here are the four most important ones.
- The Field Service Admin app lets admins customize the managed package, manage scheduling and optimization, and use the dispatcher console.
- The Field Service app lets dispatchers do what they do best: view and manage an airtight service schedule!
- The Field Service tab leads to the dispatcher console, where you can manage your team’s service schedule.
- The Field Service Settings tab is where you customize the managed package’s settings and access the Guided Setup tool. (Salesforce Setup includes a separate Field Service Settings page whose settings aren’t related to the managed package.)
By default, the Field Service tab appears in the Field Service app, and the Field Service Settings tab appears in the Field Service Admin app. However, you can add the tabs to any app.
Create and Assign Permission Sets
The managed package comes with permission sets that determine the access for each of the common field service players. Create those permission sets so you can assign them to your users later.
- From the App Launcher, find and open Field Service Admin.
- Click the Field Service Settings tab, and then click Permission Sets.

- Click Create Permissions on each of the tiles.
Time for a little power-up! Assign yourself the admin permission set so you can access Guided Setup and customize the managed package’s settings.
- Click the gear icon in the top right to open Setup.
- Enter
permission setsin the Quick Find box and select Permission Sets. The permission sets you just created are part of the list now, too.
- Click Field Service Admin Permissions.
- Click Manage Assignments.
- Click Add Assignments.
- Select your name and click Next.
- Leave the default selection for no expiration date, then click Assign.
- Click Done.
- Close the Setup tab.
- Reload the Field Service Admin app page for the assignment to take effect.
You’ve finished installing the Field Service managed package, set up the permission sets, and made yourself an admin. But you’re just getting started.