Set Up Visual Studio Code
Apex Replay Debugger is part of the Salesforce Extension Pack for Visual Studio Code. The extensions require: Visual Studio Code, Salesforce CLI, and either JDK version 21 (Recommended) or JDK version 17 or 11. In this step, you install and configure the necessary tools to run Apex Replay Debugger. If you are new to Visual Studio Code, we recommend that you complete the Quick Start: Visual Studio Code for Salesforce Development project before you go on.
Install and Update Salesforce CLI
Use Salesforce CLI to control the full application lifecycle of your Salesforce apps. With it you can easily create environments for development and testing, synchronize source code between your orgs and source control, and execute tests.
- Install Salesforce CLI from Salesforce CLI.
- Confirm Salesforce CLI is properly installed by opening Command Prompt on Windows or Terminal on macOS and running the following command from the command line.You should see output like
sf update
Updating CLI....
Install and Update Visual Studio Code
Visual Studio Code is a powerful editor that is highly customizable and cross-platform. Salesforce Extensions for Visual Studio Code is the successor to the Force.com IDE plug-in for Eclipse for Salesforce development on the desktop.
- Install Visual Studio Code from https://code.visualstudio.com/Download.
- Launch Visual Studio Code.
Install and Update Salesforce Extensions for Visual Studio Code
The Salesforce extensions provide features such as code completion, syntax highlighting, Apex debugging, and more for the Lightning Platform.
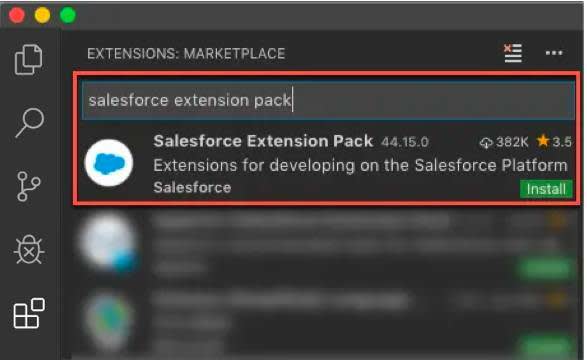
- In Visual Studio Code, click the View menu then choose Extensions.
- Enter
salesforce extension packin the search box.
- Click Install, Update or Restart for the Salesforce Extension Pack result.

- Once installed, relaunch Visual Studio Code to ensure the changes take effect.
Install Java Platform Standard Edition Development Kit
Some features, particularly Apex support, in Salesforce Extensions for Visual Studio Code depend on the Java Platform, Standard Edition Development Kit(JDK). It requires an installation of either JDK version 21 (Recommended) or any JDK version 11 or above. Even if you have another version of Java installed, you need to also install one of the recommended versions.
- Install Java following the recommendations in our Salesforce Extensions documentation.
- Confirm Java is properly installed by locating its installation directory. We need it in the next step. For example, if you installed JDK21 then these are the default installation directories.
- Windows:
C:\Program Files\Java\jdk-21 - MacOS:
/Library/Java/JavaVirtualMachines/jdk-21.0.1.jdk/Contents/Home
Configure Java Home Setting for Apex Support
By default, Salesforce Extensions for Visual Studio Code attempts to locate your Java installation directory by looking for a JAVA_HOME or JDK_HOME environment variable on your computer. You can also set the salesforcedx-vscode-apex.java.home setting to point to the Java installation directory you want to use, which is helpful when you have multiple versions installed. For this project, let’s configure Visual Studio Code settings to point to our JDK installation directory.
In Visual Studio Code, click File > Preferences > Settings (Windows or Linux) or Code > Settings > Settings (macOS).
- Enter
apex javain the search box.
- In the
salesforcedx-vscode-apex.java.homesetting, enter the Java installation directory you want to use.

- Relaunch Visual Studio Code, open a new terminal and run
java -versionto ensure the setting takes effect.
We won't check any of your setup. Click Verify Step to go to the next step in the project to set up Apex Replay Debugger in Visual Studio Code.
Resources
- Trailhead: Quick Start: Visual Studio Code for Salesforce Development
- Video: YouTube: Salesforce Development with Visual Studio Code
- Video: YouTube: Be An Efficient Salesforce Developer with VS Code
- Salesforce Developers Blog: All About Salesforce Extensions for VS Code
- Salesforce Developers Blog: The Future of Salesforce IDEs
- Salesforce Developers: Apex Replay Debugger
- External Site: Java Standard Edition Development Kit 8 Downloads
- Salesforce Developers: Salesforce CLI
- External Site: Visual Studio Code
- External Site: Salesforce Extension Pack