Enable Sales Coaching in Agentforce
Learning Objectives
In this project, you’ll:
- Explore sales coaching capabilities.
- Enable sales coaching with Agentforce.
- Create a sales coaching user.
- Grant access to, configure, and activate the agent for sales coaching.
Say Hello to Your New Coach
Sales coaching in Agentforce is like having a personal trainer in Salesforce. But instead of tracking workouts, it helps you build the skills you need to close more deals and strengthen customer relationships. Whether you're just getting started or looking to improve, sales coaching can meet you where you are and help you grow.
What makes it really useful is how it adapts. As you get more confident with the basics, it introduces new techniques and strategies to keep you learning and improving.
And here's the real magic: Sales coaching doesn’t just teach you the basics; it adapts to your needs and grows with you. As you become more comfortable with the fundamentals, it introduces advanced techniques and strategies to help you level up your sales game. So, are you ready to become a sales superstar? Let’s dive in and start your journey with sales coaching.
Enable Sales Coaching in Agentforce
Enabling the Sales Coach agent in Agentforce is a straightforward two-step process:
-
Turn on Sales Coaching in Agentforce: Activate Agentforce’s capabilities, along with the necessary supporting services, to make the Sales Coach agent available.
-
Configure and Activate the Agent: Use Agent Builder to tailor the agent to your business needs and sales processes.
In this unit, you learn how to complete the first step—enabling the Sales Coach agent through Setup.
Enable Agentforce Sales Coach
- Be sure to take the steps at the top of this page to get a new Trailhead Playground with Agentforce sales coaching and connect it.
- Then, from the playground home page, click the gear icon
 .
.
- In the Quick Find box type
Sales Coachand click Agentforce Sales Coach.
- The Agentforce Sales Coach Setup wizard makes it easy to enable all the required supporting features. It shows you a list of the features that you need and which ones are enabled. Click Enable All.

- You also use Data Cloud for Agentforce sales coaching. We’ve enabled it for you in your custom Playground. Click Go to Data Cloud.

- Since Data Cloud is already enabled, on this page you should see a section called Your Home Org Details with Home Org ID, Home Org Instance, and a few other columns. Confirm that you see that section, and then close the Data Cloud Setup page.
- Return to the Agentforce Sales Coach Setup page and refresh the browser.
- In the Step 1: Enable Agentforce Sales Coach section, click the toggle to activate Agentforce Sales Coach.

- A popup window appears. Click Got It. A confirmation box shows you that Agentforce Sales Coach is now active.
You’ve activated Agentforce sales coaching, and the next step on the Setup page is adding it to your Opportunity record pages. However, you don’t have the right permissions to do that yet, so let’s skip this section for now and come back to it shortly.
Create a Sales Coaching User
Your sales coaching agent operates as a user in Salesforce. As such, it needs reporting, record keeping, and management permissions, just like other users in your org. Next, let’s create a specific type of user for your autonomous sales agent, and assign it the appropriate permissions.
- Click Step 2: Create a User for Agentforce Sales Coach to expand this section.
- Click Go to User Setup.

- A new tab opens where you can create a new user. Populate the New User fields as follows:

- First Name:
Sales Coach - Last Name:
Agent - Alias: auto-populates
- Email: your email address
- Username: scoach + <your initials> + <today’s date> + <your favorite color> + @thsc.com
The username must be unique.
- Nickname: auto-populates
- Company:
Acme - User License: Einstein Agent
- Profile: Einstein Agent User
- Click Save. Your Agentforce Sales Coach user record has been created. You can close this tab and jump back to the Agentforce Sales Coach Setup tab.
- In the Step 2: Create a User for Agentforce Sales Coach section of the Agentforce Sales Coach Setup page, click Go to Permission Sets.
- This opens a new tab where you can manage the assignments for the Agentforce Sales Coach permission set. Click Add Assignments.
- Select the Sales Coach Agent checkbox, click Assign, and then click Done. You’ve now added the Agentforce Sales Coach permission set to your Sales Coach Agent user. Close this tab and return to the Agentforce Sales Coach Setup tab.

Grant Users Access to Sales Coaching
For this project, you need to assign yourself some permissions that let you configure and use the Agentforce sales coaching agent.
- From the Agentforce Sales Coach Setup page, click Step 3: Grant Access to Agentforce Sales Coach to expand this section.
- Click the first Go to Permission Sets next to Assign Users to Manage Agentforce Sales Coach.
- This opens a new tab where you can assign the Manage Agentforce Sales Coach permission set. Click Add Assignments.
- Check the box next to YOUR NAME, click Assign, and click Done. You’ve now granted yourself the ability to manage Agentforce Sales Coach. You can close this tab and return to the Agentforce Sales Coach Setup tab.
- In Step 3: Grant Access to Agentforce Sales Coach, click Go to Permission Sets next to Assign Users to Access Agentforce Sales Coach.

- This opens a new tab where you can assign the Use Agentforce Sales Coach permission set. Click Add Assignments.
- Check the box next to YOUR NAME, click Assign, and click Done. You now can use Agentforce Sales Coach. You can close this tab and return to the Agentforce Sales Coach Setup tab.
Add Agentforce Sales Coaching to Opportunity Pages
Now that you have the right permissions, let’s go back to the Step 1 section and add Agentforce Sales Coach to the Opportunity page. Opportunity pages are where you can interact with your Sales Coach once it’s up and running.
- Click Step 1: Enable Agentforce Sales Coach to expand this section.
- Click the Go to App Builder button
 . Lightning App Builder opens in a new tab. This is where you edit the Opportunity Record page layout.
- From Builder, click and drag Agentforce Sales Coach to just above your Related Lists section.
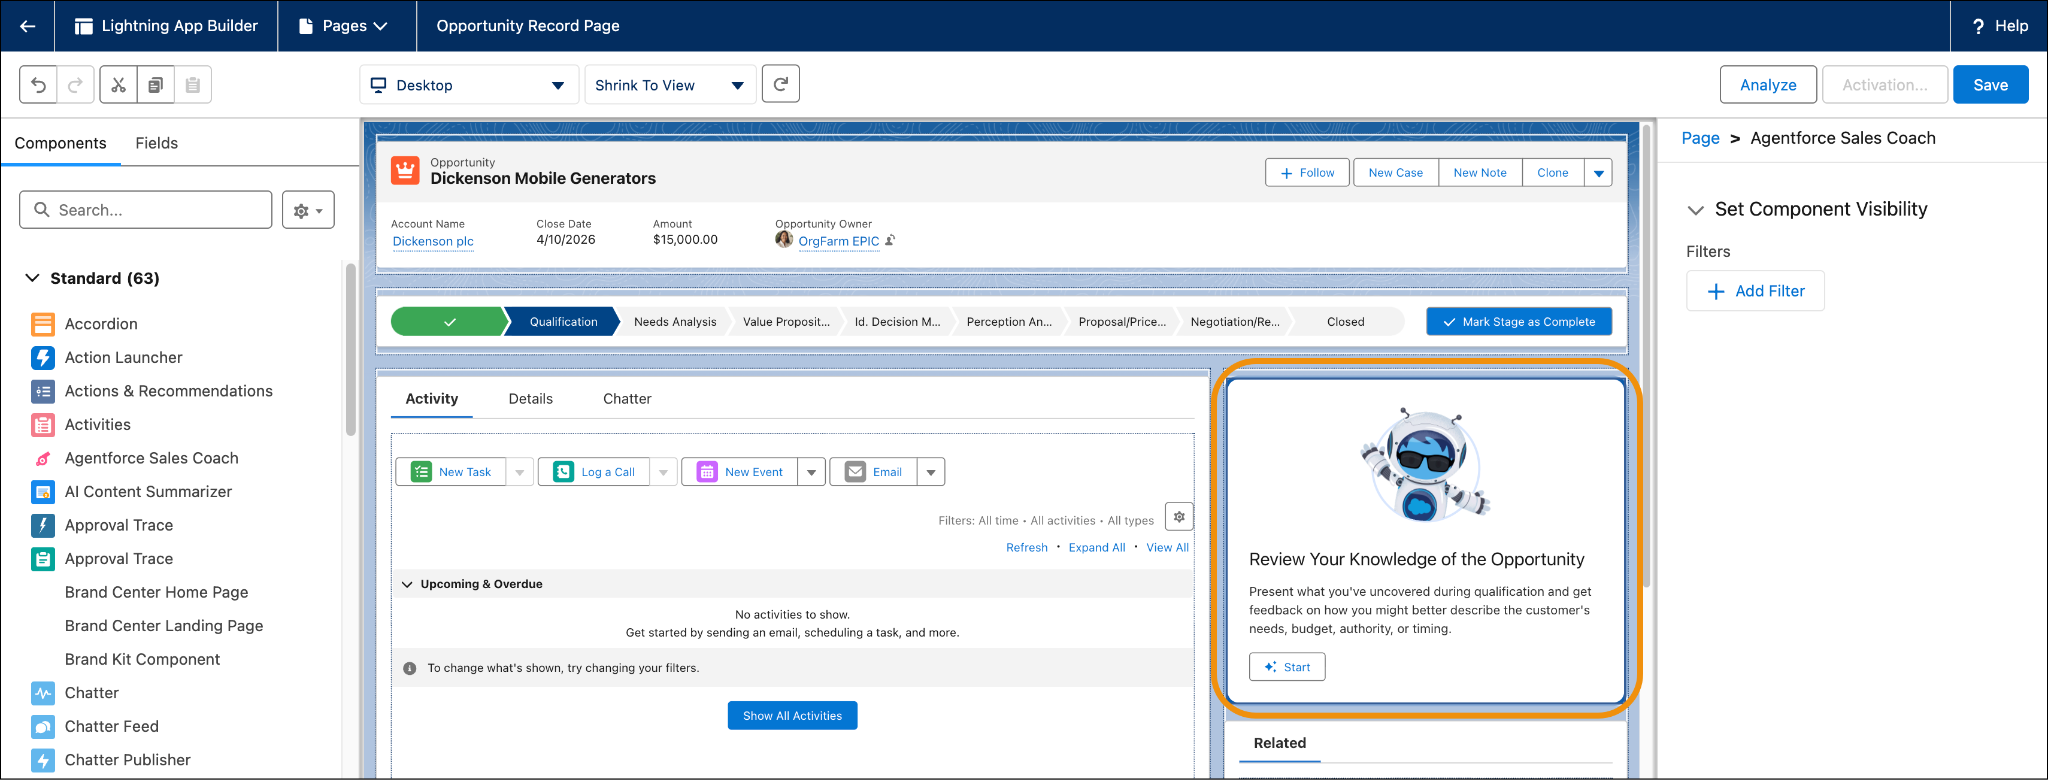
- Click Save, and then click Activate.
- Click Assign as Org Default.
- Leave Desktop as the default. Click Next, and click Save. You're finished with this tab, so you can close it. Once you are back on the Setup page, go ahead and refresh the page.
You’ve now successfully added the Agentforce Sales Coach to the Opportunity page layout—your workspace for practicing sales pitches and receiving AI-powered feedback.
The last step in the process is to actually build the agent and customize it.