Create a User Access Policy
Learning Objectives
After completing this unit, you’ll be able to:
- Create a user access policy.
- Activate the user access policy to run automatically.
Get the Business Requirements
Before you jump into creating user access policies, let’s look again at what Ursa Major Solar is hoping to achieve. Admin Maria Jimenez is currently spending a lot of time setting up access for new users. She first wants to target new sales reps so that they’re automatically given the permissions and access they need. She’s already set up the various access control features. All that’s left is to create an active user access policy that runs automatically whenever new sales reps are added.
We won’t go into detail about the permission set group and public group that will be referenced in the user access policy. If you’re looking to learn more about these features, check out Data Security and Permission Set Groups.
Sign Up for a Developer Edition Org
To complete this module, you need a special Developer Edition org that contains user access policies and our sample data. Get the free Developer Edition and connect it to Trailhead now so you can complete the challenges in this module. Note that this Developer Edition is designed to work with the challenges in this badge, and may not work for other badges. Always check that you’re using the Trailhead Playground or special Developer Edition org that we recommend.
- Sign up for a free Developer Edition org with user access policies.
- Fill out the form:
- For Email, enter an active email address.
- For Username, enter a username that looks like an email address and is unique, but it doesn't need to be a valid email account (for example, yourname@example.com).
- For Email, enter an active email address.
- After you fill out the form, click Sign me up. A confirmation message appears.
- When you receive the activation email (this might take a few minutes), open it and click Verify Account.
- Complete your registration by setting your password and challenge question. Tip: Save your username, password, and login URL in a secure place—such as a password manager—for easy access later.
- You are logged in to your Developer Edition.
Now connect your new Developer Edition org to Trailhead.
- Make sure you're logged in to your Trailhead account.
- In the Challenge section at the bottom of this page, click the org name and then click Connect Org.
- On the login screen, enter the username and password for the Developer Edition you just set up.
- On the Allow Access? screen, click Allow.
- On the Want to connect this org for hands-on challenges? screen, click Yes! Save it.
- You are redirected back to the challenge page and ready to use your new Developer Edition to earn this badge.
Create a User Access Policy
Let’s get started! Here are the steps that Maria takes to create the new user access policy. If you’d like to, you can follow along in your Developer Edition org.
- To enable user access policies, from Setup, in the Quick Find box, enter
User Management Settings, and then select User Management Settings.
- Enable User Access Policies. The Enhanced Interface for User Access Policies is enabled automatically.
- In the Quick Find box, enter
User Access Policies, and then select User Access Policies.
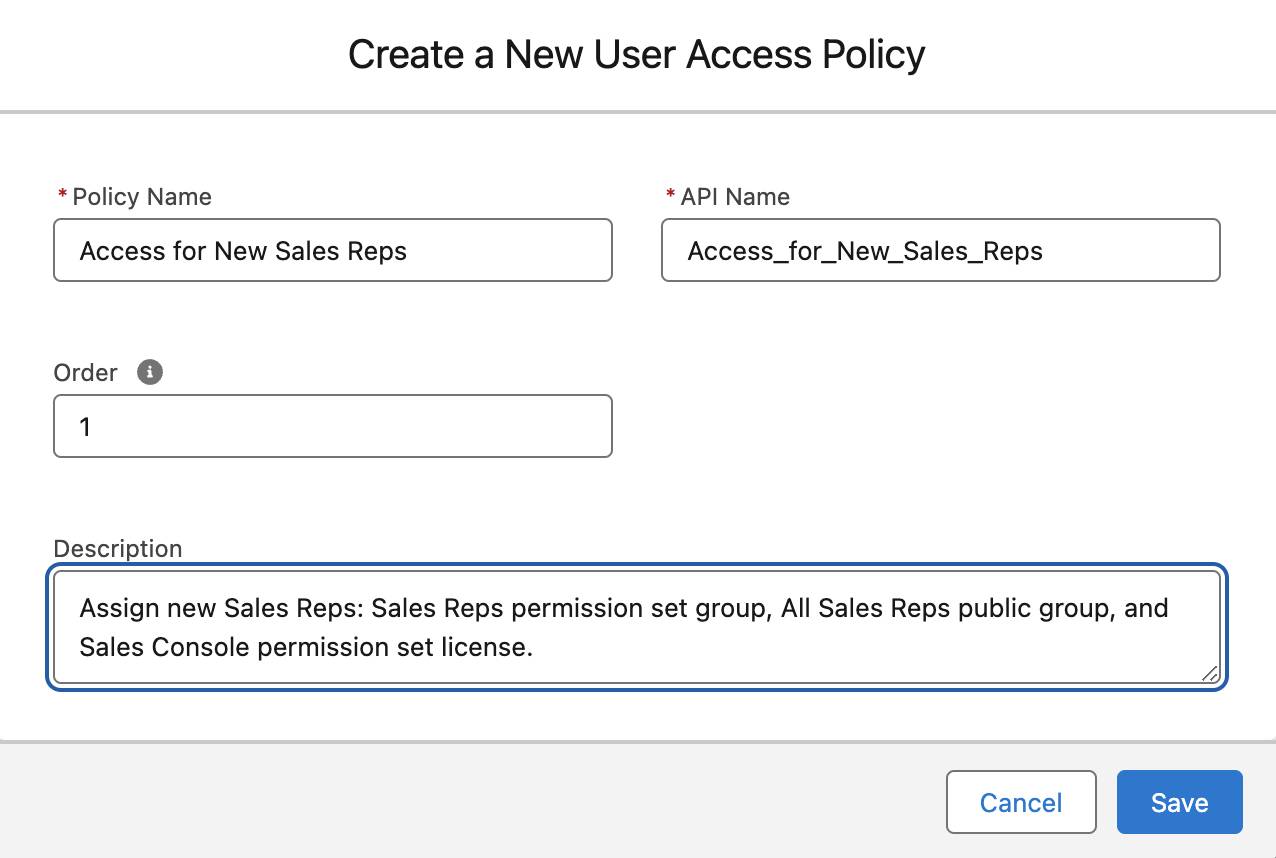
- Click New User Access Policy.
- For Policy Name, enter
Access for New Sales Reps. The API Name auto-populates.
- For Order, enter
1. This field indicates the order for which an active policy is applied if a user meets the criteria for multiple policies. Maria doesn’t have any other active policies currently.
- Enter a Description.
- Click Save.
Next, Maria specifies which users this policy is applied to and what access it either grants or revokes.

- On the Access for New Sales Reps detail page, click Edit Criteria to configure the policy’s user criteria filters and actions.
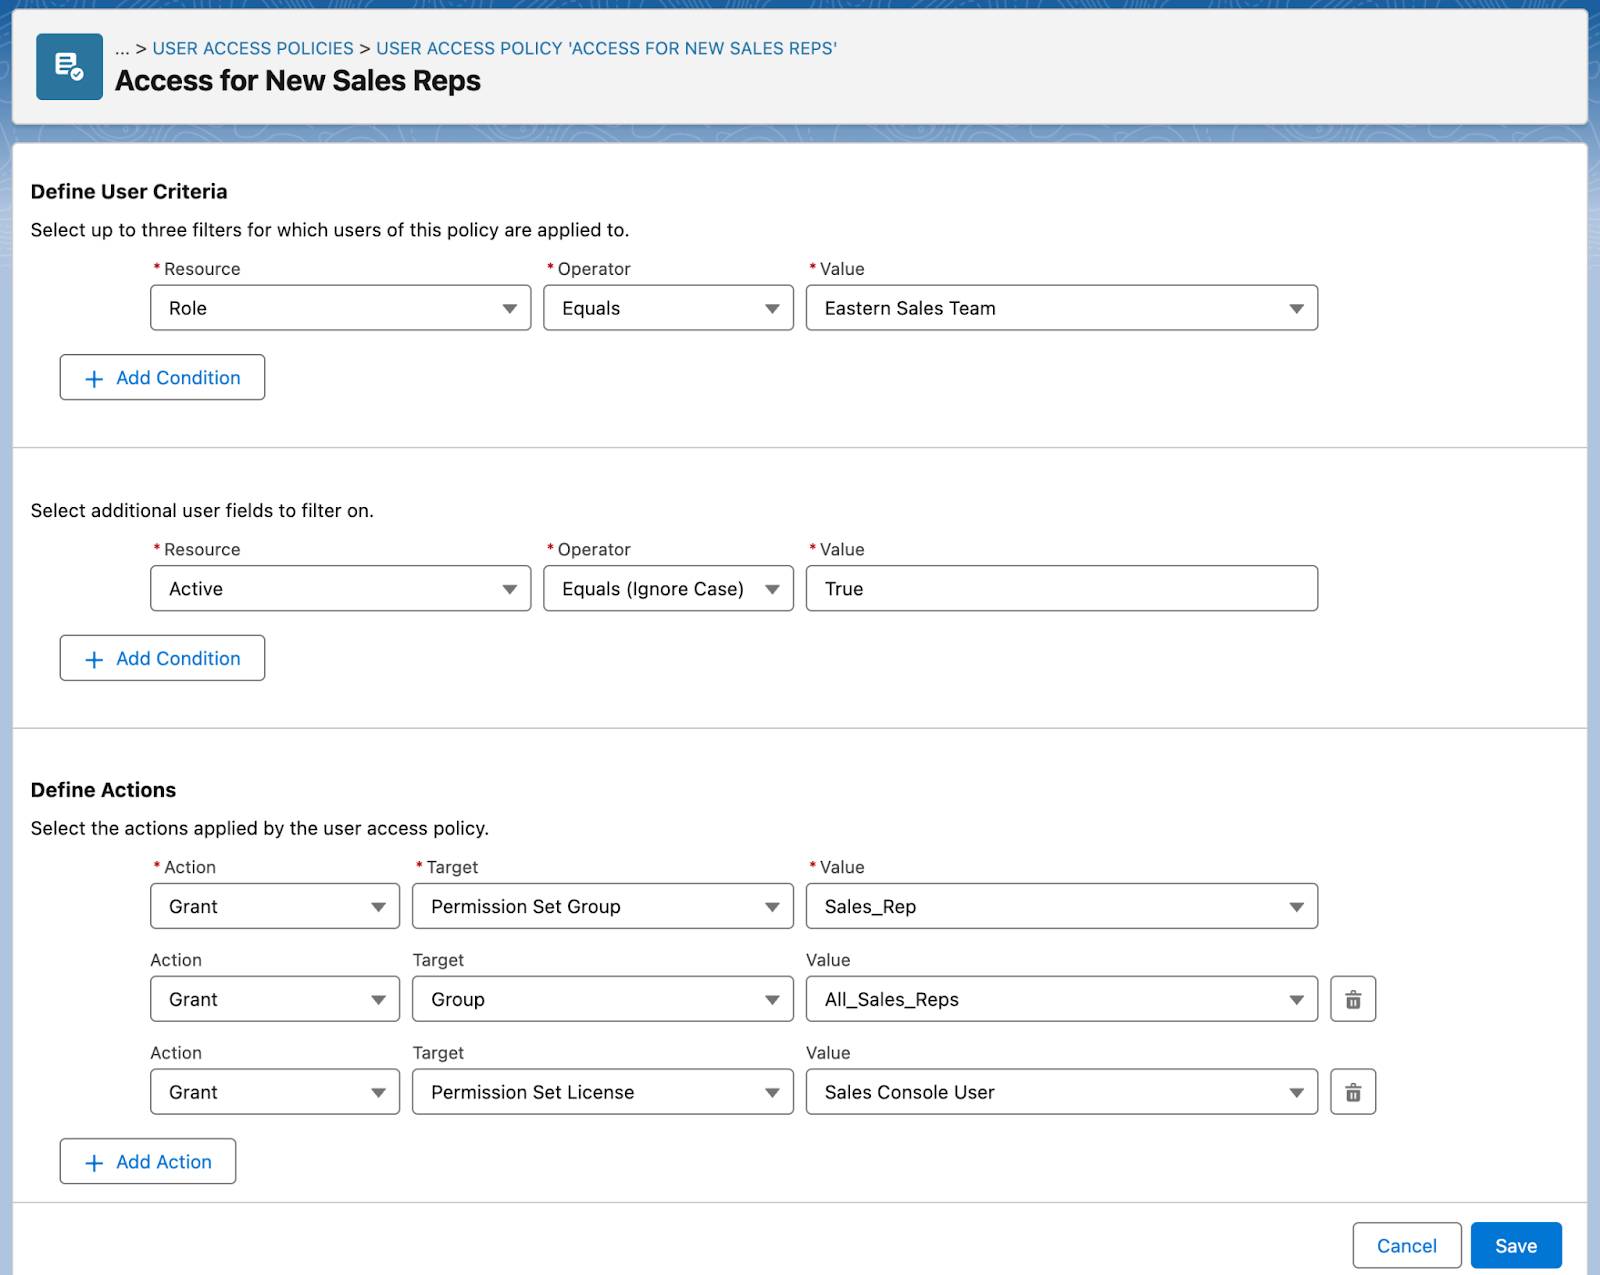
- Under Define User Criteria, add at least one user criteria filter. Set that the user’s role must be the Eastern Sales Team:
- Resource: Role
- Operator: Equals
- Value: Eastern Sales Team
- Resource: Role
- In the next section, “Select additional user fields to filter on,” set that the user must be active:
- Resource: Active
- Operator: Equals (Ignore Case)
- Value: True
- Resource: Active
- Under Define Actions, you can select Grant or Revoke from the Action picklist, then select the access mechanism that the action applies to. You can have up to 20 actions. Maria wants to define three actions, granting the Sales Rep permission set group, the All Sales Reps public group, and the Sales Console permission set license. She selects:
- Action: Grant
- Target: Permission Set Group
- Value: Sales_Rep
- Action: Grant
- She clicks Add Action and selects:
- Action: Grant
- Target: Group
- Value: All_Sales_Reps
- Action: Grant
- She clicks Add Action again and selects:
- Action: Grant
- Target: Permission Set License
- Value: Sales Console User
- Action: Grant
-
Save your changes.
Maria is pleased with her work! She still has to automate the policy though, otherwise her hard work won’t have any effect.
Automate the Policy
It just takes a few clicks to automate the policy so that it runs when new users meeting the criteria are created.
- Click Automate Policy, then select when to trigger the policy. You can set the policy to run when users meeting the criteria are created, updated, or both. Because your policy is just for new hires being added, select only when a user is created.
- Click Activate.
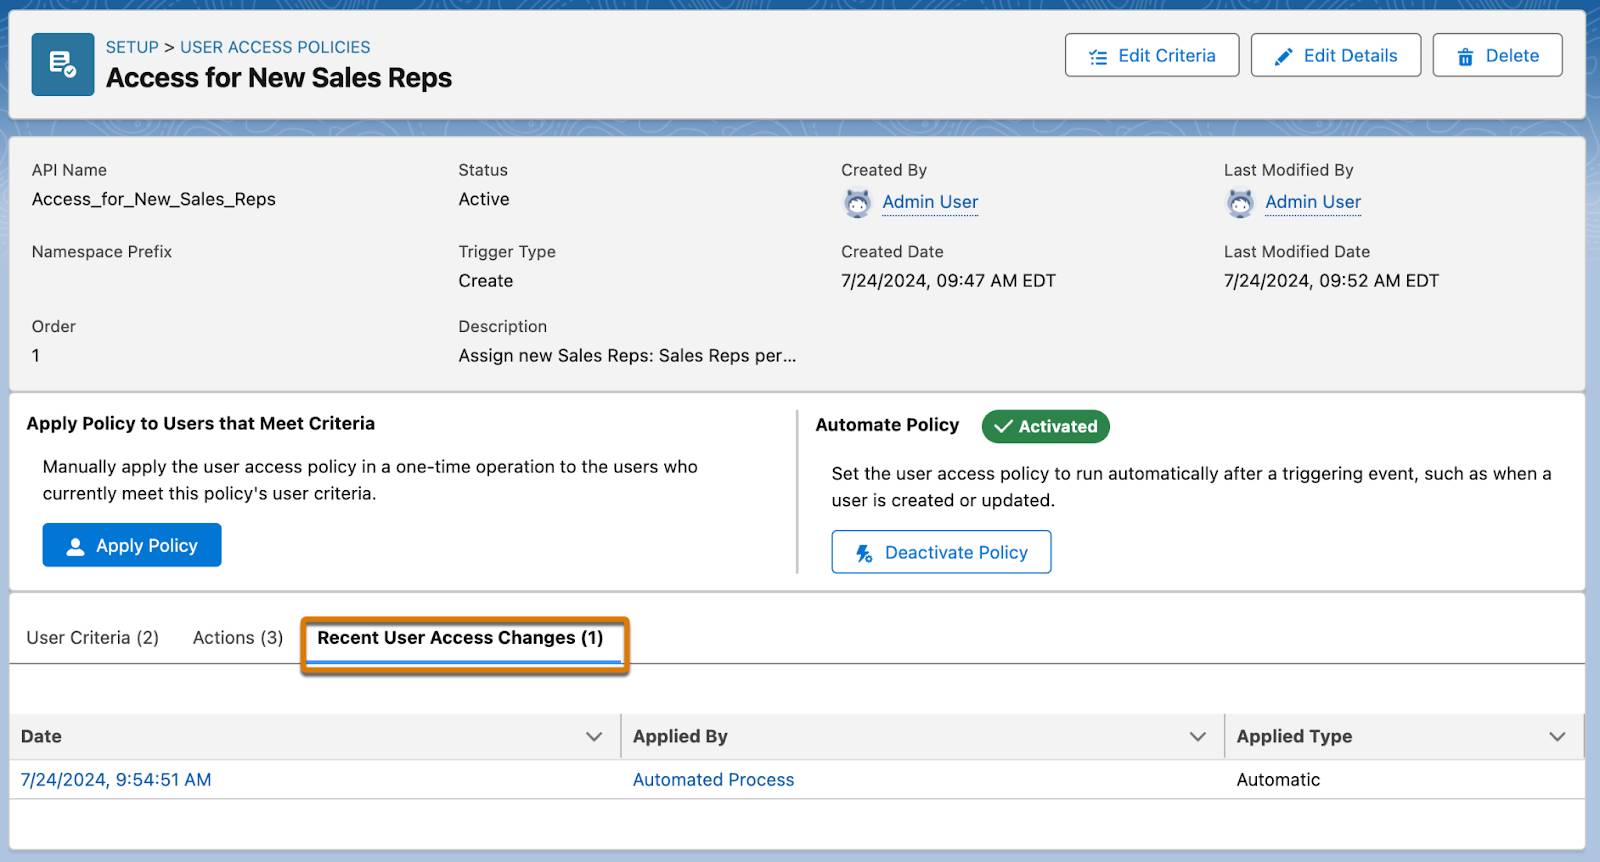
After she automates the policy, the status changes to Activated.
Trigger the Policy
A new sales rep, Lance Park, just joined the team. If Maria set up her user access policy correctly, he’ll get access as soon as she creates his user record.
- From Setup, in the Quick Find box, enter
usersand then select Users.
- Click New User.
- Enter
LanceandParkfor First and Last name.
- Press Tab to generate the Alias value
lpark.
- For Email, enter your email address.
- For Username, enter
lpark_YourInitials_YYYYMMDD@example.com. (Usernames must be unique across all Salesforce orgs.)
- For Title, enter
Sales Rep.
- For User License, select Salesforce.
- For Role, select Eastern Sales Team.
- For Profile, select Minimum Access - Salesforce.
- Disable Salesforce CRM Content User. (You don’t need access to this feature for this module).
- Click Save.
Great! Lance has officially joined Ursa Major Solar. By creating his user record, the policy should have been triggered. Maria goes back to her user access policy to check.
On the new policy’s detail page under the Recent User Access Changes tab, she can monitor when this policy is applied and the affected users.
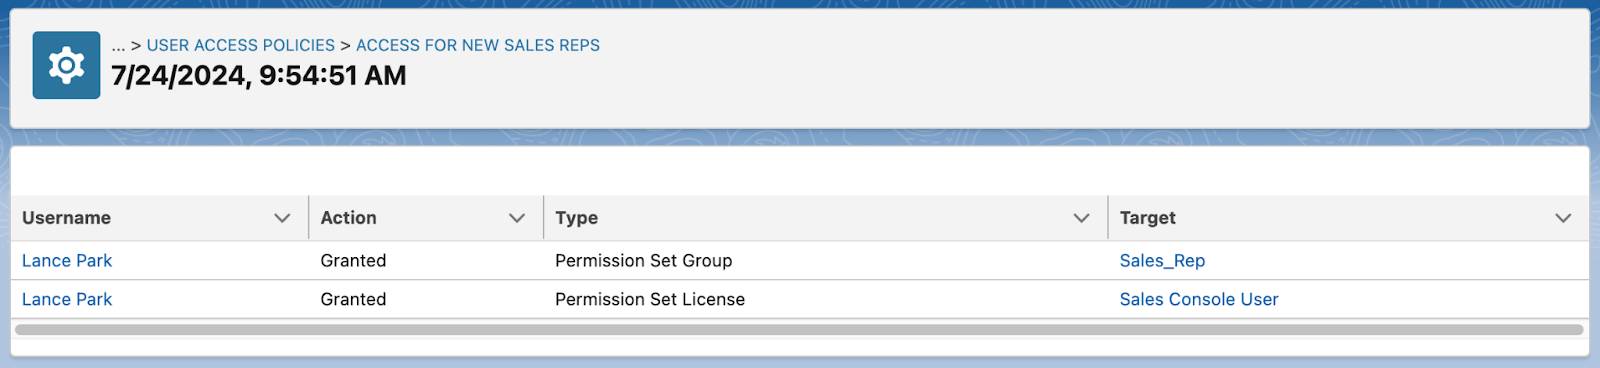
She clicks the timestamp and sees that the policy was applied to Lance.
Maria created a user access policy and set it up to run automatically. She’s already saving herself time and effort when it comes to user management. However, she isn’t done yet. In the next unit, let’s see how she creates manual user access policies for access migrations.