Set Up Salesforce Flow for Service
Learning Objectives
After completing this unit, you’ll be able to:
- Create RecordActions using an Actions & Recommendations deployment.
- Configure the Actions & Recommendations component on a record page.
Follow Along with Trail Together
Want to follow along with an expert as you work through this step? Take a look at this video, part of the Trail Together series.
(This clip starts at the 9:28 minute mark, in case you want to rewind and watch the beginning of the step again.)
Get Started with Salesforce Flow for Service
Maria figures that there are three key implementation tasks.
- Create actions to show in the list, such as flows and quick actions.
- Create an Actions & Recommendations deployment, or build a flow that creates RecordActions in Flow Builder.
- Configure the Actions & Recommendations component on record pages.
Maria suggests a pilot project, creating a call script for reps that triage a frequent customer complaint: cracked solar panels. She outlines the call script, including which steps come first and last, and whether the steps are flows or quick actions.
- Verify Caller (flow). This step is first and always required.
- Triage and Repair (flow). The rep identifies the issue, determines if a repair is appropriate, and explains the repair.
- Order Replacement (flow). If the damage is too extensive and a repair isn’t possible, the rep orders a replacement panel.
- Log a Call (quick action). The rep logs the call. Because Maria adds this quick action to her call script, her reps can focus on the to-do list. They don’t have to click elsewhere to log the call.
- Customer Feedback (flow). Because Ursa Major Solar wants to make sure that customers have a great experience, reps ask for feedback. This step is always last.
Other steps are sometimes necessary. A rep can launch them when there’s a need.
- Order Parts (flow). If there’s a damaged or missing part, the rep orders a replacement.
- Change Delivery Address (flow). If the customer wants the panel sent directly to the job site, the rep modifies the shipping address.
In addition, to show recommendations that result from Einstein Next Best Action, Maria must create flows that contain offers and actions. Then she can create recommendations and action strategies that filter them.

Create Flows
Maria starts by creating flows for her steps. Salesforce Flow for Service supports screen flows, field service mobile flows, autolaunched flows, and quick actions. Maria wants flows that guide her reps interactively, so she creates screen flows.
From Setup, she types Flows into the Quick Find Box, and selects Flows to start Flow Builder. (To refresh your flow-building skills, visit the Flow Basics Trailhead module.)
To create each flow, Maria adds screen and other logic elements to the canvas. When she’s done, she saves the flow, activates it, and tests it. To confirm that the flows reflect best practices, Maria demos her flows to a few top reps.
Important: Remember to activate your flows.
Set Up Quick Actions
To display quick actions in the Actions & Recommendations component, make them available on the record page layout. For example, Maria makes sure that the Log a Call quick action for cases, Case.LogACall, is available in the Case record page layout.

Create Recommendations and Action Strategies
Roberto wants to extend special offers to certain customers who experienced problems with broken solar panels. Maria configures Einstein Next Best Action so that recommendations can appear in the component with the steps for her call script.
Before she begins, Maria visits Get Started with Einstein Next Best Action. She starts by creating the flows that launch when the user accepts a recommendation. Then she’s ready to create these sample recommendations.
- A discount offer for the gold service plan. This recommendation references the flow Offer Gold Service Discount.
- A future purchase discount. This recommendation references the flow Offer 1-Time Discount.
- From the App Launcher, find and select Recommendations.
- Click New, and enter a name, a description, and acceptance and rejection labels.
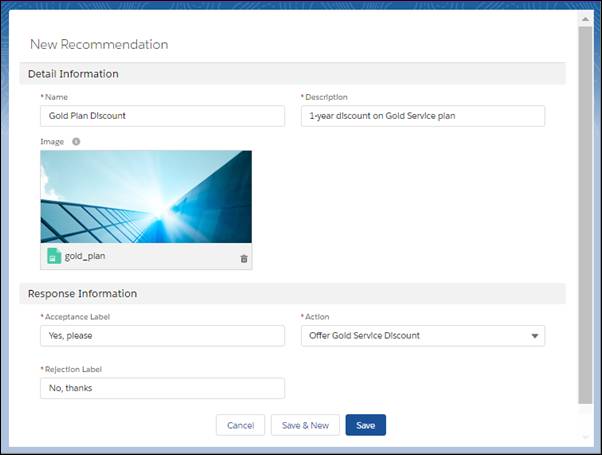
- Select the flow that launches when the recommendation is accepted.
- Optionally, upload an image to show with the offer or action.
- Click Save.
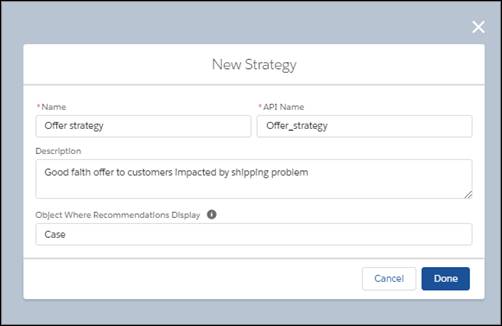
Next, Maria creates an action strategy so that recommendations can appear on the case page. From Setup, in the Quick Find box, she enters Next Best Action, and selects Next Best Action.
Maria configures settings for the strategy. Optionally, she can specify the object where she wants recommendations from the strategy to appear.
Using Strategy Builder, Maria creates a strategy that loads and filters her recommendations. She also tests the strategy in Strategy Builder. Later, she’ll work with Roberto to develop more recommendations and refine the filtering logic in her strategy.
Ready for RecordActions
Maria does a quick review of the prework she’s done. So far, she’s configured flows, quick actions, recommendations, and action strategies. Now she’s ready to create RecordActions for the steps in her call script.
Maria wants the call script to appear on all case pages. Because she wants to show the same steps every time, she decides to create an Actions & Recommendations deployment.
In a deployment, you can configure different default actions for each channel.
- Chat—This channel works with Chat in Lightning Experience.
- Phone—This channel works with Open CTI and softphone screen-pop settings.
- Default—Use this channel to specify default actions for when records open from list views or related records.
When a record opens in a channel, the component shows the default steps for that channel. For example, suppose that you use Open CTI and configure default actions for the phone channel. The component then shows those actions when the phone number matches and the caller’s contact record is popped. If reps navigate to the contact record page manually, such as when they open the record from a list view, they see the actions configured for the Default channel.
- From Setup, in the Quick Find box, enter
Actions & Recommendations, and select Actions & Recommendations.
- Click New Deployment, and click Next.
- Name your deployment, for example,
Broken Solar Panel, and select which guidance to show. Maria selects Flows and quick actions and Recommendations.
- Click Next.
- Select up to 10 objects to use as context for object-specific quick actions and Next Best Action strategies. Maria selects the Account, Case, and Contact objects.
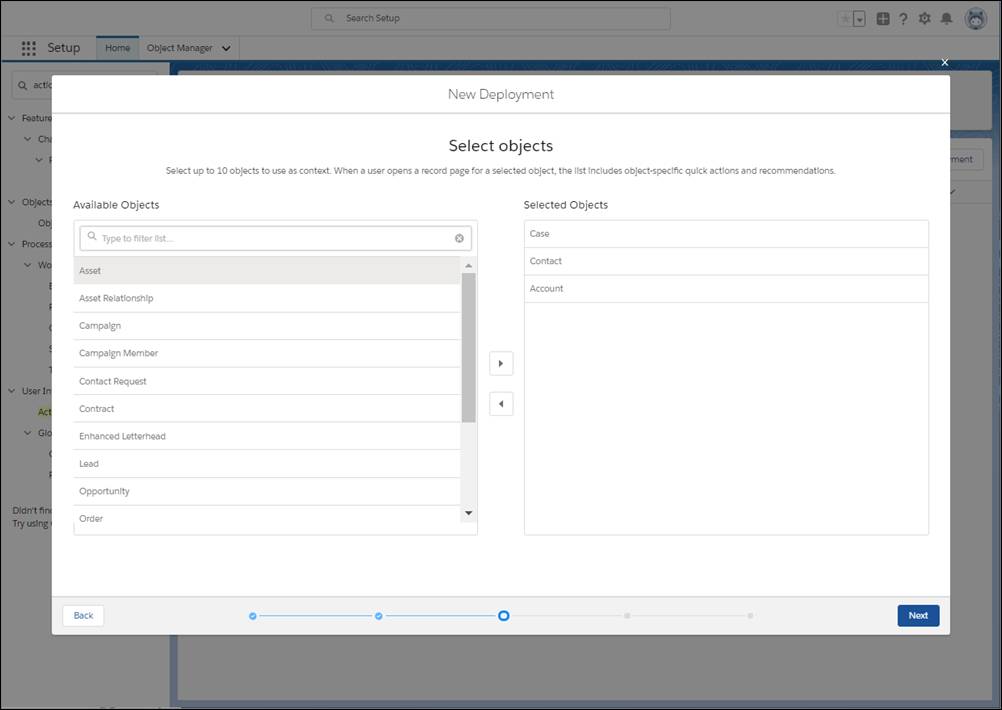
When you associate a quick action or action strategy with an object, you give that action or strategy an object-specific context. When a user opens a page for that object, they see global and object-specific actions and recommendations. On other page types, they see only global items. For example, suppose that Maria defines an object-specific quick action for the Case object. To show that quick action in the component on Case pages, she selects Case as a context object.
- Click Next.
- Configure default actions for each channel. Maria clicks the tab for the Default channel (1).

- Drag actions from All Actions (2) to regions in the preview area (3). Maria drags the Verify Caller and Customer Feedback flows to the top and bottom pinned regions, respectively. She places the Triage and Repair and Order Replacement flows in the unpinned region. She also adds the Log a Call (Case) quick action to the unpinned region.
- Select actions that are important to complete, and click Mark Mandatory (4). Maria selects Verify Caller and marks it as mandatory. If a rep tries to close this flow without completing it, a reminder appears.
- Select actions that you don’t want reps to remove, and click Unmark Removable (5). By default, all actions are removable. For example, Maria doesn’t want reps to remove Verify Caller. She selects that flow and unmarks it so reps don’t see the Remove option.
- Specify whether to auto-launch the first flow in the list when the record page opens (6).
- Click Next.
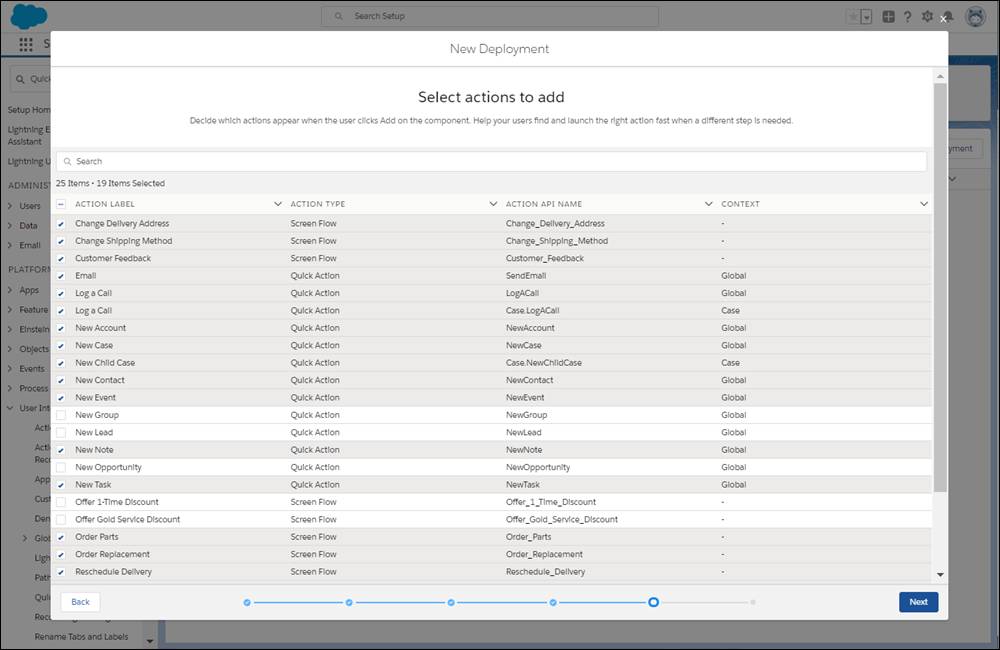
- Select other actions that the user can start from the component at run time. Maria configures the actions that reps use most often, including the flows for Order Parts and Change Delivery Address. If reps need a step that isn’t in the list, they can find it quickly in this subset.
- Click Next.
- On the General Settings tab, set up how recommendations display, and select a default strategy.
Note: If you selected recommendations as a type of guidance to show in the component, then this screen appears.
You can show a maximum of 4 recommendations. Maria sets the maximum to 2. She selects a default strategy, for example, Offer strategy (Global).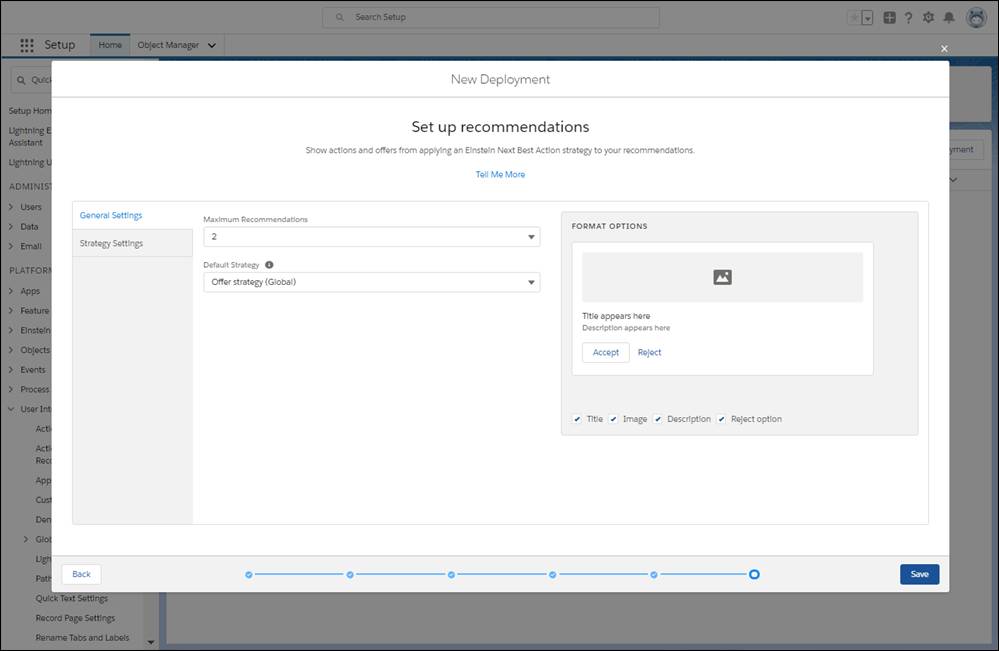
- Click the Strategy Settings tab, and select object-specific strategies that override the default strategy on those record pages. For example, Maria selects the object-specific strategy for case pages, Offer strategy (Case).

- Click Save.
- Click Close.
Configure the Component
Next, Maria adds the Actions & Recommendations component to record pages, and selects her deployment.
- From the App Launcher, find and select a supported object, for example, Cases.
- Open a Case record page.
- Click
 and select Edit Page to launch the Lightning App Builder.
- Drag the Actions & Recommendations component to a page location. In Service Console, we recommend the left sidebar.
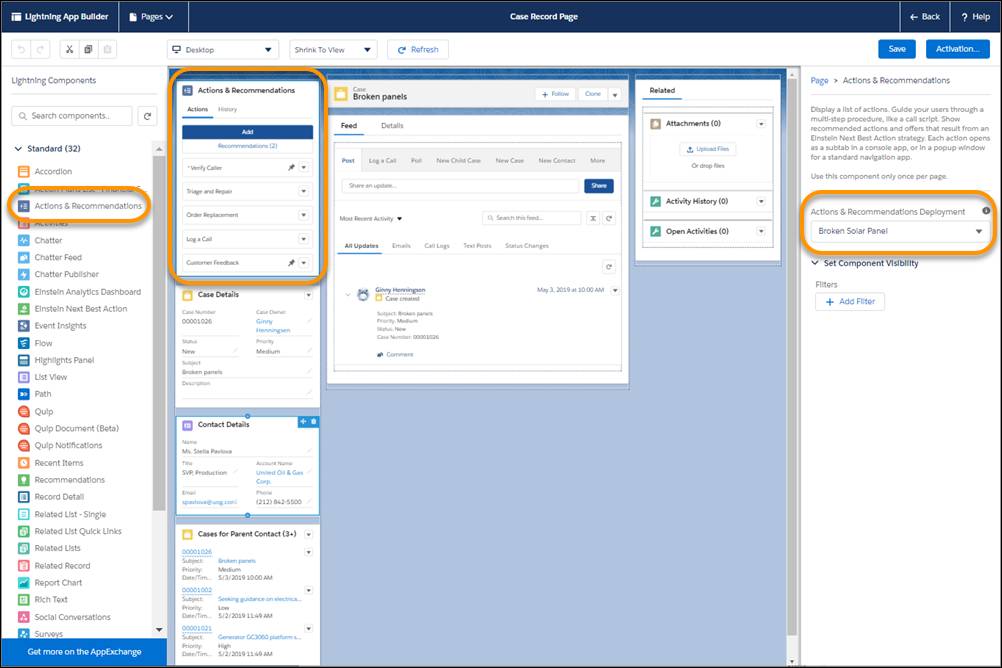
- Select a deployment in component properties.
Note: If you don’t select a deployment, reps see an empty list when they click Add.
- To save the component configuration, click Save.
- Click Activation…
- Set your customized page as the app default for Service Console. Click Close.
- Click Back to return to the Case record page.
- Optionally, repeat these steps to display the component on another record page. You can reuse a deployment on multiple pages.
- Choose Service Console from the App Launcher.
Test Your List
To test her call script, Maria creates a new case. Sure enough, the case opens and shows the list of steps. The Verify Caller action is at the top of the list, with a red asterisk indicating that it’s mandatory. Triage and Repair, Order Replacement, Log a Call, and Customer Feedback also appear. And when Maria clicks Recommendations, she sees the best offers from Einstein Next Best Action.
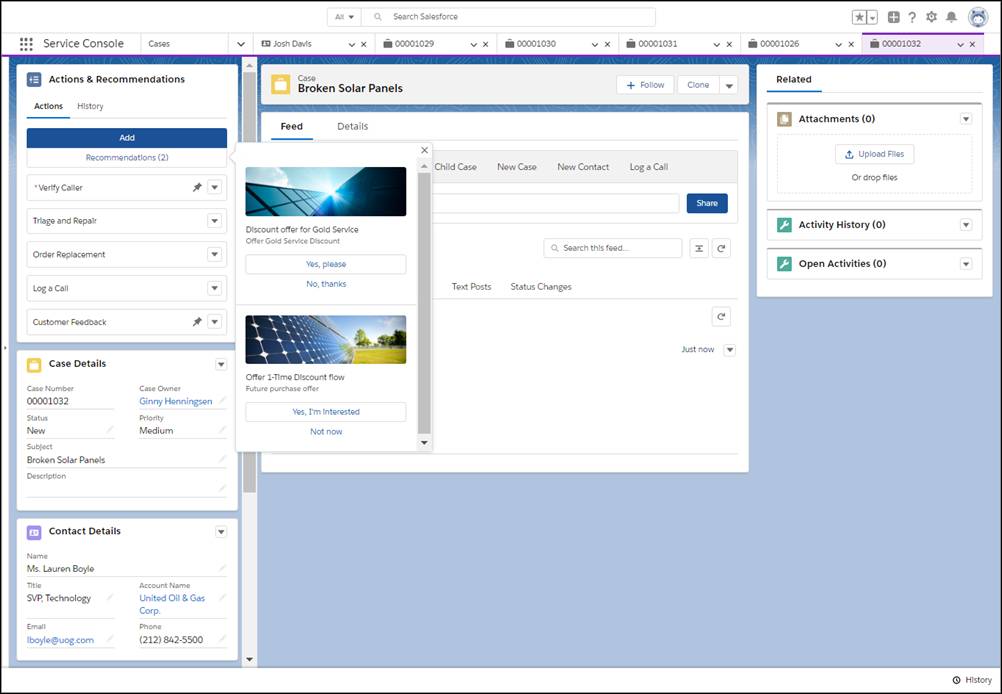
Reps can find and start a different step when they click Add.

Sometimes reps or customers pause a flow when information isn’t available to complete it. (A process automation setting controls whether users can pause flows.) The component shows if there are paused flows associated with the record. That way, reps can find and complete a paused flow quickly.
Maria thinks that Salesforce Flow for Service has the right stuff to transform her support rep experience. She looks forward to sharing her call script with Roberto and her reps.
Get Ready for the Hands-On Challenge
Before we begin, let’s install an unmanaged package in your Trailhead Playground.
If you see a tab in your org labeled Install a Package, great! Follow the steps below. If not, from the App Launcher ( ) find and select Playground Starter and follow the steps. If you don’t see the Playground Starter app, copy this AgentExchange link and check out Install a Package or App to Complete a Trailhead Challenge on Salesforce Help.
- Click the Install a Package tab.
- Paste
04t3i000002nHAuAAMinto the field.
- Click Install.
- Select Install for Admins Only, then click Install.
Resources
- Salesforce Help: Get Started with Einstein Next Best Action
- Developer Guide: Lightning Flow for Service Developer Guide