Understand the Service Console
Learning Objectives
After completing this unit, you’ll be able to:
- Describe the Service Console and its key benefits.
- Learn how to use the console to solve and close customer cases.
Before You Start
Before you start this module, consider completing this recommended content.
Meet Your Agentic Workspace for Service
Agentforce Service combines human expertise with AI agents to deliver efficient, intelligent, and proactive service. The Service Console is where that collaboration happens.
Think of the console not only as a database, but as a unified workspace that brings every piece of customer information together in one view. For service reps, it’s a workspace that surfaces and summarizes every customer detail—history, assets, and prior conversations—into one screen. For admins, it’s a flexible, customizable canvas that can fit your team’s unique workflows, whether they’re handling high-volume phone calls or complex field service dispatching.
With legacy service tools, reps often had to toggle between dozens of browser tabs to find information. In the Agentforce era, the console brings the work to you. It integrates AI agents, Omni-Channel routing, and Slack swarming directly into the layout, allowing you to solve complex issues from any channel without ever leaving the screen.
Let’s take a tour of this modern workspace.
Ready to Get Hands-on with the Service Console?
Launch your Trailhead Playground now to follow along and try out some of the steps in this module. (Note that some instructions in the badge can’t be accomplished in a playground because a required feature or resource isn’t available there.) To open your Trailhead Playground, scroll down to the hands-on challenge in unit 3 and click Launch. You also use the playground when it's time to complete the hands-on challenge in that unit.
Tour the Service Console
When you log in to Salesforce and open the Service Console app from the App Launcher ( ), you’re greeted by a specialized interface designed to minimize clicks and scrolling.
Note that the screenshot below is a customized example. Your actual Service Console interface may vary depending on enabled features and setup.
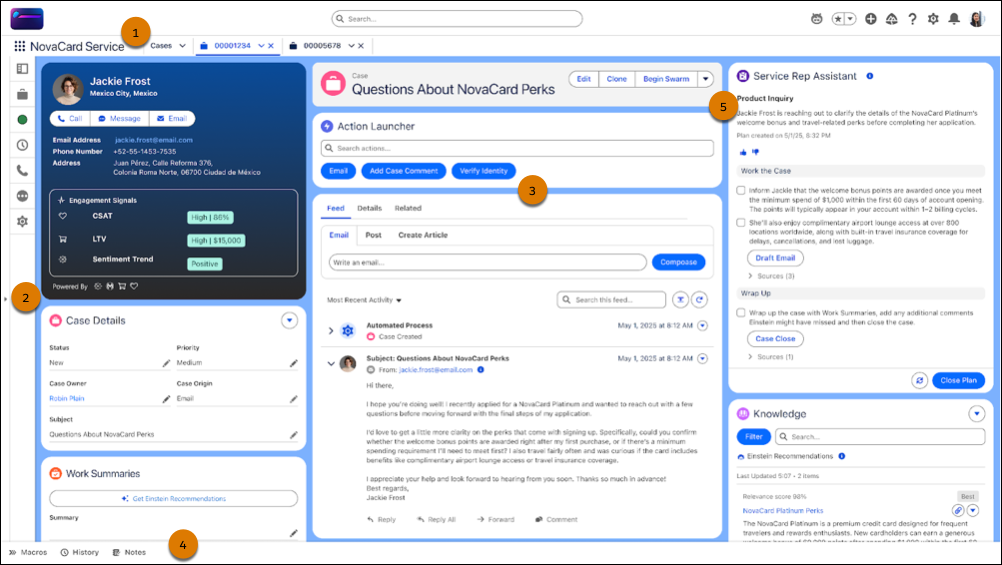
Navigation Bar (1)
At the top of the screen is the Navigation Bar. Unlike standard apps, the console lets you work with multiple records at once. You can use the Object Menu—the dropdown next to the tab name—to switch between cases, accounts, contacts, and reports instantly. When you click a record, it opens as a primary tab, and related records like a contact open as subtabs underneath it. This tab-focused navigation prevents you from losing your place when multitasking.
Split View (2)
On the far left of the console is the split view. Historically, reps wasted hours clicking Back to List, selecting a record, and waiting for it to load. Split view keeps your list of cases open in a collapsible sidebar while you work on a record in the main pane. You can click through your queue one by one, updating records instantly without navigating away.
Record Pages (3)
The center of the screen is your workspace and 360-degree view of a record.
-
Highlights Panel: Located at the top, this customizable banner shows the most critical data at a glance—Priority, Status, and Case Origin—so you know immediately if a case requires urgent attention.
-
Feed: This is the heartbeat of the record. It displays a timeline of every interaction: emails, calls, portal messages, and internal notes. In Agentforce Service, this feed is supercharged by AI. Work Summaries can automatically generate a recap of a long thread, so you don’t have to read every single email to get caught up.
-
Related Record Components: On the sidebars, you’ll see related data without clicking away. For example, the Contact Details component lets you see the customer’s phone number and email directly on the case page.
-
Knowledge Component: This intelligent sidebar suggests help articles based on the case subject. If a customer asks about “Panel Inverters,” AI surfaces the “Inverter Troubleshooting Guide” automatically, which you can attach to the case or email to the customer with one click.
Utility Bar (4)
Running along the bottom of the screen is the Utility Bar. These are always-on, customizable tools available regardless of which tab you are viewing.
-
History: A time machine that lets you jump back to the last 10 records you visited.
-
Macros: A productivity powerhouse that lets you perform repetitive tasks—like sending a standard Reset Password email and updating the case status—with a single click.
-
Omni-Channel: The engine that routes work to you. It pushes cases, chats, and calls to your console based on your availability and skills, ensuring the right work goes to the right rep.
Agentforce Integrations (5)
In the console, you find two critical capabilities.
-
Service Assistant: Often located in the sidebar or utility bar, the Service Assistant proactively surfaces data and drafts responses for you. It acts as an AI-sidekick, handling the heavy lifting of data entry and drafting so you can focus on the customer connection.
-
Slack Swarming: If you get stuck, you no longer need to walk over to a manager’s desk. You can click Begin Swarm directly from the case. This opens a dedicated Slack channel linked to the record, bringing in experts to collaborate in real-time. Once the issue is resolved, the entire Slack conversation is captured back into the Feed automatically.
To tour a service console and its tab-based navigation, watch this video.
Create or Update Cases
While AI and automation handle routine tasks, the core job of a service rep is still managing the lifecycle of a case. Here’s how you manage cases in the Service Console.
Imagine a customer, Lauren Boyle, calls in with a complex mechanical door question that the AI agent couldn't resolve autonomously. You need to log a case.
- From the App Launcher (
 ), find and select Service Console.
- Click the dropdown arrow on the Cases tab in the navigation bar, and select Cases.

- From the dropdown next to the list view, select New.

- In Contact Name, search for Lauren Boyle. If she’s a new customer, you can click + New Contact from the dropdown to create her profile on the fly. Selecting the Contact often auto-fills the Account Name.
- Set the Status to New and Priority to Low.
- For Case Origin, choose Phone or the relevant channel like Email or Web. This data helps admins track which channels are busiest.
- Describe the issue:
- Subject: Enter a concise summary like “Design issue with mechanical door.”
- Description: Enter specific, detailed notes. This data feeds the AI agent, which uses it to recommend knowledge articles and next best actions.
- Subject: Enter a concise summary like “Design issue with mechanical door.”
- Click Save.
The new case record opens and is ready for you to work. Any Omni-Channel or AI workflows set by an admin automatically route the case to the right experts, AI agents, or queues to solve the case. Any automatic responses, escalations, or service level agreement (SLA) milestones are triggered too.
You can quickly update cases to ensure your team and AI agents stay aligned on the customer’s status. Use search or locate cases using Split View, then use the Feed to log calls, send emails, or start a Slack swarm.
To modify specific details like Priority or Status, simply click the pencil icon next to the field, and when the issue is resolved, update the Status to Closed to trigger an automatic AI Work Summary.
Create or Customize a Console
Now that you’ve seen how a console app works, how do you build it? From the App Manager in Setup. To start, click  and select Setup. In the Quick Find box, search for and select App Manager.
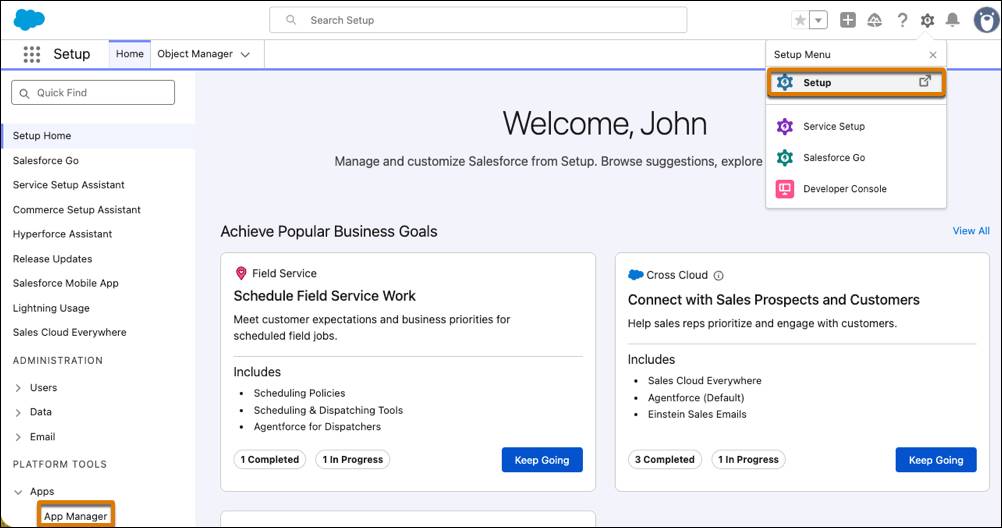
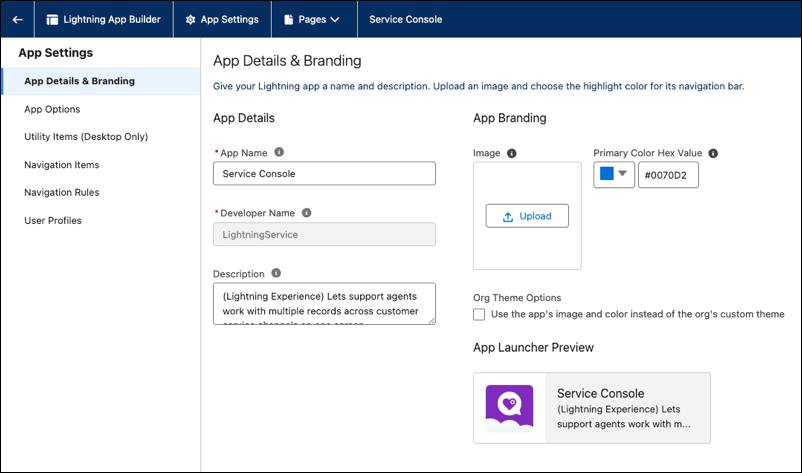
The App Manager lists all apps in your org. From the Service Console, select the dropdown and click Edit.
Here is where you refine the navigation rules and add productivity power-ups. Want to let agents swarm in Slack or see AI-generated case summaries? Simply turn on those features then edit the console app and drag those components into the utility bar or page layout to put the latest Agentforce capabilities right at your team's fingertips.
You can customize a console at any time. As your team grows, you can easily return to the App Manager to toggle new features or adjust the layout. By keeping the design clean and focused, you ensure your reps spend less time clicking and more time solving.
By thoughtfully configuring the console, you aren't just giving reps a tool. You’re building an agentic workflow that helps them succeed.