Create Macros and Quick Text to Reduce Clicks
Learning Objectives
After completing this unit, you’ll be able to:
- Create macros.
- Create quick text.
Create Irreversible Macros to Perform Mass Actions
Maria arrives at work bright and early, eager to try out her new tools. Before she can even log in, Sita stops by her desk. More cases about broken solar panels arrived today. Yikes! Sita wants to know when the tools will roll out to the service reps. Maria has good news—she plans to have the tools ready by tomorrow, or maybe even today.
Maria logs in and launches her Service Console app. She knows macros perform actions on records, so she opens one of the cases for a broken panel. She decides to create a macro that sends an email to customers who haven’t submitted photos of the broken panels. Photos are required to authorize a replacement, so she wants to make requesting them easy. Here’s how she does it.

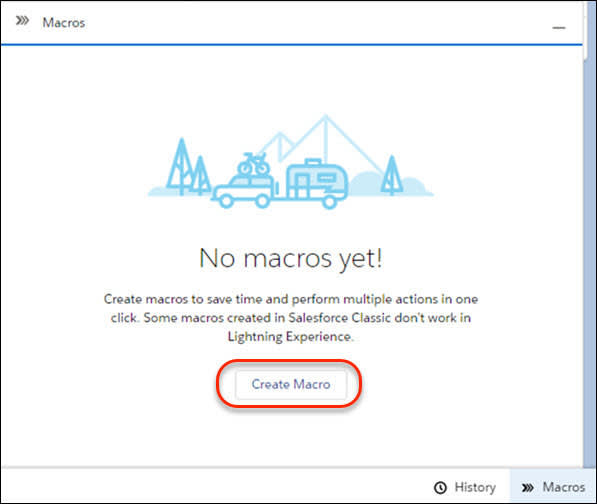
- From the Service Console app, open a case. Then click Macros in the utility bar to launch it. Click Create Macro to get started.
- Give the macro a name and description, then select the object the macro applies to. The Apply To value defaults to the object you were viewing before.Here’s Maria’s macro. Maria creates a macro with these values.
- Macro Name:
Solar Panel - Send Email Request for Photo - Description:
Sends the customer an email requesting photos in order to process the replacement.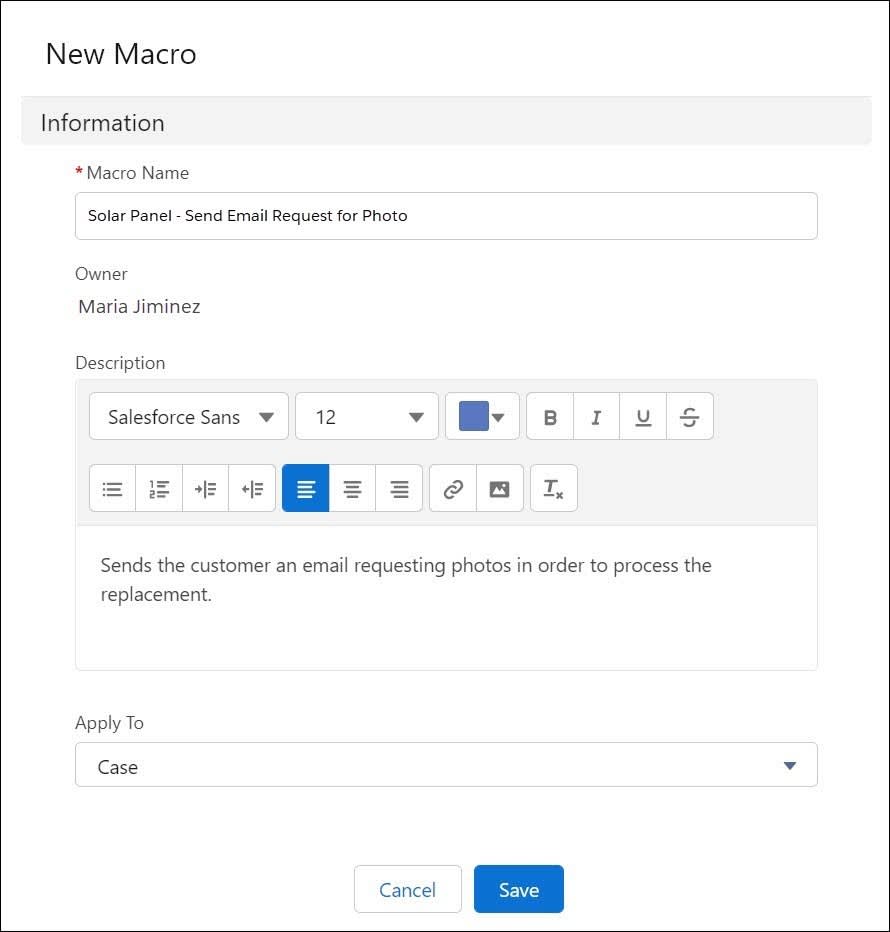
- Click Save. The macro record view is displayed. This page shows you all the details of your macro.
- Click Edit Instructions to start telling the macro what to do.
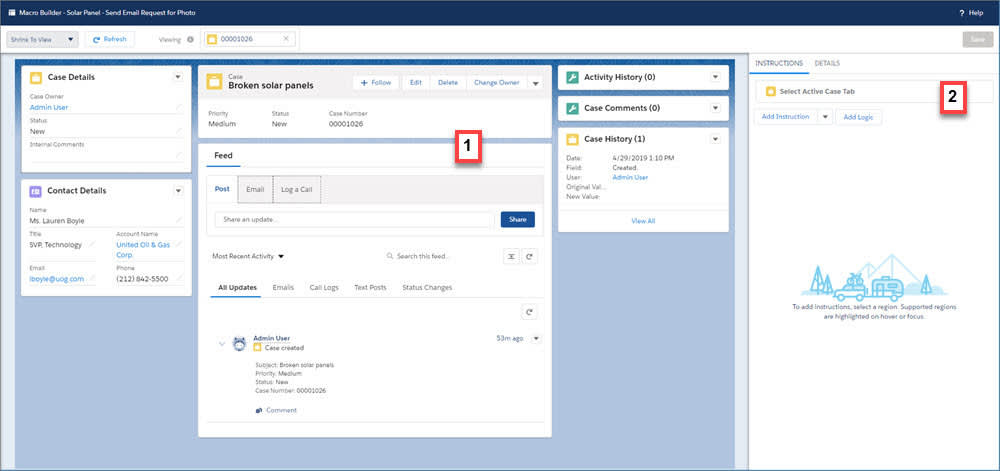
- If prompted, click Open in the pop-up window to launch the Macro Builder. Now it’s time to add instructions for the macro. The Macro Builder displays the record page that you started from. Since this isn’t the “real” record, we call this area the canvas (1). The instruction panel keeps track of all your updates (2).
- In the instruction panel, click Add Instruction.
Later, after you master creating a basic macro, you can click Add Logic and experiment with creating conditional macros. Conditional macros contain IF and ELSE statements that control when to take action.
For now, all you have to do is click the canvas and perform whatever actions you want the macro to run, kind of like making a video recording of all your actions. Click the actions and fields just like you would for a regular record. To help you out, the supported regions and actions that you can update are highlighted on hover. Then use the instruction panel to enter your updates. You can insert quick text, use email templates, add email attachments, and more.
Tip: If you mess up and click something you don’t want in your macro, just click the X next to the instruction to remove it.
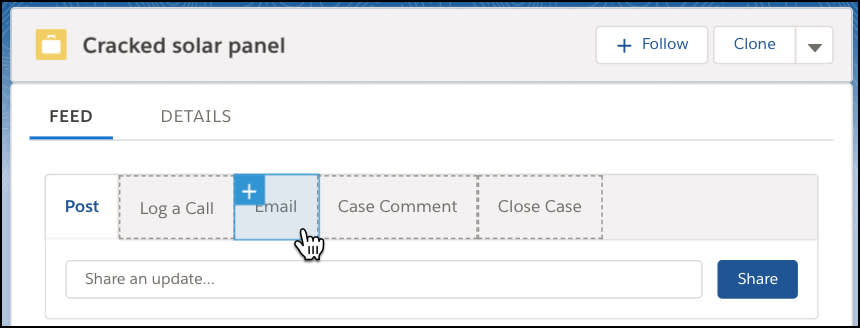
- In the canvas, click Email.
- In the instruction panel, click Insert Email Template.
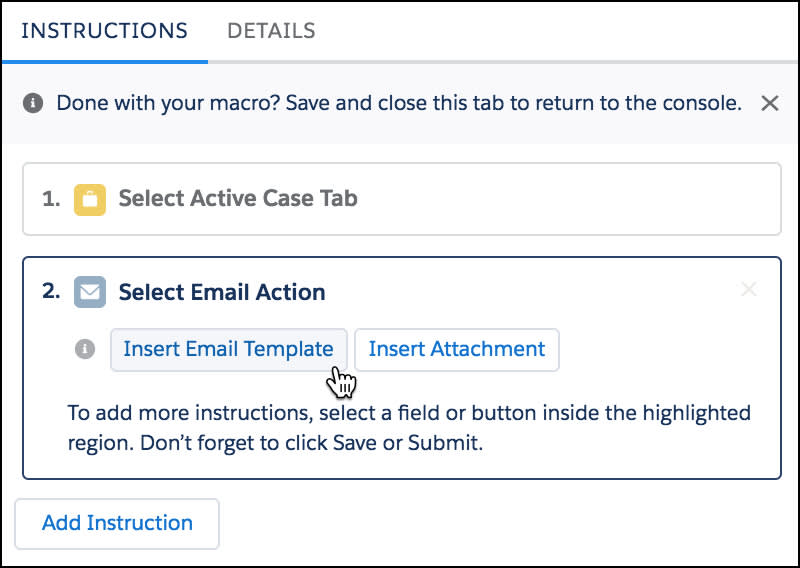
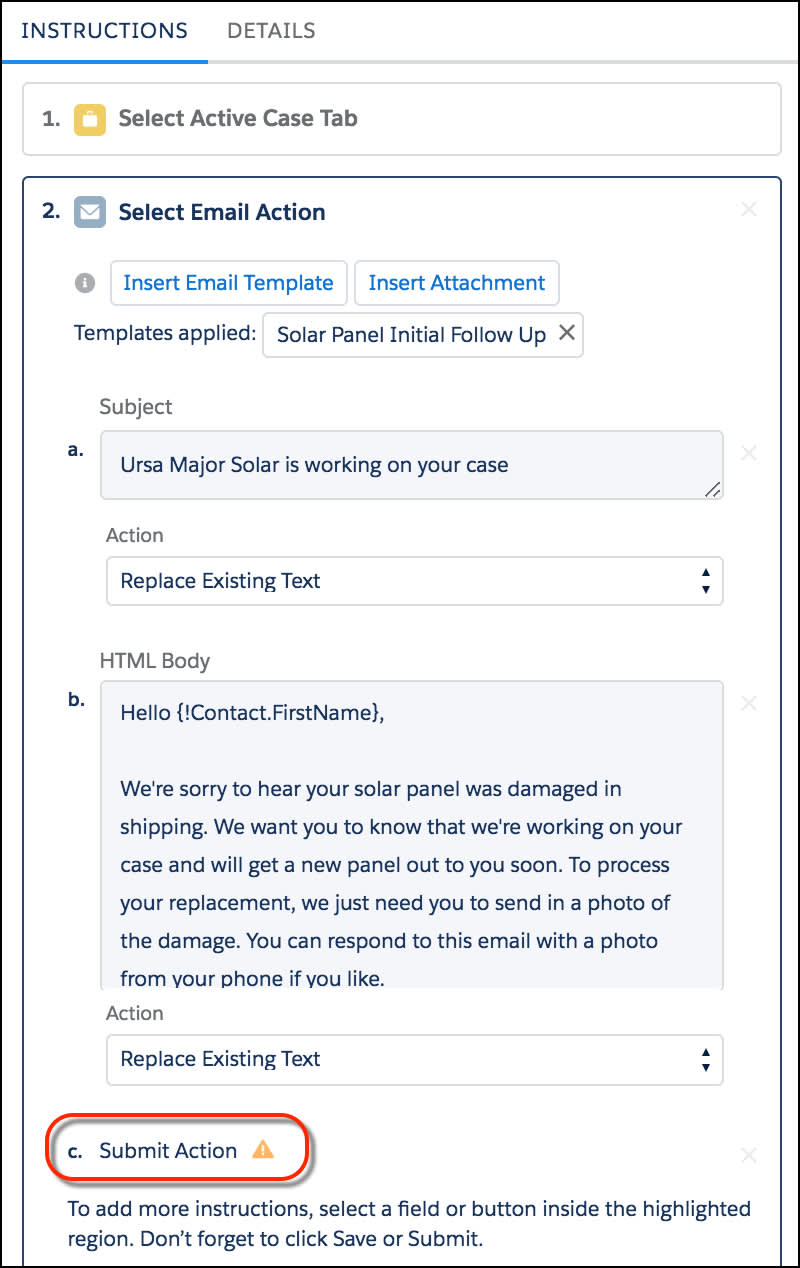
- Select an email template. Maria has already set up an email template to handle the initial email response requesting photos. To follow along, you can use the Support: Case Created (Web Inquiries) template. To find the template, you might need to first change the template directory. Select Classic Email Templates in the Templates field.
- To send the email, click Send in the canvas.The instruction panel is updated to include an irreversible action. Remember those from earlier? They’re actions that can’t be undone. Once the macro sends the email, it can’t be undone. Here’s what Maria’s instructions look like.
- Click Save.
- To return to the Service Console app, close the browser tab for the Macro Builder.
With one macro under her belt, she creates a few more.
To create more macros for a case, open the Macro utility and click the + button.
Maria then opens the navigation item menu looking for the macros list view, but realizes it’s not there…
Where’s the Macros List View?
Maria remembers specifying tab visibility for macros in the permission set she created yesterday, but she didn’t assign it to herself. By default, the macro tab isn’t visible—even for System Administrator profiles. She can either assign herself the permission set, or she can edit the navigation menu and add the Macros tab. She decides to edit the navigation menu.
Note: If you created the Macros Power User permission set, you can assign it to yourself. If you didn’t create the permission set, follow along with Maria.
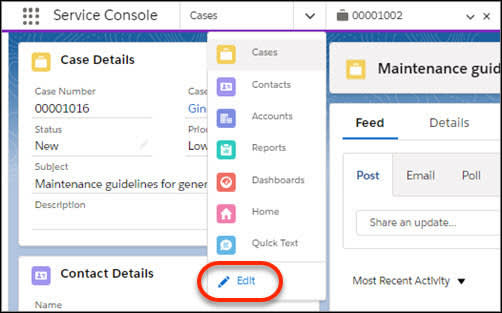
From the Service Console app, open a case. Then click the navigation menu.
- Click Edit.
- Click Add More Items, and select Macros to add it to the menu.
- Click Save.
Maria’s excited to try out her macros on the new cases that have come in. She’s curious to see just how many clicks she saves her reps.
Create Quick Text to Save Time Sending Messages
To save more clicks, Maria dives into setting up quick text. She wants to create a few samples to show her reps just how powerful they can be. She decides to make one with an apology that can be sent to customers about the broken panel. Here’s how she does it.
- From the Service Console app, select Quick Text in the navigation item menu.
- Click New Quick Text in the Quick Text list view.
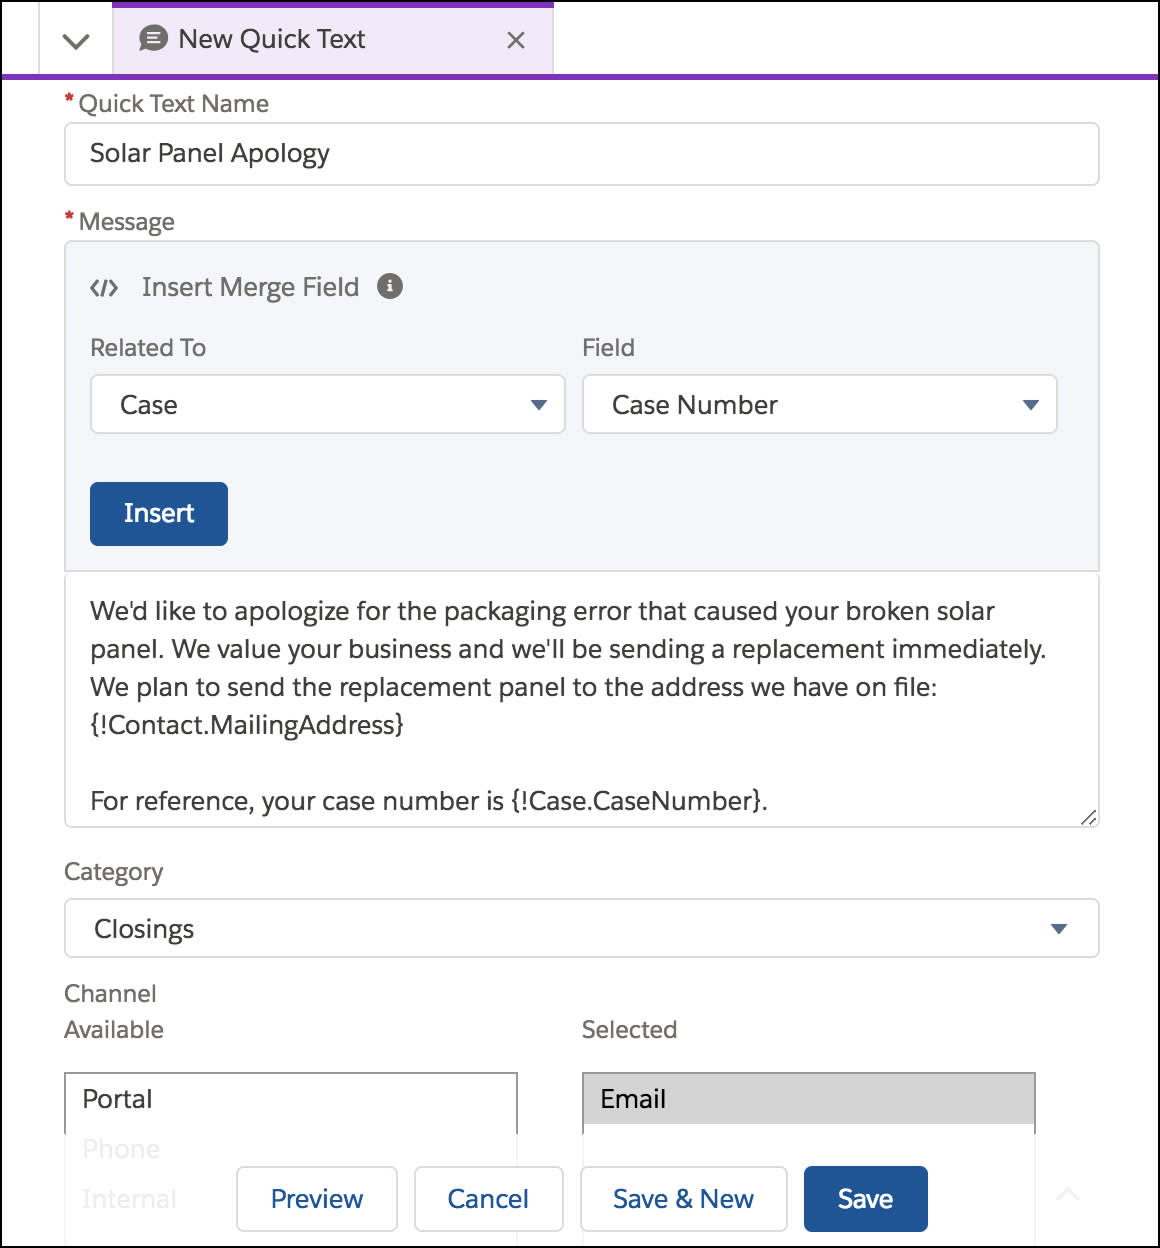
- Give your quick text a name. Maria enters Solar Panel Apology.
- Enter your quick text message. The message can include line breaks, lists, special characters, merge fields, and up to 4,000 characters.
Tip: Merge fields within quick text can supercharge rep productivity. They let you insert the value of a field for a specific record. With merge fields, quick text becomes record-aware, letting reps avoid the dreaded copy and paste from the record’s details.
- Select a category. Maria selects Closings.
- Select the channels in which you want the message to be available. Maria keeps the default selection, Email. Depending on which features are enabled in your org, these other channels might be available.
- Email—Works with the email action
- Chat—Works with Chat in the Service Console
- Phone—Works with the Log a Call action
- Portal—Works in a community or a customer portal
- Internal—Works with internal fields, like on the Change Status action
-
Important: If you don’t specify a channel, the quick text message can’t be used because it won’t be available in any actions. The Portal and Internal channels aren’t supported in Lightning Experience and don’t map to any actions in Lightning Experience. Here’s Maria’s quick text.
- Click Preview to take a peek at what the quick text looks like with resolved merge fields.
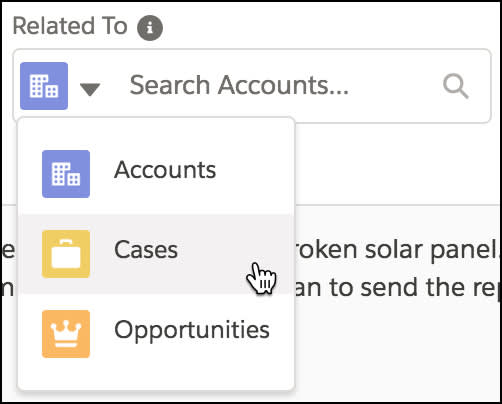
- To view sample resolved merge fields, select a recipient and a related record. Use the dropdown to change the object to cases.
Here’s Maria’s quick text in preview.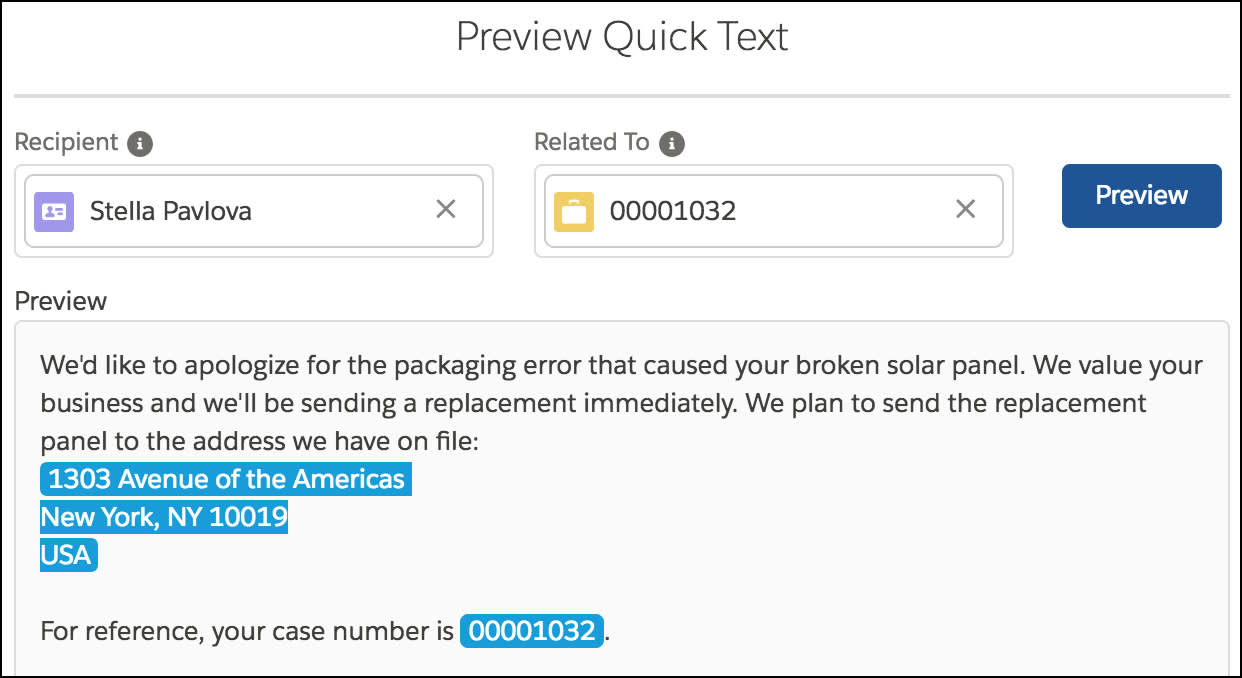
- Close the preview, then click Save.
Maria creates a few more quick text messages, including one with a personalized signature.
Understand How Sharing Works for Macros and Quick Text
By default, sharing settings for macros and quick text are set to private. That means reps can’t see the macro or quick text that Maria created until it’s shared with them. To share macros and quick text, you have a few options.
User Interface |
Sharing Model |
|---|---|
Lightning Experience |
Share folders Let users organize and share quick text and macros in folders. To share an item, users add items to a folder, and then share that folder. To use this model, you enable folders for quick text and macros in Setup. Note: Keep in mind that sharing settings on folders override sharing settings on individual items. If you shared macros or quick text in Salesforce Classic, those settings are ignored after folders are enabled. After you enable folders for quick text or macros, we recommend that you move all existing items into folders and share those folders with your users. If an item isn’t in a folder, only the owner, creator, and admin have access. Also verify that your macro and quick text page layouts include the Folder field so that your reps can actually assign items to a folder. For detailed steps on enabling folders, see the previous unit. |
Salesforce Classic |
Share individual items Let users share quick text and macros individually. To share an item, users click the Share button on the quick text or macro record details. To use this model, you don’t have to enable anything because it’s the default behavior in Salesforce Classic. |
Both |
Share org-wide Let users see all quick text and macros in your org. To use this model, you update the org-wide sharing settings for the quick text and macros objects to public in Setup. We don’t recommend this model for most orgs. |
Maria enabled folders for quick text and macros in the previous unit, so she’ll share her quick text and macros using folders after she’s tried them out herself.
Resources
- Salesforce Help: Create Quick Text Messages
- Salesforce Help: Create Macros in Lightning Experience
- Salesforce Help: View and Edit Tab Settings in Permission Sets and Profiles
- Salesforce Help: Share Quick Text
- Salesforce Help: Share Macros
- Salesforce Help: Sharing Settings