Give Users a Choice
Learning Objectives
After completing this unit, you’ll be able to:
- Add multiple-choice questions to a flow screen.
- Create multiple-choice questions that allow more than one answer.
- Manually create choices for a question.
- Populate a question’s choices from a field.
- Populate a question’s choices from a filtered list of records.

A Simpler Kind of Question
When you take a test, do you prefer questions that ask you to write out the full answer, or multiple-choice questions where you just pick the right answer?

Users tend to prefer picklist fields when working with Salesforce records, because it’s easier to select a value than to enter it. And admins love picklists because they eliminate spelling errors and other inconsistencies, which improves data quality. So how do you use that type of field in a flow?
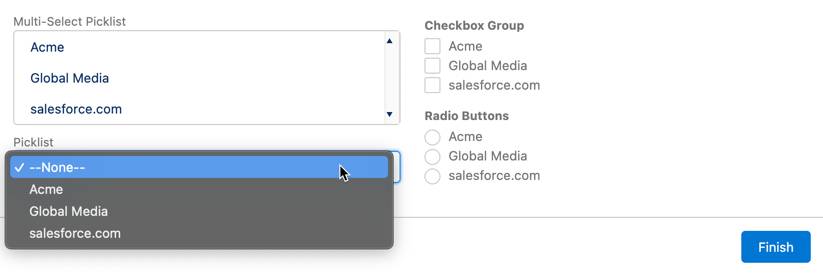
Flow Builder has screen components that ask users to select from a list of options.
- Picklist
- Radio Buttons
- Multi-Select Picklist
- Checkbox Group
Each component displays answer options, called choices, in its own way. With the Picklist and Radio Buttons components, users can select only one choice. With the Multi-Select Picklist and Checkbox Group components, users can select multiple choices.
Here’s how those four components look on a screen.
The Choice Resources
For most multiple-choice screen components, you must select or create at least one Choice resource. Choice resources are the selectable options that users see. Take a look at the different types of Choice resources and how they define the selectable options.
Name |
Description |
Example |
|---|---|---|
Choice |
Give users simple values to choose from. (You enter each value as a single choice.) |
Yes, No High, Medium, Low |
Record Choice Set |
Present users with a filtered set of records to choose from. |
A set of product records that belong to a specific product family |
Picklist Choice Set |
Present users with a set of values that are defined in an existing picklist. |
Service Level picklist: Gold, Silver, Bronze |
Collection Choice Set |
Present users with a record collection to choose one or more records from. |
A collection of contacts retrieved by a Get Records element in the same flow |
Add a Screen for Multiple-Choice Questions
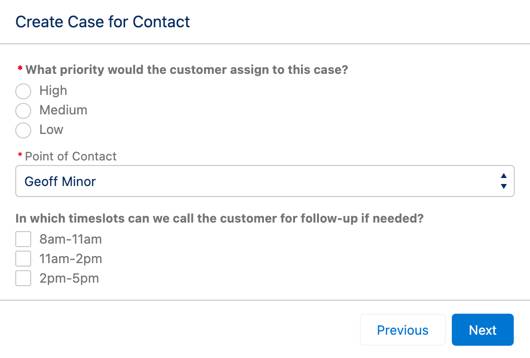
Having worked with the new flow for a couple of weeks, Pyroclastic’s support teams have decided that they want agents to collect more information during customer calls. Specifically, they want the support agent to record:
- Case priority
- Point of contact
- Best times to call the customer
Next, you add components to your flow to collect this new information. But first, take a moment to think about what type of choice resource suits each of these data points.
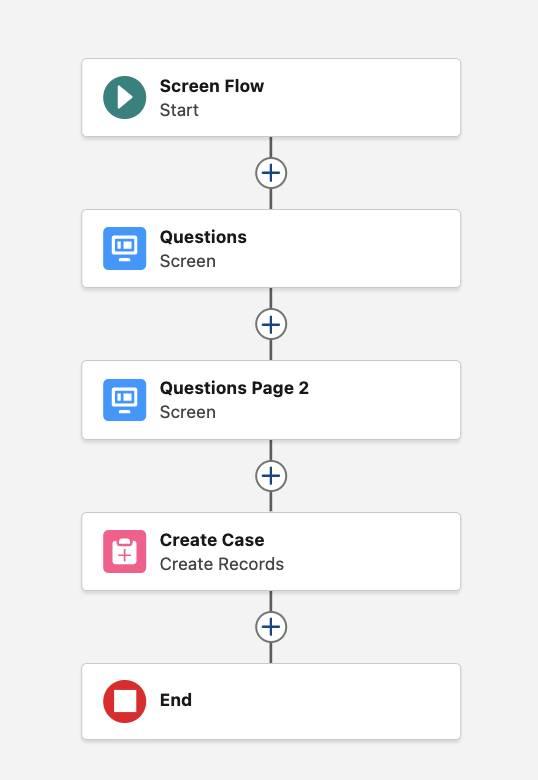
Now, let’s create a new screen and add some questions to it.
- Open the Create Case for Contact flow.
- Add a Screen element after the Questions element.
- For Label, enter
Questions Page 2.
Create a Single-Choice Question from a Picklist Field
Add a radio button component for users to indicate the case’s priority. Priority is already a picklist field on the Case object, so you can use a picklist choice set to present Case Priority values in the radio buttons.
- In the Questions Page 2 screen element, drag Radio Buttons from the Components sidebar to the screen canvas.
- In the Radio Buttons sidebar, for Label, enter
What priority would the customer assign to this case? - For API Name, enter
ScreenPriority.
- Click Require.
- For Choice, select New Choice Resource.
- For Resource Type, select Picklist Choice Set.
- For API Name, enter
choicePriorityPicklist.
- For Object, select Case.
- For Data Type, select Picklist.
- For Field, select Priority.
- Click Done.
The Choice field should now contain the choicePriorityPicklist resource.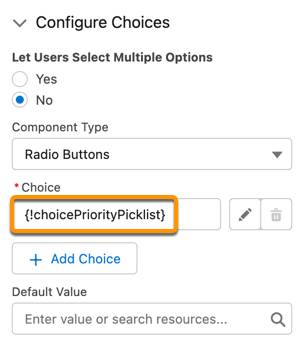
Create a Single-Choice Question from a Filtered List of Records
Add a picklist question for users to choose a contact. The flow already uses the current contact, but support managers want the option to choose a different point of contact. The point of contact should be someone already related to the current contact’s account, so you use a record choice set to show only the contacts from the same account.
- Drag Picklist from the Components sidebar to the screen canvas.
- In the Picklist sidebar, for Label, enter
Point of Contact.
- Click Require.
- For Choice, select New Choice Resource.
- For Resource Type, select Record Choice Set.
- For API Name, enter
choiceAllContacts.
- For Object, select Contact.
- Limit the accounts by setting a filter in the Filter Contact Records section:
- For Field, select Account ID.
- For Operator, select Equals.
- For Value, select inputAccountId.
- For Choice Label, select Name.
This is the text that’s shown to users as a selectable value.
- For Choice Value, select Id.
This is the value that’s stored in the component when the user makes a selection.
- Click Done.
The Choice field should now contain the choiceAllContacts resource:{!choiceAllContacts}.
- For Default Value, select inputContactId.
When the screen runs, it auto-selects the current contact from the picklist.
Create a Multiselect Question from a Manually Defined Set of Values
Add a checkbox group question for users to record the caller’s available callback times. Support agents want the workday split into three slots of three hours each. You define each time slot manually as a single choice, then present all choices for users to choose from.
- Drag Checkbox Group from the Components sidebar to the screen canvas.
- In the Checkbox Group sidebar, for Label, enter
In which timeslots can we call the customer for follow-up if needed? - For API Name, enter
CallbackTimes.
- For Choice, enter
8am-11amand select +Create ‘8am-11am’ Choice.
You just created a Choice resource with its required fields filled in for you. It’s a lot faster than using the New Choice Resource window, but only works for manually entered choices.
- Click +Add Choice twice.
- Repeat step 4 in the two new Choice fields to add these two choices:
11am-2pm2pm-5pm
- Click Done.
When Pyroclastic support agents run the flow, the second question screen looks something like this.
Update the Create Records Element
When you added the Create Records element to the flow, you used the inputContactId variable to set the Contact for the new case. Now that agents can choose a different point of contact, you need to update that field value. Also, you have two new pieces of information: the caller’s case priority and their preferred time slot for follow up.
Next, you update the flow’s Create Records element to handle agents’ responses to the new questions.
- Open the Create Case element.
- In Set Field Values, change the Contact ID value to Questions Page 2 > Point of Contact.
- Add these lines to the Set Field Values section:
- Field: Priority, Value: Questions Page 2 > What priority would the customer assign…
- Field: Internal Comments, Value:
Available callback times: {!CallbackTimes}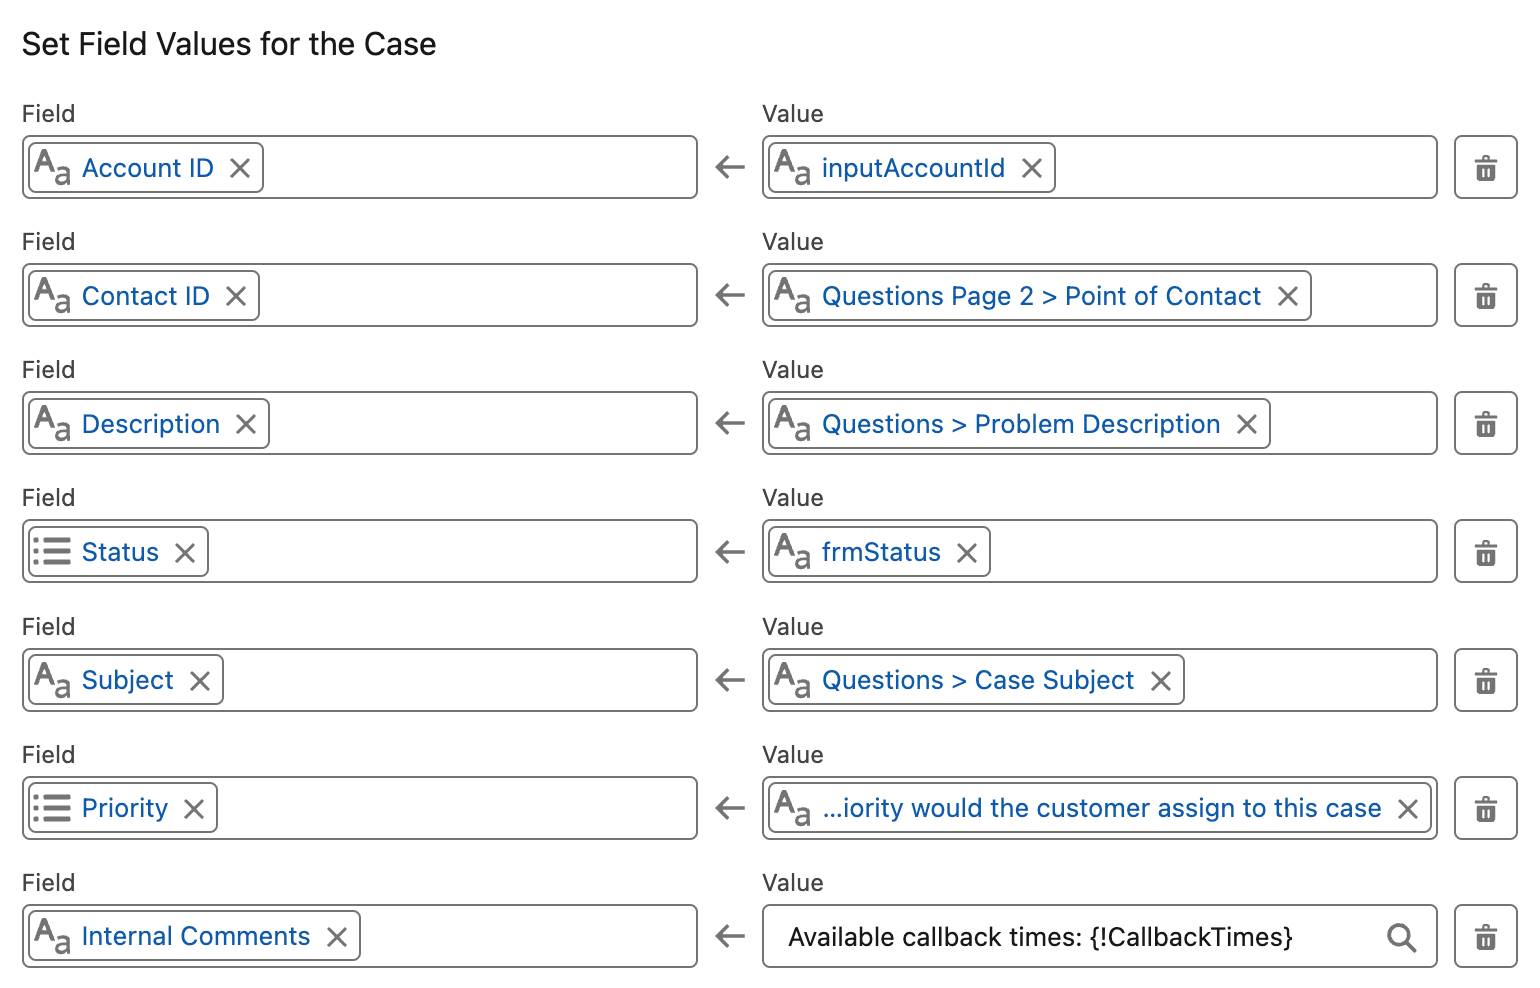
- Save the flow.
Now the flow has a whole new page of questions. In the next unit, you learn about one last set of input screen components.
Resources
- Salesforce Help: Flow Resources
- Salesforce Help: Flow Screen Input Component: Radio Buttons
- Salesforce Help: Flow Screen Input Component: Picklist
- Salesforce Help: Flow Screen Input Component: Checkbox Group