
Create and Ground Prompt Templates

Learning Objectives

After completing this unit, you’ll be able to:

  • Describe what grounding is.
  • Explain how to use Prompt Builder to create a prompt template.
  • Summarize the benefits of using Flow and Data Cloud with prompt templates.
  • Explain how to add resources to prompt templates.

The Why and the How

In the Prompt Builder: Quick Look module, Linda Rosenberg, a Salesforce admin, aimed to reduce her sales team's manual workload by automating tasks with prompt templates. In this module, we take a deeper dive and show you why and how she did it.

Build a Sales Email Prompt Template

Linda needs to create a template that her sales team can use to generate emails. She wants to reduce the time that the team spends on creating invitations to customers for product events.

To do this, Linda navigates to Prompt Builder in Salesforce Setup. When she navigates to Prompt Builder, the first page that’s shown is the Prompt Builder Explore page. Here you’ll find:

  • Guidance to help you learn more about the features of Prompt Builder.
  • Access to prompt template walkthroughs and examples.
  • A listing of all existing prompt templates with their type, category and status.
  • Functionality to edit and delete existing prompt templates.

Prompt Builder Explore page.

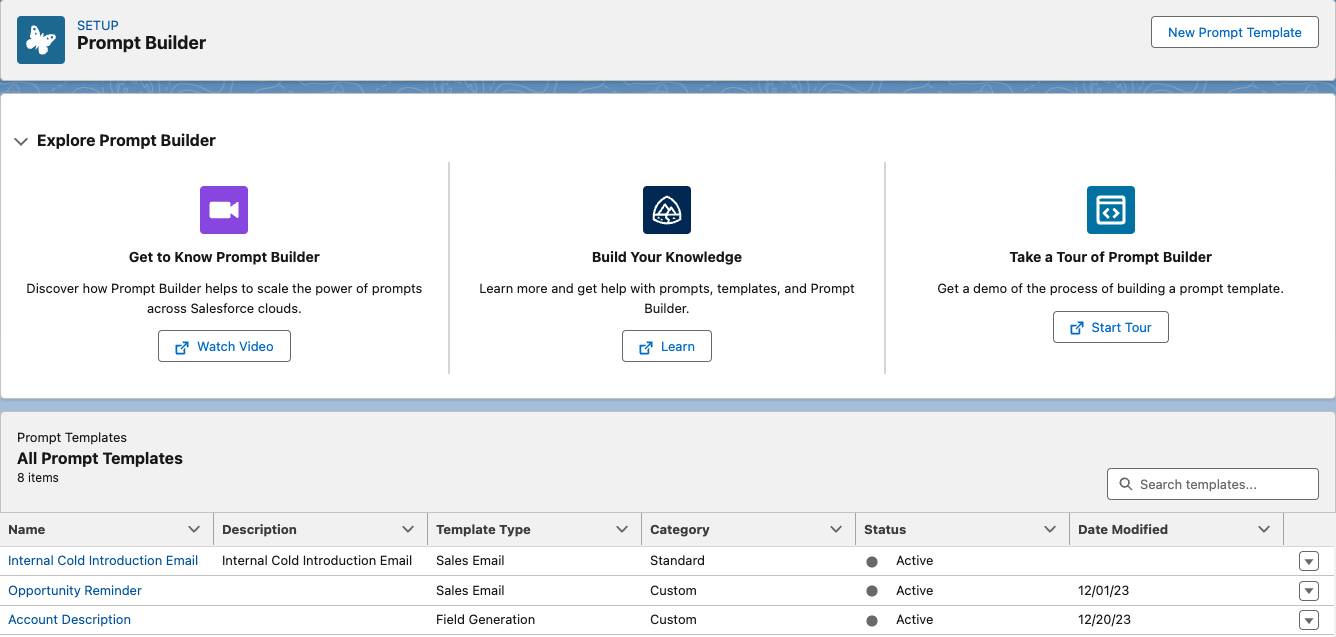
From the Explore page, Linda can also create a prompt template. She clicks the New Prompt Template button.

Template type setup.

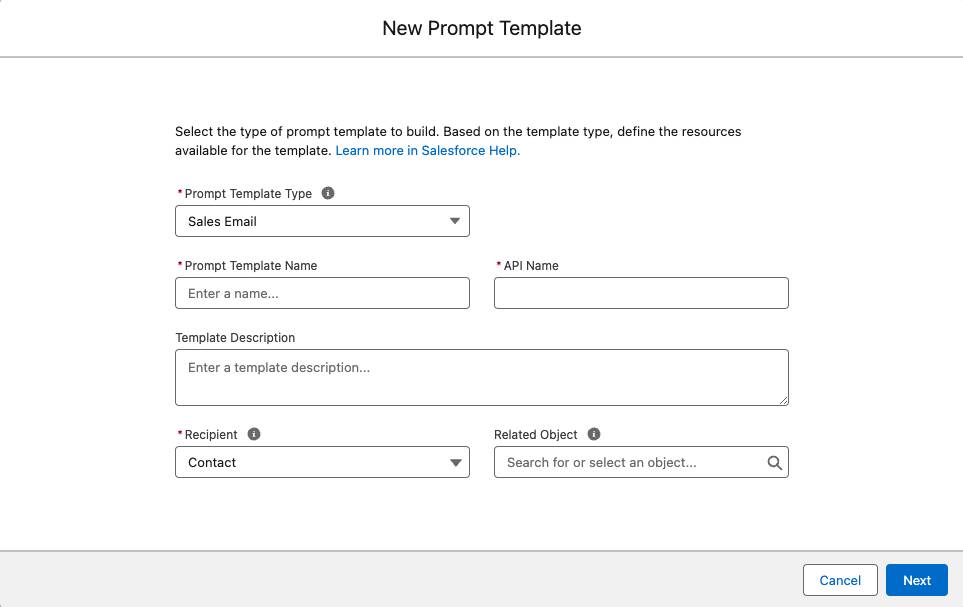
Linda starts to complete the fields in the template type setup screen.

When you set up a prompt template, it’s important to have a clear goal. In this case, Linda must think about who her company’s customers are and what the sales team wants them to see in the email.

Linda understands that her email may be sent to any Cloud Kicks contact. Therefore, Contact is the recipient object. She completes the template type setup by selecting:

  1. Prompt Template Type: Sales Email
  2. Prompt Template Name: Invite Customer to Local Product Event
  3. API Name: Invite_Customer_to_Local_Product_Event
  4. Template Description: Email customer to invite to local product event.
  5. Recipient: Contact
  6. Related Object: Account

Ground Your Template

You learned that making templates specific makes them effective. Another way of saying “specific” is to say your template is grounded.

Once Linda has defined her template type, she begins drafting and grounding her prompt in the Template Workspace.

Prompt template workspace with prompt.

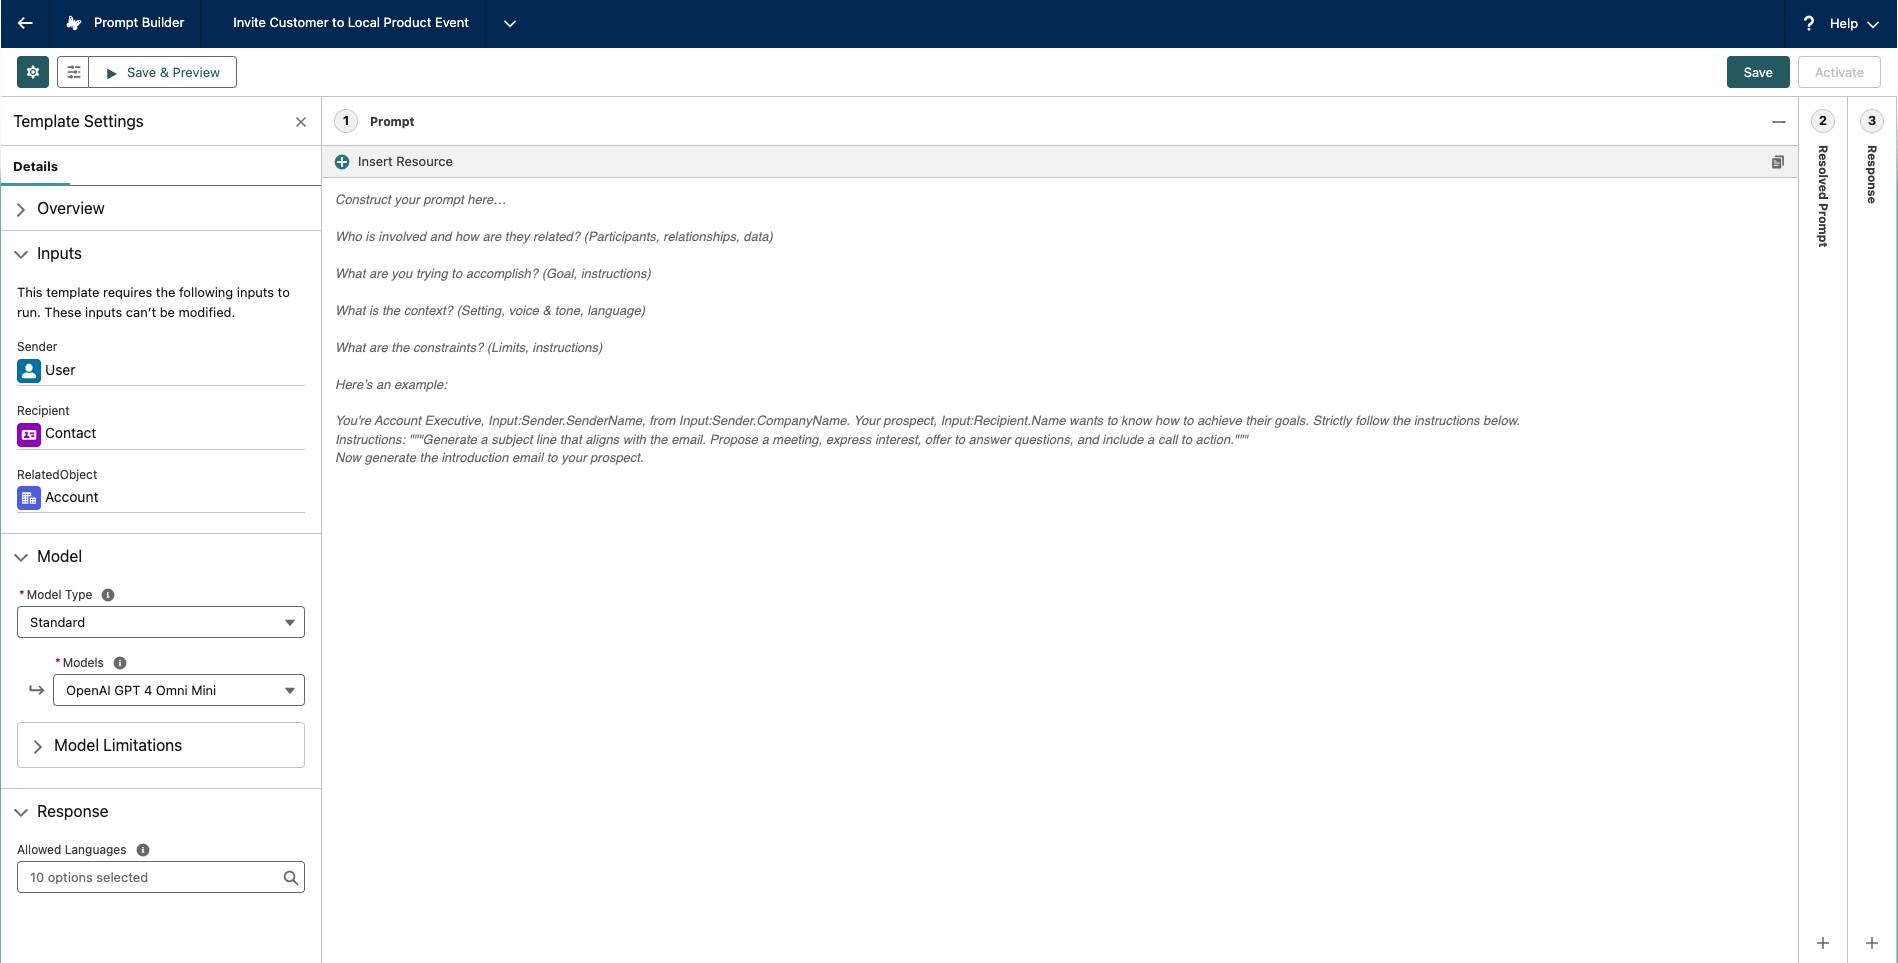
Linda includes the customer name, who the email is from, their titles, and details about the event.

You are a Salesforce admin and your name is Linda Rosenberg from the organization Cloud Kicks. Your prospect is Rob Hutchinson, a director from Acme Inc., and they are based in Toronto, Ontario.

In the email, invite the prospect to attend the event “Floating on Clouds: Toronto Kickoff” on September 18, an event for customers of Cloud Kicks new and old to network and preview upcoming products, in no more than 70 words. Explain to the prospect the possible benefits of attending the event and mention that you would be happy to chat with them further at the event or online if they need more information.

The prompt looks great. However, her first draft is hard-coded for only one specific sender and recipient. That would be okay if the prompt is going to be used once. But the concept of a prompt template is that it can be used for any sender and recipient. What she needs is a way to get her company’s CRM data into the template and ground it automatically.

Happily, Linda knows that she can use merge fields, Apex, and Flow as resources to enable Prompt Builder to securely access Salesforce data.

Add Merge Fields to a Prompt Template

Linda reviews her prompt and looks for areas where she can use merge fields to take her prompt from hardcoded for one-time use to reusable for any sender and recipient.

You are a Salesforce admin and your name is Linda Rosenberg from the organization Cloud Kicks. Your prospect is Rob Hutchinson, a director. They are based in Toronto, Ontario.

In the email, invite the prospect to attend the event “Floating on Clouds: Toronto Kickoff” on September 18, an event for customers of Cloud Kicks new and old to network and preview upcoming products, in no more than 70 words. Explain to the prospect the possible benefits of attending the event and mention that you would be happy to chat with them further at the event or online if they need more information.

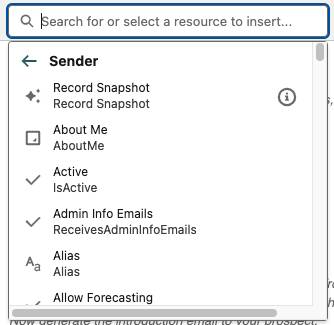
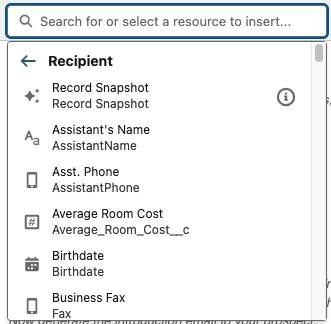
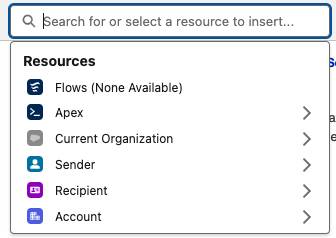
Within the Prompt Template Workspace, Linda uses the Resource picklist to choose the type of resource to use. She sees there are multiple options for sales email prompt templates. Current Organization, Sender, and Recipient are all available to use in her prompt template.

List of resources including Current Organization, Sender, and Recipient.

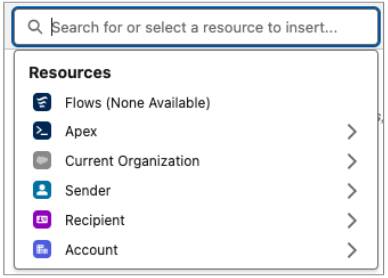
In the Resources picklist, Linda selects Sender and Recipient, where she then selects specific information, like title, name, company, and so on to ground her prompt template. She saves her work.

Resource picker displays the sender merge fields available.

Resource picker displays the recipient merge fields available.

Note

In this module you’ll see the syntax {!$Resource}in the prompt templates. This special syntax helps you to easily copy and paste the text from this module into the Prompt Template Workspace. It ensures all of your resources stay where and how you expected them in your template.

You are a {!$Input:Sender.Title} and your name is {!$Input:Sender.Name} from {!$Input:Sender.CompanyName}. Your prospect is {!$Input:Recipient.Name}, a {!$Input:Recipient.Title}. They are based in {!$Input:Recipient.MailingCity}.

In the email, invite the prospect to attend the event "Floating on Clouds: Toronto Kickoff" on September 18, an event for customers of Cloud Kicks new and old to network and preview upcoming products, in no more than 70 words. Explain to the prospect the possible benefits of attending the event and mention that you would be happy to chat with them further at the event or online if they need more information.

After she’s done, she notices there’s one piece of her prompt that needs an adjustment before it can display the correct response: "Floating on Clouds: Toronto Kickoff" on September 18.

At Cloud Kicks, “Floating on Clouds” is a nationwide event that hosts local customers based on their city. Linda wants to make sure the sales email prompt template is as personalized as possible and generates emails that invite customers to local events.

Linda understands that using only merge fields for this portion isn't enough. She needs logic incorporated into her prompt template. There are several approaches to accomplish this within Prompt Builder, including using Apex or Template-Triggered Prompt Flows. First, let’s explore how to use Apex in prompt templates.

Add Apex to a Prompt Template

If you want to use data from a SOQL query or an external API in your prompt, consider Apex. Apex is also effective if you want to generate well-formatted JSON or do programmatic data filtering.

In this case, Linda wants to create an Apex class that finds events that are close to a given contact and returns the name of the events, subject, location, and start time. Using the Developer Console she creates a class named ContactEventsPrompt with a method annotated as InvocableMethod. The InvocableMethod must accept List<Request> where the inputs defined in the Request class match the inputs within the prompt. Also, the InvocableMethod must be labeled with the CapabilityType that matches the template type.

Note

If you are interested in learning more about adding Apex classes to prompt templates or to see code samples, check out the Salesforce Documentation.

Once her class is created, Linda returns to the Prompt Template Workspace in Prompt Builder and notices that Apex is now a resource. She adds the Apex class by clicking Resource and selecting Apex.

List of resources including Apex, Current Organization, Sender, and Recipient.

Resource picker displays the Apex class available.

You’re a {!$Input:Sender.Title} and your name is {!$Input:Sender.Name} from {!$Input:Sender.CompanyName}. Your prospect is {!$Input:Recipient.Name} a {!$Input:Recipient.Title}. They are based in {!$Input:Recipient.MailingCity}.

In the email, invite the prospect to attend an event for customers of Cloud Kicks new and old to network and preview upcoming products, in no more than 70 words.Explain to the prospect the possible benefits of attending the event and mention that you would be happy to chat with them further at the event or online if they need more information.

Add the following event information to the email: {!$Apex:ContactEventsPrompt.Prompt}.

Great! Now instead of referencing one single event. Linda can rely on her Apex class to return an event close to the specified contact.

Build a Field Generation Prompt Template

Field Generation prompt templates have a direct relationship to record fields. With the help of Lightning App Builder (LAB), an Einstein button (“Einstein button icon”) can trigger an assigned prompt template to send a prompt to the LLM and return a response back to the specific field.

Linda wants to help customer support agents quickly come up to speed to help any Cloud Kicks customer. She'll utilize a field generation prompt template to generate a summary of the related case comment history when the agent clicks the Einstein button for a case summary field.

Case details displaying Case AI Summary field and Einstein button.

To configure the Einstein button and generate the LLM response, Linda needs two things:

  1. A field generation prompt template created with Prompt Builder.
  2. A field added to a component and configured in LAB.

Create a Field Generation Prompt Template

Linda opens Prompt Builder and creates a new prompt template. She selects her prompt template type, and completes the template setup by selecting:

  1. Prompt Template Type: Field Generation Template Capability
  2. Prompt Template Name: Case Comments Summary
  3. API Name: Case_Comments_Summary
  4. Template Description: Summary of case details.
  5. Object: Case
  6. Object Field: Case_AI_Summary__c

After the prompt template setup is complete, she creates her prompt template in the Template Workspace.

You are a support representative who is tasked with creating a short summary of a case that happened between a customer and a company support rep.

She clicks Save and Activate to access the template within LAB. Now that Linda has a ready-to-use prompt template, she needs to create a Case AI Summary field on the Case record page.

Configure a Field in LAB to Connect Field Generation Prompt Templates

To use an Einstein button to trigger a field generation prompt template in a record, Linda must configure the field in LAB. To start, she can select an existing Lightning Record page or create a new one.

Linda can drag either a Record Detail component or a Field Section component onto the selected page.

Lightning App Builder view adding the Case AI Summary field to Case Information.

  • For a Field Section component: Linda can drag a form field onto the Field Section component.
  • For a Record Detail component: Linda must migrate the component to Dynamic Forms. She can do this migration by selecting Upgrade from the right-hand panel and following the steps in the upgrade wizard. This change allows her to configure fields from her existing record pages as individual components.

Linda can select any form field that supports field generation, including writable text, text area, text area (long), and text area (rich) field types. Field generation prompts aren't compatible with read-only fields.

In the Einstein Generative AI section of the Field Properties panel, she selects a Field Generation prompt template to assign to the form field.

Lightning App Builder field properties panel for the Case AI Summary field.

Linda then saves and activates the record page.

Linda understands she needs to incorporate real-time data into her prompt template to make it relevant. This can be invoked from a flow.

Add a Flow to a Prompt Template

With the help of Flow Builder, admins can create Template-Triggered Prompt Flows to incorporate complex logic in prompt templates. In Flow Builder, Linda creates a Template-Triggered Prompt Flow for her Field Generation Prompt Template.

New Flow window with Template-Triggered Prompt Flow selected.

She creates the following flow:

  1. Template-Triggered Prompt Flow Name: Get Case Summary
  2. Prompt Template Type Capability: Field Generation Template Capability
  3. Object: Case

Get Case Summary flow for field generation prompt templates.

When she saves and activates the Flow, it’s immediately available in Prompt Builder to use for any Field Generation prompt template whose object is Case.

Note

To include a Flow in a prompt template, the prompt template type and flow compatibility type must match. There also must be a match between the prompt template and flow inputs.

After Linda activates her flow in Flow Builder, she navigates to the Resources list in the Prompt Templates Workspace and notices that Flows is now a resource. When she selects Flows, she sees her new Template-Triggered Prompt Flow,Get_Case_Summary.

Resource picker selected with Flows option displayed.

She selects it, and her new flow is inserted into the prompt template as {!$Flow:Get_Case_Summary.Prompt}.

You are a support representative who is tasked with creating a short summary of a case that happened between a customer and a company support rep.

"""

Case Data:

{!$Flow:Get_Case_Summary.Prompt}

"""

Linda’s now ready to test her prompt template to see the results.

Build a Flex Prompt Template

So far we’ve covered Sales Email and Field Generation prompt templates. However, if your specific use case doesn't align with those templates, Prompt Builder offers flexibility for all scenarios. Unlike other prompt templates, Flex template inputs aren’t predefined; instead, you choose them during template creation. In Prompt Builder, you have the option to add up to five inputs to a Flex template. Once defined, the resource picker shows these inputs, and your prompt template can reference them using merge fields.

Linda wants to use Prompt Builder to create a product description using the account name, asset details, and contact information. Since the Field Generation prompt template doesn't offer the necessary input choices in terms of quantity (three) and type (account, asset, and contact) for her needs, she decides to create a Flex prompt template. Linda completes the setup and creates her prompt template.

  1. Prompt Template Type: Flex
  2. Prompt Template Name: Product Details
  3. API Name: Product_Details
  4. Template Description: Information about product
  5. Define Resources:

Name

API Name

Object

Account Info Account_Info

Account

Asset Info Asset_Info

Asset

Contact Info Contact_Info

Contact

Write a detailed product description using the following information:

The Account Name is {!$Input:Account_Info.Name}

The Product Info is {!$Input:Asset_Info.Description}

The Contact Info is {!$Input:Contact_Info.Name}

Well done. You’ve learned that Prompt Builder is flexible enough to accommodate your everyday business needs. Whether you choose to use a flow or create an Apex class, Prompt Builder helps minimize the time spent on your daily tasks.

Resources

Keep learning for
free!
Sign up for an account to continue.
What’s in it for you?
  • Get personalized recommendations for your career goals
  • Practice your skills with hands-on challenges and quizzes
  • Track and share your progress with employers
  • Connect to mentorship and career opportunities