Transform Multiple Records
Learning Objectives
After completing this unit, you’ll be able to:
- Decide whether to use a Transform element or a Loop element.
- Use a Data Table component to capture and select multiple records.
- Convert data table selections into a usable collection with the Transform element.
- Map fields from source data to target data with the Transform element.
- Map a screen component selection onto a transformed collection with a formula.

Transforms vs. Loops
To modify multiple records in Flow Builder, you could change each record one at a time, but that would be incredibly inefficient. Fortunately, Flow Builder provides two elements you can use to change every record in a collection together: the Transform element and the Loop element.
-
A Transform element copies the values of one or more components or variables (single or collection) to an autogenerated variable, while also changing the copy’s finalized values.
-
A Loop element iterates through multiple values in a collection, one at a time, allowing the flow to run each of those values through a series of elements.
Transforms are great for making similar changes to a group of records, such as clearing out their Description field, because it can easily make the same change to each of the copied collection’s values. And loops are great for mass actions on a group of records, such as sending an email to a group of users.
You may be thinking, “But wait, if loops can run a group of records through elements, couldn’t I also use loops to make changes to a group of records by putting an Update Records element in the loop?” Though it’s possible, it’s not best practice, because your flow would have a good chance of exceeding the SOQL query limit. Every time an Update Records element runs, it counts as one SOQL query, and depending on your flow, it might not take many loop iterations to reach that limit.
In the past, you may have used Assignment elements in the loop and Update Records elements outside of the loop, combining their abilities to update multiple record values. This is no longer considered good practice by itself. On average, Transform elements are approximately 10 times faster than loops performing the same tasks. They also scale a lot better with more complex flows. Not only does this mean a speedier, superior experience for your users, but it also greatly reduces the chances that the flow will exceed the execution time limit.
The general rule of thumb is: If there’s something you can accomplish with either the Transform element or the Loop element, you should use the Transform element. Use loops only when you can’t use transforms.
Capture Record Selections with a Data Table
Let’s return to our example scenario from unit 1: the Choose Steps to Update flow. The Enablement team has requested a tool that can update the status of multiple steps at once. You’re creating a screen flow that asks a user to select multiple steps from one project, and set a new Status value for all of them. In this step, you create a Screen element, add a data table for the user to select steps, and provide a picklist for the user to choose the new status.
- In the Choose Steps to Update flow, after the Get Steps element, add a Screen element.
- For Label, enter
Select Steps to Update.
The API Name should auto-populate asSelect_Steps_to_Update.
- For Label, enter
- Add a Data Table component to the screen canvas.
- For API Name, enter
Select_Steps.
- For Label, enter
Steps.
- For Source Collection, select Onboarding Project Steps from Get_Steps.
- For API Name, enter
- Click Configure Rows to open the section.
- Make sure Row Selection Mode is set to Multiple.
- For Minimum Selection, enter
1.
- Make sure Row Selection Mode is set to Multiple.
- Click Configure Columns to open the section.
- For Source Field, select Name.
- Click Done in the Column Options (not at the bottom of the Edit Screen window).

- Click +Add Column and repeat these steps to add columns for the Status__c and Assigned_To__c fields.
- For Source Field, select Name.
- Add a Picklist component to the screen canvas.
- For Label, enter
New Status.
The API Name should auto-populate asNew_Status.
- Select Require.
- For Choice, select New Choice Resource.
- For Resource Type, select Picklist Choice Set.
- For API Name, enter
StepStatus.
- For Object, select Onboarding Project Step.
- For Data Type, select Picklist.
- For Field, select Status.
- Click Done.
- For Resource Type, select Picklist Choice Set.
- For Label, enter
- Click Done to close the screen canvas.
- Save the flow.
- In this module, you need two versions of this flow, so after you save the flow, you also save a copy of this flow as another flow. In the button bar, click
 and select Save As New Flow.
- For Flow Label, enter
Choose Steps to Update with Formula.
The Flow API Name should auto-populate asChoose_Steps_to_Update_with_Formula.
- Click Save.
- For Flow Label, enter
The Transform Element
When the flow runs, the data table stores the step records selected by the user. Unfortunately, some elements can’t access some screen components; specifically, the Update Records element can’t access the data table component. The flow needs to transform the data table’s selections into a collection that an Update Records element can reference. For that, you use a Transform element.
Before we dive into the steps, let’s explore the Transform element. As mentioned before, transform elements copy the values of one or more components or variables (single or collection) to an auto-generated variable, while also making changes to the copy’s finalized values. Think of the Transform element like baking a cake.

To get the final product you really want (a beautiful, delicious cake), you start with basic ingredients like flour, milk, and eggs. You have to combine all the ingredients, but you also have to do things to those ingredients along the way to transform it into a cake. You don’t want to add the eggs whole as is, unless you really like dangerously crunchy bits in your cake! There's something you always do first: Remove the shell.
Just like baking a cake, you use the Transform element to combine multiple data points and change their values as needed, resulting in a final, useful data collection.
Because there are so many ways to transform data from one form to another, the Transform element is very versatile. Therefore, a single use case can have multiple potential solutions.
For the Choose Steps to Update flow, there are two ways to update the status of multiple Onboarding Project Step records. Both ways use a Transform element and an Update Records element, but their configurations are very different.

Both methods are equally valid, but someday in the future you might encounter a scenario where one of these methods isn’t compatible with that flow’s elements or resources. We go through both methods to prepare you for both situations and to give you a sense of how you might use the Transform element’s capabilities. Let’s get all geared up and ready to flow.
Transform Values with a Formula
In the first method, you use a Transform element to set the Status of the selected step records in the collection.
Map Fields from Source to Target
- After the Select Steps to Update element, add a Transform element.
- For Label, enter
Transform Step Statuses.
The API Name should auto-populate asTransform_Step_Statuses.
- In the Source Data box, click
 .
.
- For Resource, select the Select_Steps screen component.
- In the Select_Steps box, click the > in the selectedRows line to display the collection’s available fields.
The Data Table was configured to display and select options from an Onboarding Project Step record collection variable. So when you select that data table as source data in the Transform element, all of the fields from the Onboarding Project Step object are available.
- For Resource, select the Select_Steps screen component.
- In the Target Data box, click
 .
.
- For Data Type, select Record.
- Select Allow multiple values (collection).
- For Object, select Onboarding Project Step.
- Click Create.
- For Data Type, select Record.
- In the Source Data column, mouse over the Id field and click
 in the Id line.
Some of the lines in the Target Data column should now be highlighted. These lines have data types that are compatible with the Select_Steps line you selected.
- In the Target Data column, click
 in the Id line.
You should now see a line connecting the Id fields in the two columns. This line is called a mapping. The source’s Id field is mapped to the target’s Id field.
Add a Formula
You want each selected onboarding project step to have the status that was selected in the New Status screen component. You can’t map the New Status screen component to the Status field, but you can use a formula to insert the screen component’s value into the field.
- In the Target Data column, click the Status__c row.
A new “Add or edit formula” icon appears.
- Click
 and select Formula.
The mapping panel changes to the Add Transformation panel.
- In the “Search a field…” field, select Select Steps to Update, then select New Status.
The Formula field should now contain{!New_Status}.
- Click Check Syntax to verify the formula.
The text next to the Check Syntax button most likely says Valid already, but that result is based on the previous formula value. If the text still says Valid after you click the button, your formula is good to go.
- In the Add Transformation panel, click
 to return to the mapping panel.
- Save the flow.
Notice that the target data’s Status__c now has a totally different mapping. The New_Status screen component was added to the Source Data column as the source for the target’s Status__c values.
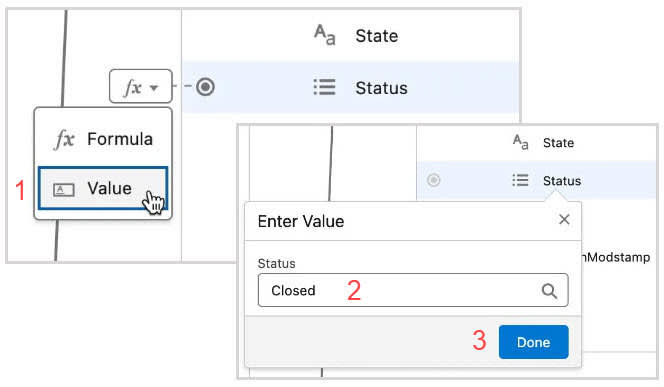
From the  button, you selected Formula because you’re referencing a screen component. However, if you want to set a static value, such as setting the Status for all records to Closed, select Value instead. Then enter the static value and click Done.
Your Transform element is complete. It contains a collection with one record for each selected onboarding project step, but because you only mapped the Id and set Status__c with a variable, the records in the transform’s collection contain only those two fields. The transform’s collection isn’t visible in the Record Collection Variables section of the Toolbox, but don’t worry, it exists.
Update the Onboarding Project Step Records
Finally, create an element that updates the status for all the selected onboarding Project Step records.
- After the Transform Step Statuses element, add an Update Records element.
- For Label, enter
Update Steps.
The API Name should auto-populate asUpdate_Steps.
- For How to Find Records to Update and Set Their Values, make sure Use the IDs and all field values from a record or record collection is selected.
- For Record or Record Collection, select Onboarding Project Steps from Transform Step Statuses.
- Save the flow.
Way to flow! This flow is done, but in the next unit, you build an alternate version of this flow that accomplishes the same goal with a text collection instead of a record collection.