Organize Data in a Collection Variable
Learning Objectives
After completing this unit, you’ll be able to:
- Filter the contents of a collection variable.
- Sort the contents of a collection variable.
- Limit the number of values in a collection variable.

When working with collection variables, you may need to change the contents of the collection before putting it to use. In Flow Builder, you can use elements to remove unwanted values from the collection, change the order of the collection’s values, or limit the collection to a specific number of values. These functions can be accomplished with the Collection Filter and Collection Sort elements. Let’s take a look at these elements and why they’re useful.
Filter a Collection’s Contents
The Collection Filter element does exactly what it says on the label: it applies a filter to a collection, removing anything that doesn’t meet the filter criteria. Well actually, that’s not entirely true. The collection you enter remains untouched, and the Collection Filter element creates a duplicate collection that doesn’t contain the values that don’t meet the criteria. This behavior can be useful, because the original unfiltered collection is still usable if you need it.
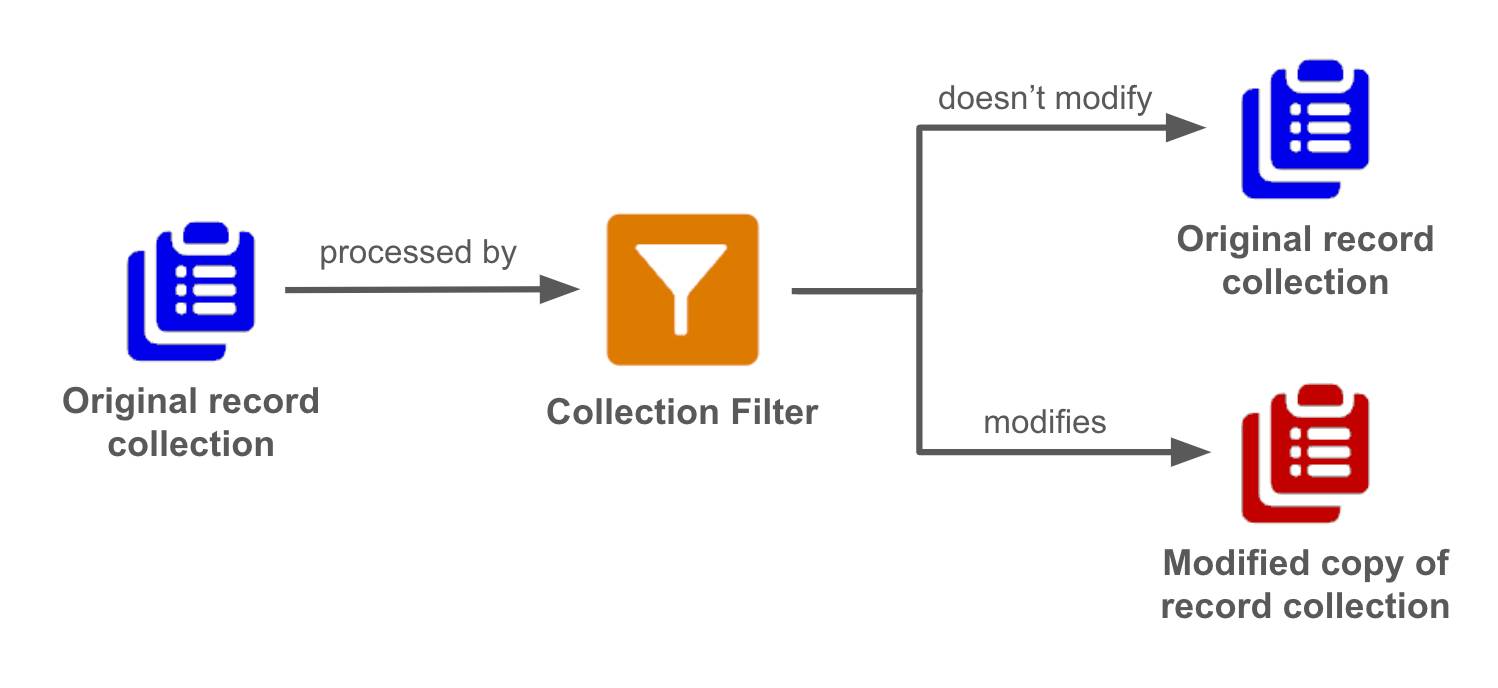
For example, let’s say you have a text collection that contains email addresses for a new service announcement email, but you want to avoid sending this message to email addresses that include your competitor’s domain. The flow now has two text collections: one with all of the originally gathered email addresses, and one without the competitor’s email addresses.
Sort and Truncate a Collection’s Contents
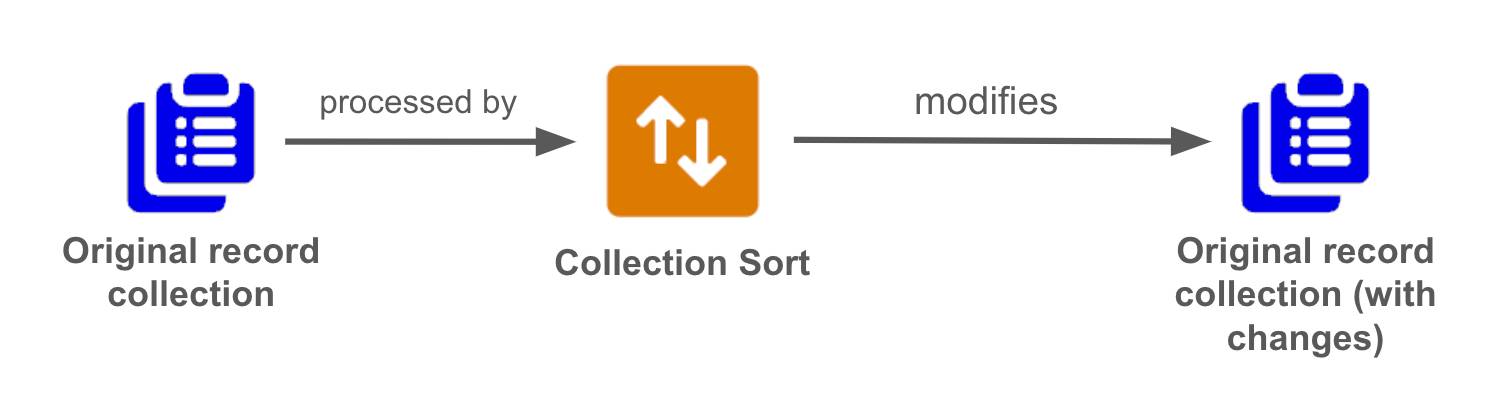
With the Collection Sort element, you can change the order of a collection based on criteria that you set. For example, you can reorder a collection that contains Opportunity records by Amount, in descending order.
However, the Collection Sort element has one more important function: It can limit the number of values in a collection, removing all values after that limit. After you sort a collection in descending order by Amount, you might choose to keep only the top 10 opportunities. All other opportunities are removed from the collection.
It’s important to note that, unlike the Collection Filter element, the Collection Sort element does not create a new collection. Instead, it modifies the collection that you select for sorting.
You may be thinking, “Wait a second, filtering, sorting, and limiting sound familiar. Can’t I do those things in a Get Records element?” Yes, you can, and it is best practice to use the Get Records element’s functionality when possible. It’s more efficient and runs faster than adding more elements. Use the Collection Filter and Collection Sort elements when you can’t determine the data’s criteria at the time of the Get Records, such as when the criteria is determined by a Decision element or screen inputs.
Filter and Sort in a Flow
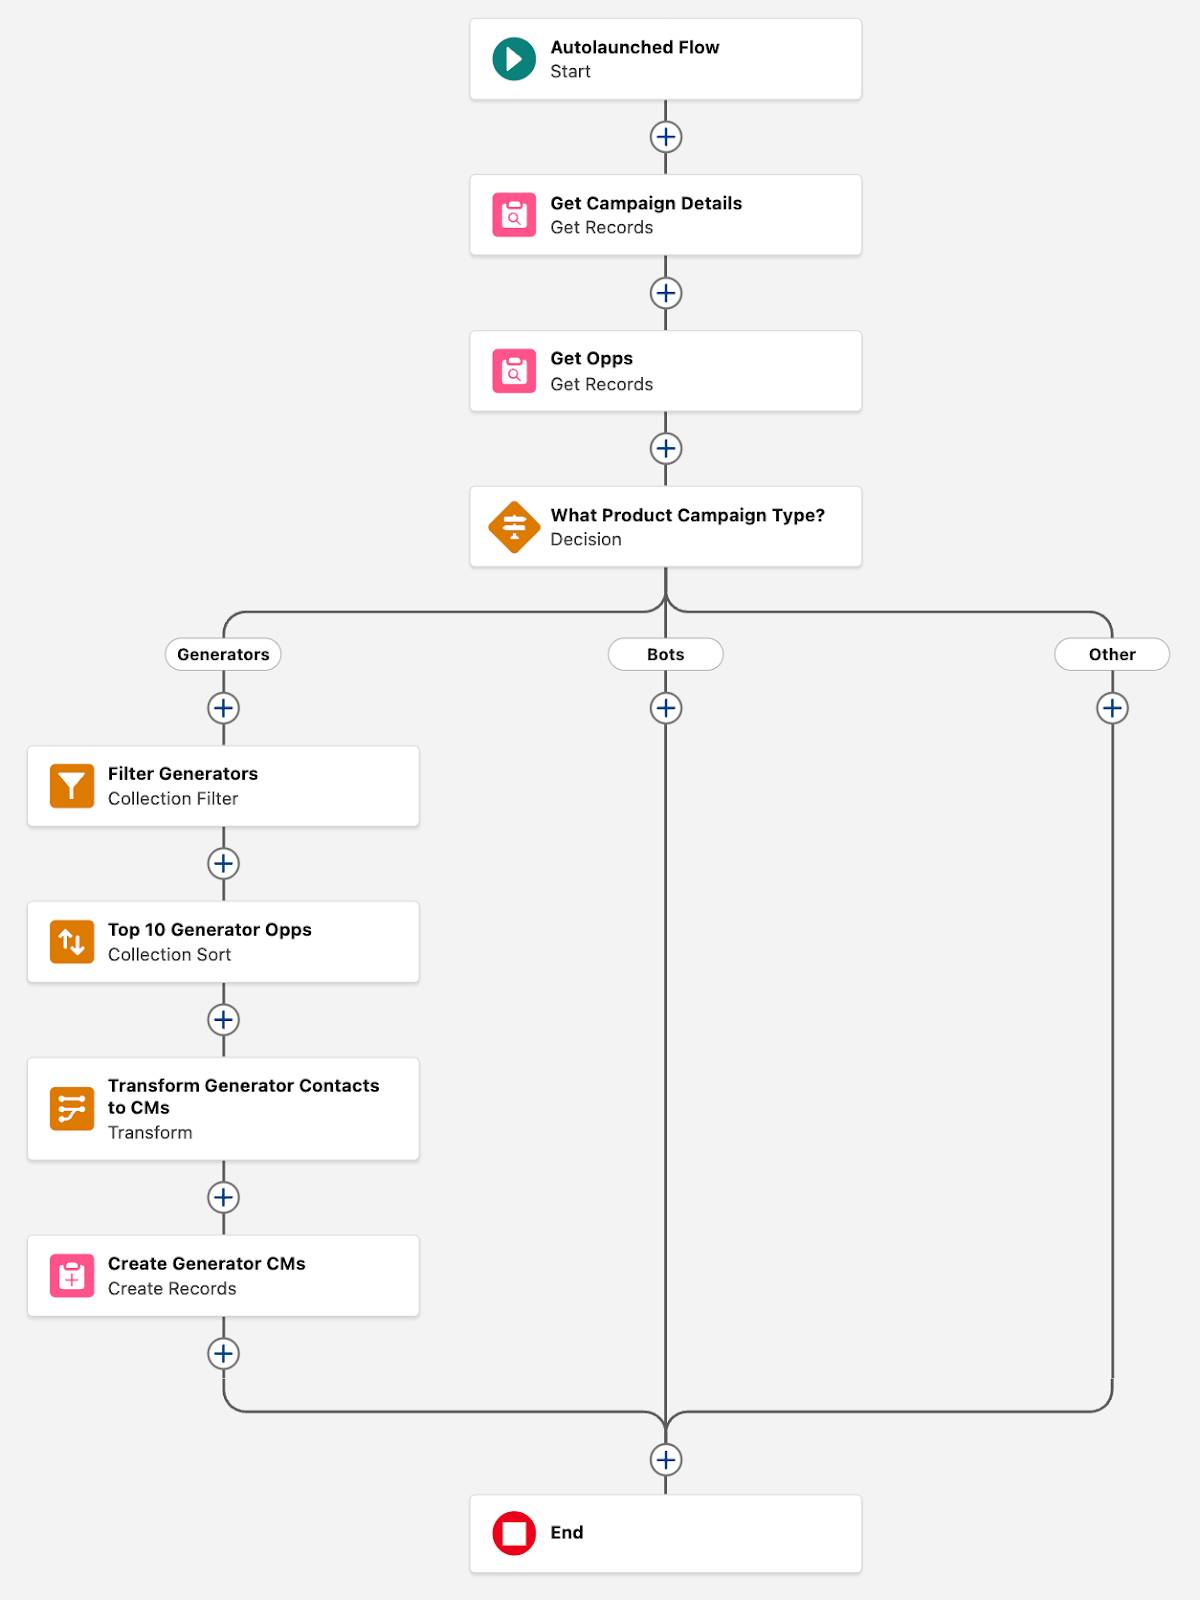
Let’s look at a scenario where you build a flow with Collection Filter and Collection Sort elements. The Product Marketing team uses an agent to manage their campaigns and has requested that it has the ability to quickly add campaign members to a product-based campaign. High-investing customers have a high rate of rebuying, so Product Marketing has asked to have the agent identify the top 10 won opportunities whose main product matches the campaign’s Product Campaign Type, and add those opportunities’ contacts as campaign members.
Create a Flow and Get the Required Records
Create an Autolaunched flow (the No Trigger kind). Then add a variable to receive the campaign ID from the prompt template, and some Get Records elements to retrieve the data that the flow needs.
- Create an Autolaunched flow (No Trigger).
- Create a variable to receive the campaign’s ID.
- For API Name, enter
recordId.
- For Data Type, select Text.
- For Availability Outside the Flow, select Available for input.
The Available for Input setting must be enabled on any variable that should receive data from an agent.
- For API Name, enter
- On the flow canvas, add a Get Records element.
- For Label, enter
Get Campaign Details.
The API Name should auto-populate asGet_Campaign_Details.
- For Object, select Campaign.
- For Condition Requirements, select All Conditions Are Met (AND).
- For Field, select Campaign ID.
- For Operator, select Equals.
- For Value, select recordId.
- Leave the remaining fields as default.
- For Label, enter
- After the Get Campaign Details element, add another Get Records element.
- For Label, enter
Get Opps.
The API Name should auto-populate asGet_Opps.
- For Object, select Opportunity.
- For Condition Requirements, select All Conditions Are Met (AND).
- For Field, select Stage.
- For Operator, select Does Not Equal.
- For Value, select Closed Lost.
- For How Many Records to Store, select All records.
- Leave the remaining fields as default.
- For Label, enter
- Save the flow.
- For Flow Label, enter
Create Top 10 Campaign Members.
The Flow API Name should auto-populate asCreate_Top_10_Campaign_Members.
- For Flow Label, enter
Check the Product Campaign Type with a Decision
The flow must behave differently based on the campaign’s Product Campaign Type, so let’s create a Decision element with different paths for the most popular product categories.
- After the Get Opps element, add a Decision element.
- For Label, enter
What Product Campaign Type?
The API Name should auto-populate asWhat_Product_Campaign_Type.
- For Label, enter
- In the Outcome Details:
- For Label, enter
Generators.
- For Outcome API Name, enter
Generators.
- For Condition Requirements to Execute Outcome, select All Conditions Are Met (AND).
- For Resource, select Campaign from Get Campaign Details, then select Product Campaign Type.
- For Operator, select Equals.
- For Value, select Generators.
- For Label, enter
- Create a new outcome with the following details:
- For Label, enter
Bots.
- For Outcome API Name, enter
Bots.
- For Condition Requirements to Execute Outcome, select All Conditions Are Met (AND).
- For Resource, select Campaign from Get Campaign Details, then select Product Campaign Type.
- For Operator, select Equals.
- For Value, select Bots.
- For Label, enter
- In the Outcome Order, select Default Outcome.
- For Label, enter
Other.
- For Label, enter
- Save the flow.
Filter and Sort the Collection
Now that we have separate paths for each product, create a Collection Filter element that generates a collection that contains only opportunities where the main product is a generator. Generator opportunities have a value of GC in the Main Product Category field.
- On the Generators path, add a Collection Filter element.
- For Label, enter
Filter Generators.
The API Name should auto-populate asFilter_Generators.
- For Collection, select Opportunities from Get Opps.
- For Condition Requirements, select All Conditions Are Met (AND).
- In the first filter condition:
- For Field, select Main Product Category.
- For Operator, select Equals.
- For Value, select GC.
- For Field, select Main Product Category.
- For Label, enter
Then, add a Collection Sort element that pares down the new Generators opps collection to just the top 10 opps with the highest Amounts.
- On the Generators path, after the Collection Filter element, add a Collection Sort element.
- For Label, enter
Top 10 Generator Opps.
The API Name should auto-populate asTop_10_Generator_Opps.
- For Collection Variable, select Opportunities from Filter Generators.
Remember, Collection Filter elements create a new collection variable. So to build upon the filtering performed in the Filter Generators element, you select its collection variable.
- For Sort By, select Amount.
- For Sort Order, select Descending.
- For How Many Items to Keep After Sorting, select Set the maximum number of items.
- In the field that appears after that selection, enter
10.
- For Label, enter
- Save the flow.
Transform and Create Campaign Members
You now have exactly the data you want: a collection of the top 10 opportunities that aren't Closed Lost and that have a Main Product Category of GC, sorted by Amount. It’s time to take the contacts from those opportunities and transform them into campaign members. Lastly, use a Create Records element to create the campaign member records from the transformed campaign member collection.
- On the Generators path, after the Collection Sort element, add a Transform element.
- For Label, enter
Transform Generator Contacts to CMs.
The API Name should auto-populate asTransform_Generator_Contacts_to_CMs.
- In the Source Data box, click
 .
.
- For Resource, select the Opportunities from Filter_Generators record collection variable.
Remember, the Collection Sort element does not create a new collection, so you still reference the collection generated by the Collection Filter element.
- For Resource, select the Opportunities from Filter_Generators record collection variable.
- In the Target Data box, click
 .
.
- For Data Type, select Record.
- Select Allow multiple values (collection).
- For Object, select Campaign Member.
- Click Create.
- For Data Type, select Record.
- For Label, enter
- Map the Source Data’s ContactId to the Target Data’s ContactId.
- Assign a formula to the CampaignId. The formula should set the CampaignId to the ID of the initial campaign.
- In the Target Data column, click CampaignId.
- Click
 , then click Formula.
- In the “Search a field…” field, select the recordId variable.
The Formula field should now contain{!recordId}.
- Click Check Syntax to verify the formula.
- In the Target Data column, click CampaignId.
- Click
 to close the Transform panel.
- On the Generators path, after the Transform element, add a Create Records element.
- For Label, enter
Create Generator CMs.
The API Name should auto-populate asCreate_Generator_CMs.
- For How to set record field values, select From a Record Variable.
- For How Many Records to Create, select Multiple.
- For Record Collection, select Campaign Members from Transform Generator Contacts to CMs.
- For Label, enter
- Save the flow.
Way to flow! Finish this flow in the hands-on challenge by creating the elements in the Bots path.
Before you leave, remember the most important rule of Transforms: use a Transform instead of a Loop whenever possible. Watch for future badges about loops and additional Transform features, right here on Trailhead.