Configure LLM Data Masking Policies
Learning Objectives
After completing this unit, you’ll be able to:
- Sign up for a Custom Playground with Data 360 and Einstein AI.
- Configure LLM Data Masking in Trust Layer.
- Verify masked data in the Prompt Builder.
Sign Up for a Custom Playground with Data 360 and Einstein AI
To complete this project, you need a custom playground that contains Data 360, Einstein AI, and our sample data.
- Click Create Playground.
- Your new org is automatically attached to your Trailhead account!
- Make note of your org's expiration date and complete this badge before then.

Set Up Einstein Trust Layer
Enable Einstein Generative AI
Before you can configure Einstein Trust Layer data masking policies, you must turn on Einstein Generative AI. Data 360 is required for Einstein Trust Layer to function correctly and to see and verify Einstein Trust Layer settings. For this module, we set up Data 360 for you in advance as part of the custom Data 360 and Salesforce playground. You just turn on Einstein Generative AI and configure the Einstein Trust Layer. Follow all the steps in this unit and click verify to earn 500 points to complete the challenge at the end of this unit.
- If you haven’t already, launch your Data 360 and Salesforce playground.
- Click the gear icon (
 ) and click Setup. The Setup page opens in a new tab.
- In the Setup Quick Find search box, search for and select Einstein Setup.
- Ensure the Turn on Einstein toggle is set to On.
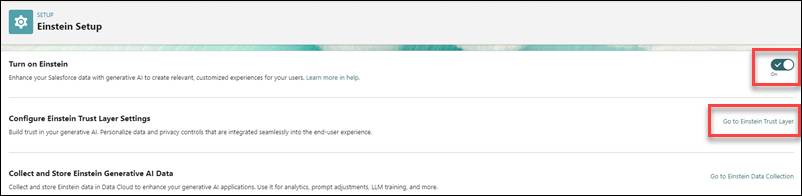
- Click Go to Einstein Trust Layer. Refresh the screen if you don’t see the Einstein Trust Layer settings.
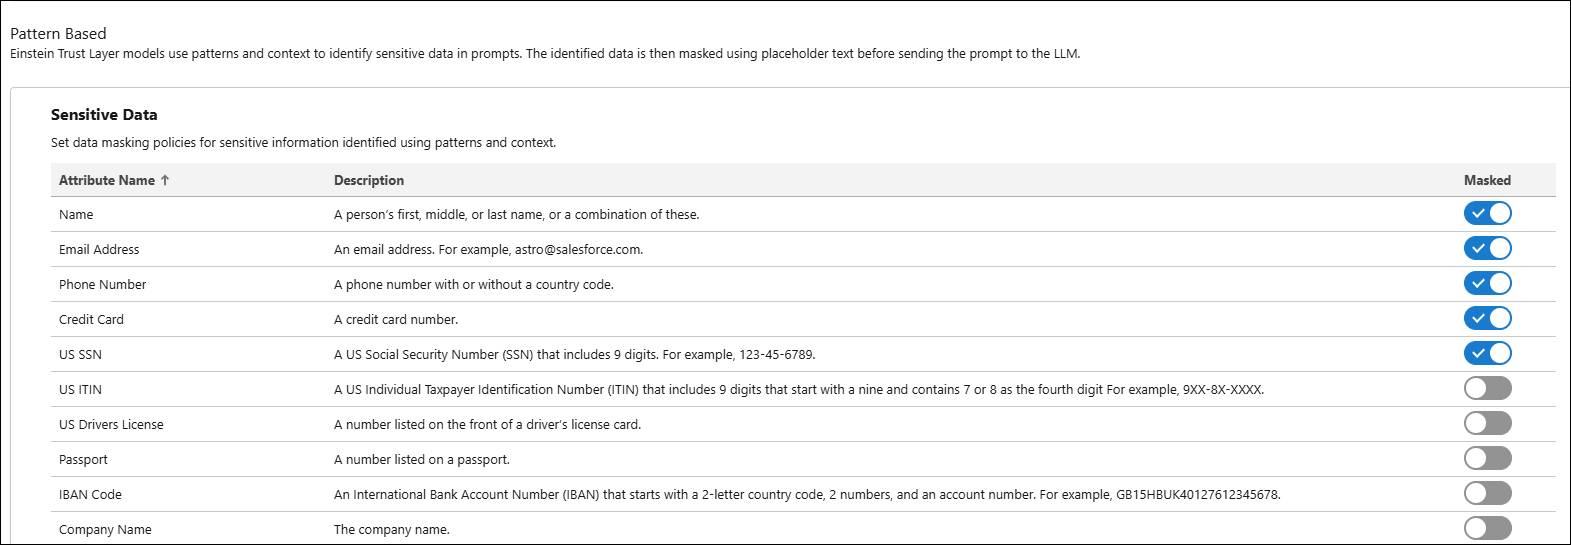
- If the Large Language Model Data Masking isn’t already turned on, use the toggle to turn it on.
Let’s take a moment to see what data types are listed. You'll see a list of sensitive data types such as name, email address, and credit card number. In the previous unit, you learned about pattern-based masking. Now you can see the type of data that Einstein Trust Layer is able to detect using patterns and context. Notice that Name, Email Address, Phone Number, Credit Card, and United States’ Social Security Numbers (US SSN) are masked by default.
Turn on Sales Emails
Enable Sales Emails
Before we create an Email Prompt Template, we need to turn on Sales Email.
- In the Quick Find search box, type
Einstein for Sales. - Click Einstein for Sales. This opens the Einstein for Sales page.
- Toggle the Turn on Sales Emails switch to Enabled. Note: The deployment can take up to 10 minutes but no need to wait, proceed to the next step.
Next, let’s see data masking in action in the Prompt Builder. As you learned in the Prompt Builder Basics badge, the key to scalable generative AI is to use prompt templates to tell a large language model (LLM) how it should generate content.
Create an Email Prompt Template
- With Einstein Generative AI menu expanded, click Prompt Builder. Refresh the screen if you don’t see the Prompt Builder menu.
- Click New Prompt Template.
- Select Sales Email for the Prompt Template Type. If you don’t see Sales Email in the list, refresh the screen.
- Enter a Prompt Template Name. Let’s call it
Verification Email(API Name 'Verification_Email').
- Enter a Template Description. This description is displayed in the list of prompt templates and can be useful to distinguish prompt templates as you add more. Let’s call it
Verify contact information.
- The Recipient field defaults to Contact and the Related Object field is blank. Accept the defaults, and click Next. You’re redirected to the Prompt Template Workspace.
Verify Data Masking
Excellent! For this scenario, we’ve provided a prompt for you to use and see how data is masked in prompts. Notice that the prompt text includes several pieces of personally identifiable information (PII) and payment card industry (PCI) information. Usually, when you create a prompt template, you use merge fields from the contact records, but for now, include this information directly in the prompt.
- Copy and paste the text below into the Prompt Template Workspace:
Your name is Becca and you’re a Sales associate at Coral Cloud Resorts writing an email to a new contact to verify their information on record.
Instructions:
"""
Introduce yourself welcome the new contact Andy Young. Let them know that you’re sending this email to verify their information. List the following information as a bullet list.
Full Name: Andy Young
Company Name: Dickenson PLC
Business Phone Number: (785) 241-6200
Mobile Phone Number: (785) 265-5350
Email: a_young@dickenson.com
SSN: 243930486
Credit Card on file: 378282246310005
Use clear and straightforward language, using active voice, and avoiding the use of filler words. End with asking them to call Coral Cloud Resorts to verify their information on the file
"""
Now create the email.
- In Preview Settings (
 , under Inputs, type
 Andyand select Andy Young.
- Click Save & Preview. Your Resolved Prompt and Generated Response tabs should look something like this (note that LLM responses can differ slightly so it may not look exactly the same):
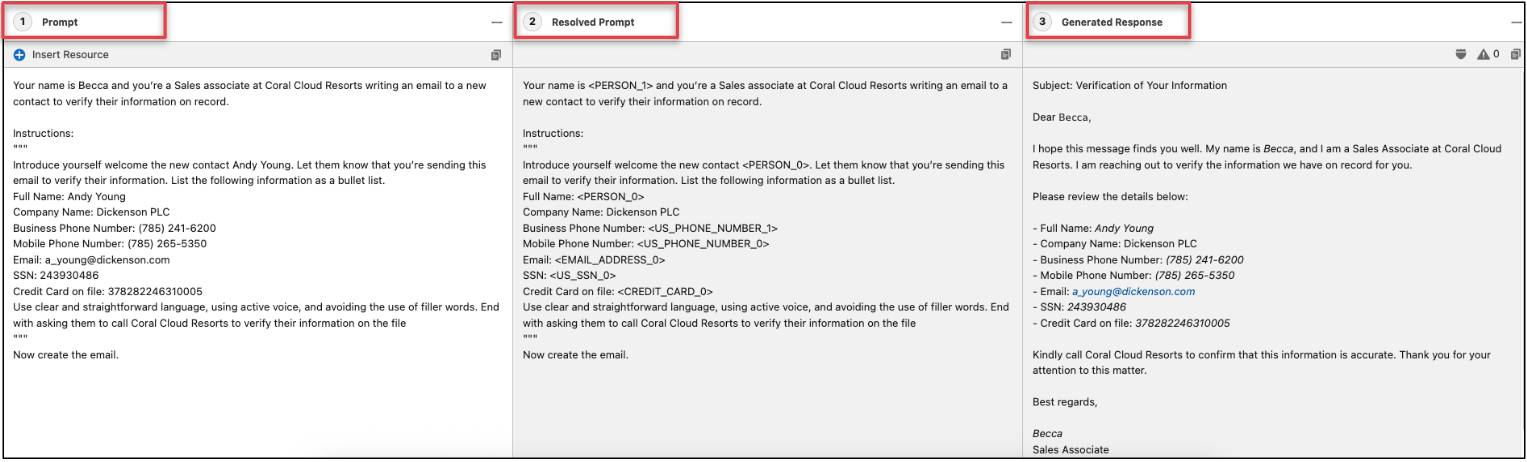
Notice that the Resolved Prompt tab shows the prompt text with the placeholder information. This is the prompt text that is sent to the LLM. This gives you a preview of the data that’s masked before sending it to the LLM. The Generated Response tab shows the generated email with the actual information after the data has been demasked. You’ll also see a shield icon ( ) in the Generated Response tab, which includes a link to see the data masking details.
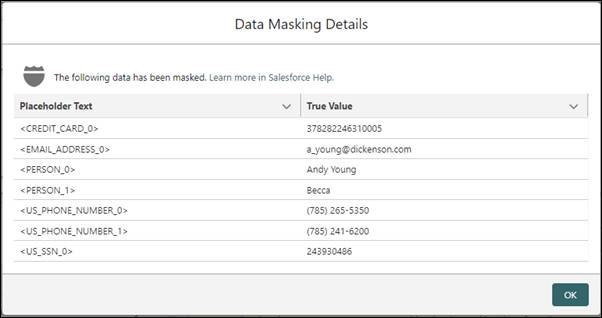
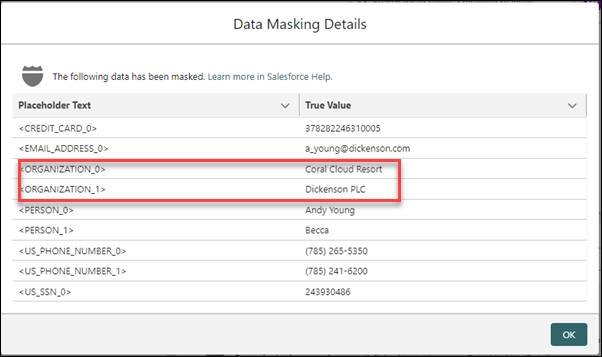
- In the Generated Response tab, click the shield icon to view your data masking details. This opens a new window where you can see the placeholder text used to mask and the corresponding actual value. You should see that the credit card number, email address, names of people, both phone numbers, and SSN are masked. However, also notice that the company’s name isn’t currently masked.
- Click OK to close the data masking details window.
Update LLM Data Masking Settings
In this case, you also want the company name to be masked, so let’s get back to the configuration and update the settings.
- Click the gear icon (
 ) and click Setup. The Setup page opens in a new tab.
- In the Quick Find search box, type
Einstein.
- Expand the Einstein Generative AI menu in the left pane.
- Click Einstein Setup. This opens the Einstein Setup page.
- Click Go to Einstein Trust Layer.
- Turn on masking for Company Name under Sensitive Data.
Verify Data Masking for Company Name
- Navigate to the Prompt Builder tab that shows the Verification Email tab. If you closed the Verification Email prompt template, you can open it by navigating to the Prompt Builder menu in the left pane. Click the Verification Email prompt template you created in the previous section to open the prompt template.
- In Preview Settings, under Inputs, type
Andyand select Andy Young.
- Click Preview.
Note: It can take a couple of minutes for the LLM Data Masking updates to take effect.
- Click the data masking shield (
 ) in the Generated Response tab. Notice that company names are now masked.
- Click OK to close the window.
After you implement LLM Data Masking in your Salesforce org, be sure to test it on a regular basis. You also want to assess if masking certain types of data for specific use cases affect the quality of the response from the LLM. Large language models change and improve over time, so doing periodic assessments of the results you’re getting is one of best practices in the world of generative AI.
Verify Invalid Credit Card Number Is Not Masked
Some types of sensitive data have specific formats and validation rules, such as credit card numbers, SSNs, and even phone numbers. LLM data masking knows about those rules, and checks to see if items are valid. If an item isn’t a valid value, it won’t be masked. Try updating the credit card number in your prompt text and see what happens:
- Using the same Verification Email prompt template you created before, In the prompt text, change the credit card number as follows:
Credit Card on file: 378282246310005
to
Credit Card on file:333312312312312 - Click Save & Preview.
- Click the data masking shield (
 ) in the Generated Response tab. Notice that the modified credit card number is no longer masked.
- Click OK to close the window.
In this unit, you learned how to configure data masking in the Einstein Trust Layer setup and see how data masking works using Prompt Builder. You also learned about the format and rules Einstein Trust Layer uses to identify sensitive data. If you haven’t already done so, follow the steps at the beginning of this unit to sign up for a custom playground with Data 360 and Einstein AI to complete the hands-on challenge.