Create Flow Tests
Learning Objectives
After completing this unit, you’ll be able to:
- Create automated tests in a record-triggered flow.
- Create assertions in a flow test.
- Run a flow test.
Ready to Get Hands-on with flow tests?
To follow along and practice the steps in this module, you need to install a package in a new Trailhead Playground. Follow the instructions here to launch a playground and install the package. You also use this package and playground when it’s time to complete the hands-on challenge.
Launch your Trailhead Playground by scrolling to the bottom of this page and clicking Launch.
If you see a tab in your org labeled Install a Package, great! Follow these steps.
- Click the Install a Package tab.
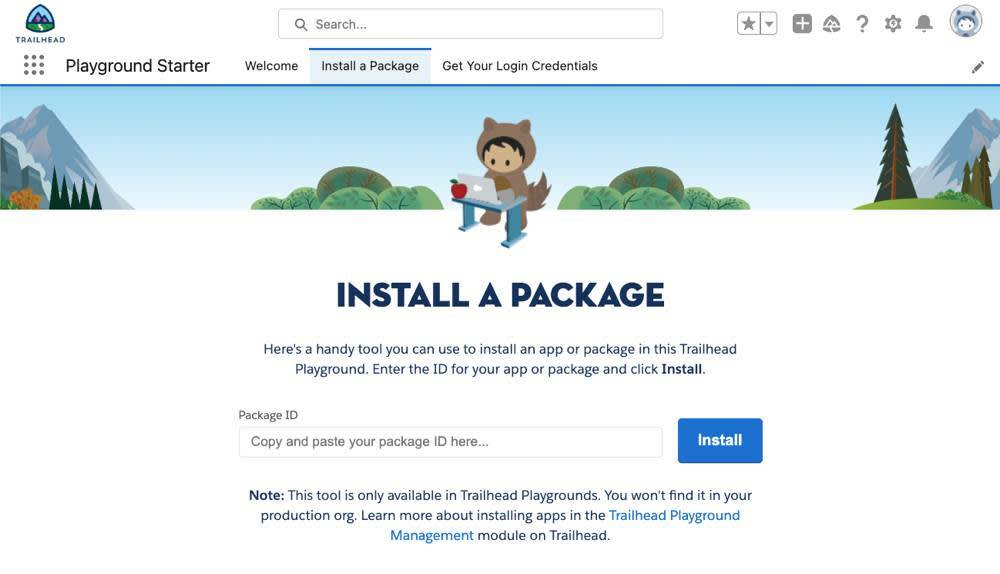
- Paste
04tKa000002OV31IAGinto the Package ID field.
- Click Install.
- Select Install for Admins Only, then click Install.
When the app is finished installing, you see a confirmation page and get an email to the address associated with your playground.
Now let's run a flow to create the records for this badge’s exercises and challenges.
- In Setup’s Quick Find box, enter
flowsand select Flows.
- Select Run This Flow Once At the Start. Flow Builder opens in a new window.
- Click Run. The flow runs in a new window.
- When the flow says “The flow interview is now waiting…”, close the flow windows.
Flowtastic! Now let’s start working with tests.
Create a Flow Test
When creating tests, avoid referring to what you’ve created in your flow. Instead, refer to the flow plan you created; specifically, when the flow runs and what the flow does. Here’s what we planned in a previous unit.
|
What to Ask
|
How to Answer
|
|---|---|
|
When will the flow run?
|
Run when a case is created or updated. |
|
What will the flow do?
|
For all users, the flow should do the following:
|
Let’s use this information to build tests for the Check Escalated in Cases flow that’s included in the package you just installed. Before we get started, here’s what you should know about this scenario.
- The flow comes with the first feature’s elements already built: a Decision element and an Update Records element. Don’t modify these elements before you begin this exercise.
- This scenario assumes that an on-the-ball admin already used Data Loader to set Escalated to True on all existing cases where the Status is currently Escalated. Keeping your data up to date like this simplifies your automation, and it’s good data hygiene.
Add a Test and Define the Initial Triggering Record
First, create a test for the first feature:
If the Status is Escalated and the Escalated field isn’t checked, the flow sets the Escalated field to True.
This action should happen both when a case is created and when a case is updated, but each test can evaluate only created or updated, not both. Let’s create a test that simulates creating a record.
- Open the Check Escalated in Cases flow.
- Click View Tests.
- Click Create.
- For Label, enter
Created: Status is Escalated, Escalated is False.
- For Run the Test When a Record Is, make sure Created is selected.
- Select the Set Initial Triggering Record tab.
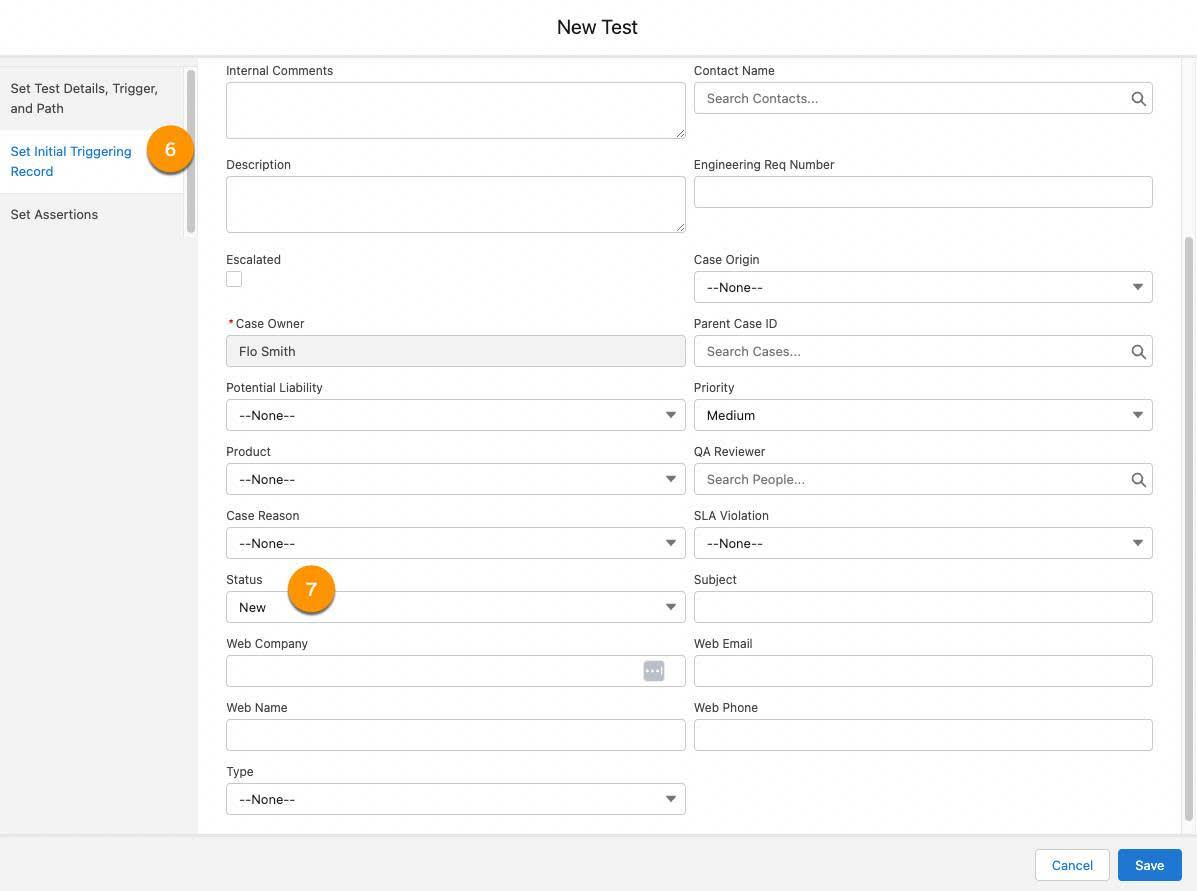
Remember, this is the record that the test uses to check the assertions, and it's not saved to your org.
- For Status, select Escalated.
In this feature, only the Status and Escalated fields are relevant to the test. The Escalated field is already False by default, so you only need to set the Status field.
Define the Assertions
Next, you define the test’s assertions: Criteria that should be true after the flow runs on the initial triggering record.
- Select the Set Assertions tab.
- Define Assertion 1 to confirm that the flow took the Status Escalated - IsEscalated False path:
- For Resource, select Criteria, then select Status Escalated - IsEscalated False.
- Make sure the Operator is Equals.
- For Value, select True.
In an assertion, you check whether the flow took a specific decision outcome path by checking if that decision outcome equals true.
- Click Add Custom Failure Message.
- For Custom Failure Message, enter
Flow did not take the Status Escalated - IsEscalated False path.
If an assertion fails, the debug details display the assertion’s custom failure message. Custom failure messages make it easier to troubleshoot a failed test later.
- Click + Add Assertion.
- Define Assertion 2 to confirm that the IsEscalated field was set to true:
- Resources: Triggering Case > Escalated
- Operator: Equals
- Value: True
- Custom Failure Message:
Escalated was not set to true.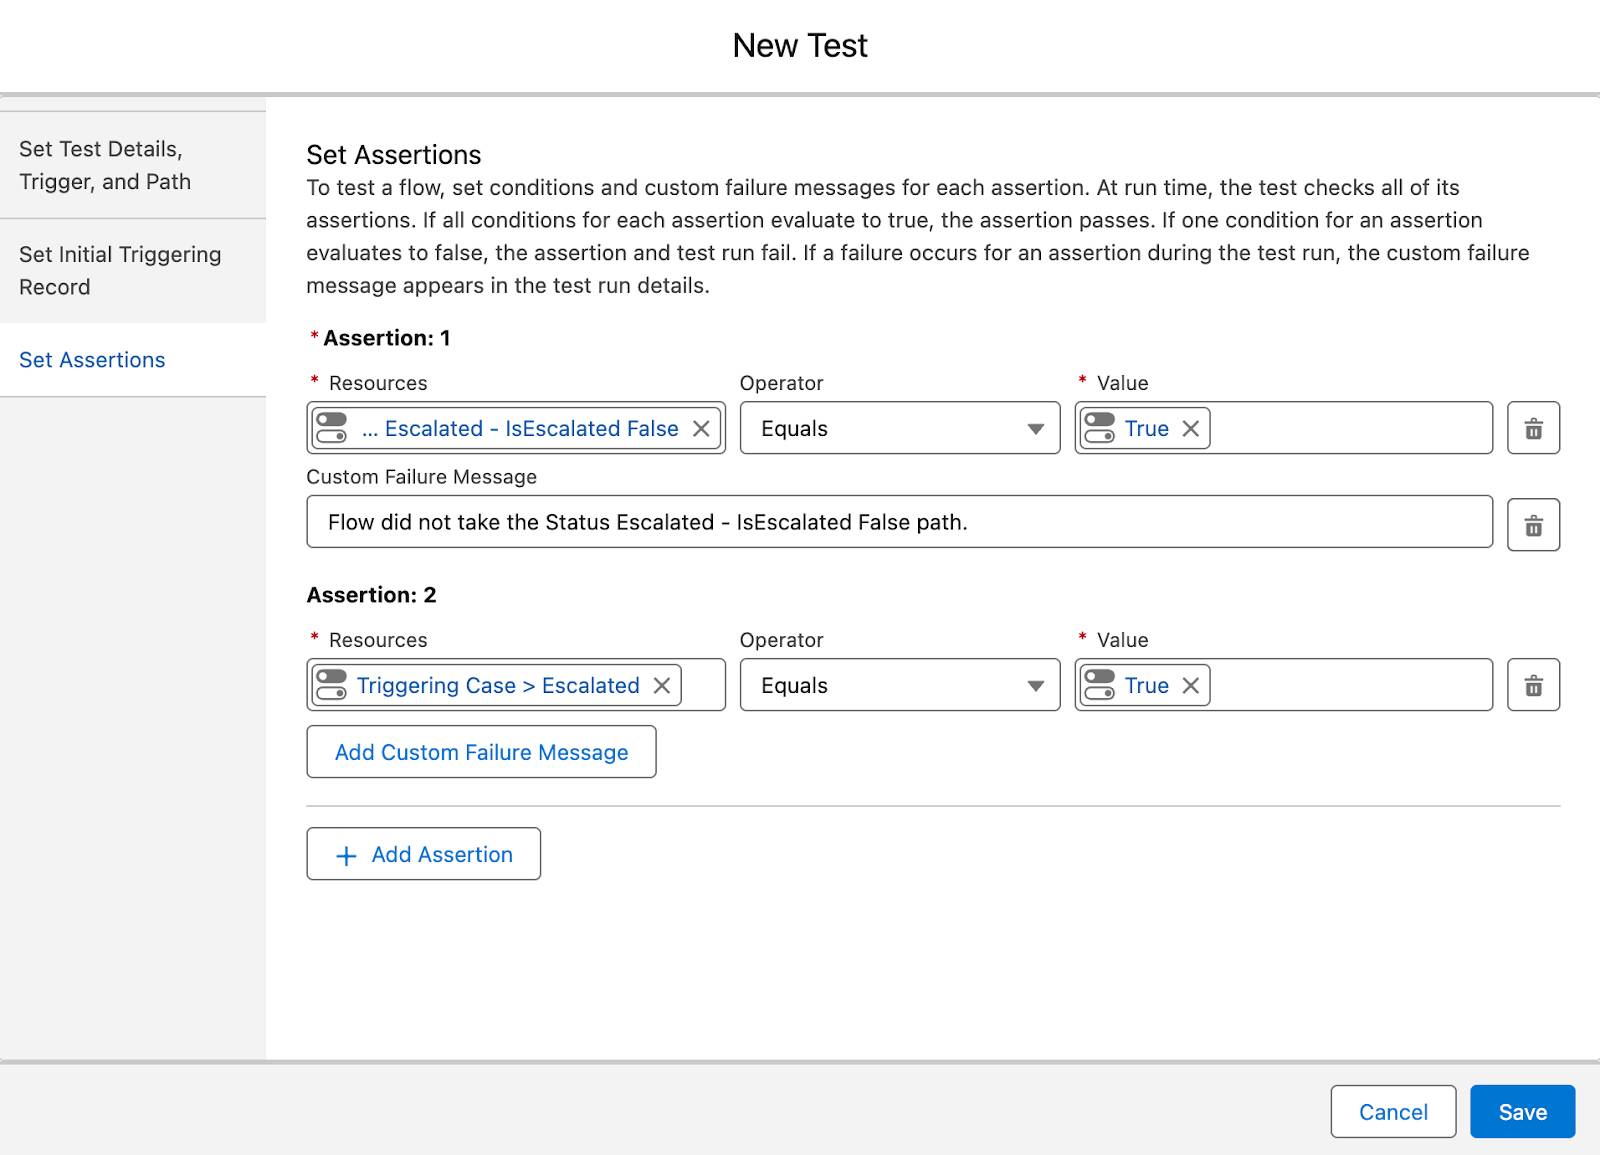
- Click Save.
Add a Test for Updates and Define the Initial Triggering Record
Now let’s create a test for the same feature, but this time simulating a record update.
- Click View Tests.
- Click Create.
- For Label, enter
Updated: Status is Escalated, Escalated is False.
- For Run the Test When a Record Is, select Updated.
- Select the Set Initial Triggering Record tab.
- For Status, select Working.
Define the Updated Triggering Record and the Assertions
Remember, the Set Updated Triggering Record tab includes the changes that triggered the flow, before the flow runs. These changes aren’t saved to the org’s database.
- Select the Set Updated Triggering Record tab.
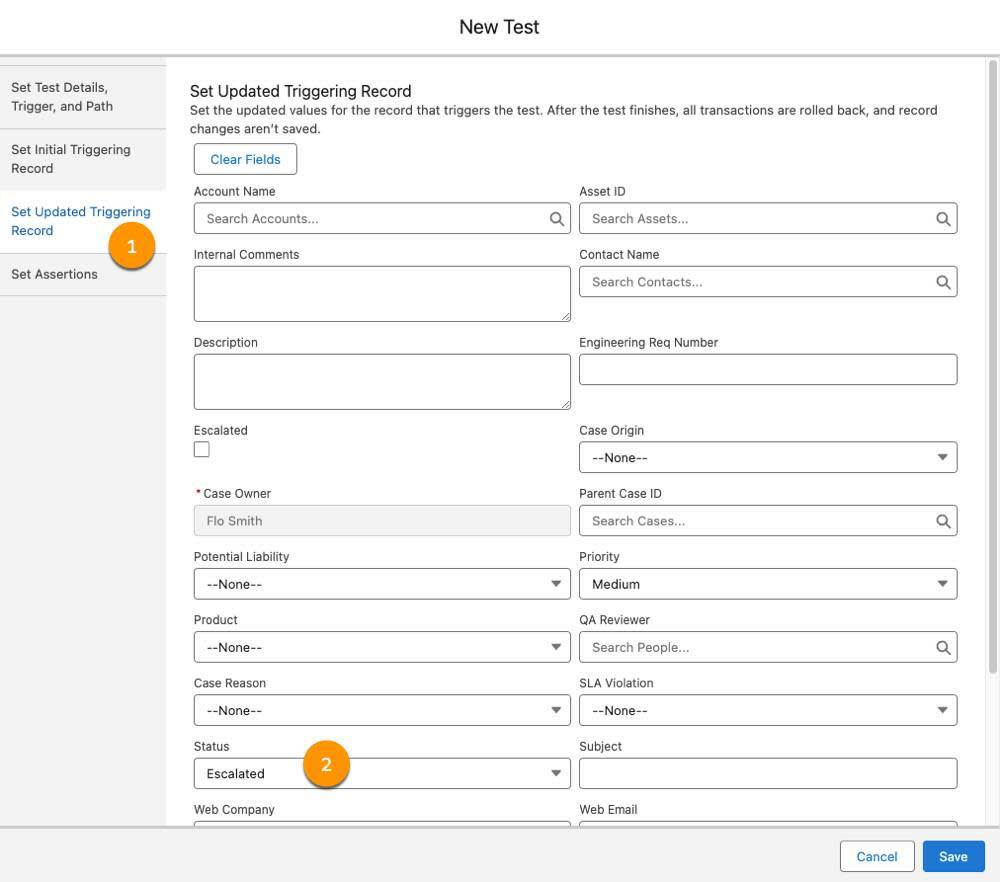
- For Status, select Escalated.
- Select the Set Assertions tab.
- Define Assertion 1 to confirm that the triggering record took the path for the Status Escalated - IsEscalated False decision outcome:
- Resources: Criteria > Status Escalated - IsEscalated False
- Operator: Equals
- Value: True
- Custom Failure Message:
Flow did not take the Status Escalated - IsEscalated False path.
- Click + Add Assertion.
- Define Assertion 2 to confirm that Escalated was set to true:
- Resources: Triggering Case > Escalated
- Operator: Equals
- Value: True
- Custom Failure Message:
Escalated was not set to true.
- Click Save.
Run the Flow’s Tests
You created the tests, so now you follow the next step in test-driven development: Run the tests you’ve just created, even if you don’t think they’ll pass.
- Click View Tests.
- Select both tests by clicking the Select All checkbox at the top of the Test Label column.
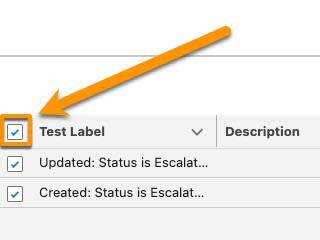
- Click Run.
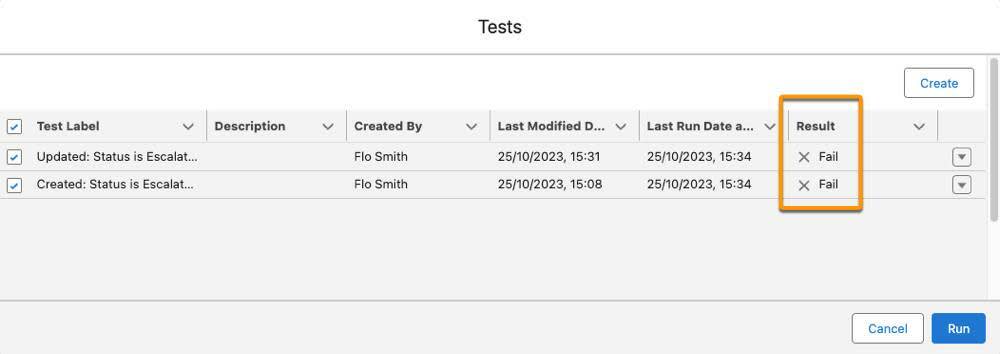
Flow Builder runs both tests and shows the results in the Result column: both tests have failed. Let’s look at one of those tests to see why it failed.
- On the line for the Updated: Status is Escalated, Escalated is False test, click
 and select Run Test and View Details.
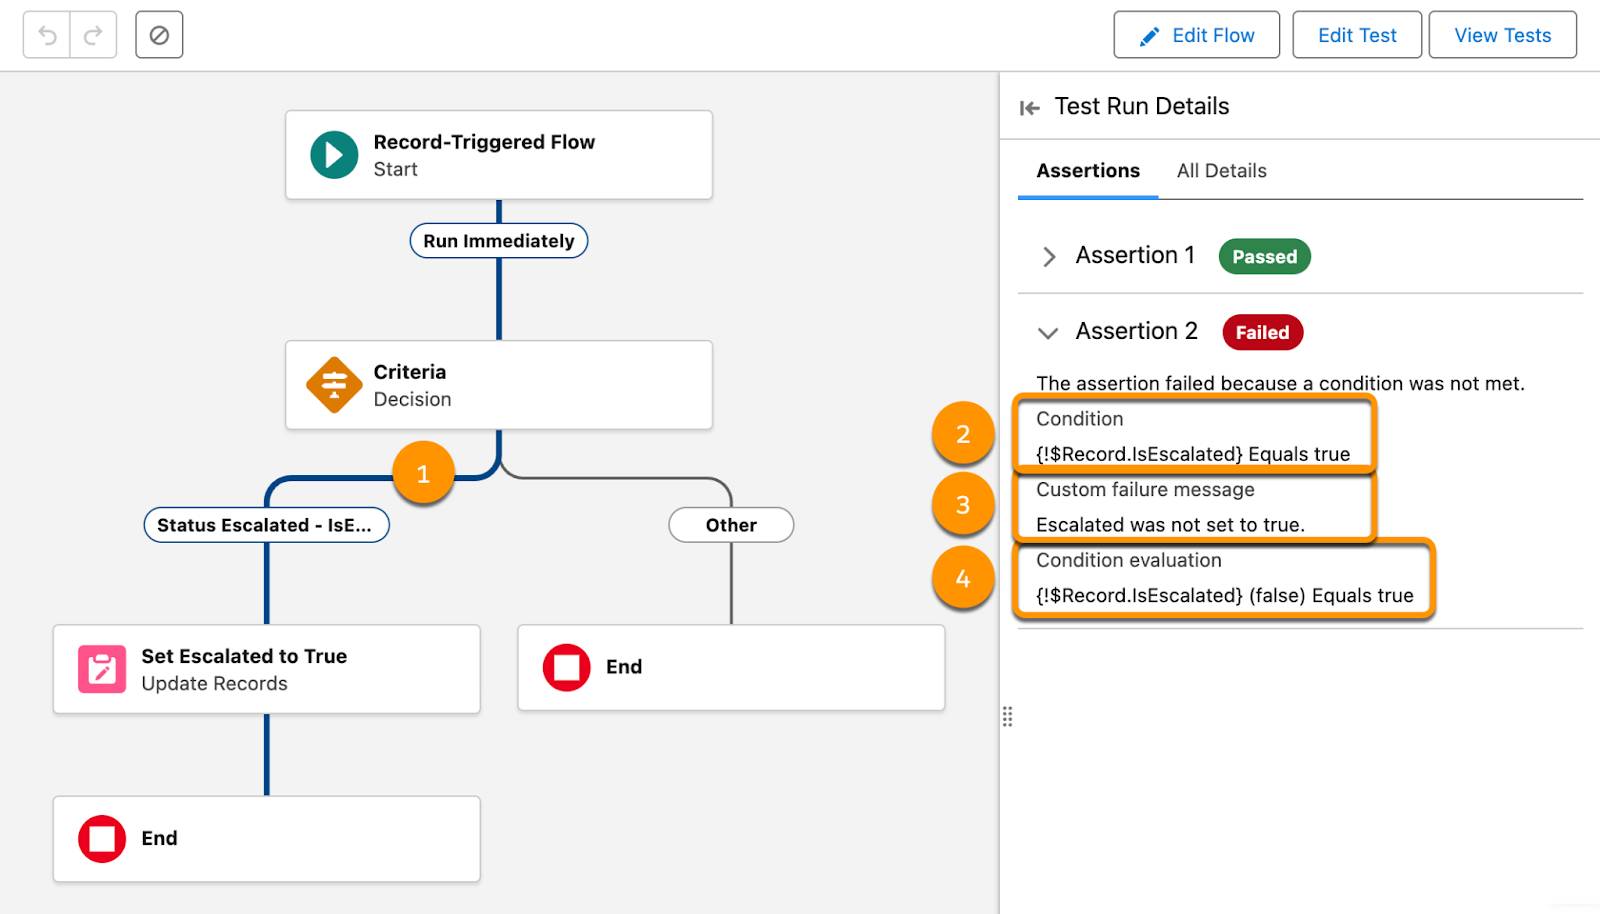
Flow Builder shows the test run and its details, highlighting the path the test run took (1) and indicating which assertions failed. In the Test Run Details, each failed assertion tells you what conditions it was looking for (2), the custom error message you defined for that assertion (3), and the values those conditions were checked against (in parentheses) (4).
The failed assertion in this test looks for the Triggering Case’s Escalated field to be set to True. Let’s take a closer look at the Set Escalated to True element that sets the Escalated field to True.
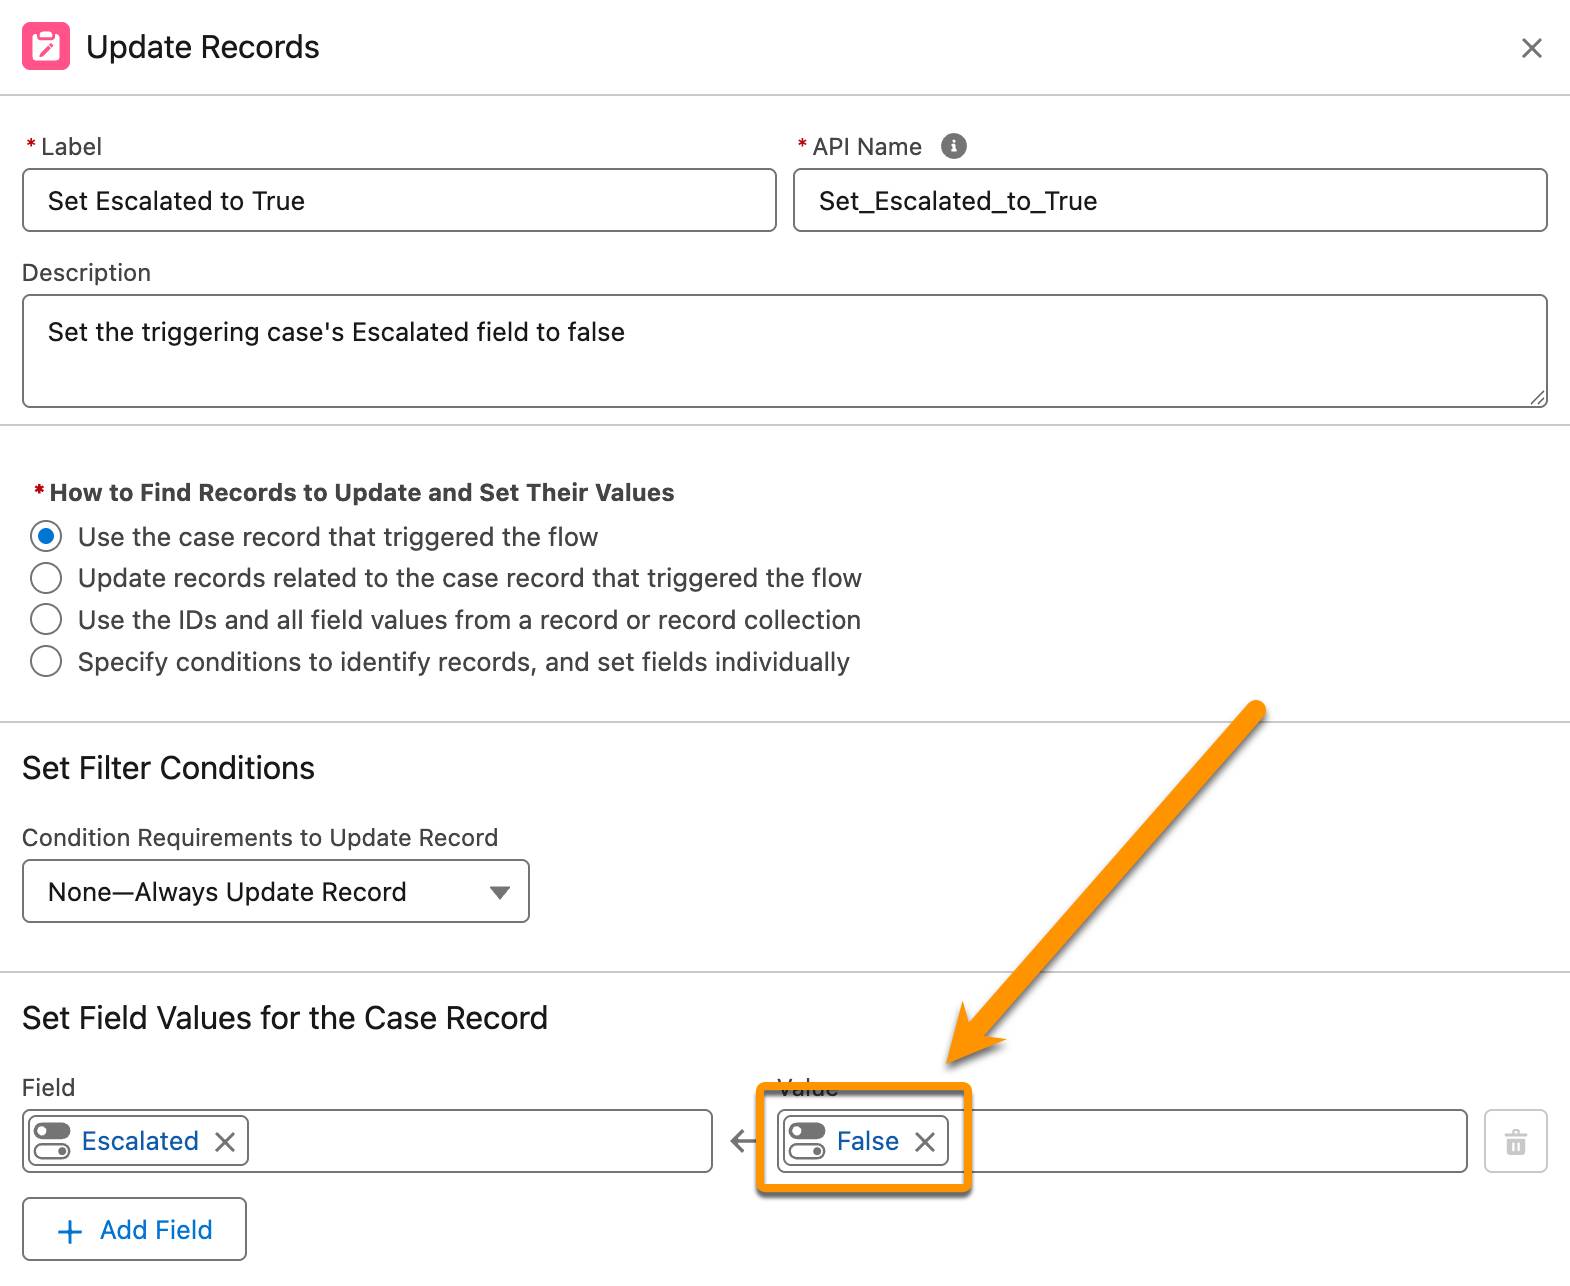
Whoops! Looks like whoever created this flow got confused and configured this element to set IsEscalated to False instead of True. Without a test, you might not have caught this error before it was deployed to production. You're reaping the benefits of flow Tests already! What an indisflowsable tool!
Update the Flow to Pass the Tests
Fortunately, test-driven development expects that this could happen. Let’s proceed with the next step: update the functionality to pass the tests.
- Click Edit Flow.
- Edit the Set Escalated to True element.
- Change Value to True.
- Save the flow.
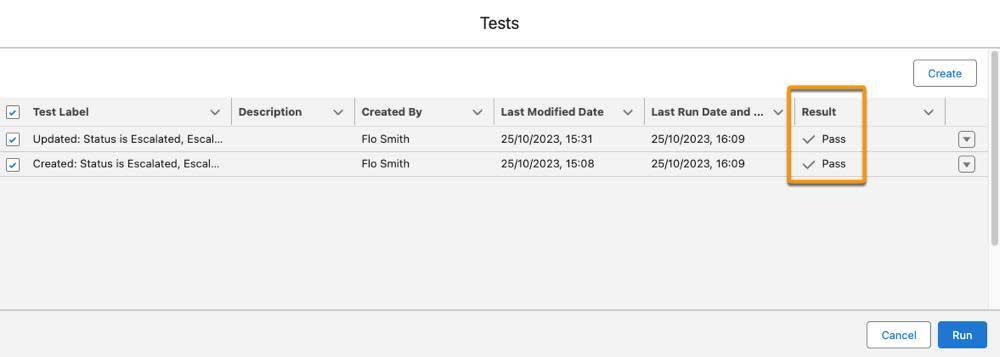
- Run all of the flow’s tests again.
This time, all your tests should pass!
Clean Up Your Flow
The last step in test-driven development is to tidy up what you just created. Thankfully, the flow is already very simple and the elements already have descriptions. But if we look carefully at the description on the Update Records element we just fixed, what does it say?
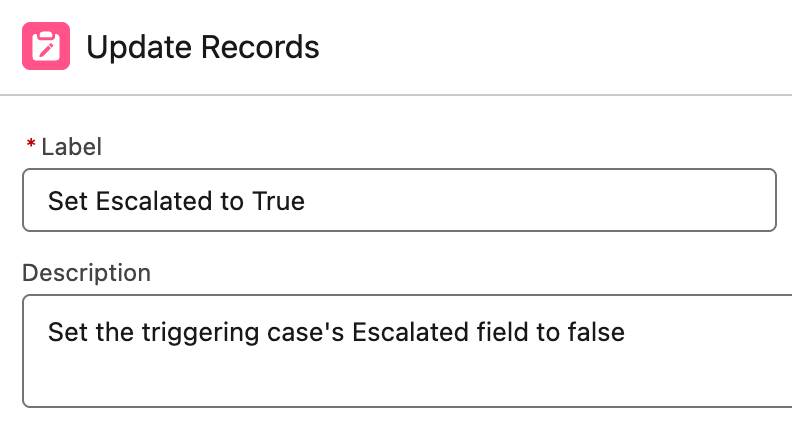
Well that’s clearly wrong! We just changed this element to set the Escalated field to true. Update this description before we move on to the next step.
Add a New Feature
Now that you finished the last step of the test-driven development cycle, you go back and start over with a new feature. The plan contains one more feature: When a case is closed and Escalated is checked, send a notification email to the owner of the case’s account. Let’s build this feature.
Add a Decision Outcome
- In the Criteria element, next to Outcome Order, click
 to create a new outcome.
- For Label, enter
Closed - IsEscalated True.
- Define the first condition requirement for the Closed - IsEscalated True outcome.
- For Resource, select Triggering Case > Status.
- Keep Equals as the Operator.
- For Value, select Closed.
- Click + Add Condition.
- Define the second condition requirement for the Closed - IsEscalated True outcome.
- For Resource, select Triggering Case > Escalated.
- Keep Equals as the Operator.
- For Value, select True.
- For When to Execute Outcome, select Only if the record that triggered the flow to run is updated to meet the condition requirements.
Create the Email Feature
- On the Closed - IsEscalated True path, click
 .
.
- Select Action.
- For Action, enter
emailand select Send Email.
- For Label, enter
Email Account Owner.
- For Recipient Addresses, select Triggering Case > Account ID > Owner ID > Email.
- For Subject, enter
Your Customer's Escalated Ticket Has Been Closed.
- Next to the Body field, click
 and select Search Resources.
- For Body, select emailBody (in the Text Templates).
- Save the flow.
Add a Test for the Email Feature
Now add one more test for this final feature of the flow. This company doesn’t allow users to create cases as Closed, so we’ll just make a test for when the record is updated. And to make things even simpler, let’s define the Initial Triggering Record from an existing case.
- Click View Tests.
- Click Create.
- Set the Test Details, Trigger, and Path:
- Label:
Case is Closed and Escalated - Run the Test When a Record Is: Updated
- Set the Initial Triggering Record:
- Select the Set Initial Triggering Record tab.
- In the Case for Test Data Only field, enter
motor breaksand select Motor breaks down when turning on.
- Make sure that the Escalated checkbox is checked. If it’s not, click the Escalated label to check the box.

Don’t worry, you’re only selecting a record to use its values, so the actual record won’t be updated by this test. Plus, if the record is deleted in the future, the test still works.
- Set the Updated Triggering Record:
- Select the Set Updated Triggering Record tab.
- Status: Closed
Define the Assertions
- Select the Set Assertions tab.
- Define Assertion 1 to confirm that the flow takes the Closed - IsEscalated True path:
- Resources: Criteria > Closed - IsEscalated True
- Operator: Equals
- Value: True
- Custom Failure Message:
Flow did not take the Closed - IsEscalated True path.
- Click + Add Assertion.
- Define Assertion 2 to confirm that the flow runs the email action:
- Resources: Email Account Owner (action)
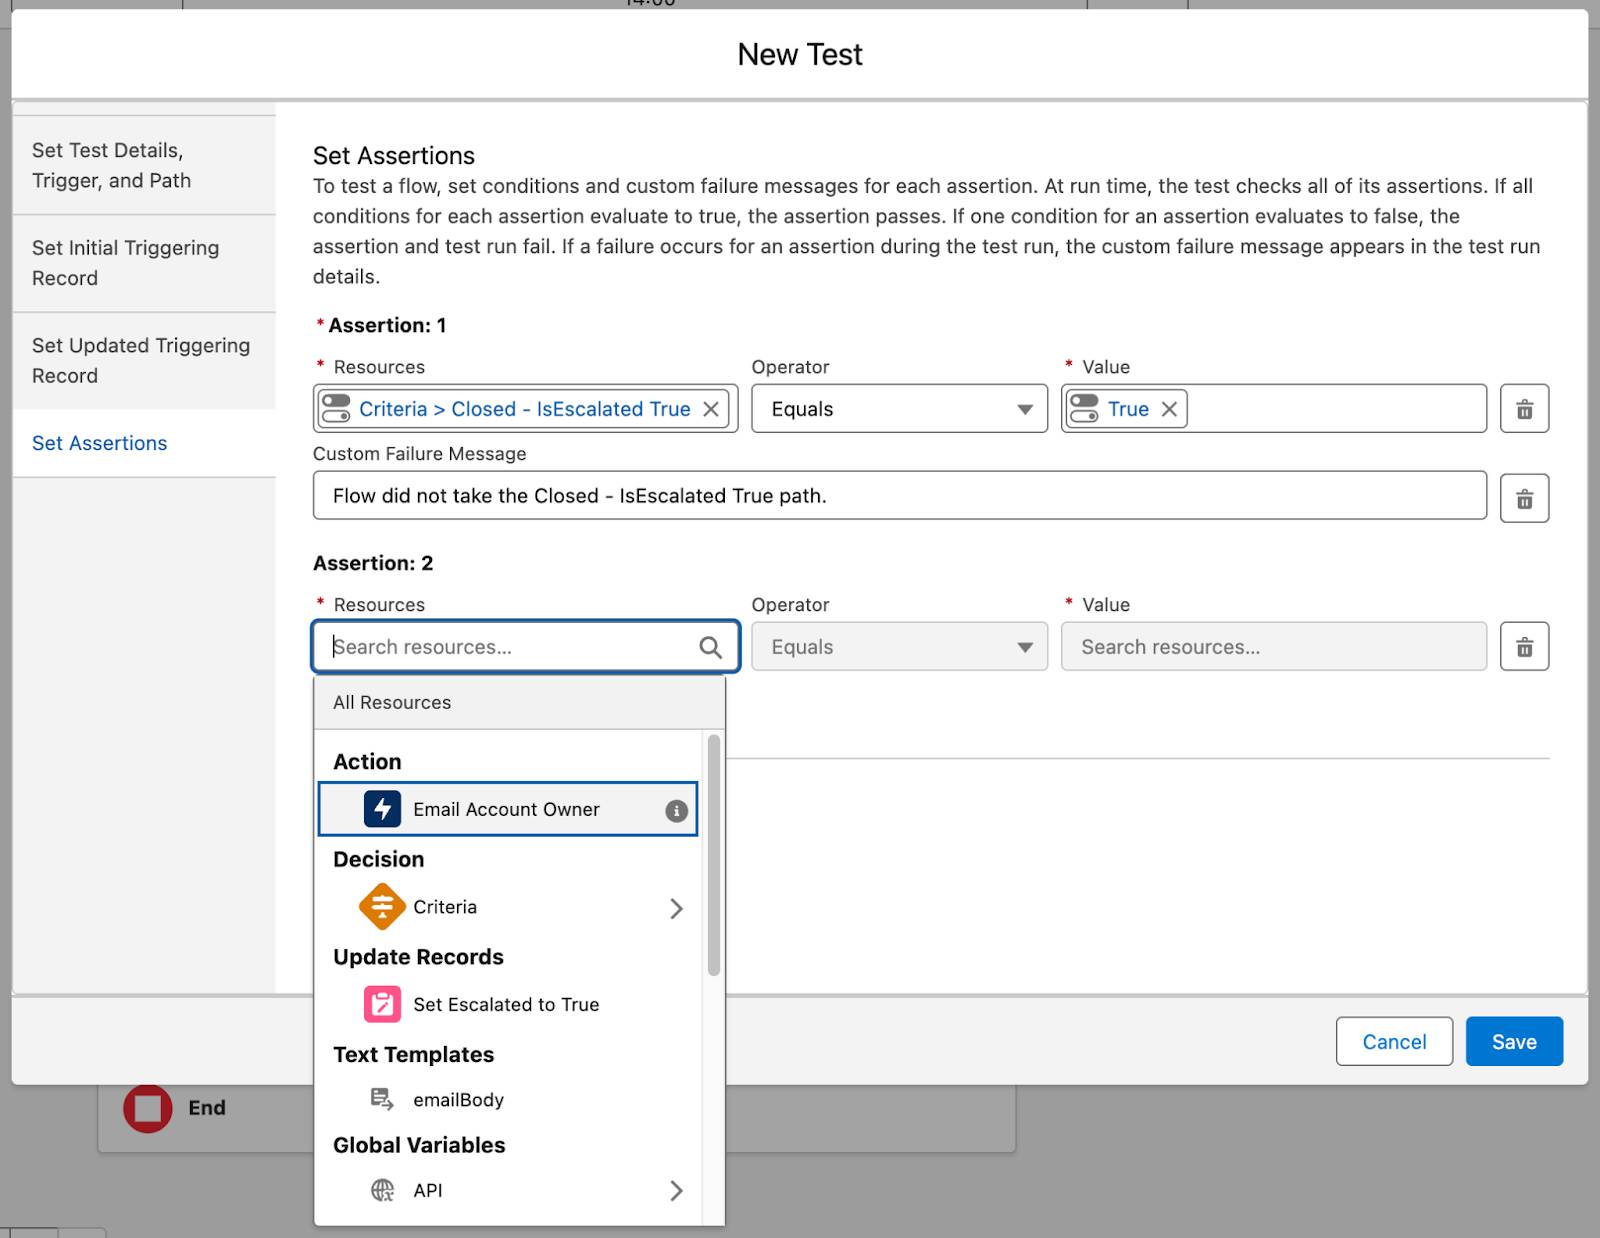
- Operator: Was Visited
- Value: True
- Custom Failure Message:
Flow did not run the email action.
- Click Save.
Now run all the tests once more.
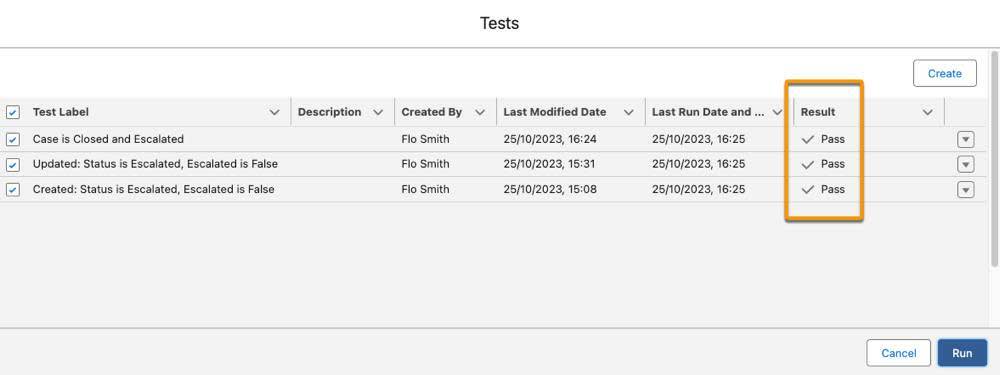
Boom! All three tests passed.
You just practiced test-driven development: You created one feature at a time, defined the feature’s outcomes in tests, verified that the tests passed, and tidied up the flow. Now’s a great time to update the Decision element’s description and add a description to the new Action element.
Resources
