Define Multiple Paths in a Flow
Learning Objectives
After completing this unit, you’ll be able to:
- Interpret business requirements and visualize them in a process flowchart.
- Build a flow to implement the business requirements process.
- Use branching logic to select one of multiple paths in a flow.

Before You Start
This badge assumes that you know how to create a flow with variables, inputs, and data elements, such as Get Records. If you aren’t familiar with these concepts or need a refresher, see the Flow Builder Basics badge and the Data and Actions in Flows badge.
When your flow runs, it travels like a train, moving down the path toward the end and making things happen at each stop. But trains don’t always travel down a single path. Train tracks split, converge, and loop to get where they need to go. Flow Builder allows you to build automation that does the same thing, with paths that branch and merge as you see fit.

The Power of If
Some automation use cases require you to automate in different ways for different situations. Let’s take a look at an example.
Flo Smith is a senior Salesforce admin and business analyst for Pyroclastic, Inc. In this module, you’re a Salesforce admin on Flo’s team, helping her automate some of Pyroclastic’s business processes.
Flo’s task for you today is to build automation that automatically sets the right priority when support cases are created. The priority value depends on the type of issue and the influence of the requester. Flo starts by reviewing the business requirements.
- If Type = Downtime: priority = Severity 0.
- If Type = Usability and the contact who submitted it is a VIP: priority = Severity 1.
- If Type = Usability and the contact who submitted it is not a VIP: priority = Severity 2.
- Otherwise (else), priority = Severity 3.
Notice that all of the lines except the last one start with if. The last line acts as a default for cases that meet none of the preceding three requirements.
Next, you and Flo create a flowchart diagram to visualize the automation that will set case priority. You can do this in whatever way works for you: anything from sketching on paper to using a design tool or flowchart program. Your goal is to transform the requirements from text into a visual model of your intended automation.
Let’s examine the flowchart diagram. It has four business requirements.
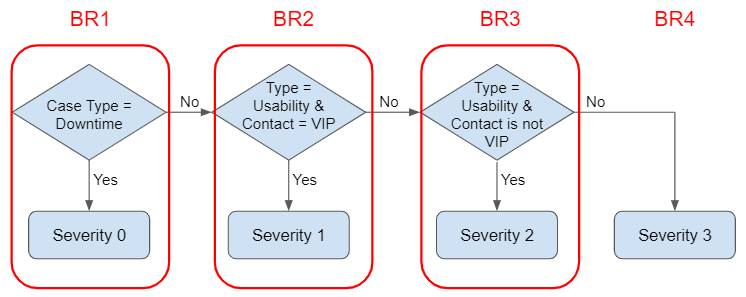
Each business requirement includes a Severity box for the path to select when the requirement is met, the Yes path. In Flow Builder, those are called outcomes, and each outcome has its own path on the canvas.
Each outcome (except the last one) has conditions that must be met. In Flow Builder, those are called condition requirements.
The last outcome is the default. It has no conditions. The flow chooses the default outcome when none of the other outcomes’ conditions are met.
To create this sort of branching logic in a flow, you use a Decision element.
The Decision Element
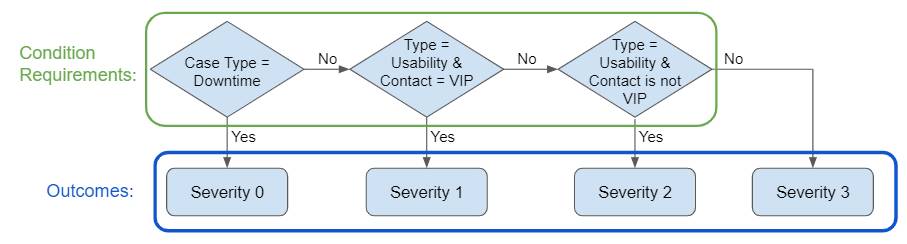
The Decision element lets you create multiple paths. Building a Decision element based on a flowchart diagram has two steps.
- Create one outcome for each Yes path in the diagram. (The final No path is handled by the default outcome.) Outcomes are listed in order under Outcome Order.
- Add condition requirements to each outcome except the default outcome. The condition requirements for each outcome come from its corresponding diamond in the flowchart.
The Decision element’s paths represent the outcomes.
When the flow reaches a decision element, it evaluates the first Outcome. If its conditions are met, the flow chooses that outcome and follows its path. If not, the flow continues through the Outcome Order until it finds an outcome for which the condition requirements are met. If none of the outcomes’ condition requirements are met, the flow follows the default outcome’s path. When the separate paths merge, the flow returns to that single path.
Ready to Get Hands-on with Flow Builder?
Launch your Trailhead Playground now to follow along and try out the steps in this module. To open your Trailhead Playground, scroll down to the hands-on challenge and click Launch. You also use the playground when it's time to complete the hands-on challenges.
Build a Decision Element
Let’s create a flow to automate this business process. But first, add these required picklist values to the relevant fields. For more info on adding picklist values, see the Manage Your Picklist Values unit in the Picklist Administration badge.
- On the Case object, in the Priority field, add these values:
Severity 0,Severity 1,Severity 2,Severity 3 - On the Case object, in the Type field, add these values:
Downtime,Usability
Create a Decision Element and Define Outcomes
Follow these steps to recreate the flowchart process as a flow, using a Decision element.
- Create a record-triggered flow:
- For Object, select Case.
- Accept the default trigger configuration and entry conditions.
- Under Optimize the Flow for, select Fast Field Updates.
Choose Fast Field Updates when all you want to do is update the triggering record. Check out the Record-Triggered Flows badge for more info on Fast Field Updates.
- Add a Decision element to the flow:
- On the canvas, click
 .
.
- Select Decision.
- For Label, enter
Check Case Details.
- Define the outcomes:
- Under OUTCOME ORDER, leave New Outcome selected.
- Under OUTCOME DETAILS, for Label, enter
Severity 0.
- Next to OUTCOME ORDER, click
 to create a new outcome.
- Label the second outcome
Severity 1.
- Create another outcome and label it
Severity 2.
- Under OUTCOME ORDER, select Default Outcome.
- Change its label to
Severity 3 (Default).
Add Condition Requirements to the Outcomes
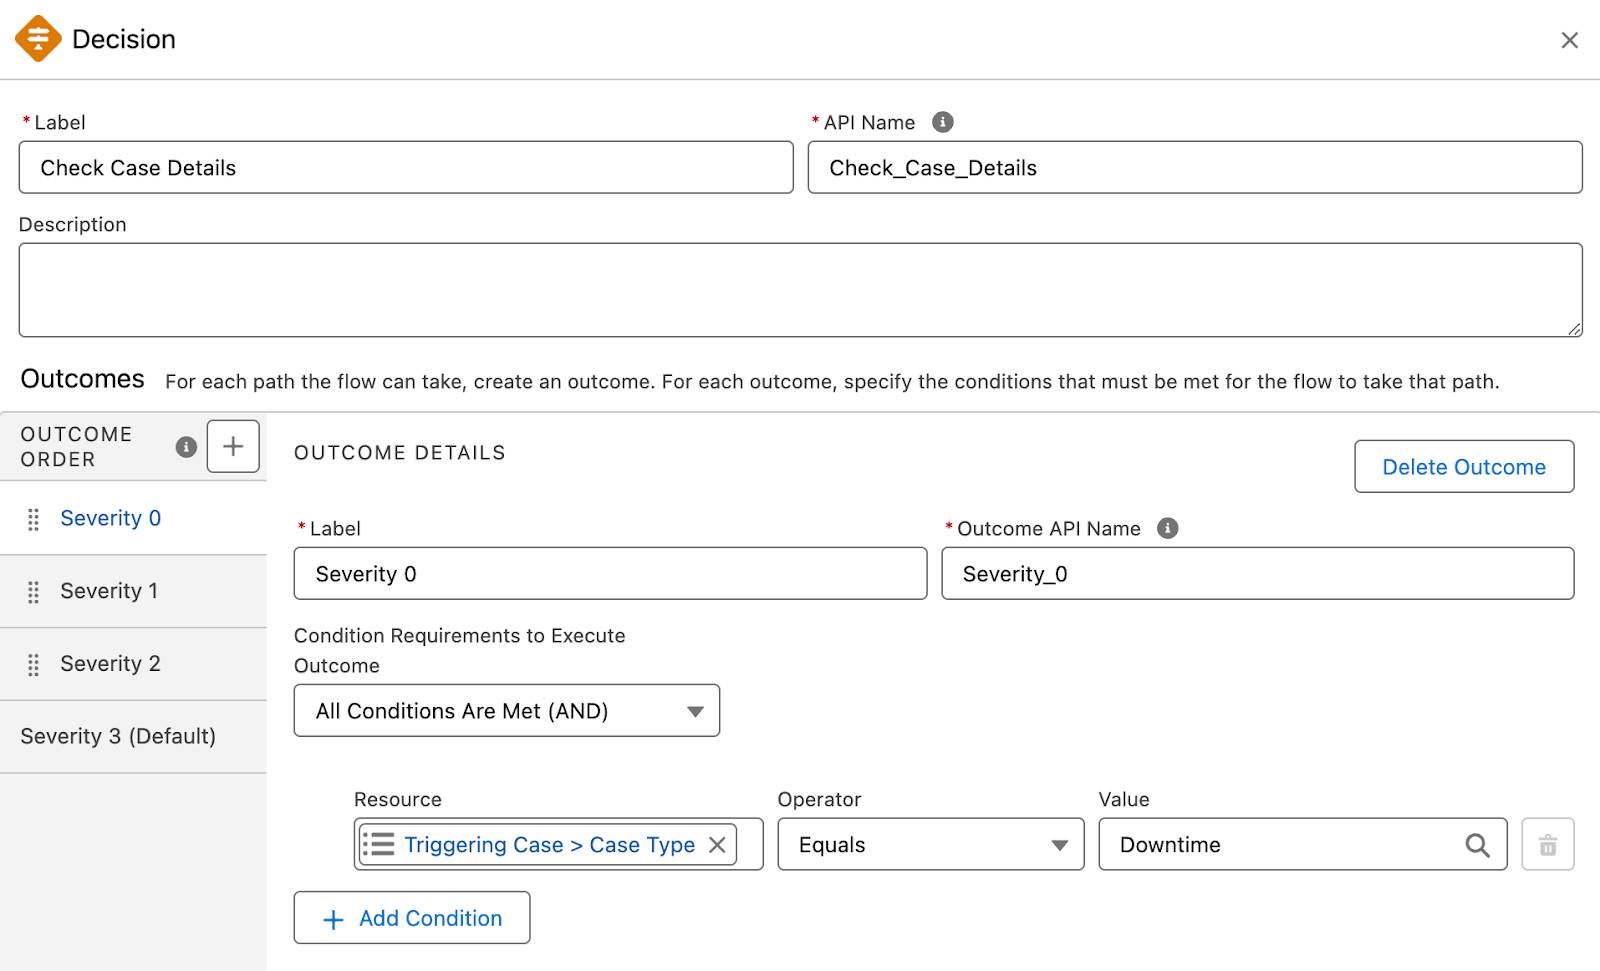
- Define the condition requirements for the Severity 0 outcome:
- Under OUTCOME ORDER, select Severity 0.
- Under OUTCOME DETAILS, for Resource, click Triggering Case and select Case Type.
- Keep Equals as the Operator.
- For Value, select Downtime.
- Define the condition requirements for the Severity 1 outcome:
- Enter the first condition requirement:
- Resource: Triggering Case > Case Type
- Operator: Equals
- Value: Usability
- Resource: Triggering Case > Case Type
- Click Add Condition.
- Enter the second condition requirement:
- Resource: Triggering Case > Contact ID > Contact Description
- Operator: Contains
- Value:
VIP
- Resource: Triggering Case > Contact ID > Contact Description
- Define the condition requirements for the Severity 2 outcome:
- Resource: Triggering Case > Case Type
- Operator: Equals
- Value: Usability
Even though the third diamond in our diagram specifies that the contact is not a VIP, we don’t need to check that requirement for Severity 2. Condition requirements are evaluated in order, so the Decision element doesn't check this outcome unless the contact isn't a VIP.
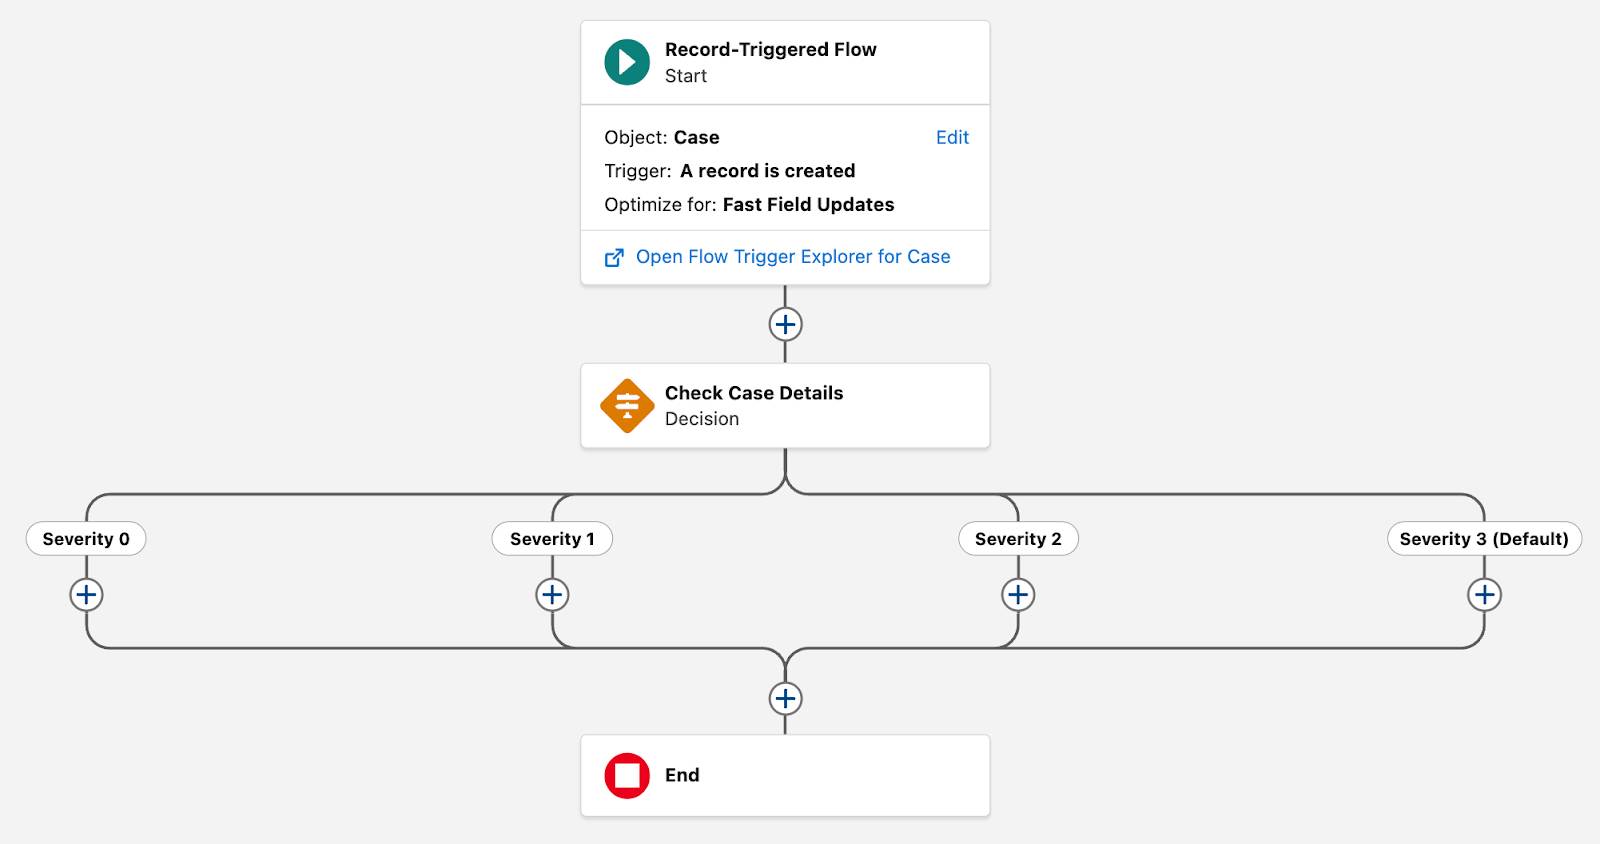
Your decision element should now look like this: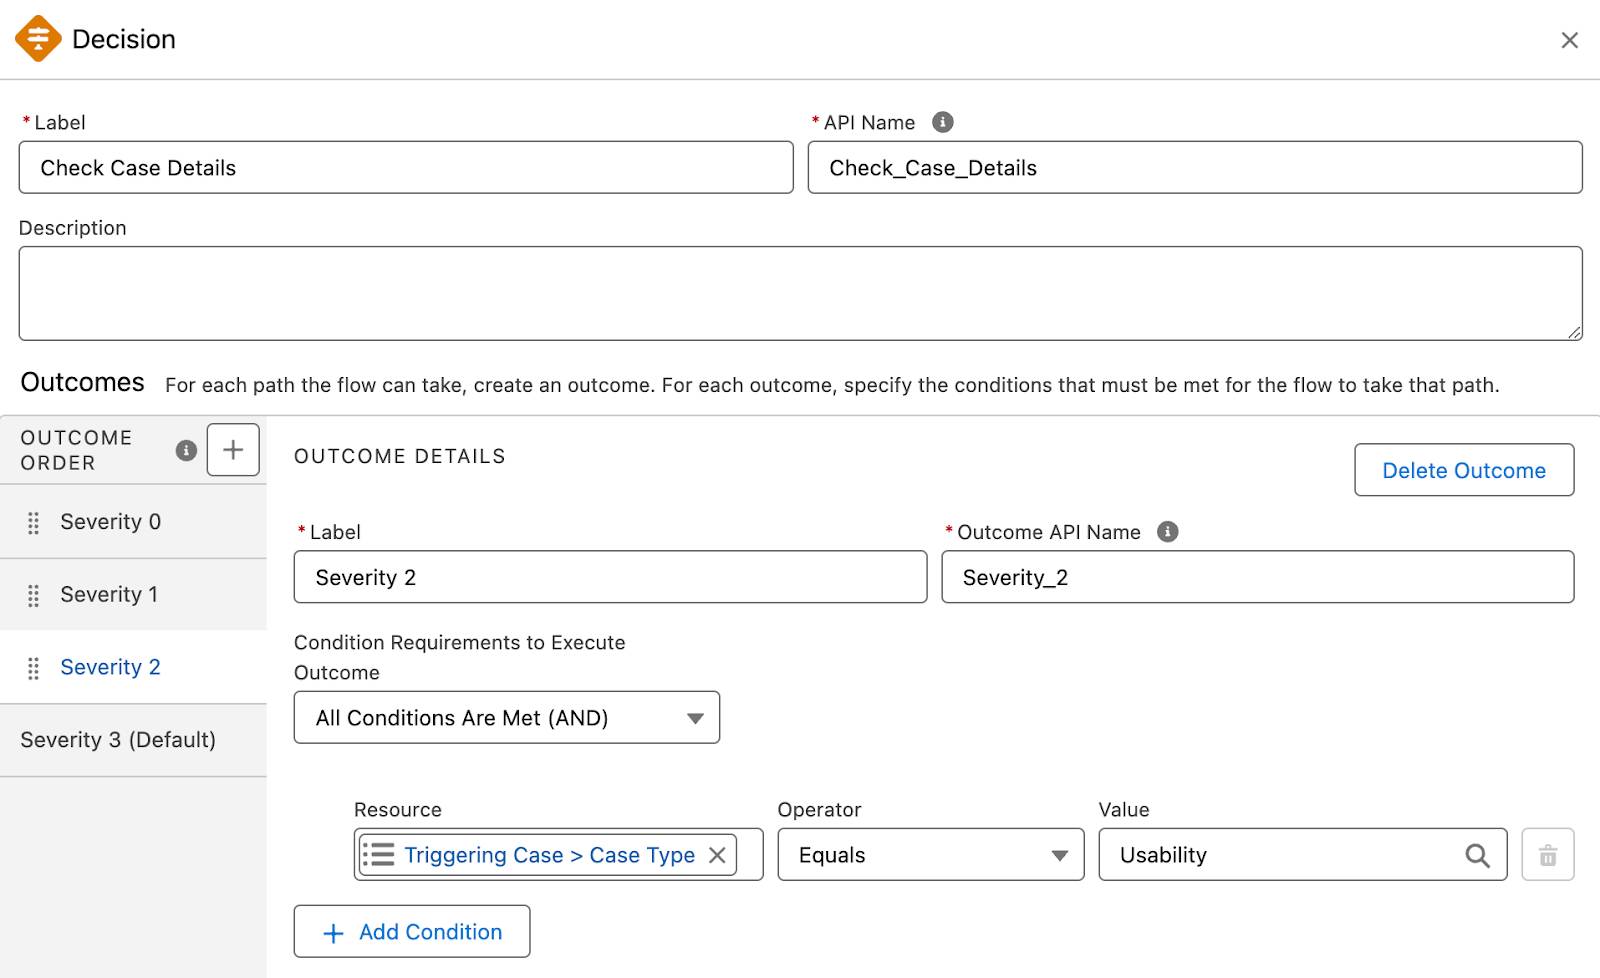
Click  to close the side panel.
Your flowchart had four potential outcomes, so the Decision element has four outcomes. Those four outcomes create four possible paths the flow can take, each named for its corresponding outcome. Here’s what it looks like on the canvas.

Now’s a good time to save and name your new flow.
- Click Save.
- For Flow Label, enter
Set Case Priority.
- Click Save.
Create Update Records Elements
On each severity path, you add an element that updates the new case with the appropriate priority value. For example, in the Severity 0 path, you set the Priority field to Severity 0.
First, add an Update Records element to the first three paths.
- Under Severity 0, click
 .
.
- Under Shortcuts, select Update Triggering Record.
- For Label, enter
Set Priority to Sev0.
- Accept the autogenerated API Name.
- Under How to Find Records to Update and Set Their Values, keep the default value: Use the case record that triggered the flow.
- Scroll to Set Field Values for the Case Record.
- For Field, select Priority.
- For Value, select Severity 0.
- Click
 in the Update Records panel to close the panel.
- Repeat steps 1-9 for the Severity 1 and Severity 2 paths. Don’t forget to change the Label and Value for each path.
For the Severity 3 path, you copy and paste the element from the Severity 2 path. (This is a pretty simple example, but if you ever need to copy or move (cut and paste) a whole bunch of elements together, this is a good technique to know.)
- Hover over the Set Priority to Sev2 element and click
 .
.
- Click Copy Element.
- Under Severity 3, click
 .
.
- Click Paste 1 Element.
- Click the new element to open its configuration panel.
- Change the Label to
Set Priority to Sev3.
- Change the API Name to
Set_Priority_to_Sev3 - Change the field Value to Severity 3.
- Save the flow.
Your flow should look like this on the canvas.
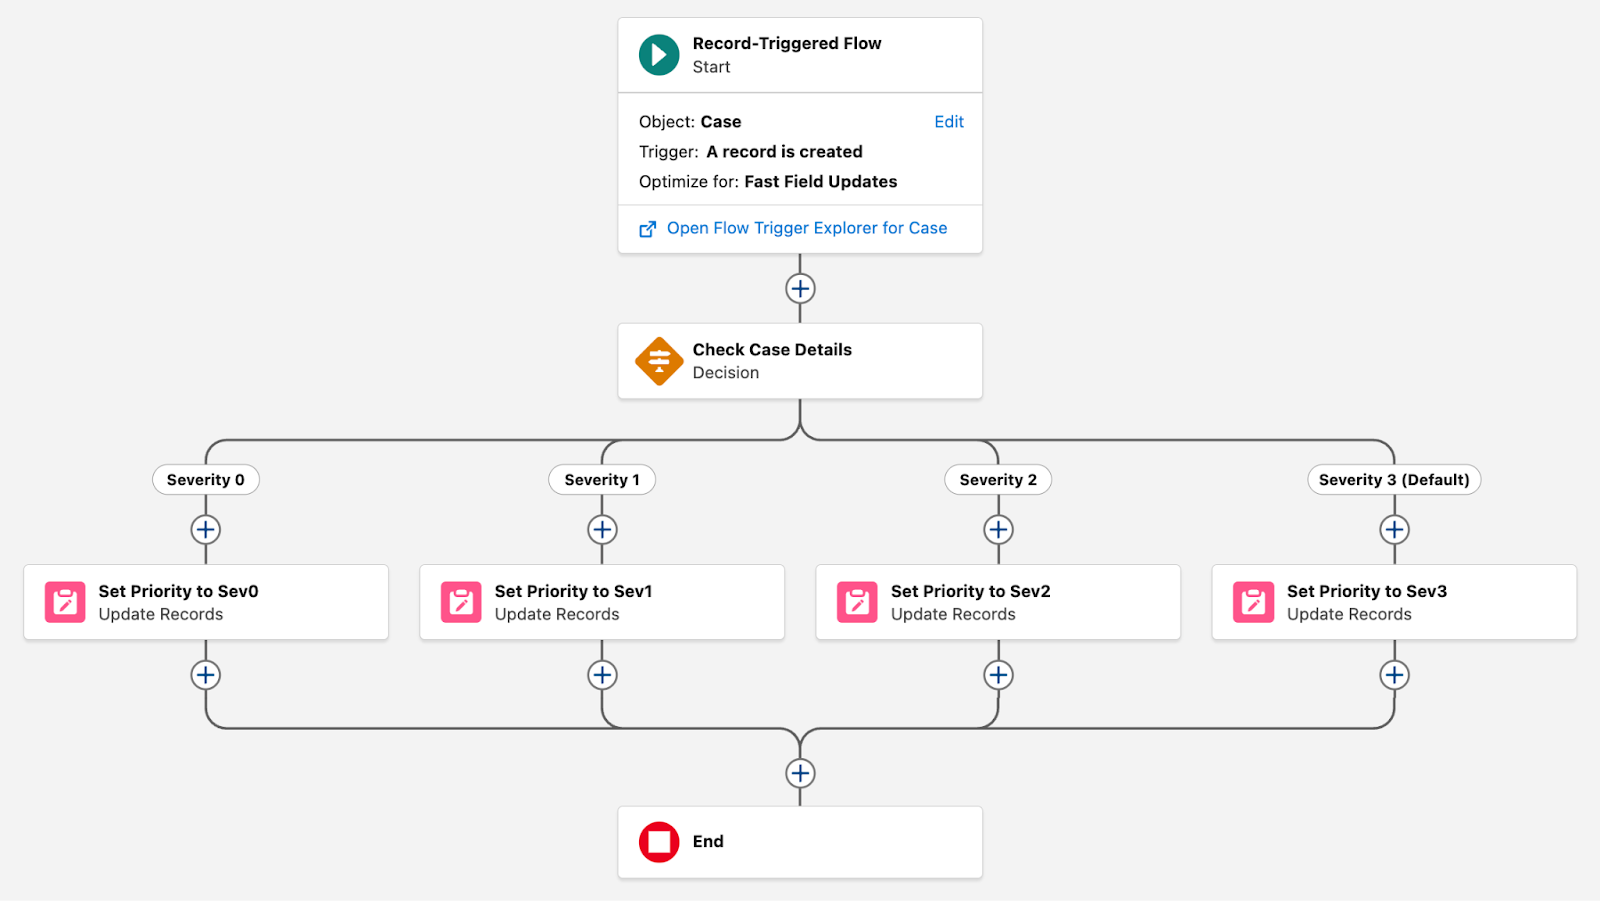
When the flow follows the path for a specific outcome, it runs only the Update Records element in that path.