Create and Edit Donations
Learning Objectives
After completing this unit, you’ll be able to:
- Describe how Nonprofit Success Pack (NPSP) uses opportunity records to track donations.
- Create a donation from an individual.
- Create a donation from an organization.
- Explain how donation rollups are used.

Before You Start
Before you start this module, consider completing the following recommended content.
Follow the Money
No matter your nonprofit’s mission, it probably relies on revenue from gifts, grants, and other donated revenue to advance your cause.
In this module, we’ll explore how to track and manage different types of donations and payments using Salesforce and Nonprofit Success Pack (NPSP). NPSP provides you with a standard data model to better record details about your donors and program clients, and adds fundraising capabilities to help you track donations and giving history in one system.
To start, we’ll explore how to track simple donations from individuals and organizations.
Understand Opportunities and Opportunity Record Types
NPSP uses the Salesforce-standard Opportunity object to track all donations, grants, and revenue. Opportunity records are related to donors, which are tracked using the Contact and Account objects, including the household account record type included in NPSP.
We often use the term opportunity interchangeably with donation or grant, because all donations (and other revenue) are tracked using opportunity records. Not all opportunities are the same, though. NPSP, by default, includes several opportunity record types to track different information and processes on many types of opportunities.
Those record types are:
- Donations
- Grants
- In-Kind Gifts
- Major Gifts
- Matching Donations
- Memberships
When you create a new opportunity and choose an opportunity record type, you start a specific process—with different page layouts and fields—defined by the record type. Your admin can customize the record type list by adding or removing record types depending on your needs.
Opportunity records work alongside other objects and features—like payments, recurring donations, general accounting units, and allocations—that we’ll review later in the module. For now, you start simple with a gift from an individual donor.
Want to Get Hands-on with Nonprofit Success Pack?
In this module, we show you the steps to manage donations in NPSP. We don’t have any hands-on challenges in this module, but if you want to practice and try out the steps, you need a special Developer Edition org that contains NPSP and our sample data. A regular Trailhead Playground doesn’t have NPSP or our sample data. Here’s how to get the free Developer Edition now.
- Sign up for a free Developer Edition org with NPSP.
- Fill out the form:
- For Email, enter an active email address.
- For Username, enter a username that looks like an email address and is unique, but it doesn't need to be a valid email account (for example, yourname@example.com).
- For Email, enter an active email address.
- After you fill out the form, click Sign me up. A confirmation message appears.
- When you receive the activation email (this might take a few minutes), open it and click Verify Account.
- Complete your registration by setting your password and challenge question. Tip: Save your username, password, and login URL in a secure place—such as a password manager—for easy access later.
You’re logged in to your Developer Edition. Now, from the App Launcher ( ), find and select Nonprofit Success Pack.
Enter and Modify Donations from Individuals
In this module, you follow along with the development staff at the nonprofit No More Homelessness (NMH). This human-services nonprofit uses NPSP and other Agentforce 360 for Nonprofits products and features to manage its entire mission.
NMH Development Associate Sofia Rivera is ready to enter the donations collected last night at a board member's fundraising house party. She already created contact records for all the new donors, and now she’s ready to enter gifts.

There are three ways to manually enter a donation in NPSP:
- Click the New Donation quick action on a contact record.

- Go to the Opportunities tab in the Nonprofit Success Pack app and click the New button.

- Use the Gift Entry tool, which we don’t cover in detail in this module. Visit the Enter Gifts in Gift Entry article linked in the Resources section to learn more.
For a simple donation from an individual, we recommend entering the gift from the contact record. Follow along with Sofia as she enters a one-time donation from donor Candace Evans.
- Find and select the donor
Candace Evansin Global Search
- Click New Donation.
- Fill in details about the gift in the New Donation interface.
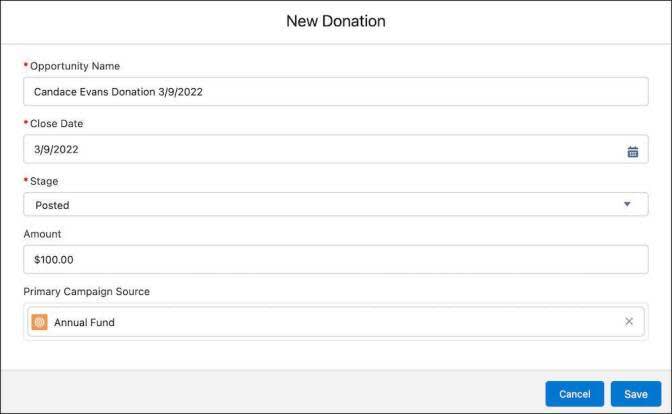
- Opportunity Name: NPSP gives your admin the tools they need to automatically fill this field with a standard name—maybe something like
Candace Evans Donationand the date. If this field is blank, you have to enter an opportunity name.
- Stage: Each opportunity record type has its own set of stages that reflect that gift type’s processes. Because Sofia has the check in hand, select Posted. Your Salesforce instance may instead use a Closed Won status.
- Close Date: If the donation is still open—before a donor decides or the grant is awarded or denied—this represents the day you expect to receive the money. If it is closed—either won, meaning the contact donated, or lost, meaning they decided not to give—then the Close Date indicates when you received the money or commitment. This gift was made last night, so pick yesterday’s date.
- Amount (optional):
100 - Primary Campaign Source: We won't dig into campaign records here, but they can be an effective way to group opportunities, like all the gifts made in response to an annual fund email or a capital campaign. Find and select Annual Fund if you’d like to attach that primary campaign source.
- Save your work.
Take a moment to review the new opportunity record. To find it, click the message that appears to tell you that the opportunity was created. Or, you can click the Related tab on the contact record, find the Opportunities related list, and select the new opportunity’s name.

The opportunity record includes more fields than were included in the New Donation interface. That's because the New Donation button is a quick action. It includes only the basic fields required to create an opportunity record. If you want to choose a different opportunity record type, or want the option to initially enter more data about an opportunity, your starting point is to click the New button on either a contact’s Opportunities related list or the Opportunities tab.
If you want to edit or change the opportunity record, click either the Edit quick action or  next to any field.
One more thing to note: Creating this opportunity also automatically created a payment record. You can find that in the Payments related list on the Related tab. You learn about payments in the next unit.
Enter Donations from a Company or Other Organization
As Sofia works through donations from individuals who attended the house party, she comes across a check from a local business called Cloud Kicks. Remember, the Opportunity object is used to also manage donations from organizations tracked using the Account object, like private foundations, corporate donors, governments, and others.
Creating a donation from an account is almost identical to creating a donation from an individual. Follow along as Sofia creates a donation from Cloud Kicks.
- Find and select Cloud Kicks from Global Search.
- Click the Related tab if it isn’t already open on the page.
- Click New on the Opportunities related list.
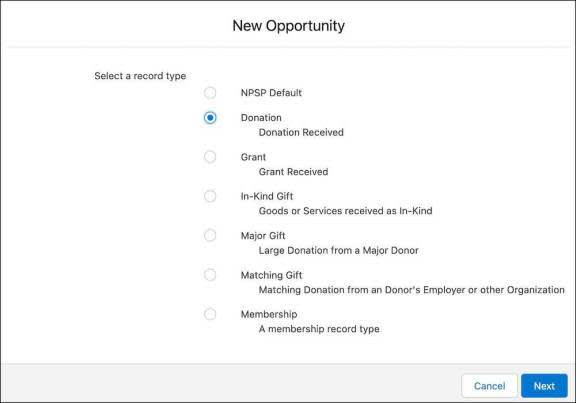
- Select the Donation record type and click Next. If this was a grant opportunity or an in-kind gift of goods, you could choose one of those record types.
- Specify these details:
- Opportunity Name: If your admin set up NPSP to pre-populate that field, you don't have to enter anything here—but you must enter a value if the field is empty. Enter
Cloud Kicks Donationfollowed by the close date.
- Amount:
1000 - Close Date: Remember, this is the date money was received or the date you expect to receive the payment. Choose yesterday’s date.
- Stage: Select Posted because this gift has been received. Your Salesforce instance may instead use a Closed Won status.
- Save your work.
Click the opportunity name in the Opportunities related list to review the donation record.

Review Opportunity Rollup Fields
Sofia was able to quickly enter a single donation from both an individual and company, but the real power of NPSP is in getting a complete view of a donor.
That’s where opportunity rollup fields come in.
Rollup fields display information from related records, allowing information from one record to appear on another. That information can be either a single value or an aggregate of values from several records.
In NPSP, account and contact records include dozens of rollup fields that display aggregate information from related opportunities. These fields provide an overview of giving on a contact or household account record, making it easier to understand each donor's level of engagement.
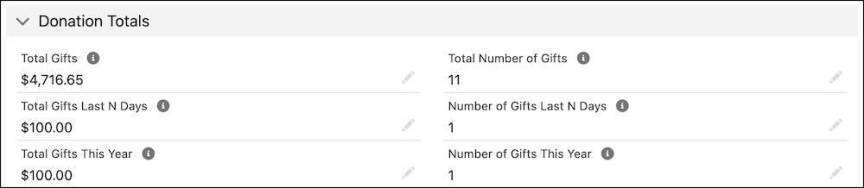
NPSP’s rollup fields are, by default, grouped into sections on your page layouts, including Membership Information, Total Gifts, Soft Credits, Household Donations, and Donation Metrics.
For example, the Total Gifts field in the Donation Totals section on a contact record displays the total value of all closed opportunity records associated with that contact. The Total Number of Gifts field shows how many times that donor has given.
Think of rollup fields as if they are read-only. You may find that you can edit the fields directly, but they are recalculated and overwritten nightly from the input fields.
Sofia has now entered two simple, one-time donations. What happens when Sofia needs to enter a pledge that hasn’t been paid yet?
NPSP supports that need, too, and you’ll learn how in the next unit.
Resources
- Trailhead: Stakeholder Data Management with Nonprofit Success Pack
- Salesforce Help: Manage Donations in Salesforce
- Video: NPSP How-To Series: Create and Manage Grants
- Salesforce Help: Rollups Overview
- Salesforce Help: Enter Gifts in Gift Entry
- Trailhead: Opportunity Settings in Nonprofit Success Pack