Set Up Customer Service Incident Management
Learning Objectives
After completing this unit, you’ll be able to:
- List features that work with Customer Service Incident Management.
- Enable Customer Service Incident Management.
- Assign permissions for Customer Service Incident Management.
- Update the page layout for Cases with Customer Service Incident Management fields.
Welcome to Service at Ursa Major Solar
Ursa Major uses Service Cloud to solve customer problems. Maria Jimenez, Ursa Major Solar’s admin, has already set up many features. She plans to use the following features with Customer Service Incident Management.
-
Omni-Channel Routing: Route incidents to team members who are on the right team with the necessary skills to solve the problem.
-
Entitlements: Make sure that each customer gets the level of service they’ve signed up for with their service level agreements, such as regular site visits or a response within a specified time period.
-
Milestones: Provide customer service on the schedule each customer has signed up for, such as specific deadlines for first response or case resolution.
-
Swarming with Slack: Give customers a single point of contact and then bring the right experts together from across the company to solve their problem quickly.
-
Work plans: Guide front-line and back-office workers with the steps to complete a work order. By following steps in work plans, field service teams can complete assignments quickly, consistently, and with less guesswork.
While these features all boost productivity, you don’t have to use any of them to benefit from Customer Service Incident Management.
Want to Get Hands-on with Customer Service Incident Management?
In this module, we show you the steps to set up and use Customer Service Incident Management. We don’t have any hands-on challenges in this module, but if you want to follow along and try out the steps, here’s how to launch your Trailhead Playground. First, make sure you are logged in to Trailhead. Then click your user avatar in the upper-right corner of this page and select Hands-on Orgs from the dropdown. Click Launch next to the org you want to open. Or, if you want to create a new playground, click Create Playground.
Enable and Give Agents Access
Customer Service Incident Management is included as part of Service Cloud. It’s just waiting for Maria to enable it to get started. Then she must give her agents the proper permissions to access its features. After that, they’ll be ready to go.
First, Maria enables Customer Service Incident Management.
- From Setup
 , in the Quick Find box, enter
 Customer Service Incident Management, and then click Customer Service Incident Management.
- If Incident Management isn’t on, turn it on.
Next, she sets up permission sets to give her agents access.
She creates a new permission set.
- From Setup
 , in the Quick Find box, enter
 Permission Sets, and then select Permission Sets.
- Click New.
- Name your Customer Service Incident Management permission set and click Save.
Maria entersCSIM Agentin the Label field to name hers.
- Back on the Permission Sets page, click the permission set you just created, and in the permission set, click Object Settings.
- Under Object Settings, enable the level of access for the Customer Service Incident Management object. You can grant Read, Create, Edit, and Delete permissions.
Maria clicks Incidents, then clicks Edit and selects Read and Edit.
- Save your changes.
- Repeat for the other two Customer Service Incident Management objects (Problems and Change Requests).
Now assign the permission set to users.
- In the permission set you just created, click Manage Assignments, then Add Assignment.
- Select the agents to assign the permission set to and click Next.
Maria selects Ada Balewa and her other support agents.
- Click Assign.
Repeat for each permission set.
Maria creates another permission set called CSIM Incident Manager with Read, Create, Edit, and Delete permissions for all three Customer Service Incident Management objects. She assigns this permission set to Ada Balewa, product support specialist at Ursa Major Solar, and will assign it to other agents when Ursa Major expands the program to include more potential incident managers.
Now Ada and her agents have access to Customer Service Incident Management. Maria assigns these same permission sets to others on the incident team such as service level agreement experts, troubleshooting experts, and customer service managers.
Add Related Lists to the Case Page Layout
It’s not enough to give her agents access to the objects. The agents must be able to see ongoing incidents from their Case record pages. So, Maria must add Case Related Issues and Related Change Requests to the Case page layout her agents use.
First, add the related lists to the Case page layout so agents can view them on their desktops.
- In Setup
 , click Object Manager.
- In the Quick Find box, enter
Case, then click Case.
- Click Case Page Layouts and Case Layout.
- In the palette, click Related Lists.
- Drag Case Related Issues and Related Change Requests to the Related Lists section.

- Save your changes.
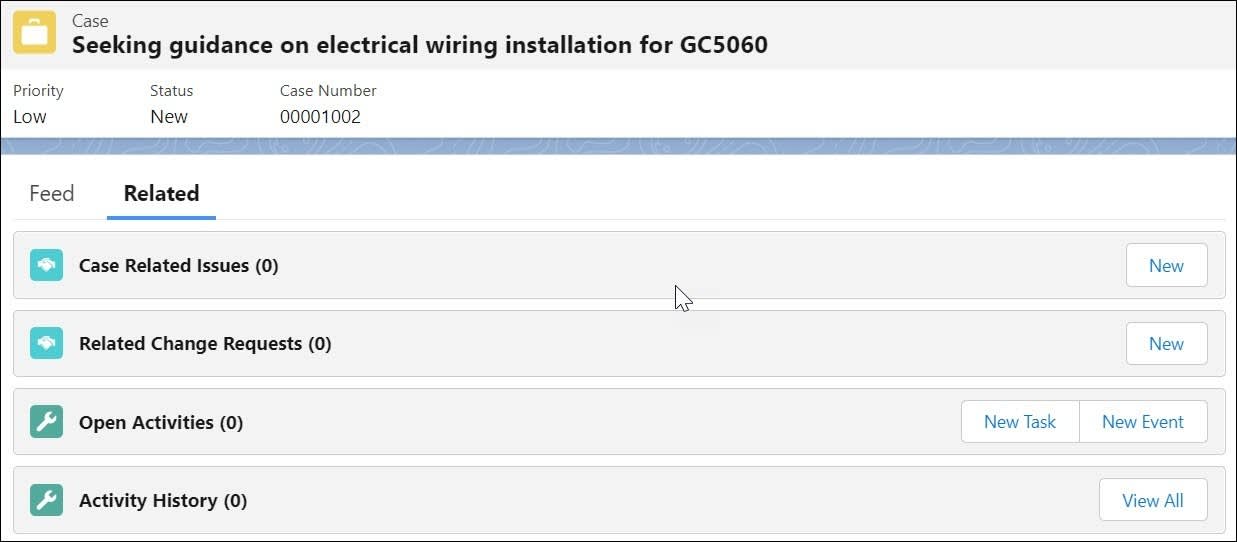
View your changes on the Case page.
- From the App Launcher, choose Cases.
- Select a case.
- Click Related Lists.
Next, add the related lists to the Lightning App Builder Case Record page. Then your agents can view the related lists on the Case page on their mobile devices too.

- From Setup
 , in the Quick Find box, enter
 Lightning App Builder, and select Lightning App Builder.
- Find the Case Record page and click Edit.
- Drag the Related List - Single component to your page layout.
- For the Related List, select Case Related Issues.
- Drag another Related List - Single component to your page layout and, for the Related list, select Related Change Requests.
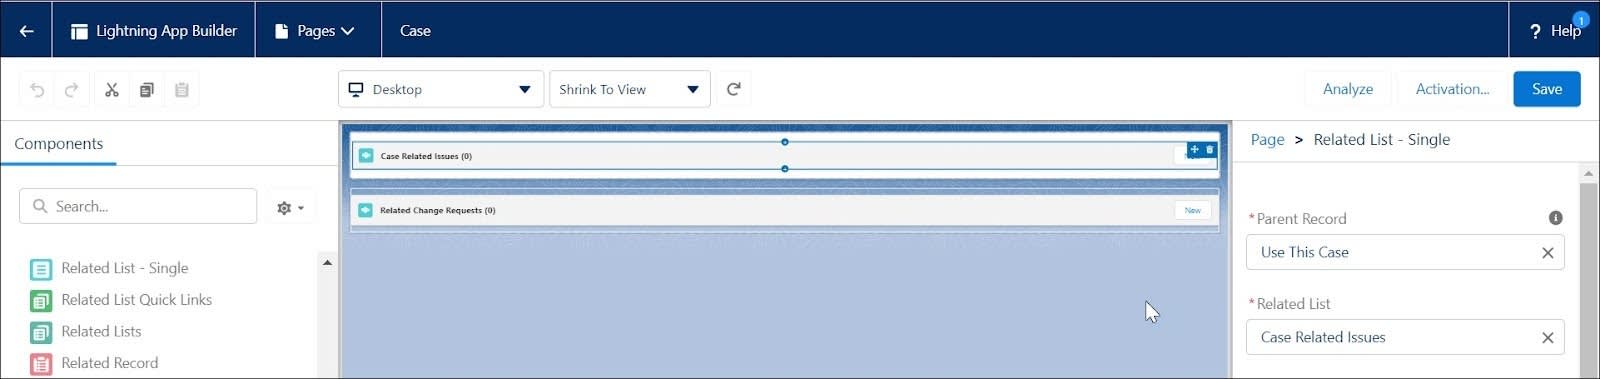
- Save and activate the page.
Now agents can use these components on both their desktop and mobile devices.
In this unit, Maria enabled Customer Service Incident Management. Then she gave her team the proper permissions. Finally, she added the necessary related lists to the Case Record pages so her team can view them on their desktop and mobile devices.
Resources
- Salesforce Help: Customer Service Incident Management
- Salesforce Help: Give Users Access to Customer Service Incident Management
- Salesforce Help: Add Related Incidents, Problems, and Change Requests to Your Case Page Layout