Document Your Solution
Learning Objectives
After completing this unit, you’ll be able to:
- Review a custom preference center example.
- Define your requirements.
- Diagram preference management data flow.
- Document your solution steps.
A Custom Preference Center for Cumulus Bank
The very nature of a custom preference is that it’s unique to each organization. However, it’s helpful to see an example. Let’s review an example project for Cumulus Bank. Cumulus Bank has been using Marketing Cloud Engagement for a few months and they want to create a custom preference center to obtain and manage information about their US-based subscribers. They’ve been using the standard preference and profile center, but have already created a data extension to track customer preferences.
Requirements
Let’s review the specific requirements (also called user stories) for this project.
# |
Requirement |
|---|---|
1 |
Unsubscribes are honored in real time, but are required to be honored within 10 days of submission. |
2 |
Unsubscribes are honored at the subscriber key level if available, otherwise according to email. |
3 |
A subscriber can access the Preference Center page by clicking on the Manage Preferences link at the bottom of all emails sent from Marketing Cloud Engagement. |
4 |
A subscriber can quickly unsubscribe by clicking Unsubscribe at the bottom of any email sent from Marketing Cloud Engagement. |
5 |
If a subscriber clicks Unsubscribe they are unsubscribed at the Cumulus AMER business unit level only. |
6 |
The Unsubscribe Confirmation page should include a success message, along with a link to the Preference Center page. |
7 |
A user can also unsubscribe from all messages on the Preference Center by clicking on an Unsubscribe From All button. |
8 |
The Preference Center page allows subscribers to update these fields. Personal Details
Email Communication Details
Your Interests
|
8 |
Known subscriber information from the user’s email shall be encrypted and then preloaded into the preference center field options. Note that if an email is forwarded to a friend, that friend has access to the subscriber’s unsubscribe center link. |
9 |
After the subscriber makes their updates and clicks Update Preferences, they see a success message. |
10 |
If an error occurs, the subscriber sees an error message that tells them to contact customer support. |
11 |
The Preference Center Confirmation page processes form data and updates associated fields in the Cumulus Customer Preferences data extension and the All Subscribers List when needed. |
Data Flow Diagram
Now that you’ve drafted your requirements, the Cumulus solution architect, Terry, draws a diagram to illustrate the solution. Diagrams are a helpful way to make sure that all data sources are accounted for, and to identify where preference data is updated. Review your diagram with your team before you begin documenting the solution steps. 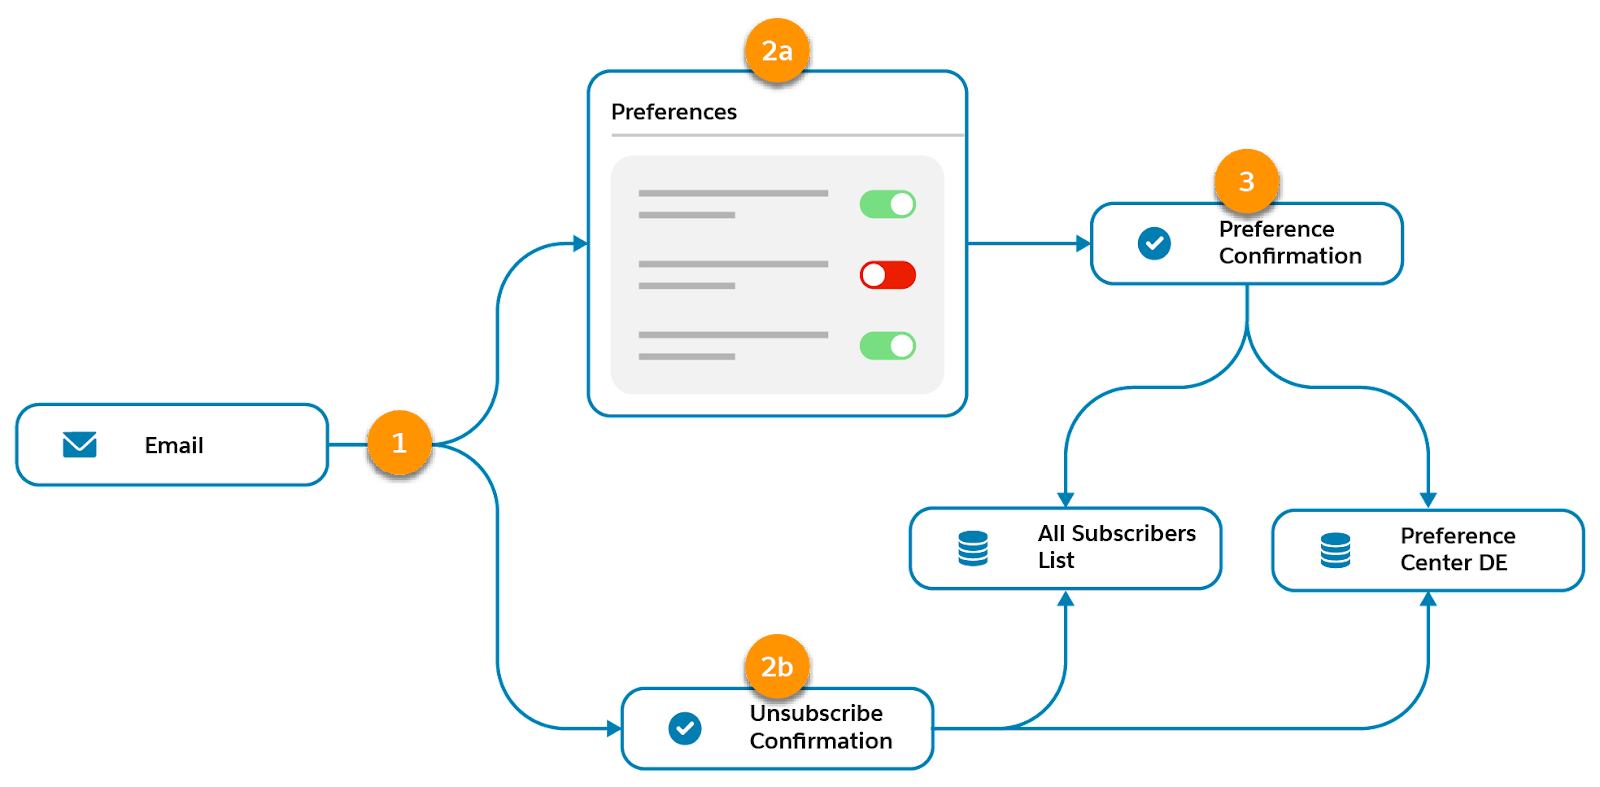
Document Solution Steps
Next, Terry documents the high-level solution steps needed to complete the project based on the requirements.
Pre-Work
- Gather assets and text copy from the Cumulus content team.
- Confirm that a private domain with SSL is implemented in the Cumulus AMER business unit.
- Allow for custom links by turning off the Profile Link Check and Unsubscribe Link Check settings in Marketing Cloud Engagement Setup.
Review Data Extension
- Review the Cumulus Customer Preferences data extension to ensure that all fields are included from the preference center requirements.
Create CloudPages
- Create a preference center collection in CloudPages.
- Create three landing pages in CloudPages.
- Preference Center
- Unsubscribe
- Preference Center Confirmation
Code the Unsubscribe Page
- Pull in subscriber information from the email.
- Use a LogUnsub events call to update the All Subscribers list.
- Display a success message after the list is updated.
-
Success message: You’ve been unsubscribed from all Marketing Communications from Cumulus Bank. To modify your preferences, click the URL below to return to view your Preferences.
- Display an error message if necessary.
-
Error message: An error has occurred when updating your preferences. Contact Cumulus Customer Support to complete your request.
Code the Preference Center Page
- Prepopulate known information into the form.
- Include a link to the Unsubscribe page.
- Confirm that each field links to a field in the Cumulus Customer Preferences data extension.
- Link the Update Preferences button to the Preference Center Confirmation page.
Code the Preference Center Confirmation Page
- Search for a subscriber key and upsert new or changed data into the Cumulus Customer Preferences data extension.
- Display a success message after the data extension is updated.
-
Success message: Your preferences have been updated. To modify your preferences, click the URL below to return to view your Preferences.
- Display error message if an error occurs during the upsert of data.
-
Error message: An error has occurred when updating your preferences, please contact Cumulus customer support to complete your request.
Test Solution
- Publish pages for testing.
- Create a test email and update the unsubscribe and preference center footer links using CloudPages URL to prepopulate information from the email to the linked page.
- Send a test email to assigned testers and check functionality.
Implement Solution
After you’ve tested the solution, update the email footer for the shared business unit with the correct links.
Create a Blueprint
After the diagram is completed and solution steps are identified, Terry documents this information along with the original use case and requirements into a solution document or project blueprint. But before anyone can begin building the solution, Terry sends the blueprint to the Cumulus team to review and make sure all of the requirements are met. After the team approves the blueprint, another team member can begin to implement the solution.

Next Up: Review the Solution Steps
In the next unit, we cover these steps in more detail, along with some tips and tricks for success.
Resources
- Salesforce Help: Create a Landing Page with Content Builder
- Salesforce Help: CloudPages
- Salesforce Developer: LogUnsubEvent
- Salesforce Developer: CloudPagesURL