Organize Your Data
Learning Objectives
After completing this unit, you’ll be able to:
- Describe how Marketing Cloud Engagement organizes contact data.
- Differentiate between attribute groups, attribute sets, and attributes.
- Determine when to use a population.
- Use populations to segment contacts.
Navigate Data Designer
Leung’s first step in helping nudge customers is to open Data Designer in Contact Builder.
To access Contact Builder:
- Log in to Marketing Cloud Engagement.
- Locate the primary navigation bar.
- Hover over Audience Builder (1).
- Click Contact Builder (2).

When you launch Contact Builder, the Attribute Groups landing page in Data Designer displays by default. Data Designer is where you define and organize information stored in Marketing Cloud Engagement, and relate it to the contacts within the account.

Data Designer is one of five main tools in Contact Builder. You use these tools to view and manage contact data.
Tool |
Description |
|---|---|
Data Designer |
Aggregate a contact’s demographic and behavioral data, and define how that data relates to a contact record. Businesses use the combined data to enrich the customer experience and serve customers better. |
All Contacts |
View and manage all contacts contained within a Marketing Cloud Engagement account including details about engagement, memberships, and attributes. |
Data Extensions |
Create and manage the data extensions that contain contact information. Use that information to segment, filter, and target contacts with relevant messaging. |
Imports |
Save and reuse import definitions. Import definitions detail how to import a data file, including which fields to import, and in which data extension to store the imported data. You use them to bring data linked to your contacts into your Marketing Cloud Engagement account. |
Contacts Configurations |
Configure how Contact Builder handles new contact information. |
Peek Under the Hood
To use Contact Builder effectively, it’s important to understand how Marketing Cloud Engagement organizes contact data.
Marketing Cloud Engagement stores contact information in database tables. In Marketing Cloud Engagement, tables are called data extensions. A contact’s information is packaged into one contact record and either stored in a single data extension or spread across multiple data extensions.
Typically, a data extension contains data from multiple contact records. That is to say, it contains data about many contacts, and those contacts have something in common. For example, the NTO Customers data extension contains every contact who has an NTO website account plus those who opt in to receive its communications.
A spreadsheet is a familiar way to visualize the structure of a data extension. A spreadsheet contains rows, columns, and cells.
-
Row: holds a set of attributes for one contact: first name, last name, phone number, and so on.
-
Column: contains one attribute for all contacts, such as everyone’s last name.
-
Cell: stores one attribute for one contact. For example, the cell at row 3, column C contains Pharr’s last name.

Differentiate Between Attribute Groups, Attribute Sets, and Attributes
You can link contact data that comes from multiple sources by creating a data model in Data Designer.
In Contact Builder:
- A data model is an attribute group (1).
- A database table is an attribute set (2).
- A table cell is an attribute (3).
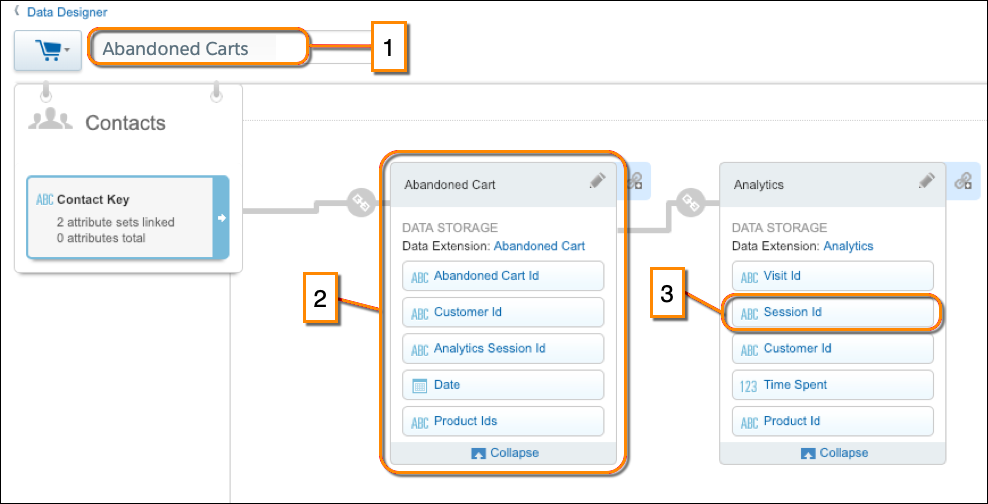
An attribute group gets its data from one or more data extensions. We mentioned earlier that a data extension is equivalent to a database table. View an attribute set in Data Designer and you’ll see what we mean. The attribute set lists its data source. In our example, the data for the Abandoned Cart attribute set is in the Abandoned Cart data extension. 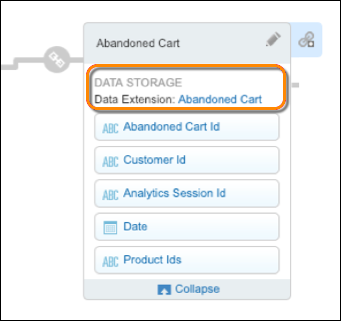
Each attribute in the set maps to a field in the data extension. An attribute, is a single piece of information about a contact, such as the product ID of an item in their cart. All the fields in the data extension represent attributes in the attribute group.
You might see metadata and attribute used interchangeably. Metadata is defined as data about data. In our case, metadata describes a contact. Within Contact Builder, you arrange metadata into a meaningful format in order to relate data back to the individual contact. The meaningful format is an attribute group.
Contact Builder Entity |
Description |
Example |
|---|---|---|
Attribute group |
|
Abandoned Carts |
Attribute set |
|
Abandoned Cart and Analytics |
Attribute |
|
Abandoned Cart Id, Session Id, and Date |
To most effectively organize your data in an attribute group, link a data extension to the contact record. Then, link all other relevant data extensions to the contact record or, to build complex relationships, link them to other data extensions in the attribute group.
Other Marketing Cloud Engagement apps can use the attribute groups you create in Contact Builder. For example, create a MobileConnect Demographics attribute group and use it in MobileConnect to segment mobile message audiences.
Organize Contacts into Populations
Populations represent a master set of contacts within a Marketing Cloud Engagement account. The contacts in a population share an overarching theme. Populations allow you to “tell” Marketing Cloud Engagement that a set of contacts is special. What makes them special? They have different basic contact information and this information is stored in different fields. For example, the unique identifier for a customer can be Customer ID, and the unique identifier for an employee can be Employee ID.
Identify Your Populations
Not all Contact Builder implementations use populations. So, before Leung rushes to create a population, she carefully considers how they’re used.
- Use populations to address a large and specific segment of contacts.
- Use populations if there are contacts that don’t yet exist in the master contact list. A subscriber can appear in a population before it is added to the All Contacts list.
If either of these use cases applies, she needs a population. To decide, she reviews the NTO requirements. To implement NTO’s solution, Leung does need to target two specific segments of contacts: NTO customers and NTO employees.
-
Customers: Contacts who create accounts on NTO’s website, who opt in to receive its communications, or both. NTO targets this population with promotional messages.
-
Employees: Individuals who work directly for NTO. NTO uses this population to internally communicate employee-related information.
Marketing Cloud Engagement stores populations in separate data extensions, which can have different data structures. Each population contains the specific data that enables NTO to target populations with its marketing and internal-communication activities respectively.
Other Marketing Cloud Engagement apps, such as Journey Builder, MobileConnect, and MobilePush, can use the populations you create in Contact Builder. For example, in Journey Builder, you can create an abandoned cart journey for NTO’s European market. Use the NTO Customers population as the journey’s entry contacts. Configure the journey to filter contacts by location.

Create a Population
Leung is ready to create the customer population. Let’s follow along.
- Select the Populations tab (1) in Data Designer.
- Click Create Population (2).

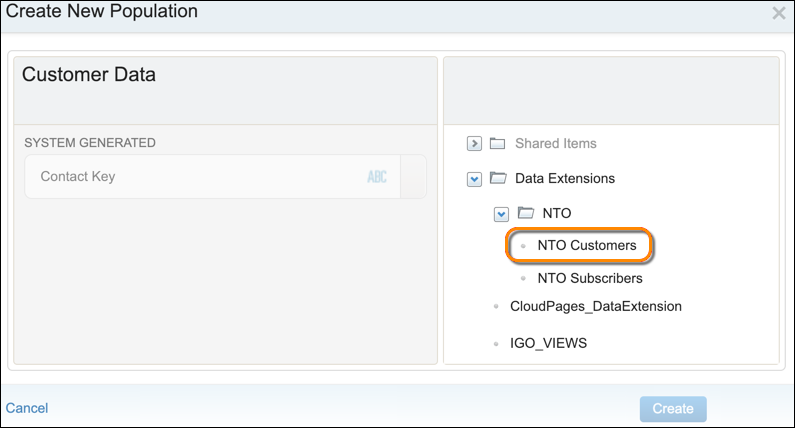
- She’s prompted to select a data source. This tells Contact Builder where to find the info for the contacts you want to include in the population. Leung browses to and selects an existing data extension, NTO Customers, and the Create New Population form updates.
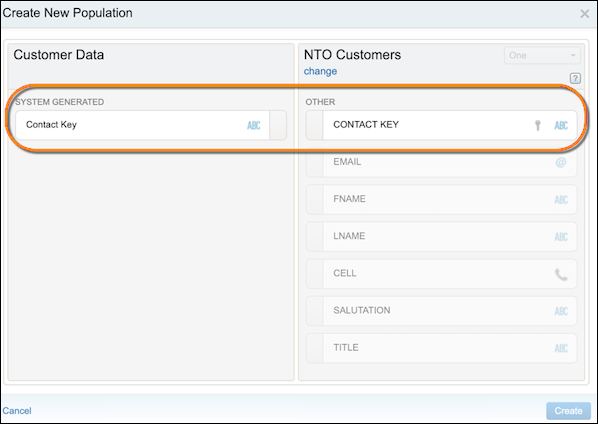
 The Create New Population form is where you define how a contact is related to a customer. To configure the relationship, choose a field from each column.
- Select the system-generated Contact Key field from the Customer Data column.
- Select CONTACT KEY from the NTO Customers data extensio
- Click Create and the population details page appears.
- Confirm that the NTO Customers population (1) has an attribute set, also named NTO Customers (2).
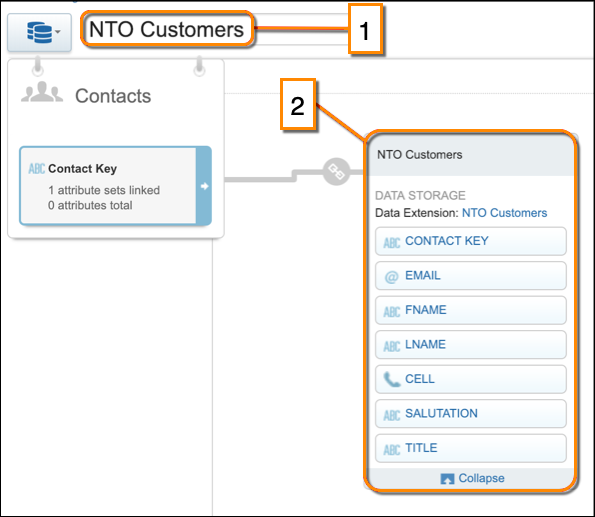
With a few clicks, Leung created a customer population based on the data in the existing NTO Customers data extension. She can use the populations to separate external customer marketing from internal employee marketing.
Next, Leung shows us how to create a data model in Contact Builder to link contact data from multiple sources.