Connect Your Data Sources
Learning Objectives
After completing this unit, you’ll be able to:
- Link contact data from multiple sources.
- Describe relationship cardinality.
Create Your Data Model
Now that we understand how Contact Builder organizes data, let’s see how Leung uses the data to turn the abandoned cart into a sale. Her tool of choice is Data Designer. Leung uses Data Designer to organize and build relationships between the data that comes from the different sources.
Identify Your Data Sources
In our abandoned-cart scenario, there are two data sources.
-
NTO website: The NTO website collects abandoned cart data, such as Pharr’s unique Contact ID and the product ID for the backpack in his cart. To this abandoned cart data, the web analytics integration in the NTO online store adds a session ID. The session ID can be used to track all the details that Google Analytics collected during the session when a cart was abandoned.
-
Analytics: Google Analytics collects behavioral data. This includes info about the products Pharr browsed, how long he spent on each product page, and the last page he viewed.
To link the data from both sources to contacts, Leung needs a data model that contains contact, cart, and analytics data. This is what makes it easy to find the NTO contacts who abandoned carts and to learn about the behavior that preceded the abandonment.
It’s best to create your attribute group or groups and link all relevant data extensions at the same time. That helps ensure that you have all the right data in the right places, but it requires some planning. Leung puts on her data-designer thinking cap and gets to work.

An attribute group is akin to a data model. You create attribute groups to stitch together data from multiple sources in a way that makes it easy to link the data back to individual contacts. To ameliorate NTO’s abandoned cart problem, Leung needs to link contacts to their carts and the carts to their analytics data. That means the contact, cart, and analytics data must be in the same attribute group.
To set up the attribute group, complete three tasks.
- Create the attribute group.
- Link data sources.
- Configure relationship cardinality.
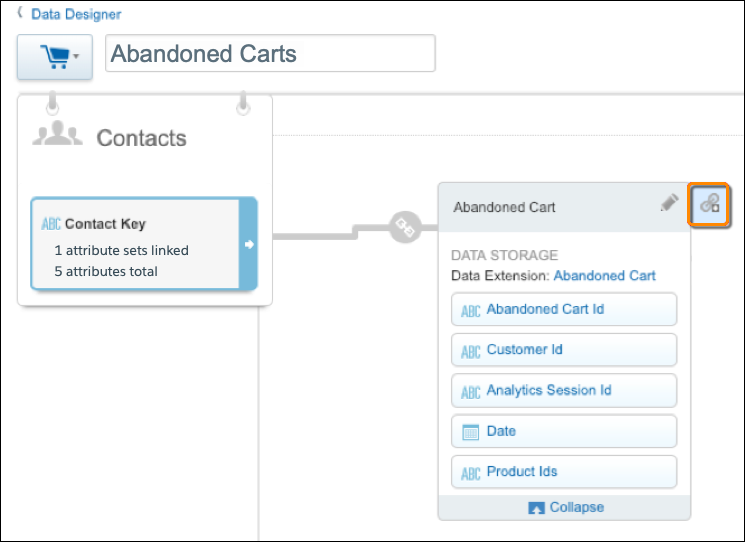
Create an Attribute Group
When you create an attribute group, the first data source you specify links directly to the contact. Leung considers her two data sources to determine which one directly relates to the contact. An abandoned cart “belongs” to a contact, but analytics data “belongs” to the cart. She has her answer, the cart.
To create the attribute group:
- Click Create Attribute Group on the Data Designer landing page. The Create New Attribute Group form loads.
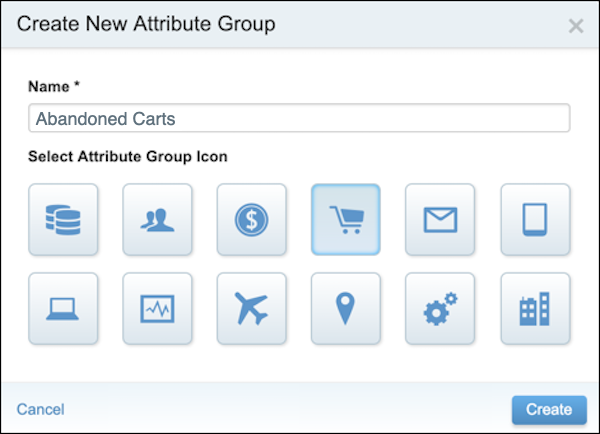
- Enter the Name for the group,
Abandoned Carts.
- Select the cart icon.
- Click Create.
She has a new attribute group, but it’s empty. She hasn’t yet selected a data source. Once she does, Contact Builder uses the selected data source to create an attribute set in the attribute group.
Link Data Sources
In this context, a data source is a data extension. Leung has existing data extensions to use for this attribute group, one contains the abandoned cart data and one contains the Google analytics data. First, she adds the cart data.
- Click Link Data Extensions.
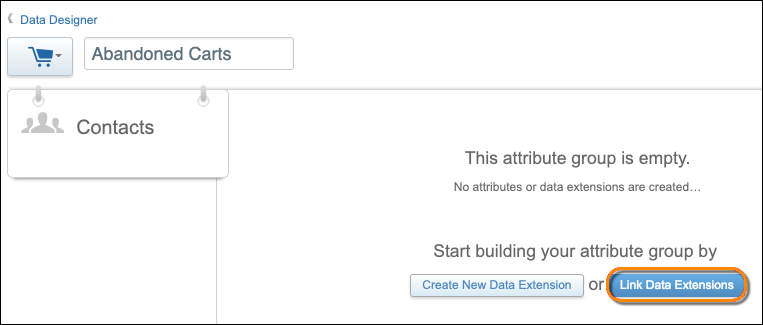
- Browse existing data extensions.
- Select Abandoned Cart.
Next, she selects one field from Contacts and one from Abandoned Cart to link the two. Contact Builder uses the Contact Key field value to uniquely identify a contact within a Marketing Cloud Engagement account. Whenever possible, use Contact Key to link attribute groups to contacts. Remember that Contact Key relates to your populations. Thus, it’s the magic glue that ties all the information within your attribute group directly to the contacts in your populations.
Let’s see how Leung builds the relationship between the contact and the cart.
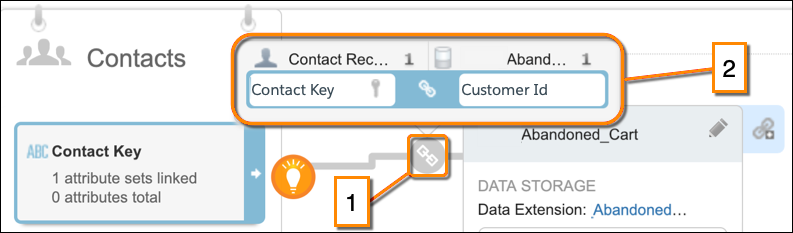
- Select Contact Key from the contact.
- Select Customer Id from the cart.
- Verify that they are the same data type, in this case strings.
- Save the changes, and the attribute group details page displays.
- Hover over the relationship link icon (1) to view the relationship details (2).
- Confirm that Contact Key maps to Customer Id.
Leung notices that Contact Key is followed by a key icon, but Customer Id is not. 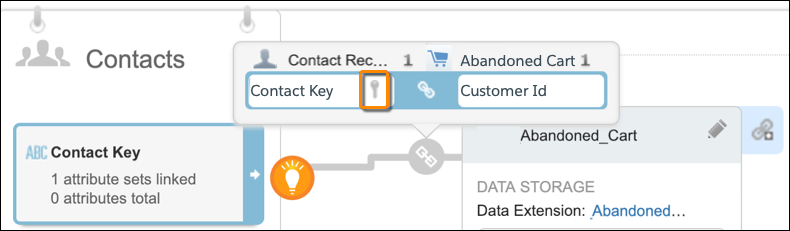
The key icon indicates that the attribute is a primary key for Contacts. A primary key uniquely identifies a specific instance of an entity. For Contacts, it uniquely identifies a specific contact, such as Pharr.
When the attribute name isn’t followed by a key icon, the attribute is a foreign key. A foreign key provides a link between data in two entities. In our example, Customer Id in the abandoned cart attribute set is the foreign key in the relationship. It refers to the primary key in Contacts, Contact Key.
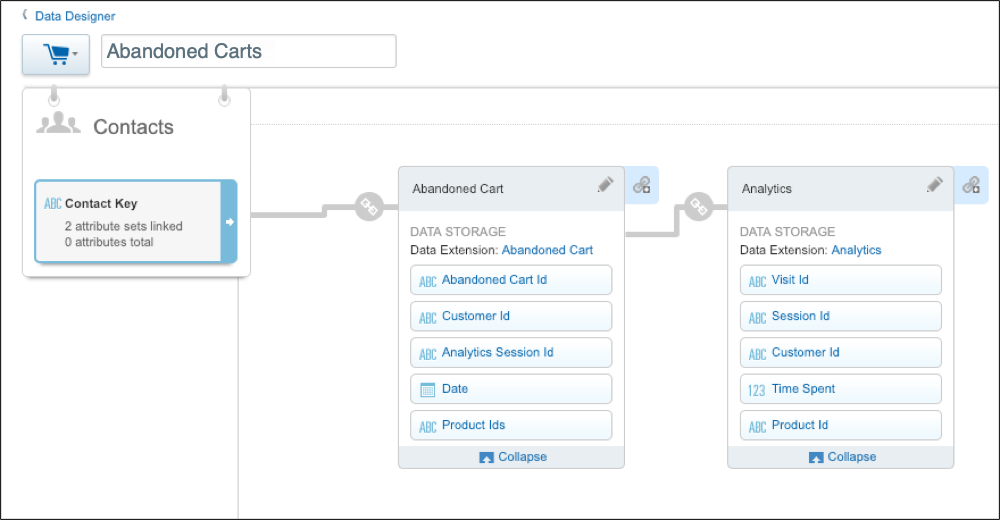
Leung now has an attribute group, named Abandoned Carts, that links contacts to their abandoned carts. Her next task is to add the analytics data to the attribute group.
First she must decide where to connect analytics, either to the contact or to the cart. Earlier she determined that an abandoned cart “belongs” to a contact, but analytics data “belongs” to the cart. The analytics information is about the cart, not the contact.
To link the analytics data to the cart:
- Click the Add Relationship icon for the Abandoned Cart data extension.
- Select the Analytics data extension.
Next, she configures the relationship between the cart and the analytics attribute sets. To link the two, she must select one cart attribute and one analytics attribute. She recalls that the unique identifier for an analytics session is Session Id. She scans the attributes in the abandoned cart to find its equivalent.
There’s an integration between NTO’s site and Google Analytics. Thanks to the integration, the cart’s Analytics Session Id attribute gets populated with the Google Analytics session id. That’s her match. The fact that they don’t have the same name isn’t a problem. You can link attributes with different names as long as their data types match.
- Select the cart’s Analytics Session Id attribute and the analytics’ Session Id attribute.
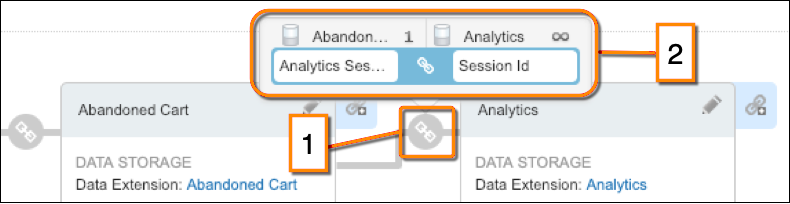
- Save changes and the attribute group details page displays.
- Confirm that there’s a link between the Abandoned Cart and Analytics data extensions.
- Hover over the relationship link (1) to view the details (2) of this relationship.
- Confirm that Analytics Session Id maps to Session Id.
Leung has all her data sources set up in the Abandoned Carts attribute group. There’s one more relationship characteristic to configure, the cardinality.
Configure Relationship Cardinality
Whenever you link contacts to attribute sets and attribute sets to other attribute sets, you must set the relationship cardinality. Cardinality states how many of one entity can match how many of another. There are three options: one-to-one, many-to-one, or many-to-many. Whichever one of these characteristics an attribute set has in a relationship with another attribute set is the cardinality of that relationship.
Relationship Cardinality |
Example |
|---|---|
One-to-one |
A contact can be in only one population. |
One-to-many |
A contact can have many abandoned carts over time. |
Many-to-many |
An abandoned cart can contain many products and a product can be put in many abandoned carts for a single contact over time. |
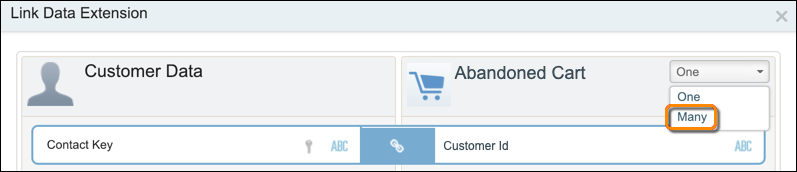
First, Leung sets the Contacts to Abandoned Cart cardinality. She notes that one contact can have only one abandoned cart at a given point in time, but over time the contact can abandon many carts. Translation: The relationship between a contact and a cart is a one-to-many relationship.
To set cardinality:
- Click the relationship link icon. The Link Data Extension form appears. The cardinality for Contact is always set to one and can’t be changed.
- Select Many for Abandoned Cart.
- Save the changes.
She repeats these steps for the cart to analytics relationship, setting the cardinality to one-to-many, and saves her changes. 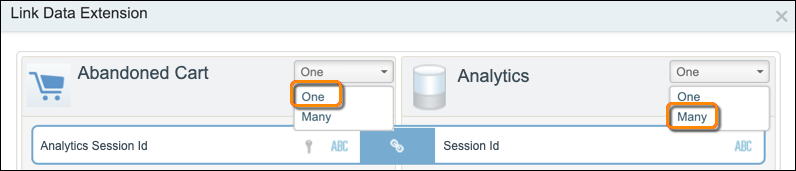
With this step done, Leung has a complete data model. It includes the information necessary to analyze Pharr’s online behavior right before he abandoned his cart. And to determine why he ended his purchase journey.
Resources