Send Email to Groups
Learning Objectives
After completing this unit, you’ll be able to:
- Send emails to campaign members.
- Send emails from a list view.
- Summarize the implications of laws governing mass email.
Send Email to Small Groups of Contacts
Sending an email to just one contact is great for major gifts fundraising, working with grant officers, and other situations where you have one or two points of contact, but what about situations where you must send to a group?
Sometimes you must send a message to the whole board, your volunteer fundraising committee, or every program participant who attends your Wednesday night job skills class. In those cases, you can use Salesforce campaigns and list views to send messages to small groups of contact or lead records.
What exactly is a small group? Well, there’s a 5,000-email daily limit on group emails sent through Salesforce. Check the General Email Limits in Salesforce Help for details. There’s no limit on the number of individual emails you send through the Activity panel you learned about in the last unit.
There are options for sending a larger volume of emails, which you learn about in the next unit. Let’s first review how to send to groups through campaigns and list views.
Send Email to Campaign Members
Campaigns are a planned set of communications that move people toward a specific goal, like asking supporters to donate, volunteer, or rally for your cause.
In Salesforce, you track and manage these efforts with the Campaign object. Campaign records collect campaign member records, which connect contacts and leads to a campaign. Complete the Campaign Basics module if you aren’t yet familiar with campaigns.
You can use campaigns to send an email to campaign members and track their responses. Let’s do that now.
- Navigate to Campaigns.
- Select a campaign from the list view.
- Navigate to the Related tab if it isn’t the default view of the record.
- In the Campaign Members list, click Show More (
 ) and select Send List Email.
- Enter a Subject and compose a message in the Content section. You can use all of the same features you learned about in the last unit, like quick text, templates, and merge fields.

- Navigate to the Review tab to preview the message and check that the merge fields populate correctly.
- Click Send (or, optionally, you can choose Send Later).
The messages are sent! If a campaign member has a blank or incorrect email address, it only affects that individual. Everyone else gets the message.
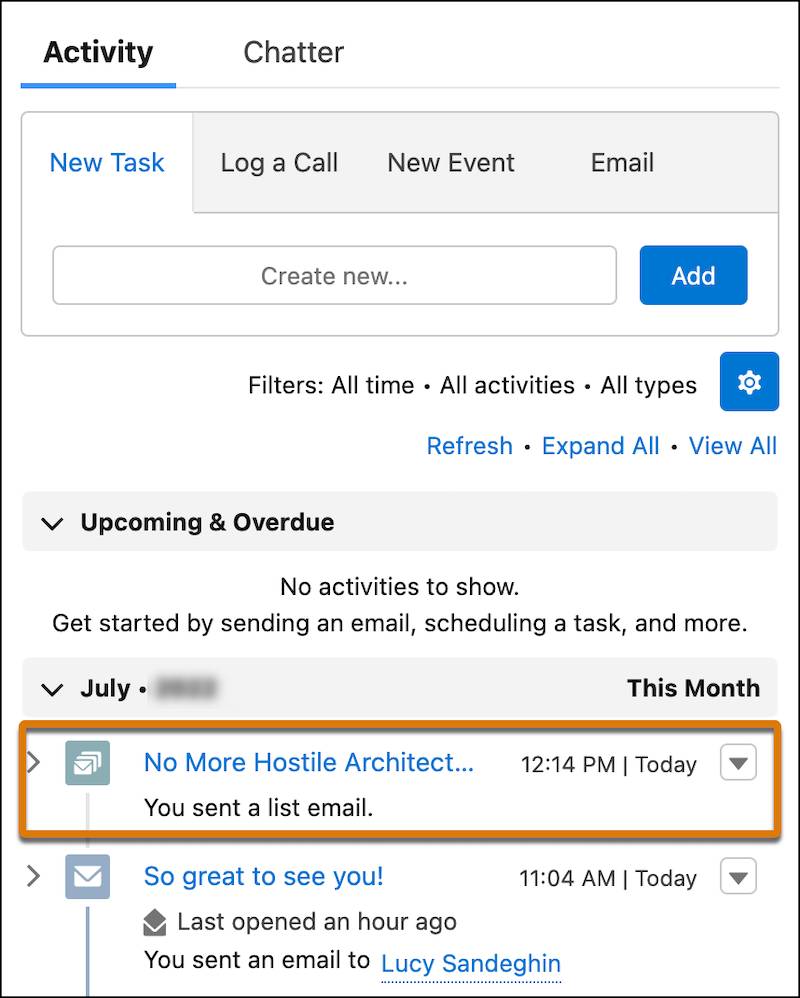
A history of campaign emails is included in the Activity panel on a contact record, just like an individual email, but you can’t immediately check if the email was opened. You must set up a report for that information—you learn how to do that later in this unit.
Send Email from a List View
If the contacts you email aren’t in the same campaign, you can also send a group email from a list view of contacts or leads.
Here’s how.
- Navigate to the Contacts or Leads tab. In this example, navigate to Contacts.
- Select a list view, or create one for your needs. (Check the Resources section for details on creating a list view.)
- Select contacts using the checkboxes next to each.
- Click Send List Email in the list view’s quick actions. It might be under Show More (
 ). If the option isn’t available, check with your organization’s Salesforce admin.
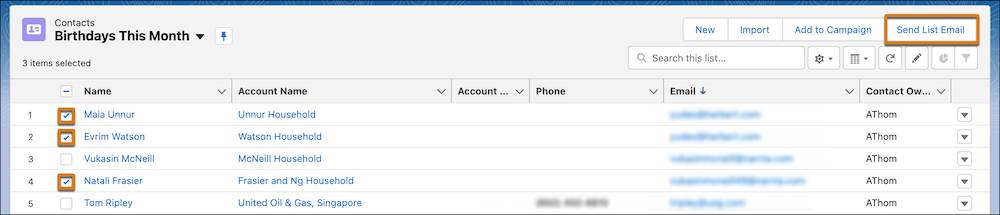
- Enter a Subject and compose a message in the Content section. You can use all of the same features you learned about in the last unit, like quick text, templates, and merge fields.
- Navigate to the Review tab to preview the message and check that the merge fields populate correctly.
- Click Send (or, optionally, you can choose Send Later).
These emails, too, are tracked in an individual contact or lead’s Activity panel.
Report on Group Email Opens
As you learned earlier, the message status of list emails isn’t included in the Activity timeline.
Only the sender of a list email can retrieve status information, such as if a message bounced and when it was opened. To do that, they must create and run a report.
Let’s do that now.
- Navigate to Reports.
- Click New Report.
- In Category, click All.
- Use the search field to find and select HTML Email Status.

- Click Start Report.
- Add filters and groups to organize the data, if necessary. We suggest grouping by Date Sent.
- Click Run.
- Click Save to add a title and description if you want to save the report for later.
This report includes every person in the group that received the email and data about their open rates and the date the email was first opened, last opened, and the number of times it was opened.
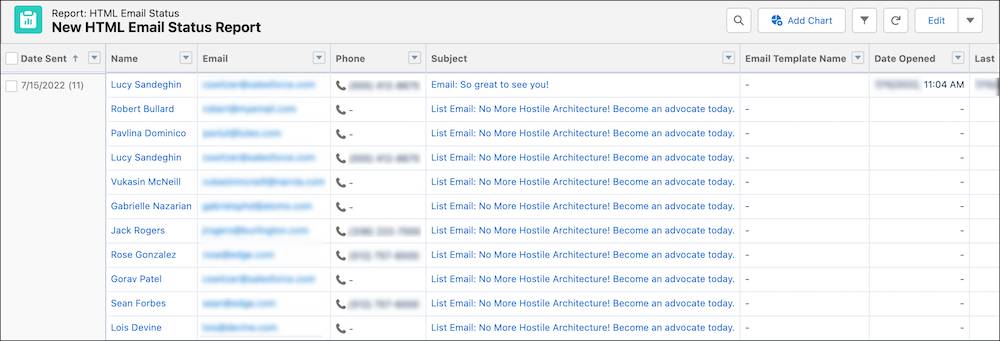
Using the HTML Status Report can help you with a few things. First, you can make sure everyone in the group receives an email. Second, if someone hasn’t opened a message, you can follow up with the individual privately.
Plus, you can use this report to troubleshoot your sends. For example, if someone is missing from the list, it’s likely that the person has an incorrect email address and the message has bounced, or they've opted out of email.
Manage Email Opt-Outs
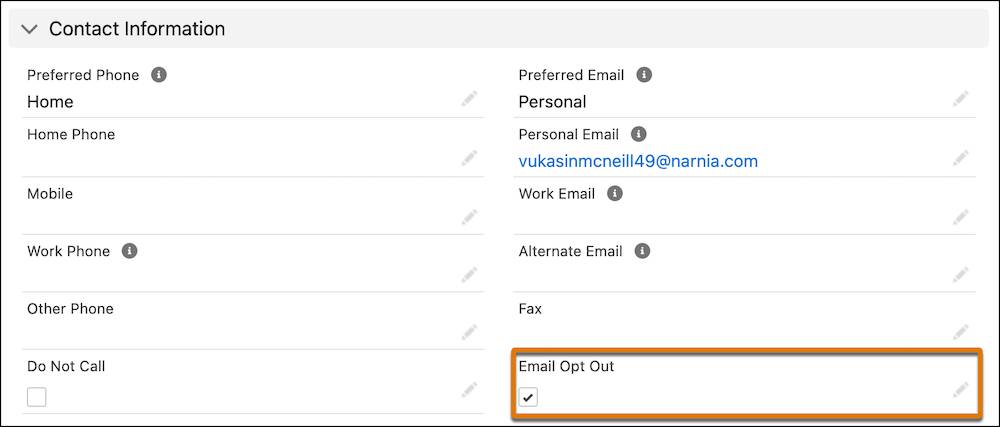
Speaking of email opt-outs, if a stakeholder doesn’t want to receive commercial or promotional emails from your organization, you can track that information on their contact or lead record.
Depending on the circumstances and the laws that apply to your organization, event invitations, requests for donations, and newsletters may all be legally considered commercial email, even when sent from a nonprofit.
To opt someone out of email, find their contact or lead record and select the Email Opt Out field.
What happens next depends on whether you’re sending an individual or a group email.
If you try to send an individual email to someone who’s opted out, you receive a warning message to remind you that your organization has agreed not to send this person a commercial email. The system allows you to continue, but Salesforce prompts you to agree that the message isn’t commercial.
If you include a person who’s opted out of email on a small group message, they won’t receive the email and you won’t receive a warning that they’re not included. Their opt-out status doesn’t impact message delivery to other recipients in the group.
Talk to a lawyer to help your organization understand the privacy and marketing laws in your area. They can also help you understand how the law classifies commercial and noncommercial email based on your situation. Salesforce can’t give legal advice to its customers, and this section isn’t meant to be taken as legal advice.
Now that you know the basics of sending individual and small group emails, there are a few more tools that can help you be even more efficient with your sends. Continue to the final unit to learn more.
Resources
- Salesforce Help: General Email Limits
- Salesforce Help: Create or Clone a List View in Lightning Experience
- Salesforce Help: Send a List Email in Lightning Experience
- Trailhead: Campaign Basics
- Salesforce Help: What Are Campaigns and How Do They Work?
- Salesforce Help: What’s the Difference Between Commercial and Non-Commercial Email?
- Salesforce Help: Store Customers’ Data Privacy Preferences